- 数据库选型
- Skip
- GENNERAL
- read_only=on
- MyISAM
- myisam_recover = FORCE,BACKUP
- undo log
- SAFETY
- innodb = FORCE
- innodb_strict_mode = 1
- Replice
- DATA STORAGE
- BINARY LOGGING
- CACHES AND LIMITS
- thread_concurrency = 24
- table_cache = 32768
- INNODB
- innodb_buffer_poor_instances = 8
- LOGGING
- Disabling symbolic-links is recommended to prevent assorted security risks
- symbolic-links=0
- Settings user and group are ignored when systemd is used.
- If you need to run mysqld under a different user or group,
- customize your systemd unit file for mariadb according to the
- http://fedoraproject.org/wiki/Systemd">instructions in http://fedoraproject.org/wiki/Systemd
- datadir = /usr/local/mysql/data
- log-error = /usr/local/mysql/sql_log/mysql-error.log
- pid-file=/var/run/mariadb/mariadb.pid
- include all files from the config directory
- 数据库选型
- 数据库建模
- 数据库访问
- SQL开发
- SQL优化
- 事务和高并发
使用到的环境:centos7、MySQL8.0、SQLyog
数据库选型
1. 数据库的特点和适用场景
- 关系型数据库的特点:
- 数据结构化存储在二维表当中。
- 支持事务的ACID(原子性,一致性,隔离性,持久性)
- 支持使用SQL语言对存储在其中的数据进行操作
- 关系数据库的适用场景:
- 数据之间存在一定的关系,需要关联查询数据的场景
- 需要事务支持的业务场景
- 需要使用SQL语言灵活操作数据的场景
- 非关系数据库的特点:
- 存储结构灵活,没有固定的结构
- 对事务的支持比较弱,但对数据的并发处理性能高(非常适合日志处理、用户行为分析的场景当中)
- 大多不适用SQL语言操作数据
- 非关系数据库的实用场景:
- 数据结构不固定的场景
- 对事务(数据的完整性)要求不高,但读写并发比较大的场景
- 对数据的处理操作比较简单的场景
2. 选择合适的数据库
- 关系型数据库选型原则
- 数据库使用的广泛性
- 数据库的可扩展性
- 数据库的安全性和稳定性
- 数据库所支持的系统
- 数据库的使用成本
- MySQL数据库的可扩展性
- 支持基于二进制日志的逻辑复制
- 存在多种第三方数据库中间层,支持读写分离及分库分表
- MySQL的安全性和稳定性
- Mysql主从复制集群可达到99%的可用性
- 配合主从复制高可用架构可以达到99.99%的可用性
- 支持对存储在MySQL的数据进行分级安全控制
- MySQL的使用成本
- 社区版本免费
- 使用人员众多,可以方便的获取技术支持
3. 配置项目环境
- 首先去安装虚拟机,并在虚拟机上安装CentoOS系统,这个步骤可以参考环境准备。
- 准备Mysql文件,这里是下载地址。
使用下面的命令来下载wget:
yum install wget -y
然后使用下面的命令去下载mysql文件:
wget https://dev.mysql.com/get/Downloads/MySQL-8.0/mysql-8.0.15-linux-glibc2.12-x86_64.tar.xz
使用下面的命令将xz文件解压成tar文件:
xz -d mysql-8.0.15-linux-glibc2.12-x86_64.tar.xz
然后再使用下面的命令将tar文件解压:
tar xf mysql-8.0.15-linux-glibc2.12-x86_64.tar
可以使用下面的命令查看一下目录:
ls -lh
将mysql文件移动到usr/local/mysql
mv mysql-8.0.15-linux-glibc2.12-x86_64 /usr/local/mysqlcd /usr/local/mysql/
4. 配置和启动MySQL
首先我们要创建一个linux账号来启动mysql,一般是不能使用root账号去启动mysql的,很不安全,需要单独创建账号。
adduser mysql
然后我们来看一下mysql的配置文件,一般在这个/etc/my.cnf ```nginx [client] port = 3306 socket = /usr/local/mysql/data/mysql.sock [mysqld]
Skip
skip_name_resolve = 1 skip_external_locking = 1 skip_symbolic_links = 1
GENNERAL
user = mysql default_storage_engine = InnoDB character-set-server = utf8 socket = /usr/local/mysql/data/mysql.sock pid_file = /usr/local/mysql/data/mysqld.pid basedir = /usr/local/mysql port=3306 bind-address = 0.0.0.0 explicit_defaults_for_timestamp = off sql_mode=NO_ENGINE_SUBSTITUTION,STRICT_TRANS_TABLES
read_only=on
MyISAM
key_buffer_size = 32M
myisam_recover = FORCE,BACKUP
undo log
innodb_undo_directory = /usr/local/mysql/undo innodb_undo_tablespaces = 8
SAFETY
max_allowed_packet = 100M max_connect_errors = 1000000 sysdate_is_now = 1
innodb = FORCE
innodb_strict_mode = 1
secure-file-priv = ‘/tmp’ default_authentication_plugin=’mysql_native_password’
Replice
server-id = 1001 relay_log = mysqld-relay-bin gtid_mode = on enforce-gtid-consistency log-slave-updates = on master_info_repository = TABLE relay_log_info_repository = TABLE
DATA STORAGE
datadir = /usr/local/mysql/data/ tmpdir = /tmp
BINARY LOGGING
log_bin = /usr/local/mysql/sql_log/mysql-bin max_binlog_size = 1000M binlog_format = row binlog_expire_logs_seconds = 86400
CACHES AND LIMITS
tmp_table_size = 32M max_heap_table_size = 32M max_connections = 4000 thread_cache_size = 2048 open_files_limit = 65535 table_definition_cache = 4096 table_open_cache = 4096 sort_buffer_size = 2M read_buffer_size = 2M read_rnd_buffer_size = 2M
thread_concurrency = 24
join_buffer_size = 1M
table_cache = 32768
thread_stack = 512k max_length_for_sort_data = 16k
INNODB
innodb_flush_method =O_DIRECT innodb_log_buffer_size = 16M innodb_flush_log_at_trx_commit = 2 innodb_file_per_table = 1 innodb_buffer_pool_size = 256M
innodb_buffer_poor_instances = 8
innodb_stats_on_metadata = off innodb_open_files = 8192 innodb_read_io_threads = 16 innodb_write_io_threads = 16 innodb_io_capacity = 20000 innodb_thread_concurrency = 0 innodb_lock_wait_timeout = 60 innodb_old_blocks_time = 1000 innodb_use_native_aio = 1 innodb_purge_threads = 1 innodb_change_buffering = all innodb_log_file_size = 64M innodb_log_files_in_group = 2 innodb_data_file_path = ibdata1:256M:autoextend innodb_rollback_on_timeout = on
LOGGING
log_error = /usr/local/mysql/sql_log/mysql-error.log slow_query_log_file = usr/local/mysql/sql_log/slowlog.log
Disabling symbolic-links is recommended to prevent assorted security risks
symbolic-links=0
Settings user and group are ignored when systemd is used.
If you need to run mysqld under a different user or group,
customize your systemd unit file for mariadb according to the
instructions in http://fedoraproject.org/wiki/Systemd
[mysqld_safe]
datadir = /usr/local/mysql/data
log-error = /usr/local/mysql/sql_log/mysql-error.log
pid-file = /usr/local/mysql/data/mysqld.pid
pid-file=/var/run/mariadb/mariadb.pid
#
include all files from the config directory
# !includedir /etc/my.cnf.d
由于上述配置的一些地址,需要我们在mysql当中创建一些文件:```shellmkdir data sql_log undo
由于在mysql文件当中所有的文件的属主都是root,我们需要改一些文件的权限:
chown mysql:mysql -R data/ sql_log/ undo/
这样的话使用mysql账号对mysql启动的时候,对这些文件就有读写的权限了: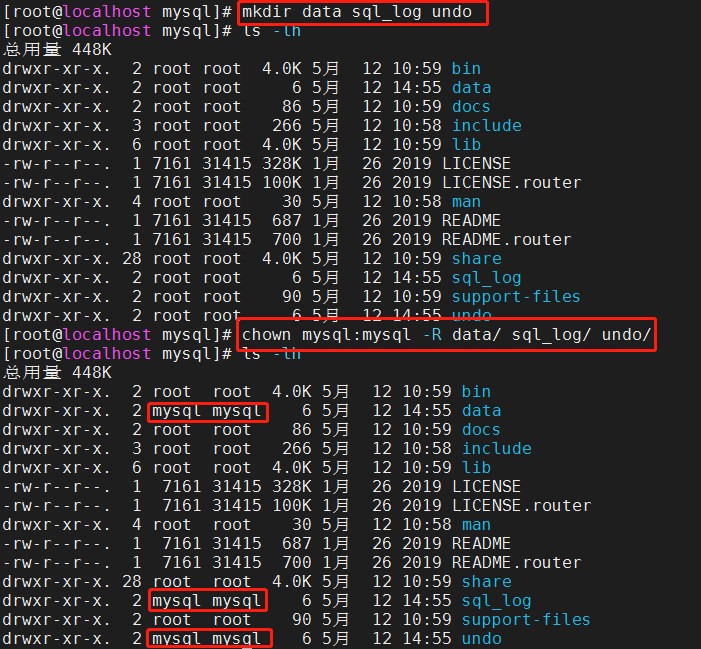
接下来为了使用方便,我们还需要对环境变量进行配置,需要在etc/profile的末尾添加上mysql可执行文件的路径,这样就能在系统的任何路径当中使用MySQL的命令了:
export PATH=$PATH:/usr/local/mysql/bin
接着使用source命令让文件生效:
source /etc/profile
下面就可以来初始化mysql了,初始化它的系统库和系统表,在5.7版本之后需要使用mysqld命令来初始化,这样在data文件下就初始化好了一些mysql一下系统表:
mysqld --initialize --user=mysql --basedir=/usr/local/mysql --datadir=/usr/local/mysql/data
接着我们把support-files当中的mysql.server复制到/etc/init.d/mysqld当中,然后就可以使用这个脚本来启动mysql:
cd support-filescp mysql.server /etc/init.d/mysqld/etc/init.d/mysqld startps -ef | grep mysql
5.7之后的MySQL的初始化密码可以在sql_log当中的mysql-error.log文件当中查询到:
cd sql_loggrep password mysql-error.log
然后通过下面的命令进入mysql,密码上述已经查询到:
mysql -uroot -p# 开始修改密码:mysql> alter user user() identified by 'tao3941319=-=';Query OK, 0 rows affected (0.11 sec)mysql> exit
然后再通过mysql -uroot -p进入的时候就可以使用新的密码了。如果我们想要停止MySQL服务,我们可以使用下面命令:
/etc/init.d/mysqld stop
数据库设计
把握住一个标准的流程:业务分析 -> 逻辑设计 -> 数据类型 ->对象命名 ->建立库表。

若有收获,就点个赞吧
0 人点赞
