官方文档:Getting Started
测试环境:Windows10、Visual Studio 2017(VC++15)
编写代码
此代码使用了Poco包
#include "Poco/MD5Engine.h"#include "Poco/DigestStream.h"#include <iostream>int main(int argc, char** argv){Poco::MD5Engine md5;Poco::DigestOutputStream ds(md5);ds << "abcdefghijklmnopqrstuvwxyz";ds.close();std::cout << Poco::DigestEngine::digestToHex(md5.digest()) << std::endl;return 0;}
使用conan安装Poco包
conan的安装
一、安装Python3
Conan基于Python编写,所以需要安装Python
二、安装Conan
使用Python的包管理工具pip安装Conan
# Windowspip install conan# Linux需要使用sudo安装全局的Python包sudo pip install conan# OSX下也可以使用brewbrew updatebrew install conan
三、修改包存放路径
找到文件:C:\Users\Administrator.conan\conan.conf
修改路径
[storage]path = D:\code\conan_data
管理项目的依赖库(编写conanfile文件)
使用命令搜索Poco,查看服务器中有哪些版本
C:\Users\2107>conan search poco --remote=conancenterExisting package recipes:poco/1.8.1poco/1.9.3poco/1.9.4poco/1.10.0poco/1.10.1poco/1.11.0poco/1.11.1
查看包的详细说明
C:\Users\2107>conan inspect poco/1.9.4name: pocoversion: 1.9.4url: https://github.com/conan-io/conan-center-indexhomepage: https://pocoproject.orglicense: BSL-1.0author: Nonedescription: Modern, powerful open source C++ class libraries for building network- and internet-based applications that run on desktop, server, mobile and embedded systems.topics: ('building', 'networking', 'server', 'mobile', 'embedded')generators: ('cmake', 'cmake_find_package')exports: Noneexports_sources: Noneshort_paths: Falseapply_env: Truebuild_policy: Nonerevision_mode: hashsettings: ('os', 'arch', 'compiler', 'build_type')options:enable_active_record: [True, False]enable_apacheconnector: [True, False]enable_cppparser: [True, False]enable_crypto: [True, False]enable_data: [True, False]enable_data_mysql: [True, False]enable_data_odbc: [True, False]enable_data_postgresql: [True, False]enable_data_sqlite: [True, False]enable_encodings: [True, False]enable_fork: [True, False]enable_json: [True, False]enable_jwt: [True, False]enable_mongodb: [True, False]enable_net: [True, False]enable_netssl: [True, False]enable_netssl_win: [True, False]enable_pagecompiler: [True, False]enable_pagecompiler_file2page: [True, False]enable_pdf: [True, False]enable_pocodoc: [True, False]enable_redis: [True, False]enable_sevenzip: [True, False]enable_util: [True, False]enable_xml: [True, False]enable_zip: [True, False]fPIC: [True, False]shared: [True, False]default_options:enable_active_record: Trueenable_apacheconnector: Falseenable_cppparser: Falseenable_crypto: Trueenable_data: Trueenable_data_mysql: Trueenable_data_odbc: Falseenable_data_postgresql: Trueenable_data_sqlite: Trueenable_encodings: Trueenable_fork: Trueenable_json: Trueenable_jwt: Trueenable_mongodb: Trueenable_net: Trueenable_netssl: Trueenable_netssl_win: Falseenable_pagecompiler: Falseenable_pagecompiler_file2page: Falseenable_pdf: Falseenable_pocodoc: Falseenable_redis: Trueenable_sevenzip: Falseenable_util: Trueenable_xml: Trueenable_zip: TruefPIC: Trueshared: Falsedeprecated: Non
确定使用poco/1.9.4之后,就可以在项目目录下创建conanfile.txt文件,编写此项目的conan包依赖
注:使用cmake工程构建器
[requires]poco/1.9.4[generators]cmake
安装依赖包并构建系统生成信息
# 在项目目录中创建一个build目录,并进入此目录$ mkdir build && cd build# 根据conanfile.txt安装依赖包,生成的文件放到此目录下(./build)$ conan install .. -settings compiler.version=15#.. 代表conanfile.txt所在目录,即上一级目录#指定编译器为VC++15(即Visual Studio17)
可以看到,conan为我们安装了Poco和Poco所依赖的库。
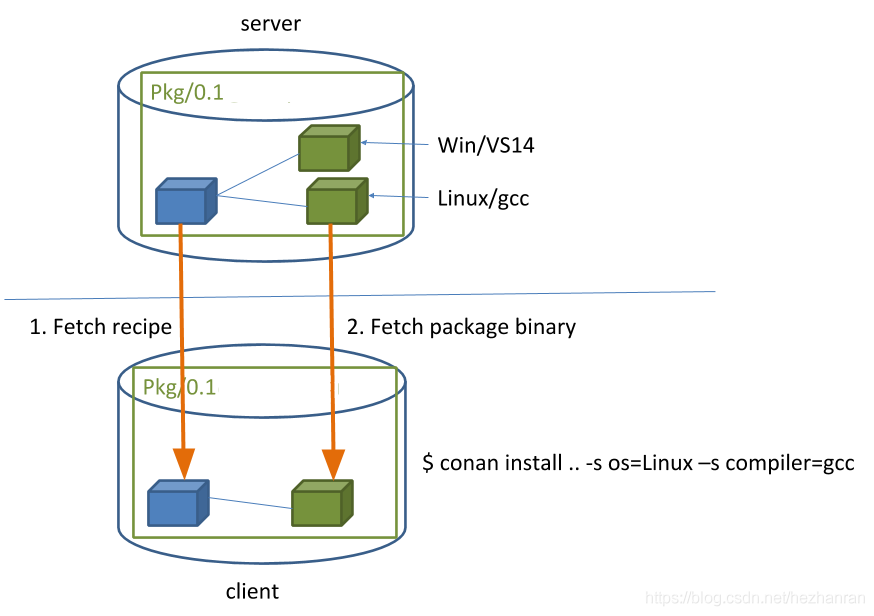
具体原理如下:
- 在conan server中,每个包中,都有一个叫做recipe的东西(蓝色方块),并且有不同配置信息的、已经编译好的包
- 在客户端要使用时,会去服务器上,拿去对应配置信息的二进制包
注:如果conan install ..后面没有指定profile(参数)文件的话,使用的是C:\Users\2107\.conan\profiles\default
- 它(
default)会在你第一次使用时,生成一个默认的 - 值得注意的是,如果你电脑上有多个VS版本(如VS17、VS19、VS2022),它会默认使用最新的版本(即VS2022)。但不幸的是,VS2022(VC++17编译器)的预编译版本还很少,所以不建议使用。你可以把
compiler.version=17改成compiler.version=15(即VS17)的版本
编写cmake文件
cmake_minimum_required(VERSION 2.8.12)project(MD5Encrypter)add_definitions("-std=c++11")#conan install之后,会生成一个conanbuildinfo.cmake文件,以方便我们的cmake找到conan安装的包#根据上面的命令,conanbuildinfo.cmake文件生成在./build目录下#注:在cmake构建工程时,将${CMAKE_BINARY_DIR}指定为/build目录include(${CMAKE_BINARY_DIR}/conanbuildinfo.cmake)conan_basic_setup() #conan初始设置add_executable(md5 md5.cpp)target_link_libraries(md5 ${CONAN_LIBS}) #链接你使用conan安装的所有lib文件
编译
# 使用cmake构建VS工程cmake .. -G "Visual Studio 15 Win64"# Visual Studio 15指定是VC++15,对应的就是Visual Studio2017# Win64,代表构建x64版本# 编译cmake --build . --config Release#编译结果:build/bin/md5.exe# 运行结果cd binmd5.exe
错误合集
conan install时,未找到库
在conan install ..之后,可能会报以下错误,意思是服务器上没有事先编译好的。
bzip2/1.0.8: WARN: Can't find a 'bzip2/1.0.8' package for the specified settings, options and dependencies:- Settings: arch=x86_64, build_type=Release, compiler=Visual Studio, compiler.runtime=MD, compiler.version=17, os=Windows- Options: build_executable=True, shared=False- Dependencies:- Requirements:- Package ID: 53b5fd22ba061620078deefdae9a437c5f693201ERROR: Missing prebuilt package for 'bzip2/1.0.8', 'expat/2.4.1', 'openssl/1.1.1l', 'pcre/8.45', 'poco/1.9.4', 'sqlite3/3.36.0', 'zlib/1.2.11'Use 'conan search bzip2/1.0.8 --table=table.html -r=remote' and open the table.html file to see available packagesOr try to build locally from sources with '--build=missing'More Info at 'https://docs.conan.io/en/latest/faq/troubleshooting.html#error-missing-prebuilt-package
如果遇到没有事先编译好的,conan服务器可以帮你拿着源码+你配置的参数(arch、build_type、compiler等等)帮你现场编译。你只需在安装命令后加上--build=missing,就能触发编译的操作。
但是经常会编译失败。这可能是因为它的编译脚本和我们的编译环境不适配有关。
bzip2/1.0.8:bzip2/1.0.8: ERROR: Package '53b5fd22ba061620078deefdae9a437c5f693201' build failedbzip2/1.0.8: WARN: Build folder C:\Users\2107\.conan\data\bzip2\1.0.8\_\_\build\53b5fd22ba061620078deefdae9a437c5f693201ERROR: bzip2/1.0.8: Error in build() method, line 67cmake = self._configure_cmake()while calling '_configure_cmake', line 61self._cmake.configure()ConanException: Error 1 while executing cd C:\Users\2107\.conan\data\bzip2\1.0.8\_\_\build\53b5fd22ba061620078deefdae9a437c5f693201 && cmake -G "Visual Studio 17 2022" -A "x64" -DCONAN_LINK_RUNTIME="/MD" -DCONAN_IN_LOCAL_CACHE="ON" -DCONAN_COMPILER="Visual Studio" -DCONAN_COMPILER_VERSION="17" -DCONAN_CXX_FLAGS="/MP12" -DCONAN_C_FLAGS="/MP12" -DBUILD_SHARED_LIBS="OFF" -DCMAKE_INSTALL_PREFIX="C:\Users\2107\.conan\data\bzip2\1.0.8\_\_\package\53b5fd22ba061620078deefdae9a437c5f693201" -DCMAKE_INSTALL_BINDIR="bin" -DCMAKE_INSTALL_SBINDIR="bin" -DCMAKE_INSTALL_LIBEXECDIR="bin" -DCMAKE_INSTALL_LIBDIR="lib" -DCMAKE_INSTALL_INCLUDEDIR="include" -DCMAKE_INSTALL_OLDINCLUDEDIR="include" -DCMAKE_INSTALL_DATAROOTDIR="share" -DCMAKE_EXPORT_NO_PACKAGE_REGISTRY="ON" -DCONAN_EXPORTED="1" -DBZ2_VERSION_STRING="1.0.8" -DBZ2_VERSION_MAJOR="1" -DBZ2_BUILD_EXE="True" -Wno-dev C:\Users\2107\.conan\data\bzip2\1.0.8\_\_\build\53b5fd22ba061620078deefdae9a437c5f693201
解决方式(解决不了,曲线救国)
- 去看服务器有哪些预编译的版本,然后换编译器(使用Linux环境,这种问题就少)
- 搭建私有的conan服务器,编译好,传上去
附:生成器版本
Generators* Visual Studio 16 2019 = Generates Visual Studio 2019 project files.Use -A option to specify architecture.Visual Studio 15 2017 [arch] = Generates Visual Studio 2017 project files.Optional [arch] can be "Win64" or "ARM".Visual Studio 14 2015 [arch] = Generates Visual Studio 2015 project files.Optional [arch] can be "Win64" or "ARM".Visual Studio 12 2013 [arch] = Generates Visual Studio 2013 project files.Optional [arch] can be "Win64" or "ARM".Visual Studio 11 2012 [arch] = Generates Visual Studio 2012 project files.Optional [arch] can be "Win64" or "ARM".Visual Studio 10 2010 [arch] = Generates Visual Studio 2010 project files.Optional [arch] can be "Win64" or "IA64".Visual Studio 9 2008 [arch] = Generates Visual Studio 2008 project files.Optional [arch] can be "Win64" or "IA64".Borland Makefiles = Generates Borland makefiles.NMake Makefiles = Generates NMake makefiles.NMake Makefiles JOM = Generates JOM makefiles.MSYS Makefiles = Generates MSYS makefiles.MinGW Makefiles = Generates a make file for use withmingw32-make.Unix Makefiles = Generates standard UNIX makefiles.Green Hills MULTI = Generates Green Hills MULTI files(experimental, work-in-progress).Ninja = Generates build.ninja files.Ninja Multi-Config = Generates build-<Config>.ninja files.Watcom WMake = Generates Watcom WMake makefiles.CodeBlocks - MinGW Makefiles = Generates CodeBlocks project files.CodeBlocks - NMake Makefiles = Generates CodeBlocks project files.CodeBlocks - NMake Makefiles JOM= Generates CodeBlocks project files.CodeBlocks - Ninja = Generates CodeBlocks project files.CodeBlocks - Unix Makefiles = Generates CodeBlocks project files.CodeLite - MinGW Makefiles = Generates CodeLite project files.CodeLite - NMake Makefiles = Generates CodeLite project files.CodeLite - Ninja = Generates CodeLite project files.CodeLite - Unix Makefiles = Generates CodeLite project files.Sublime Text 2 - MinGW Makefiles= Generates Sublime Text 2 project files.Sublime Text 2 - NMake Makefiles= Generates Sublime Text 2 project files.Sublime Text 2 - Ninja = Generates Sublime Text 2 project files.Sublime Text 2 - Unix Makefiles= Generates Sublime Text 2 project files.Kate - MinGW Makefiles = Generates Kate project files.Kate - NMake Makefiles = Generates Kate project files.Kate - Ninja = Generates Kate project files.Kate - Unix Makefiles = Generates Kate project files.Eclipse CDT4 - NMake Makefiles= Generates Eclipse CDT 4.0 project files.Eclipse CDT4 - MinGW Makefiles= Generates Eclipse CDT 4.0 project files.Eclipse CDT4 - Ninja = Generates Eclipse CDT 4.0 project files.Eclipse CDT4 - Unix Makefiles= Generates Eclipse CDT 4.0 project files.

若有收获,就点个赞吧
0 人点赞
