Helm 是 Kubernetes 生态系统中的一个半官方的软件包管理工具。本文将介绍为何要使用 Helm 进行 Kubernetes 软件包管理,并通过一些示例展示如何使用 Helm 和 Helmfile 部署和管理 Kubernetes 应用。
使用 Helm 部署 Kubernetes “应用”
“世上本没有路,走的人多了,也边成了路”。用这句话形容 Kubernetes “应用”当前的发展情况再贴切不过了。作为一个声明式的系统,Kubernetes 本身并没有“应用”的概念,而是通过 YAML 文件声明各个资源(Pod, Deployment, Service, PersistenceVolume, etc.)的状态诉求来完成各类资源的部署、编排和管理,即“声明式的应用管理”。(参见:Kubernetes API Referene,API Swgger JSON)
这意味着 K8s “应用” 存在的唯一形态就是一个或多个符合 K8s 资源声明格式的 YAML 文件,它和我们平时理解的以二进制文件形态存在的应用的概念有加大的区别。所以为了帮助开发者更好的理解和传递“怎么让一个应用(镜像)运行在 K8s 上”这类问题,社区涌现了一些管理和组织 K8s YAML 文件的工具及其对应的文件包组织方式,Helm 即为其中的代表。
社区中的一些“应用”部署工具简介
在介绍 Helm 的使用之前,我们先一起看一些现在社区中常见的一些 K8s “应用”的组织形式,并进行一些基础的对比(截止到 2020.04.23)。
| kustomize 3.5.4 | Helm 3.2.1 | kapp 0.24.0 | OAM v1alph2 | |
|---|---|---|---|---|
| 出品方 | Kubernetes 官方社区 | CNCF 云原生基金会 | 社区 k14s 团队 | 微软 + 阿里巴巴 |
| 社区热度 | 5.2k ⭐️ | 16.9k ⭐️ | 300+ ⭐️ | 1.1k ⭐️(Rudr: 1.4k ⭐️) |
| 应用仓库 | ❌ | 官方:Helm Hub, CNCF Hub + 各类三方仓库,如阿里 App Hub | ❌ | ❌ |
| 实现形式 | 基于 Go 跨平台命令行工具 | 基于 Go 跨平台命令行工具 | 基于 Go 跨平台命令行工具 | OAM CRDs |
| 输入内容 | kustomization 引导文件,资源定义文件,及相关功能文件 | Helm Chart(Helm 应用包,K8s YAML 资源文件组) | K8s YAML 资源文件 | OAM 应用定义文件(即符合 OAM 标准的资源文件) |
| 输出内容 | K8s YAML 资源文件 | 可输出 K8s YAML 资源文件 | / | / |
| 文件组织 | 树状组织:大致可分为一个基础层(存放基础资源)和多个叠加层(存放覆盖基础资源的补丁) | Helm Chart 特定的包结构组织 | K8s YAML 资源文件目录 | 同 K8s YAML 资源文件目录 |
| 功能特点 | 以 K8s 原生资源文件为基础,附加了大量数据组合、转化的功能 | 充分利用 Go Template 进行模版化的资源文件生成;比较完整的包管理机制、全面的部署流程 | 专注部署的工作流:部署内容差分、状态监测、交互式执行 | “业内首个云原生应用标准定义与架构模型”:提出将应用描述为“应用组件” + “应用特征” |
从 Helm 2 到 Helm 3
在介绍 Helm 的具体使用方法之前,有必要对 Helm 社区最近的一个大的架构改动,即 Tiller 的移除,进行一个说明。

上图是 Helm 2 体系的架构图,以下逐一介绍一下其中的三个核心模块:
- Helm Charts Repository:Helm 应用包的仓库,用于存储和管理 Helm Charts(Helm 应用包)。Helm 官方提供构建一个仓库的标准规范,它本质上其实就是一个可提供
index.yaml包索引文件和存储包的 HTTP 服务,除了云服务商会提供此类仓储服务,社区也有很多开源的 Helm Chart 仓库项目(如最知名的 ChartMuseum,甚至可以通过 GitHub Pages 构建)。 - Helm Client:为开发者提供了一个命令行工具,使其能够管理 Helm 的 Chart、配置、发布及仓库。Helm Client 会通过与 Helm Tiller Server 的交互,执行各种操作,如安装、升级、回滚 Helm Chart 和 Helm 应用发布。
- Helm Tiller Server:是部署在 Kubernetes 集群中的内置服务,负责与 Helm Client 交互,并与 Kubernetes API Server 进行通信。因此,Helm 可以方便地管理 Kubernetes,为Kubernetes 资源进行安装、升级、查询、删除等任务。并且 Helm 应用的发布信息都会由 Tiller 服务负责维护。
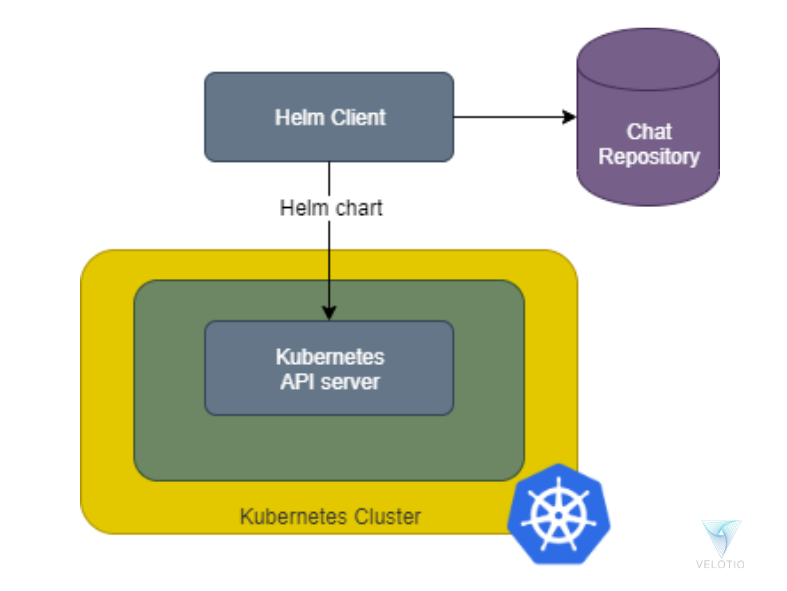
Helm 3 的架构改变也很直观,如上图所示,集群内的 Tiller 服务被完全摘除,改由 Helm Client 直接与 Kubernetes API Server 进行通信来进行 Helm Chart 的安装。
这个架构改变的最重要原因是出于安全考量,没有了 Tiller 服务之后,Helm 的安全模型从根本上简化了。Helm 3 现在支持现代 Kubernetes 的所有现代安全、身份和授权功能(RBAC)。使用用户本地的 Kubeconfig 文件来评估 Helm 的权限。集群管理员可以在他们认为合适的粒度上限制用户权限。Helm 应用的发布信息仍然在集群内(通过 Secret)记录,Helm 的其余功能也仍然保留。
使用 Helm 3 从阿里 App Hub 安装 Nginx 应用
基于上面的架构了解,我们可以开始介绍如何使用最新的 Helm 3 体系来部署一个应用到 Kubernetes 集群中,代码仓库我们选用阿里的 App Hub 来方便 Helm Chart 的拉取。
安装 Helm 之后,首先要通过 helm repo add [REPO] 来添加 Helm Charts 仓库:
$ helm repo add apphub https://apphub.aliyuncs.com/incubator
🎯 Helm Hub 官方仓库的 Azure 站镜像
- stable:http://mirror.azure.cn/kubernetes/charts/
- incubator:http://mirror.azure.cn/kubernetes/charts-incubator/ :::
然后,我们可以直接通过 helm search repo [CHART] 来搜索所有已连接的仓库中的 Nginx 应用包:
$ helm search repo nginxNAME CHART VERSION APP VERSION DESCRIPTIONapphub/nginx 5.1.5 1.16.1 Chart for the nginx serverapphub/nginx-ingress 1.30.3 0.28.0 An nginx Ingress controller that uses ConfigMap...apphub/nginx-ingress-controller 5.3.4 0.29.0 Chart for the nginx Ingress controllerapphub/nginx-lego 0.3.1 Chart for nginx-ingress-controller and kube-legoapphub/nginx-php 1.0.0 nginx-1.10.3_php-7.0 Chart for the nginx php serverstable/nginx-ingress 1.36.3 0.30.0 An nginx Ingress controller that uses ConfigMap...stable/nginx-ldapauth-proxy 0.1.3 1.13.5 nginx proxy with ldapauthstable/nginx-lego 0.3.1 Chart for nginx-ingress-controller and kube-legostable/gcloud-endpoints 0.1.2 1 DEPRECATED Develop, deploy, protect and monitor...
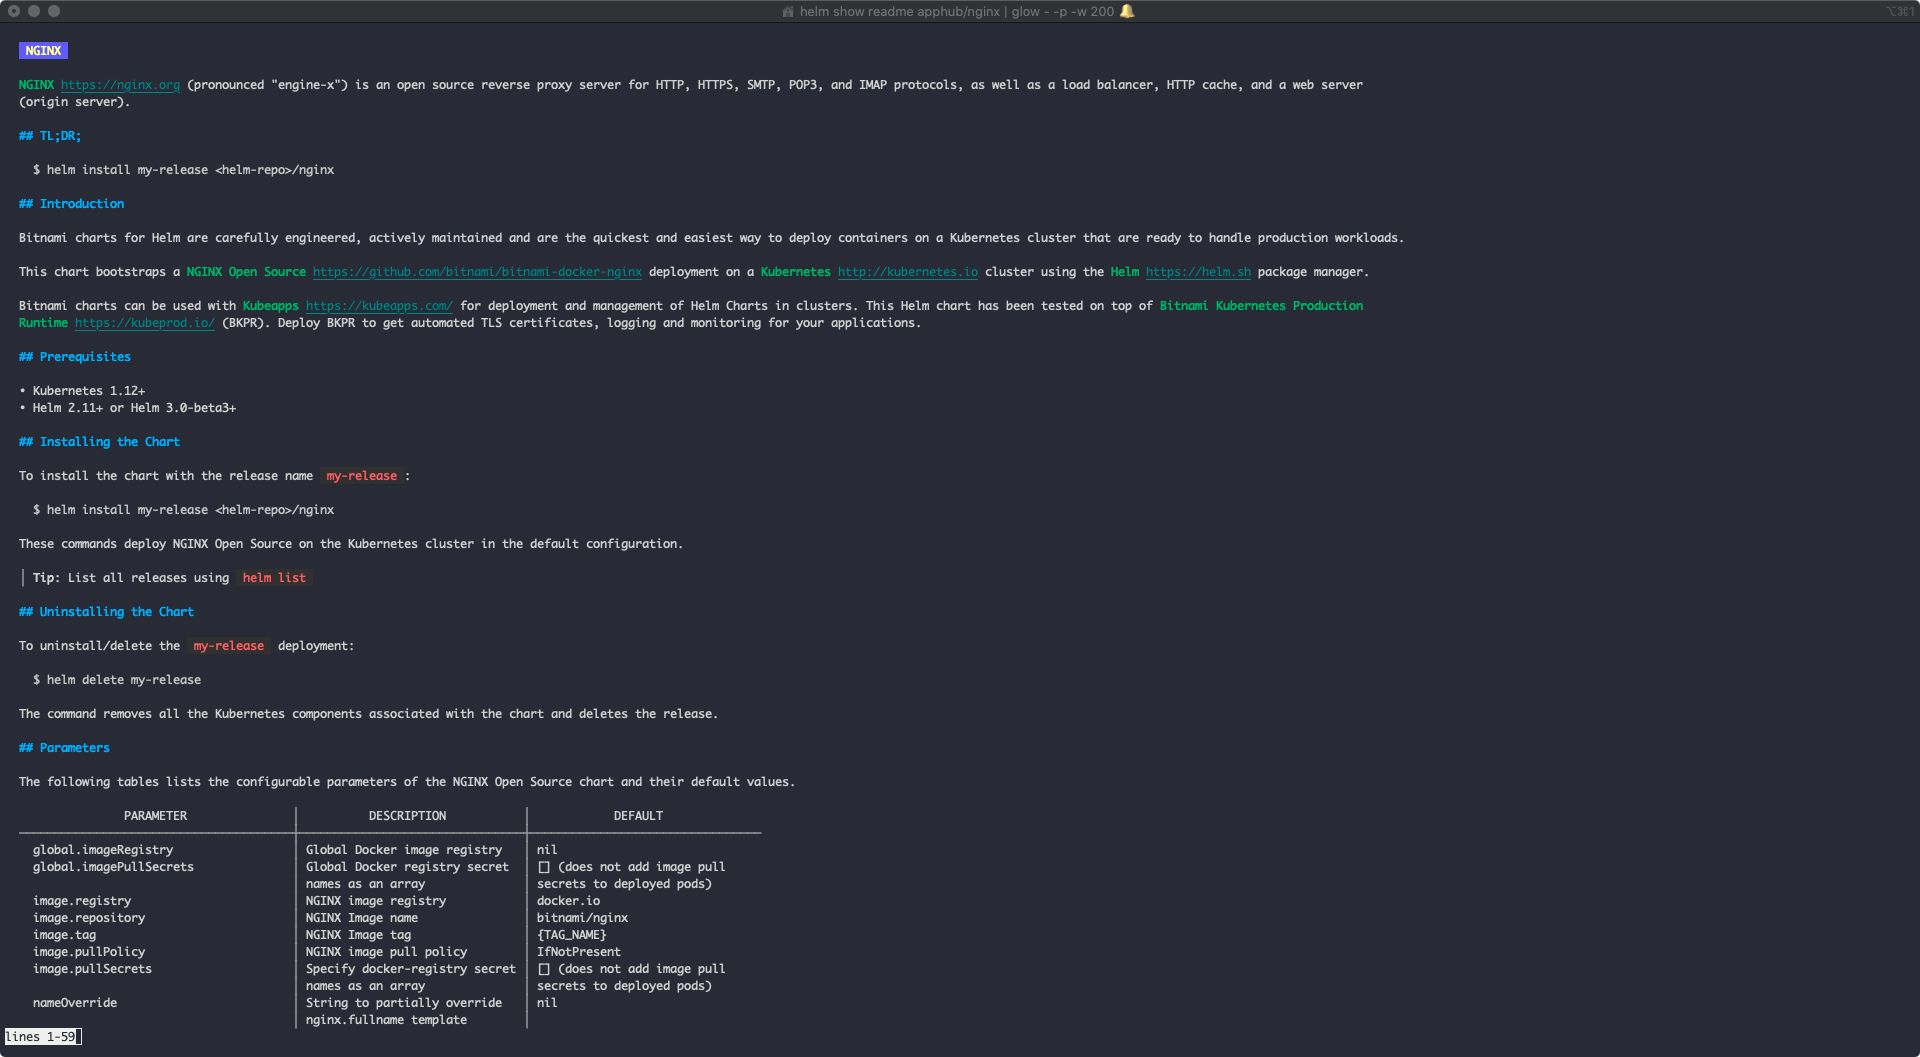
如果希望了解 Helm Chart 的介绍内容,可以通过 helm show readme [CHART] 来阅读其中的 README 文件:(配合 glow 食用更佳!)
$ helm show readme apphub/nginx | glow - -p -w 200
亦或是更直接的,通过 helm show values [CHART] 来读取 Chart 中的 values.yaml 来直接了解默认配置文件的具体内容(配合 yh 食用更佳!),或者直接保存到本地:
# 使用 yh 来语法高亮预览$ helm show values apphub/nginx | yh# 或直接把 values.yaml 保存到本地备用$ helm show values apphub/nginx > values.yaml
通常我们可以直接修改保持到本地的 values.yaml 文件中的默认值,以配置部署的应用的各项参数,比如我们可以使用 1.17 作为新的镜像版本,并修改服务类型为内部网络:
# values.yamlimage:registry: docker.iorepository: bitnami/nginxtag: 1.17service:## Service type##type: ClusterIP
接下来我们就可以通过 helm install [NAME] [CHART] 来部署 Chart 到集群上了(同时通过 -f <values-file> 来指定所需加载的配置文件):
# 通过 -n 来指定部署的 Namespace(Helm 3.2 前需要注意该 Namespace 必须存在!)
$ helm install nginx apphub/nginx -f values.yaml -n kube-public
NAME: nginx
LAST DEPLOYED: Thu Apr 23 16:49:44 2020
NAMESPACE: kube-public
STATUS: deployed
REVISION: 1
TEST SUITE: None
NOTES:
Get the NGINX URL:

  echo "NGINX URL: http://127.0.0.1:8080/"
  kubectl port-forward --namespace kube-public svc/nginx 8080:80

WARNING: Rolling tag detected (bitnami/nginx:1.17), please note that it is strongly recommended to avoid using rolling tags in a production environment.
+info https://docs.bitnami.com/containers/how-to/understand-rolling-tags-containers/
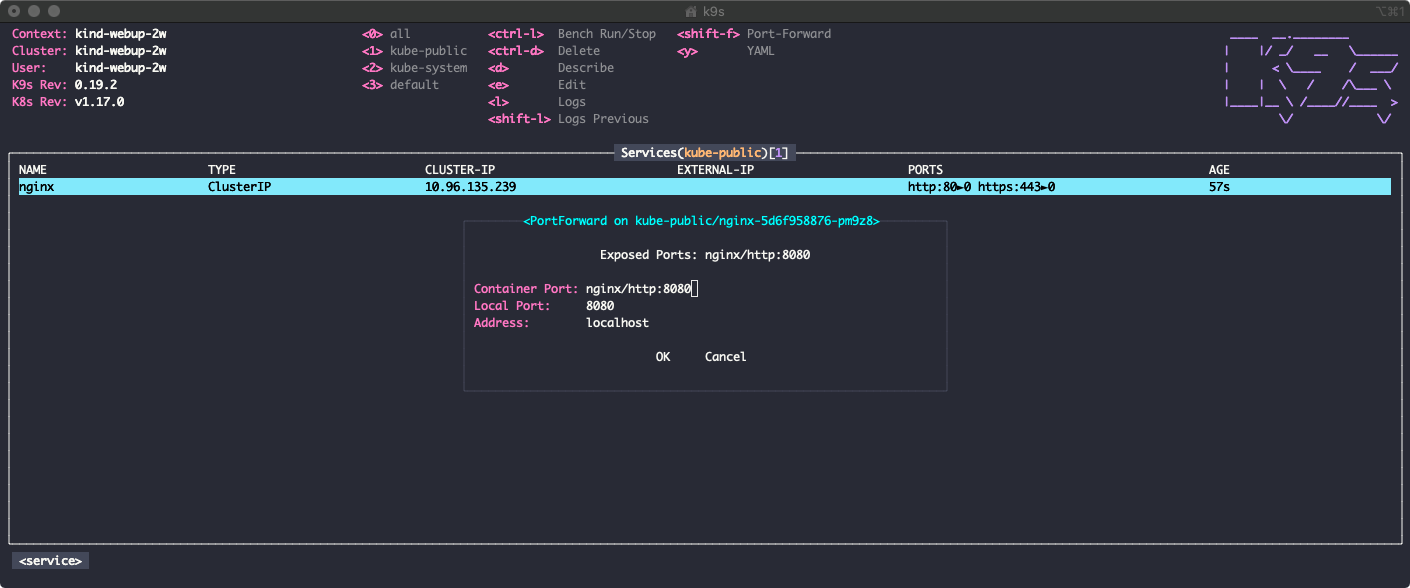
部署完成后,我们可以通过 helm ls 查看应用的部署状态;同时通过 Port Forward 功能将 Nginx 端口暴露给本地访问:
$ helm ls
NAME     NAMESPACE      REVISION    UPDATED                                 STATUS      CHART          APP VERSION
nginx    kube-public    1           2020-04-23 16:49:44.123594 +0800 CST    deployed    nginx-5.1.5    1.16.1
如需要更新部署可以通过 helm upgrade [RELEASE] [CHART] 来完成;最后,可以通过 helm uninstall [RELEASE] 来删除任意已部署的应用。
# 更新 "nginx" 部署的内容,注意 -f 是可以叠加覆盖使用的
$ helm upgrade nginx apphub/nginx -f values.yaml -f override.yaml

# 最后,删除名为 "nginx" 的部署
$ helm uninstall nginx
release "nginx" uninstalled
:::info 🍮 Helm 还有很多官方及社区的插件和工具,可以参见 Helm 插件使用指引来进行安装和使用。 :::
浅析 Helm Chart 包结构
一个 Chart 被组织成一个目录内的文件集合。目录名称是 Chart 的名称(不含版本信息),利润 WordPress 应用的 Chart 会被存储在如下的 wordpress/ 目录结构中:
wordpress/
  Chart.yaml          # A YAML file containing information about the chart
  LICENSE             # OPTIONAL: A plain text file containing the license for the chart
  README.md           # OPTIONAL: A human-readable README file
  values.yaml         # The default configuration values for this chart
  values.schema.json  # OPTIONAL: A JSON Schema for imposing a structure on the values.yaml file
  charts/             # A directory containing any charts upon which this chart depends.
  crds/               # Custom Resource Definitions
  templates/          # A directory of templates that, when combined with values,
                      # will generate valid Kubernetes manifest files.
  templates/NOTES.txt # OPTIONAL: A plain text file containing short usage notes
⚠️ 注意
charts/,crds/,templates/这三个目录是 Helm Chart 保留专有的目录,其它目录则可以任意命名。
同时,Chart.yaml 也是必须存在的,它负责携带和描述这个 Chart 的所有元数据:
apiVersion: The chart API version (required)
name: The name of the chart (required)
version: A SemVer 2 version (required)
kubeVersion: A SemVer range of compatible Kubernetes versions (optional)
description: A single-sentence description of this project (optional)
type: It is the type of chart (optional)
keywords:
  - A list of keywords about this project (optional)
home: The URL of this projects home page (optional)
sources:
  - A list of URLs to source code for this project (optional)
dependencies: # A list of the chart requirements (optional)
  - name: The name of the chart (nginx)
    version: The version of the chart ("1.2.3")
    repository: The repository URL ("https://example.com/charts") or alias ("@repo-name")
    condition: (optional) A yaml path that resolves to a boolean, used for enabling/disabling charts (e.g. subchart1.enabled )
    tags: # (optional)
      - Tags can be used to group charts for enabling/disabling together
    enabled: (optional) Enabled bool determines if chart should be loaded
    import-values: # (optional)
      - ImportValues holds the mapping of source values to parent key to be imported. Each item can be a string or pair of child/parent sublist items.
    alias: (optional) Alias usable alias to be used for the chart. Useful when you have to add the same chart multiple times
maintainers: # (optional)
  - name: The maintainers name (required for each maintainer)
    email: The maintainers email (optional for each maintainer)
    url: A URL for the maintainer (optional for each maintainer)
icon: A URL to an SVG or PNG image to be used as an icon (optional).
appVersion: The version of the app that this contains (optional). This needn't be SemVer.
deprecated: Whether this chart is deprecated (optional, boolean)
:::info
🍮 templates/ 目录和 values.yaml 配合使用构成了 Helm Chart 内容的主体,关于私有的 Helm Chart 的制作,可以参考官方的开发指南。
:::
使用 Helmfile 批量部署 Helm 应用
通过前面的案例可以看到 Helm 工具不管在应用包管理还是在部署流程方面都具备比较扎实、完整的功能,但唯二比较遗憾的一是 Helm Chart 的部署和运维只能是逐个实施的,二是 Helm 似乎和官方“亲儿子” kustomize 工具没什么可以融合的点。“自古乱世出英雄”,这些问题也逐步造就了社区的一些 Helm 生态链工具,也便有了要给大家介绍的 Helmfile。
NAME:
   helmfile

USAGE:
   helmfile [global options] command [command options] [arguments...]

VERSION:
   v0.116.0

COMMANDS:
     deps      update charts based on the contents of requirements.yaml
     repos     sync repositories from state file (helm repo add && helm repo update)
     charts    DEPRECATED: sync releases from state file (helm upgrade --install)
     diff      diff releases from state file against env (helm diff)
     template  template releases from state file against env (helm template)
     lint      lint charts from state file (helm lint)
     sync      sync all resources from state file (repos, releases and chart deps)
     apply     apply all resources from state file only when there are changes
     status    retrieve status of releases in state file
     delete    DEPRECATED: delete releases from state file (helm delete)
     destroy   deletes and then purges releases
     test      test releases from state file (helm test)
     build     output compiled helmfile state(s) as YAML
     list      list releases defined in state file
     help, h   Shows a list of commands or help for one command

GLOBAL OPTIONS:
   --helm-binary value, -b value           path to helm binary (default: "helm")
   --file helmfile.yaml, -f helmfile.yaml  load config from file or directory. defaults to helmfile.yaml or `helmfile.d`(means `helmfile.d/*.yaml`) in this preference
   --environment default, -e default       specify the environment name. defaults to default
   --state-values-set value                set state values on the command line (can specify multiple or separate values with commas: key1=val1,key2=val2)
   --state-values-file value               specify state values in a YAML file
   --quiet, -q                             Silence output. Equivalent to log-level warn
   --kube-context value                    Set kubectl context. Uses current context by default
   --debug                                 Enable verbose output for Helm and set log-level to debug, this disables --quiet/-q effect
   --no-color                              Output without color
   --log-level value                       Set log level, default info
   --namespace value, -n value             Set namespace. Uses the namespace set in the context by default, and is available in templates as {{ .Namespace }}
   --selector value, -l value              Only run using the releases that match labels. Labels can take the form of foo=bar or foo!=bar.
                                           A release must match all labels in a group in order to be used. Multiple groups can be specified at once.
                                           --selector tier=frontend,tier!=proxy --selector tier=backend. Will match all frontend, non-proxy releases AND all backend releases.
                                           The name of a release can be used as a label. --selector name=myrelease
   --allow-no-matching-release             Do not exit with an error code if the provided selector has no matching releases.
   --interactive, -i                       Request confirmation before attempting to modify clusters
   --help, -h                              show help
   --version, -v                           print the version
Helmfile 可使用的命令很多,其中最常使用的是 apply 和 destroy 这两个:
helmfile apply: 该命令从执行helm diff开始。如果结果发现有任何更改,同步就会被执行。由于输出往往较多,通常可以添加-i, --interactive参数来确保在同步发生之前请求用户的确认。- 这个命运也常用于安排定期执行 Helm 部署,这样用户就可以自动修正在 Kubernetes 集群上运行的应用程序的期望状态和当前状态之间的偏差。
helmfile destroy: 该命令会删除并清除清单中定义的所有版本。同样可以通过添加-i, --interactive参数来确保在实际删除版本之前请求用户的确认。destroy基本上是在所有目标版本上运行helm delete --purge(Helm 2)或helm uninstall(Helm 3)。
:::info
🍮 可以考虑在你的本地环境添加 alias hi='helmfile --interactive 的命令别名来便于使用以上两个命令。
:::
配置 Helm 仓库和使用参数
Helmfile 的配置文件默认命名为 helmfile.yaml,其中包含了各项与 Helm 体系相关的配置,也负责什么期望部署的 Helm 应用的状态,因此也称为状态文件(State File)。
# Use `helm-s3` and `helm-git` and whatever Helm Downloader plugins
# to use repositories other than the official repository or one backend by chartmuseum.
repositories:
  # To use official "stable" charts a.k.a https://github.com/helm/charts/tree/master/stable
  - name: stable
    url: https://kubernetes-charts.storage.googleapis.com
  # To use official "incubator" charts a.k.a https://github.com/helm/charts/tree/master/incubator
  - name: incubator
    url: https://kubernetes-charts-incubator.storage.googleapis.com
  # helm-git powered repository: You can treat any Git repository as a charts repository
  - name: polaris
    url: git+https://github.com/reactiveops/polaris@deploy/helm?ref=master
  # Advanced configuration: You can setup basic or tls auth
  - name: roboll
    url: http://roboll.io/charts
    certFile: optional_client_cert
    keyFile: optional_client_key
    username: optional_username
    password: optional_password
  # Advanced configuration: You can use a ca bundle to use an https repo
  # with a self-signed certificate
  - name: insecure
    url: https://charts.my-insecure-domain.com
    caFile: optional_ca_crt
⚠️ 配置了
repositories之后每次执行helmfile apply都会先执行仓库的更新(即helm repo update),在仓库连接情况不佳的时候请谨慎使用该配置。
# Default values to set for args along with dedicated keys that can be set by contributors, cli args take precedence over these.
# In other words, unset values results in no flags passed to helm.
# See the helm usage (helm SUBCOMMAND -h) for more info on default values when those flags aren't provided.
helmDefaults:
  tillerNamespace: tiller-namespace  #dedicated default key for tiller-namespace
  kubeContext: kube-context          #dedicated default key for kube-context (--kube-context)
  cleanupOnFail: false               #dedicated default key for helm upgrade flag --cleanup-on-fail
  # additional and global args passed to helm (default "")
  args:
    - "--set k=v"
  # verify the chart before upgrading (only works with packaged charts not directories) (default false)
  verify: true
  # wait for k8s resources via --wait. (default false)
  wait: true
  # time in seconds to wait for any individual Kubernetes operation (like Jobs for hooks, and waits on pod/pvc/svc/deployment readiness) (default 300)
  timeout: 600
  # performs pods restart for the resource if applicable (default false)
  recreatePods: false
  # forces resource update through delete/recreate if needed (default false)
  force: false
  # enable TLS for request to Tiller (default false)
  tls: false
  # path to TLS CA certificate file (default "$HELM_HOME/ca.pem")
  tlsCACert: "path/to/ca.pem"
  # path to TLS certificate file (default "$HELM_HOME/cert.pem")
  tlsCert: "path/to/cert.pem"
  # path to TLS key file (default "$HELM_HOME/key.pem")
  tlsKey: "path/to/key.pem"
  # limit the maximum number of revisions saved per release. Use 0 for no limit. (default 10)
  historyMax: 10
  # when using helm 3.2+, automatically create release namespaces if they do not exist (default true)
  createNamespace: true
⚠️ 以上配置相对使用的比较少,仅在真的需要对 Helm 进行全局化的参数配置时才使用。通常会用的到是
timeout参数,用于延长资源就绪的等待时间。⌛️
管理多个 Helm Charts
Helmfile 对 Helm Chart 的管理基本上比较忠于 Helm 工具在命令行下的各种参数配置,以下大部分内容可以看成是对相关参数的集中式管理;同样,Helmfile 也支持对于本地 Helm Chart 的管理。
# Helmfile runs various helm commands to converge the current state in the live cluster to the desired state defined here.
releases:
  # Published chart example
  - name: vault                            # name of this release
    namespace: vault                       # target namespace
    createNamespace: true                  # helm 3.2+ automatically create release namespace (default true)
    labels:                                # Arbitrary key value pairs for filtering releases
      foo: bar
    chart: roboll/vault-secret-manager     # the chart being installed to create this release, referenced by `repository/chart` syntax
    version: ~1.24.1                       # the semver of the chart. range constraint is supported
    missingFileHandler: Warn                              # set to either "Error" or "Warn". "Error" instructs helmfile to fail when unable to find a values or secrets file. When "Warn", it prints the file and continues.
    # Values files used for rendering the chart
    values:
      # Value files passed via --values
      - vault.yaml
      # Inline values, passed via a temporary values file and --values, so that it doesn't suffer from type issues like --set
      - address: https://vault.example.com
    # Use `values` whenever possible!
    # `set` translates to helm's `--set key=val`, that is known to suffer from type issues like https://github.com/roboll/helmfile/issues/608
    set:
    # single value loaded from a local file, translates to --set-file foo.config=path/to/file
    - name: foo.config
      file: path/to/file
    # set a single array value in an array, translates to --set bar[0]={1,2}
    - name: bar[0]
      values:
        - 1
        - 2
    # will attempt to decrypt it using helm-secrets plugin
    secrets:
      - vault_secret.yaml
    # Override helmDefaults options for verify, wait, timeout, recreatePods and force.
    verify: true
    wait: true
    timeout: 60
    recreatePods: true
    force: false
    # restores previous state in case of failed release (default false)
    atomic: true
    # when true, cleans up any new resources created during a failed release (default false)
    cleanupOnFail: false
    # enable TLS for request to Tiller (default false)
    tls: true
    # path to TLS CA certificate file (default "$HELM_HOME/ca.pem")
    tlsCACert: "path/to/ca.pem"
    # path to TLS certificate file (default "$HELM_HOME/cert.pem")
    tlsCert: "path/to/cert.pem"
    # path to TLS key file (default "$HELM_HOME/key.pem")
    tlsKey: "path/to/key.pem"
    # limit the maximum number of revisions saved per release. Use 0 for no limit (default 10)
    historyMax: 10

  # Local chart example
  - name: grafana                            # name of this release
    namespace: another                       # target namespace
    chart: ../my-charts/grafana              # the chart being installed to create this release, referenced by relative path to local helmfile
    values:
        - "../../my-values/grafana/values.yaml"
通过模版来动态配置参数
Helmfile 使用 Go Template 为 helmfile.yaml 提供模版功能支持,同时也集成了 Helm 中使用的 Sprig 模版函数集,并额外增加了一个 requiredEnv 模版函数用于强制引入环境变量。
对于保存配置参数值的 values.yaml 文件(默认文件名如此,可随意定制),也推荐使用 .gotmpl 作为后缀以支持模版渲染,即 values.yaml.gotmpl 可被 Helmfile 执行模版渲染处理。
releases:
  - name: vault
    values:
      - image:
          # The end result is more or less YAML. So do `quote` to prevent number-like strings from accidentally parsed into numbers!
          # See https://github.com/roboll/helmfile/issues/608
          tag: {{ requiredEnv "IMAGE_TAG" | quote }}
          # Otherwise:
          #   tag: "{{ requiredEnv "IMAGE_TAG" }}"
          #   tag: !!string {{ requiredEnv "IMAGE_TAG" }}
        db:
          username: {{ requiredEnv "DB_USERNAME" }}
          # value taken from environment variable. Quotes are necessary. Will throw an error if the environment variable is not set. $DB_PASSWORD needs to be set in the calling environment ex: export DB_PASSWORD='password1'
          password: {{ requiredEnv "DB_PASSWORD" }}
        proxy:
          # Interpolate environment variable with a fixed string
          domain: {{ requiredEnv "PLATFORM_ID" }}.my-domain.com
          scheme: {{ env "SCHEME" | default "https" }}
    set:
      # set a templated value
      - name: namespace
          # use namespace value from `-n value` global options
        value: {{ .Namespace }}
Reference: Golang Templates Cheatsheet
通过分层结构来共享配置参数
Helmfile 提供了配置分层叠加继承的 Layering 管理机制,用于通用配置参数的聚合和复用:
# Advanced Configuration: Layering
#
# Helmfile merges all the "base" state files and this state file before processing.
#
# Assuming this state file is named `helmfile.yaml`, all the files are merged in the order of:
#   environments.yaml <- defaults.yaml <- templates.yaml <- helmfile.yaml
bases:
  - environments.yaml
  - defaults.yaml
  - templates.yaml
同时,对于 helmfile.yaml 本身的管理,也提供了嵌套使用的机制,便于在不同层级“分治” Helm 应用,同时又在顶层做“集中”式的宏观管理:
# Advanced Configuration: Nested States
#
helmfiles:
  - # Path to the helmfile state file being processed BEFORE releases in this state file
    path: path/to/subhelmfile.yaml
    # Label selector used for filtering releases in the nested state.
    # For example, `name=prometheus` in this context is equivalent to processing the nested state like
    #   helmfile -f path/to/subhelmfile.yaml -l name=prometheus sync
    selectors:
      - name=prometheus
    # Override state values
    values:
      # Values files merged into the nested state's values
      - additional.values.yaml
      # One important aspect of using values here is that they first need to be defined in the values section
      # of the origin helmfile, so in this example key1 needs to be in the values or environments.NAME.values of path/to/subhelmfile.yaml
      # Inline state values merged into the nested state's values
      - key1: val1
  - # All the nested state files under `helmfiles:` is processed in the order of definition.
    # So it can be used for preparation for your main `releases`. An example would be creating CRDs required by `releases` in the parent state file.
    path: path/to/mycrd.helmfile.yaml
  - # Terraform-module-like URL for importing a remote directory and use a file in it as a nested-state file
    # The nested-state file is locally checked-out along with the remote directory containing it.
    # Therefore all the local paths in the file are resolved relative to the file
    path: git::https://github.com/cloudposse/helmfiles.git@releases/kiam.yaml?ref=0.40.0
使用环境变量来控制模版的引用
环境变量允许用户将一组特定于所选环境的值注入到 values.yaml 等模板文件中。使用它可以将环境中的常用值注入到多个值文件中,使与应用环境相关的配置分割的更加清晰。
假设现在我们有 helmfile.yaml, default.yaml, production.yaml 和 values.yaml.gotmpl 这样几个文件,各自的内容如下:
# helmfile.yaml
environments:
  default:
    values:
        - default.yaml
  production:
    values:
      - production.yaml
      - other.yaml.gotmpl

releases:
  - name: myapp-{{ .Values.releaseName }}     # release name will be one of `dev` or `prod` depending on selected environment
    values:
        - values.yaml.gotmpl
  - name: prod-only-release
    # this release would be installed only if selected environment has value `somecomp.enabled` is true
    condition: somecomp.enabled
    ...
# default.yaml
domain: dev.example.com
releaseName: dev
somecomp:
    enabled: false

---

# production.yaml
domain: prod.example.com
releaseName: prod
somecomp:
    enabled: true
# values.yaml.gotmpl
domain: {{ .Values.domain | default "example.com" }}
简单的解读一下在不同环境下执行 helmfile apply -e [ENVIORNMENT] 所对应执行的部署内容:
-e default或不添加-e参数时:只部署一个名为myapp-dev的应用,且其中的domain值为dev.example.com-e production: 会部署一个名为myapp-prod的应用,其中的domain值为prod.example.com;以及一个名为prod-only-release的应用
使用 Hooks 来触发额外的操作
Helmfile 还提供一些 Hook 用于为每个部署(Release)绑定一些额外的操作,一个 Hook 锚点有如下 4 个属性:
events: 可以同时绑定多个事件,包括:prepare(部署执行前)、presync(部署到集群前)、postsync(部署到集群后)、cleanup(部署执行完成后)commandargs: 本地的一个可行性文件或命令及其参数showlogs: 布尔值,是否打印 👆上面命令的执行的结果
我们可以利用 Hook 做一些 Helm 体系以外的操作,例如我们可以利用 helmify-kustomize 脚本来转换 kustomize 文件成为 Helm Chart,从而达成这两个工具的集成:
# helmfile.yaml
releases:
  - name: kustomize
    chart: ./foo
    hooks:
      - events: ["prepare", "cleanup"]
        command: "../helmify"
        args: ["{{`{{if eq .Event.Name \"prepare\"}}build{{else}}clean{{end}}`}}", "{{`{{.Release.Chart}}`}}", "{{`{{.Environment.Name}}`}}"]
示例:渐进式的构建 Helmfile 部署体系
以下我们通过一个假定的部署场景,一起来探索一下如何通过 Helmfile 从零开始一步步构建一个具备良好扩展性的 Helm 应用管理体系。
:::info 🚀 部署需求:将一个自主研发的 Web 应用服务(Console)及其支撑服务部署到私有云测试环境的同一空间中。
- 该应用服务依赖两个自研的业务服务:车辆服务(Vehicle)和地图(Map)服务;
- 以上两个业务服务同时依赖 MySQL 数据库,但生产环境会连接即有数据库因此不需要额外部署。 :::
基于以上需求,首先我们需要构建一个合理的目录组织结构,一方面满足既有需求,一方面考虑之后业务服务及其依赖的逐步扩展:
.
 ├── app                                                        #「应用服务」根目录
 │   ├── console                                        # Console 应用及其配置参数
 │   │   └── values.yaml.gotmpl
 │   └── helmfile.yaml                            #「应用服务」集合的状态管理
 ├── common                                                  # 通用配置集合的根目录
 |   └── defaults.yaml.gotmpl
 ├── database                                                #「数据库服务」根目录
 │   └── mysql
 │   │   └── values.yaml.gotmpl
 │   └── helmfile.yaml
 ├── service                                                #「业务服务」根目录
 │   ├── map
 │   │   └── values.yaml.gotmpl
 │   ├── vehicle
 │   │   └── values.yaml.gotmpl
 │   └── helmfile.yaml
 └── helmfile.yaml                                    # 全局部署管理的入口
接下来我们按部署需求编写一下各层级 helmfile.yaml 内的应用基本配置,并组织一下其中 repositories 和 releases 的相关依赖:
# helmfile.yaml
helmfiles:
    - **/helmfile.yaml                                # 读入一级子目录下的所有状态配置文件

---
# app/helmfile.yaml
repositories:
    - name: cloud
      url: https://internal.repo/cloud/charts

releases:
    - name: console
    chart: cloud/console
    version: ~1.0.0
    values:
        - console/values.yaml.gotmpl
    # *snip*

---
# database/helmfile.yaml
releases:
    - name: mysql
      chart: stable/mysql
    version: ~1.6.3
    values:
        - mysql/values.yaml.gotmpl
    # *snip*

---
# service/helmfile.yaml
repositories:
    - name: service
      url: https://internal.repo/service/charts

releases:
    - name: map
      needs:
        - mysql                                                # 声明对 mysql 的依赖
    chart: service/map
    version: ~1.0.0
    values:
        - ../common/defaults.yaml.gotmpl
        - map/values.yaml.gotmpl
    # *snip*
    - name: vehicle
      needs:
        - mysql                                                # 声明对 mysql 的依赖
    chart: service/vehicle
    version: ~1.0.0
    values:
        - ../common/defaults.yaml.gotmpl
        - vehicle/values.yaml.gotmpl
    # *snip*
而后依据不同环境(生产环境 / 测试环境)的差异化部署要求,通过设定环境变量来进一步控制部署执行的内容:
# database/helmfile.yaml
enviornments:
    default:
      values:
        - mysql:
              enabled: true
  production:
      values:
        - mysql:
              enabled: false

releases:
    - name: mysql
    condition: mysql.enabled                # `-e production` 环境下不执行部署
    # *snip*

若有收获,就点个赞吧
0 人点赞
