:::success 👀 如果大家发现其它实用、有趣的 Kubernetes 命令行小工具,欢迎大家在评论区投稿~ 👏👏👏 :::
tubectl
tubectl 是对 kubectl 简单但强大的封装,它降低了使用上下文、命名空间和智能匹配资源的复杂性。Tubectl 允许在上下文和命名空间之前无缝切换。
- 例如对于命令
kubectl --context staging或kubectl --context production- 现在只需要输入
tubectl @st或tubectl @prod
- 现在只需要输入
- 同样,在命令
kubectl get pods -n kube-system中kube-system也可以被替换- 你只需输入命令
tubectl get pods +sys
- 你只需输入命令
- 此外,可以在命令中通过
%来匹配资源名称,如tubectl logs nginx%- 甚至可以通过
%:X来匹配第 X 个 Pod,如tubectl log nginx%:1可匹配第 1 个 Nginx Pod
- 甚至可以通过
kube-prompt
kube-prompt 是基于 kubectl 实现的交互式 Shell 工具,支持命令自动补全、关键字高亮等功能。 其实 kubectl 自带的命令自动补全功能也挺够用的:
source <(kubectl completion bash)

Krew
Krew 是一个 Kubernetes 官方提供的 kubectl 插件管理工具,它的功能就是提供简单的方法下载、检索、管理其他插件,类似操作系统的 apt、yum、brew 等工具(其命名也似乎模仿的 brew 工具)。
目前社区已有 90+ 的插件,以下介绍几个实用的、不和 k9s 功能重复的插件。(科学上网可加速插件下载)
konfig
konfig 可以用于合并、分割和导入 kubeconfig 配置文件。
# import a kubeconfig$ kubectl konfig import --save new-cfg# merge serveral kubeconfig files$ kubectl konfig merge config1 config2 > merged-config# extract context minikube from the default kubeconfig$ kubectl konfig export minikube > minikube.config# extract context minikube and docker-for-desktop from two input configs$ kubectl konfig export minikube docker-for-desctop -k ~/.kube/other,~/dockercfg > local
kubectx + kubens
这两个切换 Kubenetes Context 和 Namespace 的插件几乎是最实用的插件。(⚠️ k9s 只可临时切换)

debug
这个基本是目前最好的一个容器调试工具,设计和用法详见下文。

sniff
ksniff 使用 kubectl 将静态编译的
tcpdump二进制文件上传到的待侦测的 Pod 中,并将其输出重定向到本地 Wireshark,以获得流畅的网络调试体验,下文给出了一个使用案例。(⚠️ 不推荐在生产环境中使用)

ingress-nginx
NGINX Ingress Controller 是 Kubernetes 官方的 Ingress 控制器项目,这个项目还配套提供了这个 kubectl 插件用以方便开发者和运维人员在本地环境与集群中的 Nginx Ingress 控制器交互,下面列举一些内置的命令。
$ kubectl ingress-nginx --helpA kubectl plugin for inspecting your ingress-nginx deploymentsUsage:ingress-nginx [command]Available Commands:backends Inspect the dynamic backend information of an ingress-nginx instancecerts Output the certificate data stored in an ingress-nginx podconf Inspect the generated nginx.confexec Execute a command inside an ingress-nginx podgeneral Inspect the other dynamic ingress-nginx informationhelp Help about any commandinfo Show information about the ingress-nginx serviceingresses Provide a short summary of all of the ingress definitionslint Inspect kubernetes resources for possible issueslogs Get the kubernetes logs for an ingress-nginx podssh ssh into a running ingress-nginx podFlags:--as string Username to impersonate for the operation--as-group stringArray Group to impersonate for the operation, this flag can be repeated to specify multiple groups.--cache-dir string Default HTTP cache directory (default "/Users/alexkursell/.kube/http-cache")--certificate-authority string Path to a cert file for the certificate authority--client-certificate string Path to a client certificate file for TLS--client-key string Path to a client key file for TLS--cluster string The name of the kubeconfig cluster to use--context string The name of the kubeconfig context to use-h, --help help for ingress-nginx--insecure-skip-tls-verify If true, the server's certificate will not be checked for validity. This will make your HTTPS connections insecure--kubeconfig string Path to the kubeconfig file to use for CLI requests.-n, --namespace string If present, the namespace scope for this CLI request--request-timeout string The length of time to wait before giving up on a single server request. Non-zero values should contain a corresponding time unit (e.g. 1s, 2m, 3h). A value of zero means don't timeout requests. (default "0")-s, --server string The address and port of the Kubernetes API server--token string Bearer token for authentication to the API server--user string The name of the kubeconfig user to useUse "ingress-nginx [command] --help" for more information about a command.
doctor
这个插件的灵感来自于
brew doctor,它将扫描当前的目标 K8s 集群,看看是否有异常或有用的操作点,并将其报告输出到命令行。这个插件不会改变任何状态或配置,它只是扫描并收集信息,然后输出 YAML 报告。

df-pv
你有没有想过,”我所有的PV有多少空闲的磁盘空间?” 我也是! 这也是我制作这个插件的原因! 我一直以来都想快速查看我的 Persistent Volumes 的磁盘使用情况(类似于 Unix 中的
df或du)。 这个插件正是在尝试解决这个问题,⚠️ 但受限于 PV 类型太多,采集到的信息并非都那么准确。

view-allocations
这个插件列出了资源分配(CPU、内存、GPU)的情况,采集的数据来自于 Node 和 Pod 的 YAML 清单文件。它不像
kubectl top那样列出使用情况。它可以提供按命名空间、节点、Pod 和资源名称进行分组的结果。

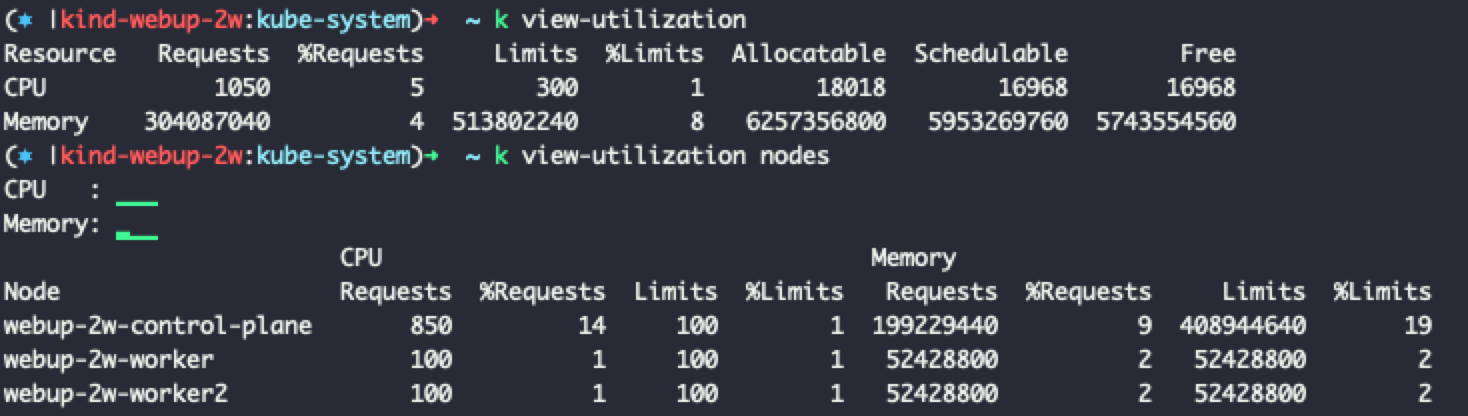
view-utilization
和前一个插件类似,这个插件也是用于了解集群的资源情况,但它关注的是实际的资源使用情况,可以通过这个插件了解集群整体和各个 Node 当前的 CPU 及内存的利用率。
🍮 Krew 插件宝库拾遗
- k9s 已覆盖的功能:eksporter, grep, iexec, net-forward, restart, tail, tree, view-secret, etc.
- 集群管理员可用功能:ca-cert, cssh, get-all, images, node-restart, outdated, rbac-lookup, etc. :::
Telepresence
Telepresence 的基本原理是在集群中新建了一个 Pod,以此作为代理,方便访问集群中的其他 Pod。当本地的
telepresence进程退出时,它将被删除。(本小节内容来自于云脑团队许娟 @XJ(u160728) 的整理)
对于这个工具的使用,我们可以根据使用场景来选择适当的参数。
usage: telepresence [-h] [--version] [--verbose] [--logfile LOGFILE]
                    [--method {inject-tcp,vpn-tcp,container}]
                    [--new-deployment DEPLOYMENT_NAME | --swap-deployment DEPLOYMENT_NAME[:CONTAINER]
                    | --deployment EXISTING_DEPLOYMENT_NAME]
                    [--context CONTEXT] [--namespace NAMESPACE]
                    [--expose PORT[:REMOTE_PORT]]
                    [--also-proxy CLOUD_HOSTNAME] [--mount PATH_OR_BOOLEAN]
                    [--env-json FILENAME] [--env-file FILENAME]
                    [--run-shell | --run ... | --docker-run ...]

  --run-shell           Run a local shell that will be proxied to/from
                        Kubernetes.
  --run ...             Run the specified command arguments, e.g. '--run
                        python myapp.py'.
  --docker-run ...      Run a Docker container, by passing the arguments to
                        'docker run', e.g. '--docker-run -i -t ubuntu:16.04
                        /bin/bash'. Requires --method container.
用法一:连接到集群
要连接到集群,我们需要在集群中设置代理,有三种方法(这里只介绍两种,另一种为手动创建 YAML 文件来配置,较为麻烦,不推荐使用)。
- 创建新的 Deployment(以下例子将会创建名为
myserver的 Deployment 和 Pod)$ telepresence --new-deployment myserver --run-shell T: How Telepresence uses sudo: https://www.telepresence.io/reference/install#dependencies …… T: Setup complete. Launching your command. # 进入你本地的环境 @kubensx-current|bash-4.3$
如果你不关心新内容 Deployment 是什么,可以不用命名:
$ telepresence --run-shell
- 交换现有的 Deployment (将现有部署替换为
telepresence代理,当telepresence进程退出时,它将恢复 Deployment 的先前状态)$ telepresence -s database-mysql --run-shell T: Starting proxy with method 'vpn-tcp', which has the following limitations: All processes are affected, …… T: Setup complete. Launching your command. @kubensx-current|bash-4.3$ ls
如果 Deploymnet 创建的 Pod 中有多个容器,还可以指定容器名称来进行环境交换:
$ telepresence --swap-deployment myserver:containername --run-shell
用法二:快速开发 K8s 服务
应用场景:假设你正在开发一个新的 K8s 服务。通常测试的方法是更改代码,重建镜像,将镜像推送到 Docker 仓库,然后重新部署 K8s Deployment。这可能会很慢。
Telepresence 会代理远程的 Deployment 到你本地的进程。这就意味着你可以本地开发,编辑代码,但是在 K8s 集群内测试你的服务。
from http.server import BaseHTTPRequestHandler, HTTPServer
class RequestHandler(BaseHTTPRequestHandler): def do_GET(self): self.send_response(200) self.send_header(‘Content-type’, ‘text/plain’) self.end_headers() self.wfile.write(b”Hello, world!\n”) return
httpd = HTTPServer((‘’, 8080), RequestHandler) httpd.serve_forever()
- 在本地执行 `telepresence`,创建新的 Deploymnet :
```bash
$ telepresence --new-deployment hello-world --expose 8080
T: Starting proxy with method 'vpn-tcp', which has the following limitations: All processes are affected,
                        ……
T: Setup complete. Launching your command.
@kubensx-current|bash-4.3$ ls

# 打开本地的另一个终端
$ python3 helloworld.py
使用
--new-deployment选项telepresence会创建几个 K8s 对象(一个 Deployment 和一个 Pod,两者都名为myserver及对应的 Service 对象)。它将监听 Service 声明的8080端口并将流量转发到本地8080端口的进程。
- 验证:在本地编辑代码,更改会立刻反映到 K8s 集群内的客户端,而无需重新部署、创建 Docker 镜像等
```bash
进入集群中的一个Pod 或者 在集群中先创建一个 Pod 连接进去
$ kubectl —restart=Never run -it —image=alpine console /bin/sh / # wget -O - -q http://hello-world:8080/ Hello, world!
切换回本地的另一个终端,先中止之前 helloworld.py 这个进程,然后编辑 helloworld.py
python3 helloworld.py ^C $ sed s/Hello/Goodbye/g -i helloworld.py $ grep Goodbye helloworld.py self.wfile.write(b”Goodbye, world!\n”) $ python3 helloworld.py
我们已经使用新代码重新启动了本地进程,再次进入 Pod 中查询
/ # wget -O - -q http://hello-world:8080/ Goodbye, world!
<a name="nXwMV"></a>
### 用法三:`--docker-run` 测试镜像
> 该方法的主要用途是测试已经 Docker 化的镜像;在部署到 K8s 之前,可以先用 telepresence 挂载到 K8s 集群中测试一下;如果没有问题,可执行容器部署再测试。


这里以 `reg.uisee.ai/cloud/utility-tools` 为例(这是一个自制的包含各种工具的全家桶,里面集合了雷开发调试工具,包括网络工具,HTTP 工具以及一些操作数据库的命令行工具):
```bash
$ telepresence --namespace team-test --docker-run -it reg.uisee.ai/cloud/utility-tools:httpie /bin/bash
T: How Telepresence uses sudo: https://www.telepresence.io/reference/install#dependencies
T: Invoking sudo. Please enter your sudo password.
                    ……
T: Setup complete. Launching your container.
root@telepresence-1555998950-0367048-12914-56c6d999d-qsn2c:/#
两个类似的工具:KT Connect 和 warp
warp 是一个 kubectl 插件;而 KT Connect 则是阿里开源的自制 Telepresence,具体介绍见下面几篇文章。
部分参考资料

若有收获,就点个赞吧
0 人点赞
