2021-9-28
4-1 http-概述
开发接口(不用任何框架)
- nodejs 处理 http请求
- 搭建开发环境
- 开发接口(暂不连接数据库,暂不考虑登录)
http 请求概述
- DNS 解析,建立 TCP 连接,发送 http 请求——浏览器来做
- server 端接收到 http 请求,处理并返回
- 项目来做
- 客户端(浏览器)接收到返回数据,处理数据(如渲染页面,执行js)
2021-9-29
4-2 处理 get 请求
nodejs 处理 http 请求
- get 请求和 querystring
- post 请求和 postdata
- 路由
简单示例
nodejs 处理 get 请求
- get 请求,即客户端要向 server 端获取数据,如查询博客列表
- 通过 querystring 来传递数据,如 a.html?a=100&b=200
- 浏览器直接访问就发送 get 请求
代码示例
操作一下
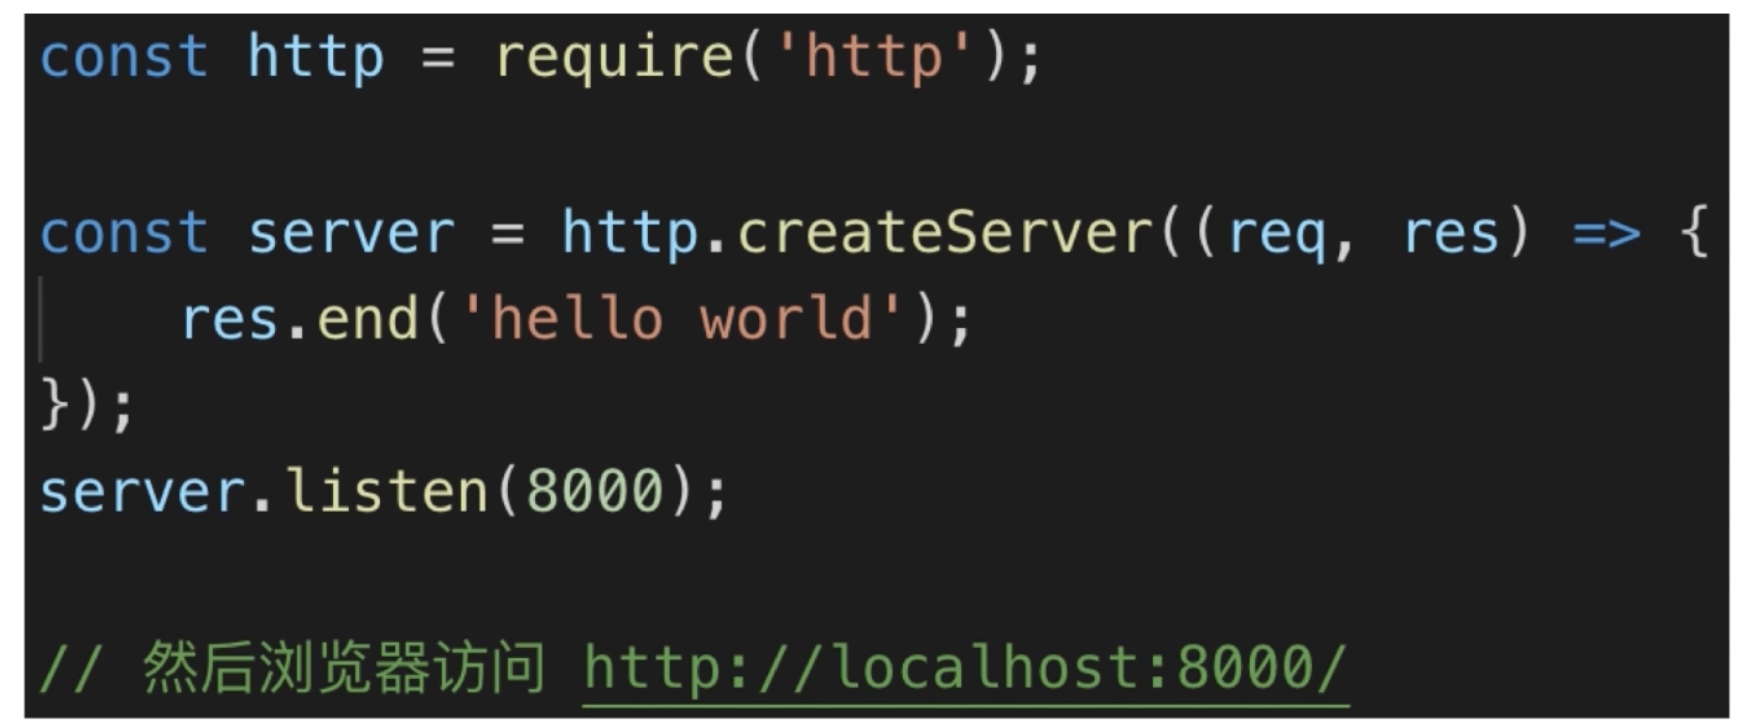
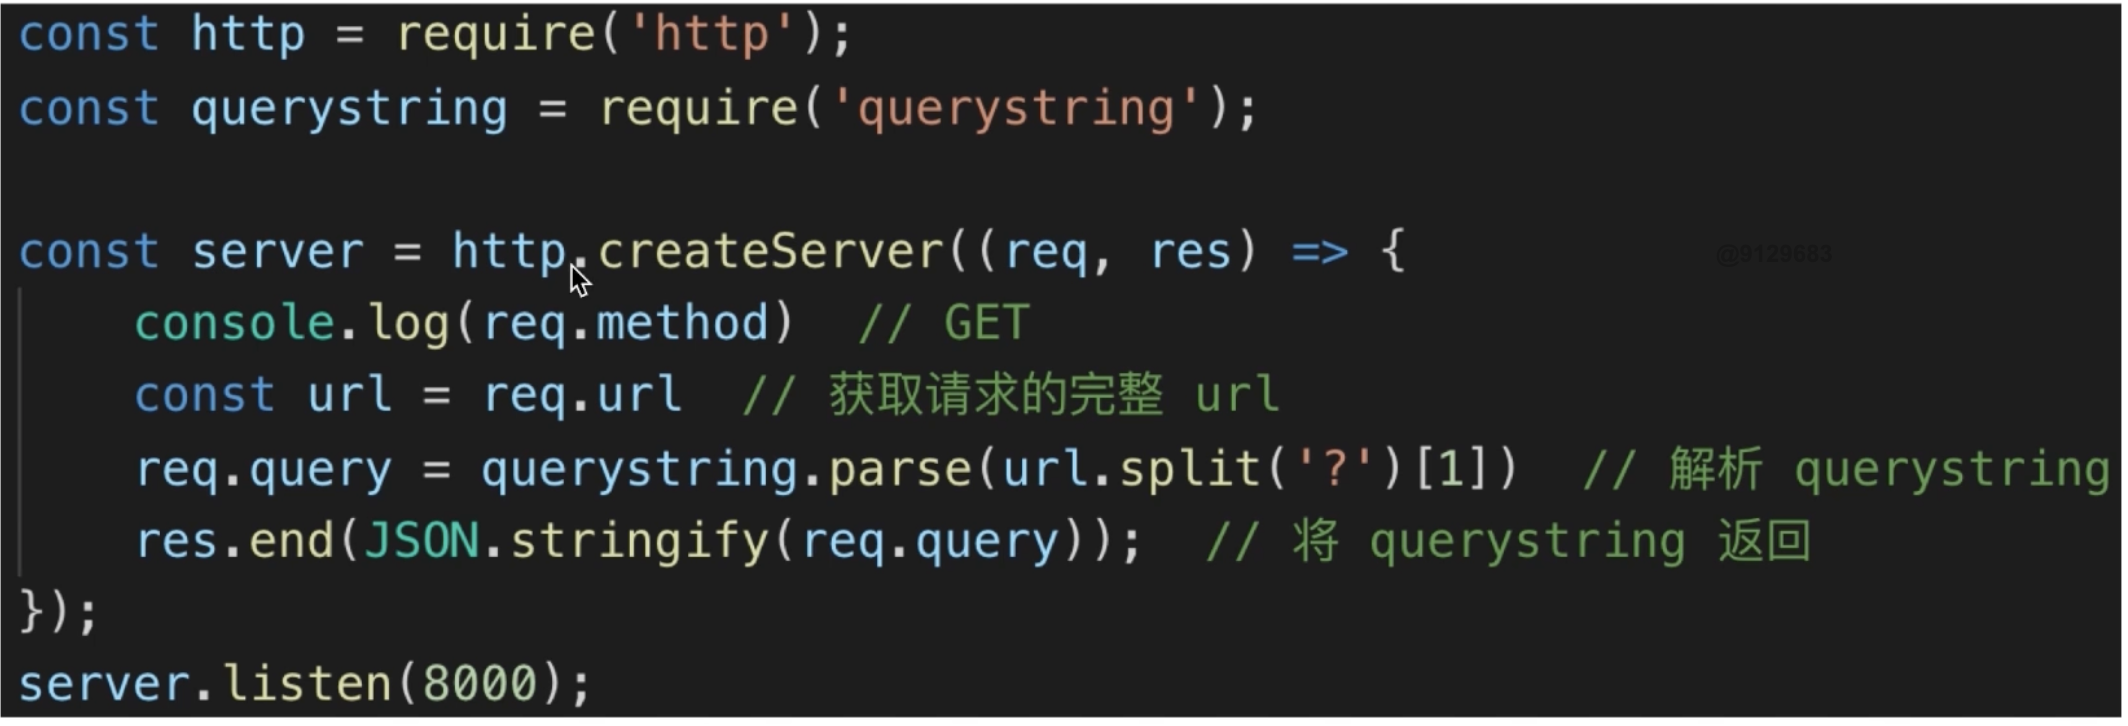
const http = require('http')const qs = require('qs')const server = http.createServer((req, res) => {const method = req.methodconsole.log('method ', method) // GETconst url = req.url // 获取请求的完整 urlconsole.log('url', url)req.query = qs.parse(url.split('?')[1]) // 解析 querystringconsole.log('req.query', req.query)res.end(JSON.stringify(req.query) // 将 querystring 返回)})server.listen(8000)console.log('ok');
如果在 url 中输入 user=demonlb&keyword=123456
就会显示出来这个值
http://localhost:8000/?user=demonlb&keyword=123456
当输入 http://localhost:8000/api/blog/list/?user=demonlb&keyword=123456 时
控制台返回如下
还有一个固定的请求,浏览器自主发送的:获取favicon
2021-10-9
4-3 处理post请求
nodejs 处理 post 请求
- post 请求,即客户端要向 server 端传递数据,如新建博客
- 通过 post data 来传递数据,后面演示
- 浏览器无法直接模拟,需要手写 js,或者使用 postman
代码示例

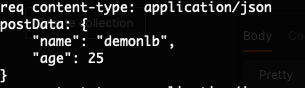
接收数据时触发 on 方法,将数据放到 postData 中,如果数据较大就会多次触发。当触发结束的时候就会触发下面的 end ,然后可以打印一下数据,让 res end掉
操作一下
const http = require('http')const server = http.createServer((req, res) => {if(req.method === "POST") {// req 数据格式console.log('req content-type:', req.headers['content-type'])// 接收数据let postData = ''req.on('data', chunk => {postData += chunk.toString()})req.on('end', () => {console.log('postData:', postData)res.end('end')})}})server.listen(8000)console.log('OK');
写好代码后,打开 postman 选择新建一个 Request
- 设置方法为 POST ,url 为http://localhost:8000/

- 选择 Body 选择数据为 raw 数据(普通的字符串数据),格式为 JSON
- 然后随便写个数据
- 然后 控制台 会返回 postData 内容
代码示例
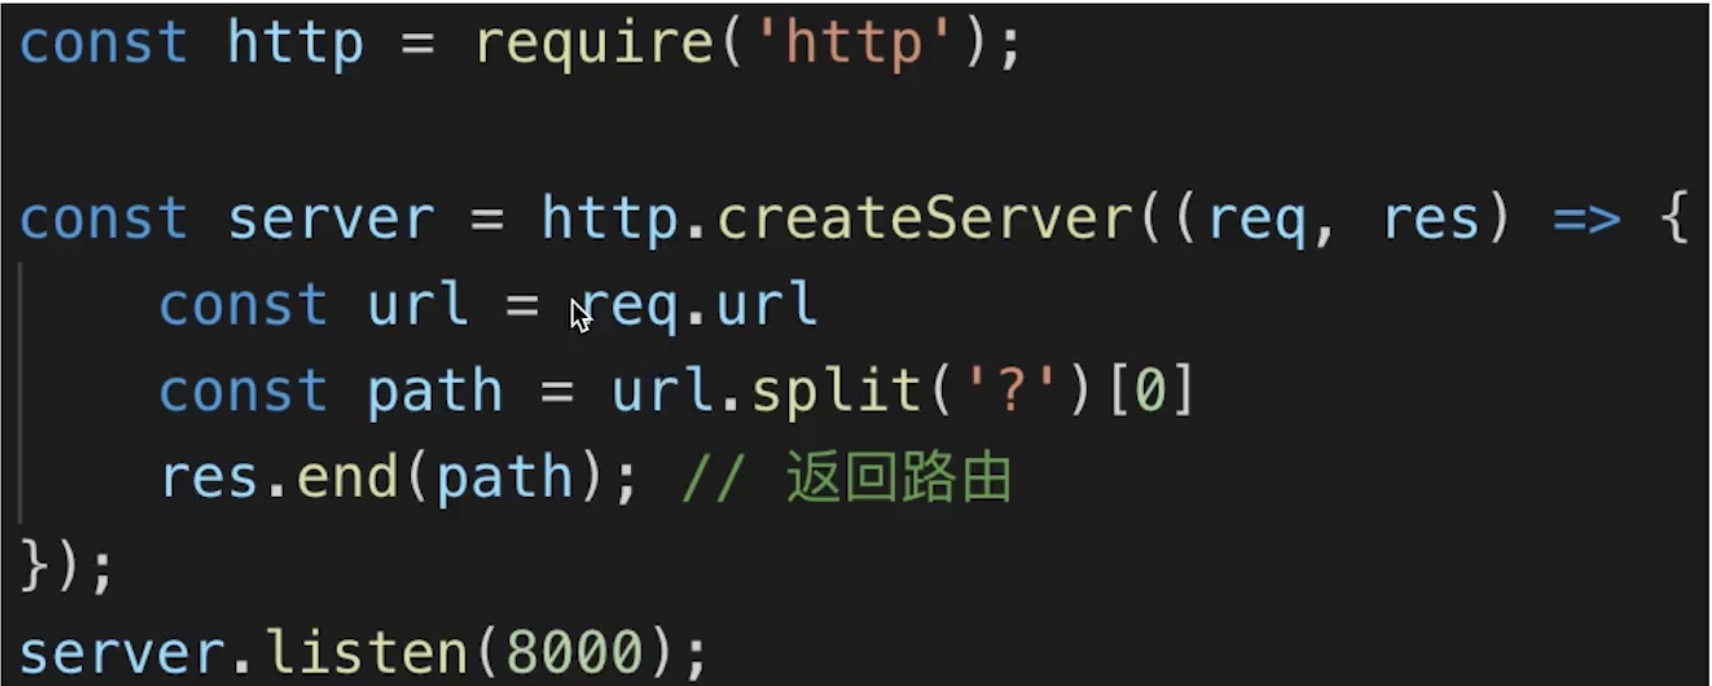
split(‘?’)[0] 截取问号前面的内容:即路由
这个在这就不演示了
问题
存在数据截断问题:https://coding.imooc.com/learn/questiondetail/W48BaYR4Ddl6ALwG.html
2021-10-11
4-4 处理http请求的综合示例
写一个综合实例来展现 4-2 和 4-3 所学的
记得 先 npm install —save qs
Get请求
const http = require('http')const qs = require('qs')const server = http.createServer((req, res) => {const method = req.methodconst url = req.urlconst path = url.split('?')[0]const query = qs.parse(url.split('?')[1])// 设置返回格式为JSONres.setHeader('Content-type', 'application/json')// 设置返回的数据const resData = {method,url,path,query,}// 返回if(method === 'GET') {res.end(JSON.stringify(resData))}})server.listen(8000)console.log('OK')
然后 node app.js
在浏览器中输入
http://localhost:8000/api/blog/list/?user=demonlb&keyword=123456
打开 network 中的 preview 会看到我们设置的返回的数据
Post 请求
继续写:如果 method 为 POST 的话
if (method === 'POST') {let postData = ''req.on('data', chunk => {postData += chunk.toString()})req.on('end', () => {resData.postData = postData})// 返回res.end(JSON.stringify(resData))}
然后在 postman 中测试一下
- 输入url: http://localhost:8000/api/blog/update?id=1
- 然后更新一下 请求
- 可以看到设置返回的一些值
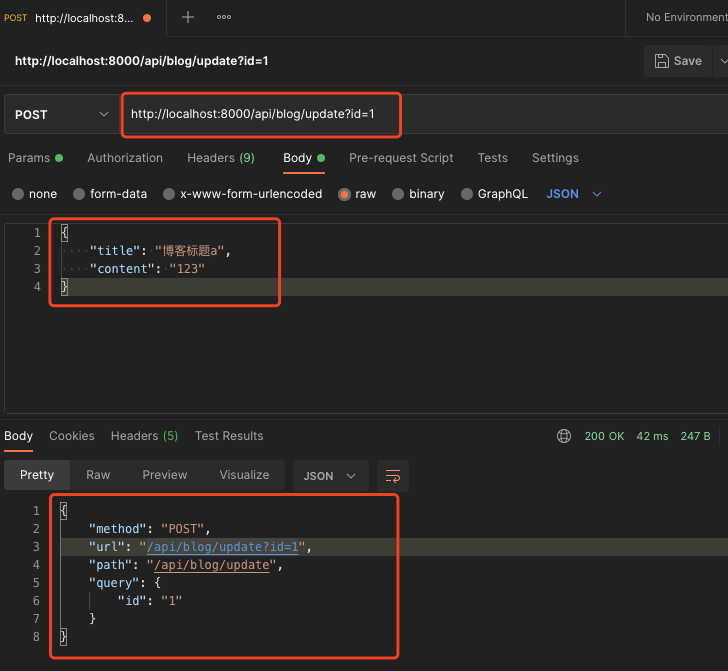
Post 请求解析
req.on(“data”)是接受来自客户端POSTMAN发送的JSON数据,本地的vscode中的这些req.on(“data”),req.on(“end”)相当于服务端用来处理这些数据。
2021-10-12
4-5 搭建开发环境
- 从 0 开始搭建,不使用任何框架
- 使用 nodemon 监测文件变化,自动重启 node
- 使用 cross-env 来设置环境变量,兼容 mac linux 和 windows
开始搭建
1.新建一个 目录 blog-1,初始化文件 npm init -y,然后新建一个 bin 目录
修改 main 字段为”bin/www.js”
2.在 bin 目录下新建 www.js ,写入一些之前练习过的模块
const http = require('http')const PORT = 8000const serverHandle = require('../app')const server = http.createServer(serverHandle)server.listen(PORT)
3.在 blog-1 下新建一个 app.js,用来书写具体逻辑
分为app.js和www.js的目的:解耦抽离基本的配置代码和业务代码
const serverHandle = (req, res) => {// 设置返回格式为JSON格式res.setHeader('Content-type', 'application/json')// 设置返回的值const resData = {name: 'robinluo',gender: 'male'}// 将 JSON 字符串解析res.end(JSON.stringify(resData))}module.exports = serverHandle
安装所需的一些工具
npm install nodemon cross-env --save-dev
安装好 nodemon 和 cross-env 后
改写一下 package.json 中的 scripts
// 写一个新的script,让它用 nodemon 来运行 www.js,然后设置环境为 dev 环境"dev": "cross-env NODE_ENV=dev nodemon ./bin/www.js"
现在就可以直接 npm run dev
env:process.env.NODE_ENV 可以用来识别当前的环境是 env 还是别的,可以监测是线上还是线下环境
2021-10-13
4-6 初始化路由
- 初始化路由:根据之前的技术方案设计,做出路由
- 返回假数据:将路由和数据分离以符合设计原则
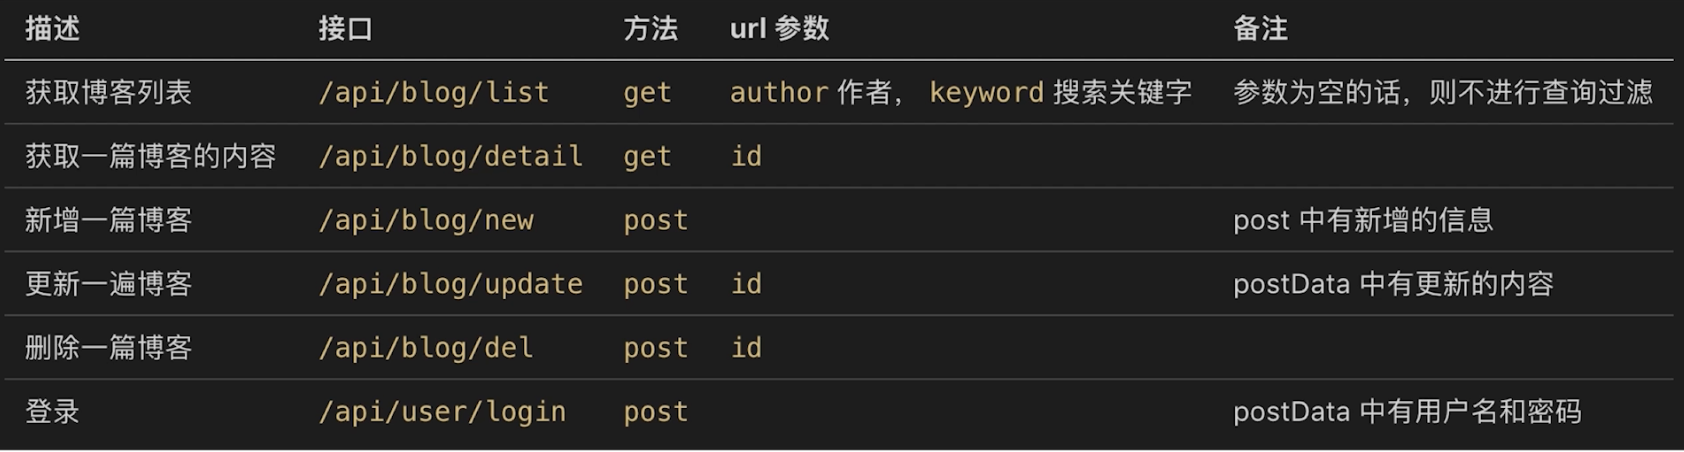
接口设计
开始去写!
在 /blog-1/ 下新建一个 src 文件夹,所有的代码都会写在这个里面
然后继续新建 /blog-1/src/router 和里面的文件 router/blog.js 以及 router/user.js
然后书写逻辑:
blog.js
const handleBlogRouter = (req, res) => {// 获取 method,url,pathconst method = req.methodconst url = req.urlconst path = url.split('?')[0]// 获取博客列表if (method === 'GET' && path === '/api/blog/list') {return {msg: '这是获取博客列表的接口'}}// 获取博客详情if (method === 'GET' && path === '/api/blog/detail'){return {msg: '这是获取博客详情的接口'}}// 新建一篇博客if (method === 'POST' && path === '/api/blog/new') {return {msg: '这是新建一篇博客的接口'}}// 更新一篇博客if (method === 'POST' && path === '/api/blog/update') {return {msg: '这是更新一篇博客的接口'}}// 删除一篇博客if (method === 'POST' && path === '/api/blog/del') {return {msg: '这是删除一篇博客的接口'}}}module.exports = handleBlogRouter
user.js
const handleUserRouter = (req, res) => {// 获取 method,url,pathconst method = req.methodconst url = req.urlconst path = url.split('?')[0]// 登录if (method === 'POST' && path === '/api/user/login') {return {msg: '这是登录的接口'}}}module.exports = handleUserRouter
处理路由
在 app.js 中引入这两个接口导出的js
const handleBlogRouter = require('./src/router/blog')const handleUserRouter = require('./src/router/user')
然后处理这两种路由和意外情况
// 处理 blog 路由// 传入 req 和 res 到 blogData 中const blogData = handleBlogRouter(req, res)// 如果 blogData 存在的话就获取那个值,并将值转换为字符串if (blogData) {res.end(JSON.stringify(blogData))return}// 处理 user 路由const userData = handleUserRouter(req, res)if (userData) {res.end(JSON.stringify(userData))return}// 未命中路由返回 404// 改写一下头和状态码res.writeHead(404, {"Content-type": "text/plain"})res.write("404 not found\n")res.end()
测试一下:成功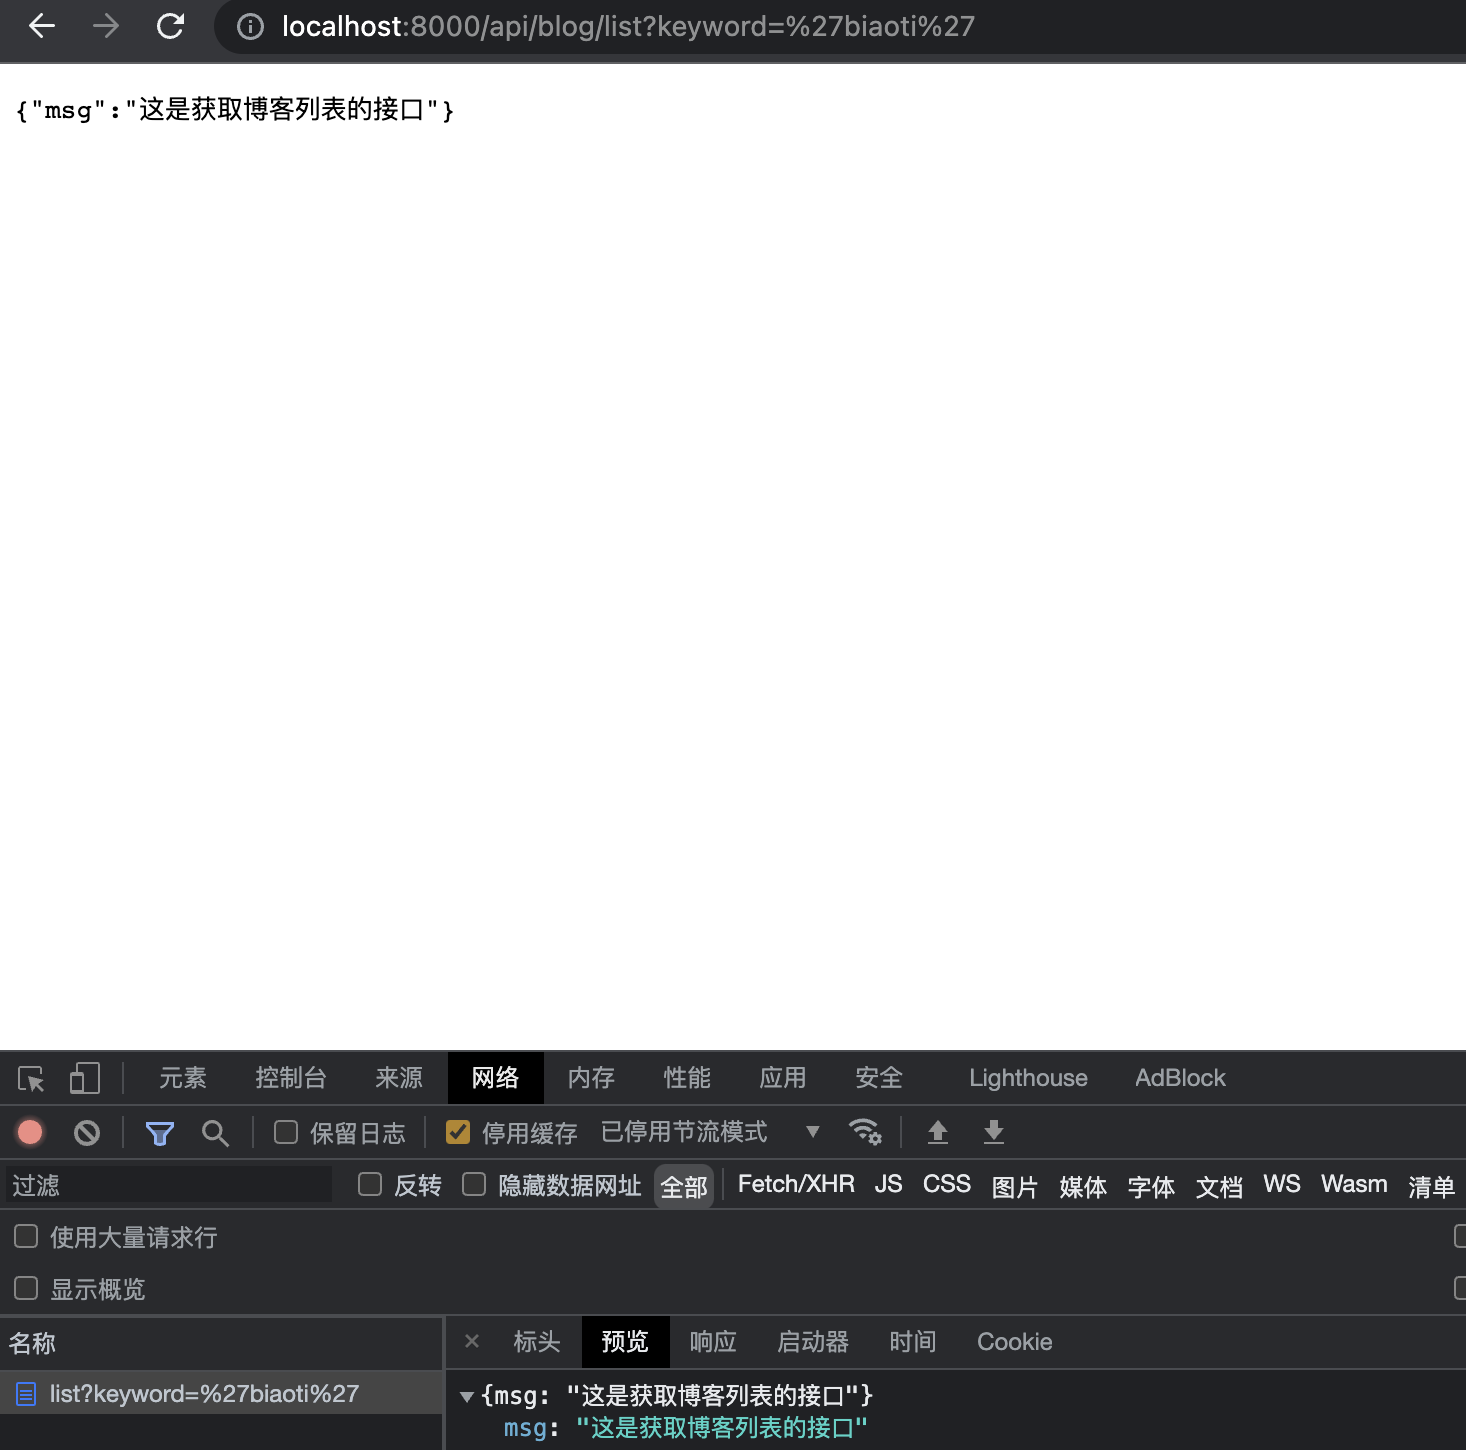
打开 postman 继续测试 POST 请求
回顾
1.分离出blog.js user.js ,拆分的理由:对某个特定的功能进行自己的处理,结构简单,处理专一
4-7 开发路由(博客列表路由)(上)
新建一个数据模型
新建文件夹和文件 resModel.js src/model/resModel.js
准备工作-创建基类
// 创建一个基类class BaseModel {constructor(data, message) {// 兼容只传字符串的方式if (typeof data === 'string') {this.message = data;data = nullmessage = null}// 如果有 data 就传 data,如果有 message 就传 messageif (data) {this.data = data}if (message) {this.message = message}}}// 创建成功基类class SuccessModel extends BaseModel {constructor(data, message) {super(data, message)this.errNo = 0}}// 创建失败基类class ErrorModel extends BaseModel {constructor(data, message) {super(data, message)this.errNo = -1}}// 最后导出module.exports = {SuccessModel,ErrorModel}
这样写了之后可以做到:
返回数据时规定数据的格式
因此可以根据 errNo 让浏览器知道是返回错误或者正确
res.end(JSON.stringify({errNo: -1或者0,data: {...},message: 'xxx'}))
准备工作-解析 query
在 app.js 中解析query,安装 qs 后引入并写入
const qs = require('qs')...const serverHandle = (req, res) => {...// 解析 queryreq.query = qs.parse(url.split('?')[1])...}
准备工作-创建 controller
创建 controller 文件夹和 controller/blog.js 和之前创建的 model 文件夹平级
然后在 blog.js 中 创建 mock 数据
const getList = (author, keyword) => {// 先返回假数据(格式是正确的)return [{id: 1,title: '标题A',content: '内容A',createTime: 1634116705303,author: 'zhangsan'},{id: 2,title: '标题B',content: '内容B',createTime: 1634116705304,author: 'lisi'}]}module.exports = {getList}
Get请求-解析数据-开发博客列表
在 router/blog.js 中
- 引入解析 query 中的数据 author 和 keyword
- 将其作为形参传入 getList 中可以获取在 blog.js 中设置的 mock data
最后引入 SuccessModel 来评价 errNo 来返回完整的请求数据 ```javascript // 引入 getList 和 SuccessModel const { getList } = require(‘../controller/blog’) const { SuccessModel, ErrorModel } = require(‘../model/resModel’) … const handleBlogRouter = (req, res) => { … // 获取博客列表 if (method === ‘GET’ && req.path === ‘/api/blog/list’) { // 获取地址栏中 query 中的数据 const author = req.query.author || ‘’ const keyword = req.query.keyword || ‘’ // 然后根据 query 的值查询 mock 数据 const listData = getList(author, keyword)
return new SuccessModel(listData) }
}
拆分 bin controller model router app.js 的目的- bin/www.js 是连接服务的内容 ,createServer 的内容- app.js 是设置基本设置的地方 404 命中那里那里- router 逻辑层面,并且只管路由- controller 是最关心数据的层次<a name="S2x3q"></a># 2021-10-17<a name="fiMfY"></a># 4-8 开发路由(博客列表路由)(下)<a name="gJNJ0"></a>## Get请求-解析数据-开发博客详情继续在 /controller/blog.js 下开发代码<br />开发假数据```javascript...const getDetail = (id) => {// 先返回假数据// 假设就返回 id 为 1 的这些内容return {id: 1,title: '标题A',content: '内容A',createTime: 1634116705303,author: 'zhangsan'}}
然后导出
module.exports = {...getDetail}
来到 router/blog.js
修改获取博客详情的代码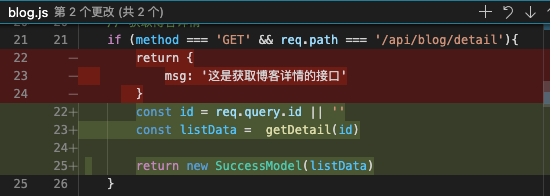
...// 获取博客详情if (method === 'GET' && req.path === '/api/blog/detail'){const id = req.query.id || ''const listData = getDetail(id)return new SuccessModel(listData)}

Post请求-新建博客
使用之前讲过的 数据流的形式来进行操作
这是异步的,使用 Promise 来操作
if (method === 'POST') {let postData = ''req.on('data', chunk => {postData += chunk.toString()})req.on('end', () => {resData.postData = postData})// 返回res.end(JSON.stringify(resData))}
插-讲解 Promise
新建 promise-test(文件夹)(nodejs-learning/promise-test)
新建一个 index.js 和文件夹files 里面分别创建 a.json b.json c.json
其中 a.json 写入
{"next": "b.json","msg": "this is a"}
非 promise 形式读取文件
在 index.js 中写入 读文件的一系列操作
// 首先讲解文件操作const fs = require('fs')const path = require('path')// path.resolve 方法拼接文件名// __dirname 相当于一个全局变量,指明当前的文件路径// fullFileName 就可获取绝对路径const fullFileName = path.resolve(__dirname, 'files', 'a.json')// 异步的读取文件fs.readFile(fullFileName, (err, data) => {// 如果报错了if (err) {console.error(err)return}// 如果没错,将数据以二进制的形式打印出来console.log(data.toString())})
最后在控制台中打印 index.js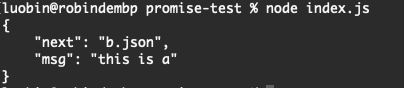
然后把它封装成一个函数,并调用
// callback 方式获取一个文件的内容function getFileContent(fileName, callback) {const fullFileName = path.resolve(__dirname, 'files', fileName)// 异步的读取文件fs.readFile(fullFileName, (err, data) => {// 如果报错了if (err) {console.error(err)return}// // 如果没错,将数据以二进制的形式打印出来// console.log(data.toString())// 如果没错,将数据传到 callback 中callback(JSON.parse(data.toString()))})}// 测试getFileContent('a.json', aData => console.log('a data', aData))

可以循环的调用获取数据
// 测试getFileContent('a.json', aData => {console.log('a data', aData)getFileContent(aData.next, bData => {console.log('b data', bData)getFileContent(bData.next, cData => {console.log('c data', cData)})})})

promise 形式读取文件
修改刚才的文件 使用 promise的形式来写
getFileContent(‘a.json’) 是一个 promise对象,.then 获取 aData 的内容
const fs = require('fs')const path = require('path')// 用 promise 获取文件内容function getFileContent(fileName) {const promise = new Promise((resolve, reject)=> {const fullFileName = path.resolve(__dirname, 'files', fileName)// 异步的读取文件fs.readFile(fullFileName, (err, data) => {// 如果报错了 执行 reject 函数if (err) {reject(err)}resolve(JSON.parse(data.toString()))})})return promise}getFileContent('a.json').then(aData => {console.log('a data', aData);}).then()
可以继续写
getFileContent('a.json').then(aData => {console.log('a data', aData);return getFileContent(aData.next)}).then(bData => {console.log('b data', bData);return getFileContent(bData.next)}).then(cData => {console.log('c data', cData);})
使用 promise 的好处,将 callback 形式的循环嵌套式的代码变为了 .then 这种链式调用的代码,结构更加清晰,更加简单
前端和后端路由的区别
nodejs 的路由是真正的 http 请求的路由,每个路由地址都代表了一个服务端的资源。 而 vue 或者 react 中的路由,它们的特点是切换路由不会发送 http 请求(这也是 SPA 网页的特点),只会切换页面。因此,可以理解为每个路由代表了一个页面。
4-9 开发路由(处理 POSTData)
在 app.js 中定义处理方法
// 用于处理 post dataconst getPostData = (req) => {const promise = new Promise((resolve, reject)=> {// 如果是 GET 请求,返回一个空就行了,并不是错误if (req.method !== 'POST') {resolve({})return}// 如果 content-type 给错了话,返回一个空就行了,也不是错误if (req.headers['content-type'] !== 'application/json') {resolve({})return}if (method === 'POST') {let postData = ''req.on('data', chunk => {postData += chunk.toString()})req.on('end', () => {// 如果数据为空的话,返回一个空对象if (!postData) {resolve({})return}resolve(JSON.parse(resData))})}})return promise}
具体使用
在获取完 postdata 再获取路由的数据
// 处理 post datagetPostData(req).then(postData => {req.body = postData// 处理 blog 路由// 传入 req 和 res 到 blogData 中const blogData = handleBlogRouter(req, res)// 如果 blogData 存在的话就获取那个值,并将值转换为字符串if (blogData) {res.end(JSON.stringify(blogData))return}// 处理 user 路由const userData = handleUserRouter(req, res)if (userData) {res.end(JSON.stringify(userData))return}// 未命中路由返回 404// 改写一下头和状态码res.writeHead(404, {"Content-type": "text/plain"})res.write("404 not found\n")res.end()})
这样做不会影响 GET 请求,会将 POST 请求的 postData 放到 req.body 中去
4-10 开发路由(新建和更新博客路由)
新建博客路由
在 controller/blog.js 中写入测试方法 newblog
这里的 blog 用来承接 postman 中传入的数据,比如 title,content 内容
当成功时,返回 id 给 postman
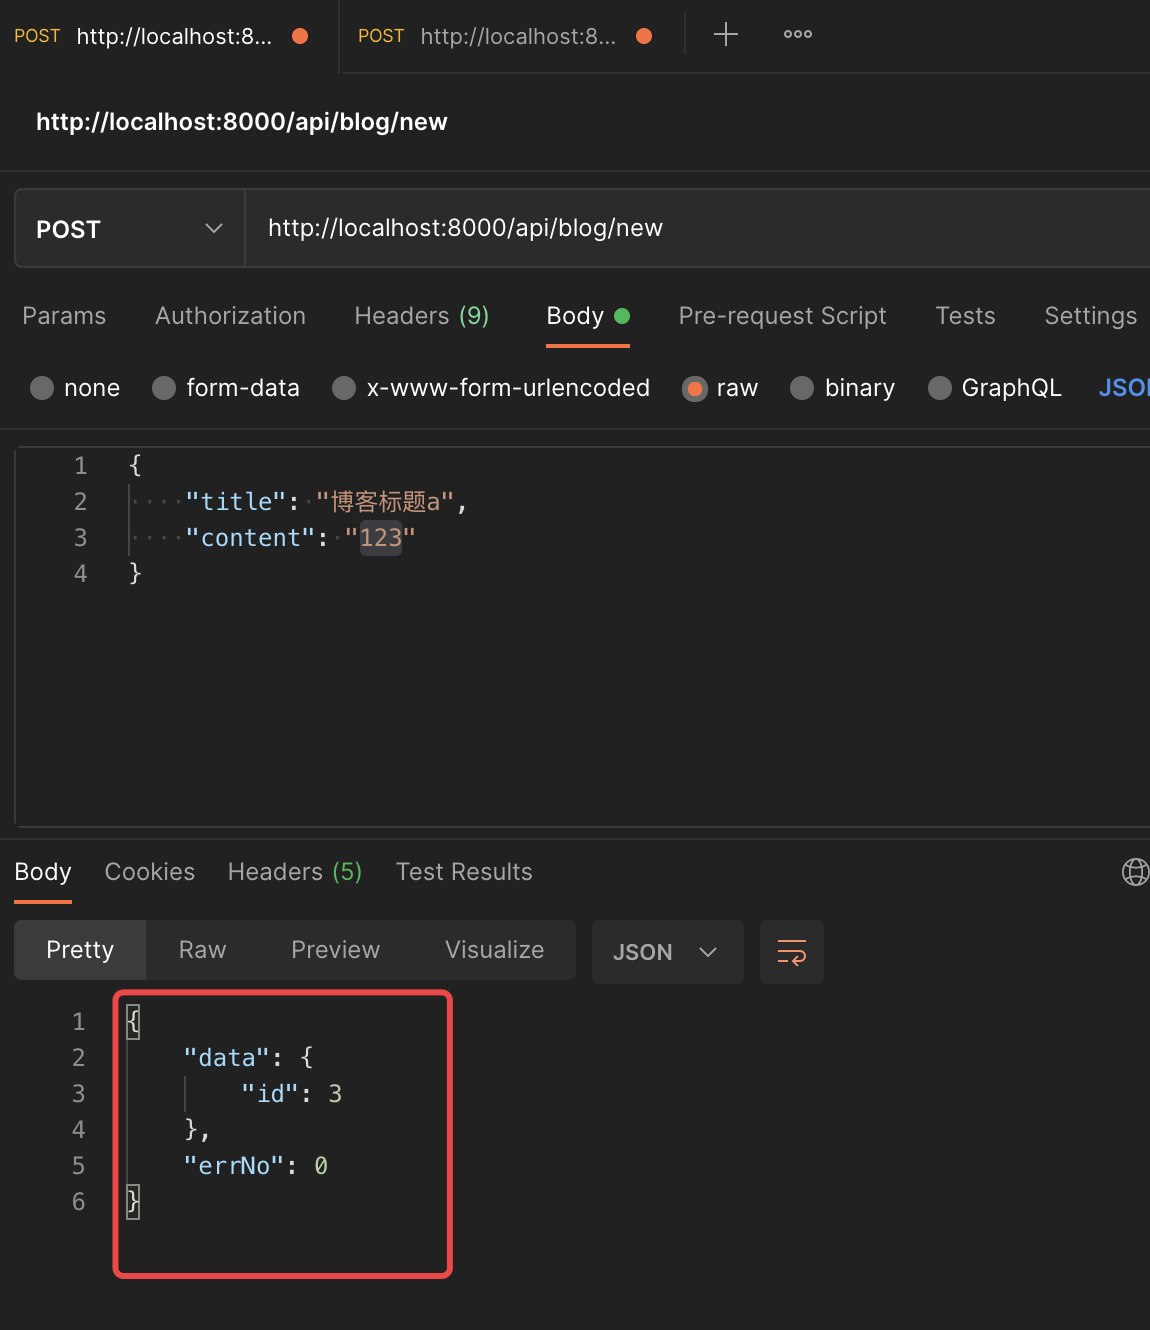
const newBlog = (blogData = {}) => {// blogData 是一个博客对象,包含 title content 属性console.log('blogData', blogData);return {id: 3 // 表示新建博客,插入到数据表里面的 id}}
最后导出方法
module.exports = {...newBlog}
回到 router/blog.js 中 处理新建博客的逻辑
// 新建一篇博客if (method === 'POST' && req.path === '/api/blog/new') {const blogData = req.bodyconst data = newBlog(blogData)return new SuccessModel(data)}
更新博客路由
同样的,和新建类似
只不过多一个id
假数据:
const updateBlog = (id, blogData = {}) => {// blogData 是一个博客对象,包含 title content 属性console.log('blogData,id', blogData, id);return true}
更新路由的逻辑
// 更新一篇博客if (method === 'POST' && req.path === '/api/blog/update') {const result = updateBlog(id, req.body)if (result) {return new SuccessModel()} else{return new ErrorModel('update failed')}}
最后测试,测试成功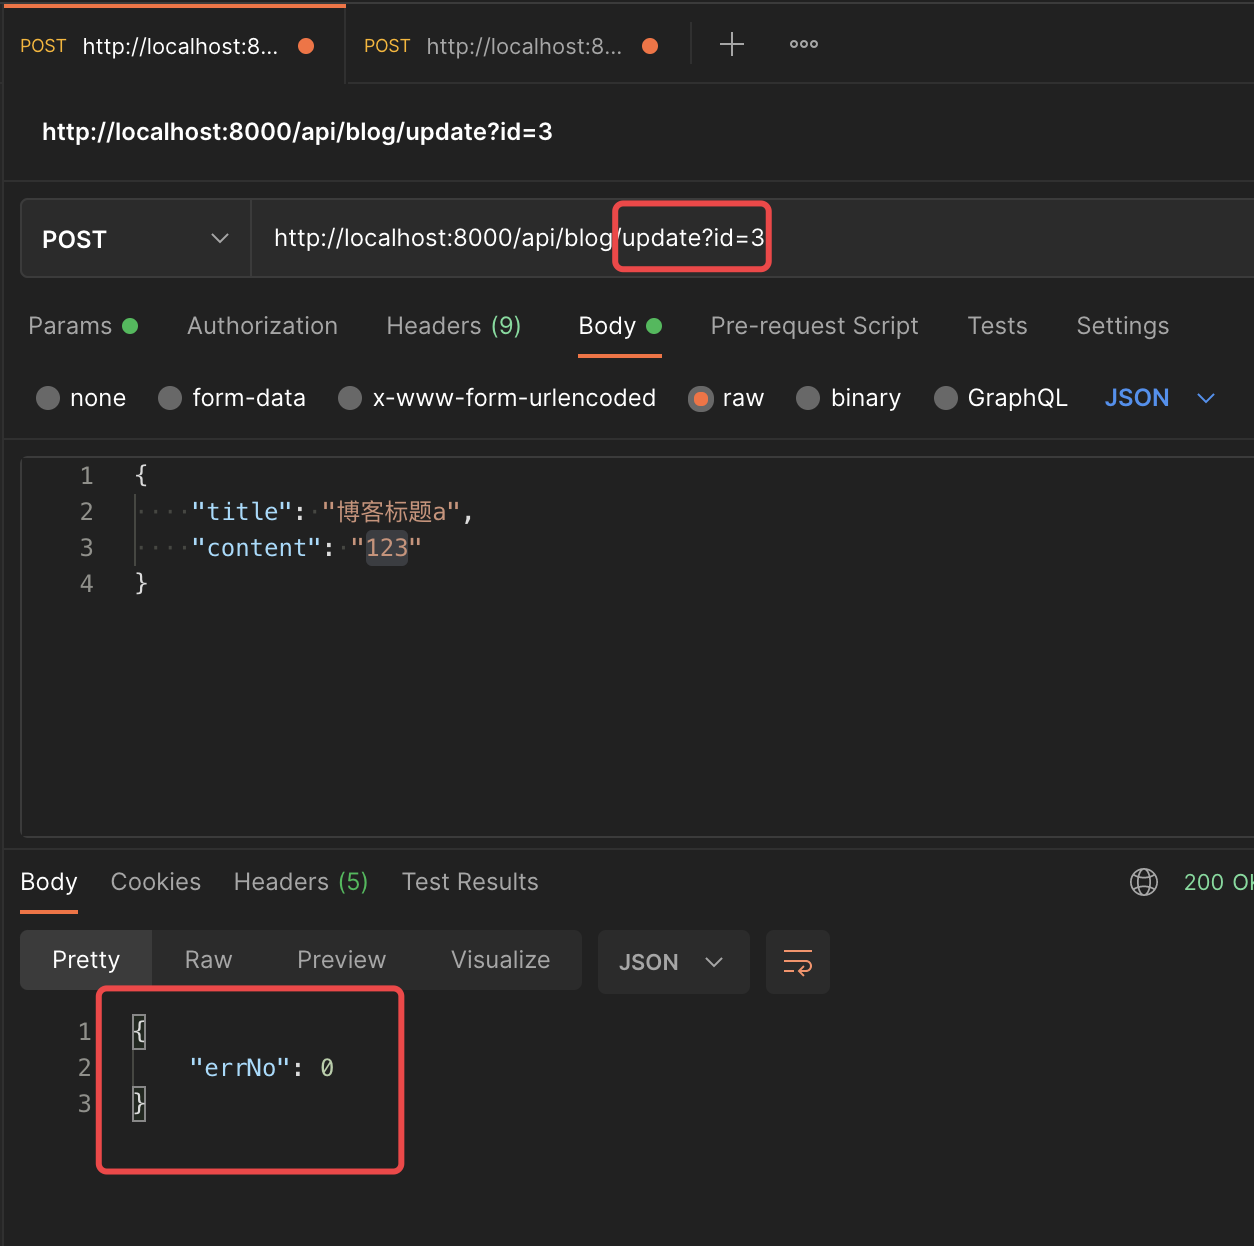
2021-10-18
4-11 开发路由(删除博客路由和登录路由)
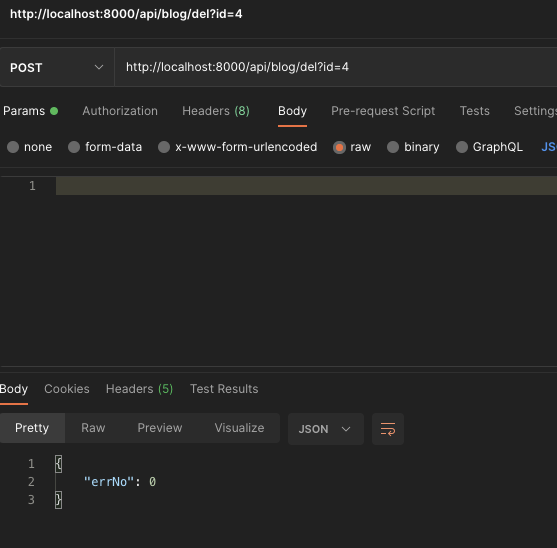
删除博客路由
删除路由和更新类似
// 删除一篇博客if (method === 'POST' && req.path === '/api/blog/del') {const result = deleteBlog(id)if (result) {return new SuccessModel()} else{return new ErrorModel('delete failed')}}...const deleteBlog = (id) => {// id 就是要删除博客的idreturn true}module.exports = {...deleteBlog}
登录路由
首先创建 user.js (controller/user.js)
写假数据
const loginCheck = (username, password) =>{// 先使用假数据if (username === 'zhangsan' && password === '123') {return true}return false;}module.exports = {loginCheck}
处理数据
/router/user.js
const { loginCheck } = require('../controller/user')const { SuccessModel, ErrorModel } = require('../model/resModel')const handleUserRouter = (req, res) => {// 获取 method,url,pathconst method = req.method// 登录if (method === 'POST' && req.path === '/api/user/login') {const { username, password } = req.bodyconst result = loginCheck(username, password)if (result) {return new SuccessModel()} else {return new ErrorModel('login failed')}}}module.exports = handleUserRouter
最后测试
成功!
总结
- nodejs 处理 http 请求的常用技能, postman 的使用
- nodejs 开发博客项目的接口,(未连接数据库,未使用登录)
- 为何要将 router 和 controller 分开?
- router 是只管路由相关的(来了什么路由就处理什么数据,至于数据时什么样的和从哪来的都不管,有errNo 可以处理正确错误数据)
- controller 只管处理数据,路由什么不管,如何包装数据,如何传给客户端不管
4-12 补充:路由和API
API:

若有收获,就点个赞吧
0 人点赞
