一、什么是线程
进程是代码在数据集合上的一次运行活动,是系统进行资源分配和调度的基本单位,线程则是进程的一个执行路径,一个进程中至少有一个线程,进程中的多个线程共享进程的资源。
操作系统在分配资源时是把资源分配给进程的,但是CPU资源比较特殊,它是被分配到线程的,因为真正要占用CPU运行的是线程,所以也说线程是CPU分配的基本单位。
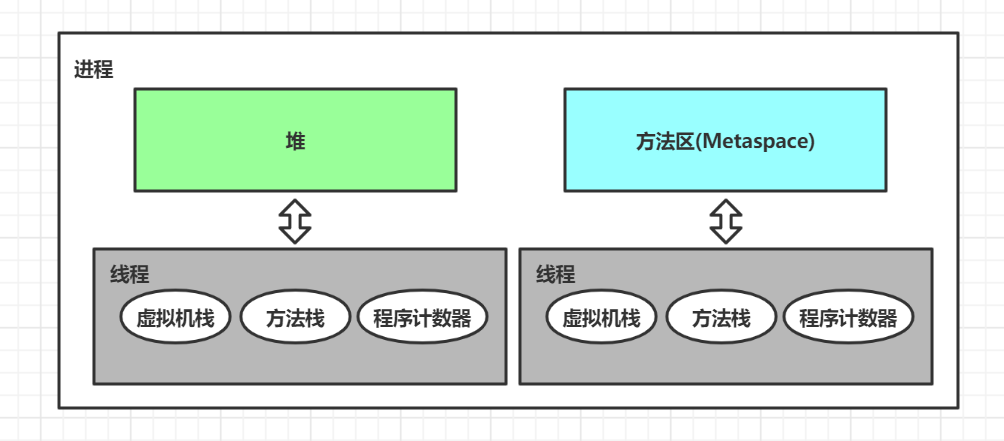
以Java 为例,我们启动一个main函数时,实际上就是启动了一个JVM 的进程,main函数所在的线程就是这个进程的一个线程,也称为主线程。一个JVM进程中有多个线程,多个线程共享进程的堆和方法区资源,但是每个线程有自己的程序计数器和栈区域。
二、从内存角度看线程
内存是非常重要的系统资源,是硬盘和CPU的中间仓库及桥梁,承载着操作系统和应用程序的实时运行。JVM 内存布局规定了 Java 在运行过程中内存申请、分配、管理的策略 ,保证了 JVM 的高效稳定运行。
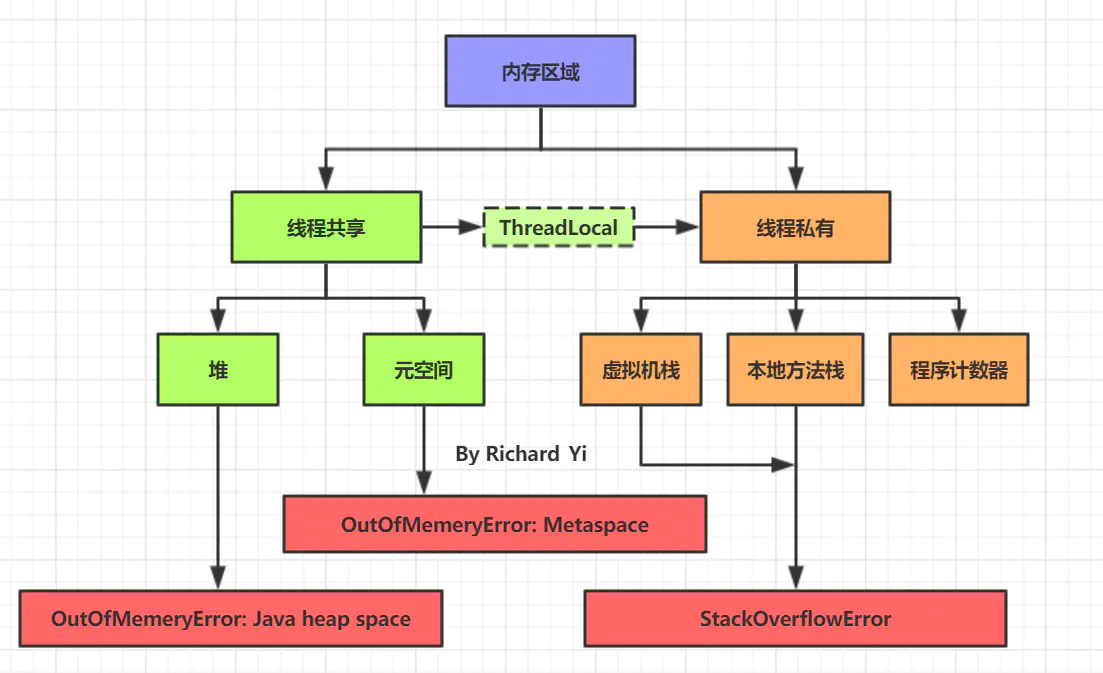
如果按照线程是否共享来分类的话,如下图所示:
三、线程创建和运行
Thread类
这里简单的看一个Thread类的,我们看源码知道Thread实现了Runnable接口:
package java.lang;public class Thread implements Runnable {// 构造方法public Thread() {init(null, null, "Thread-" + nextThreadNum(), 0);}public Thread(String name) {init(null, null, name, 0);}public Thread(Runnable target) {init(null, target, "Thread-" + nextThreadNum(), 0);}public Thread(Runnable target, String name) {init(null, target, name, 0);}public Thread(ThreadGroup group, Runnable target) {init(group, target, "Thread-" + nextThreadNum(), 0);}public Thread(ThreadGroup group, String name) {init(group, null, name, 0);}public Thread(ThreadGroup group, Runnable target, String name) {init(group, target, name, 0);}public Thread(ThreadGroup group, Runnable target, String name, long stackSize) {init(group, target, name, stackSize);}public synchronized void start();}
可见,这八个public类型的构造函数只不过是给init的方法的四个参数分别赋不同的值, 这四个参数分别是:
- ThreadGroup g(线程组)
- Runnable target (Runnable 对象)
- String name (线程的名字)
- long stackSize (为线程分配的栈的大小,若为0则表示忽略这个参数)
而init方法又调用了另一个init方法,设置了AccessController,以及inheritThreadLocals参数:
/*** Initializes a Thread with the current AccessControlContext.* @see #init(ThreadGroup,Runnable,String,long,AccessControlContext,boolean)*/private void init(ThreadGroup g, Runnable target, String name, long stackSize) {init(g, target, name, stackSize, null, true);}//上面那个init方法最终调用了下面这个方法:/*** Initializes a Thread.** @param g the Thread group* @param target the object whose run() method gets called* @param name the name of the new Thread* @param stackSize the desired stack size for the new thread, or* zero to indicate that this parameter is to be ignored.* @param acc the AccessControlContext to inherit, or* AccessController.getContext() if null* @param inheritThreadLocals if {@code true}, inherit initial values for* inheritable thread-locals from the constructing thread*/private void init(ThreadGroup g, Runnable target, String name, long stackSize, AccessControlContext acc, boolean inheritThreadLocals) {...}
init方法中有一些关于线程组和访问控制上下文的设置,这里我们暂时就不深入讨论了。
所以综上来看,我们最常用的也就两个参数:
- Runnable target (Runnable 对象)
- String name (线程的名字)
而对于线程的名字,其默认值为"Thread-" + nextThreadNum(), nextThreadNum方法又是什么呢:
/* For autonumbering anonymous threads. */private static int threadInitNumber;private static synchronized int nextThreadNum() {return threadInitNumber++;}
可见,它就是一个简单的递增计数器,所以如果创建线程时没有指定线程名,那线程名就会是:
Thread-0, Thread-1, Thread-2, Thread-3, …
至此,我们看到,虽然Thread类的构造函数有这么多,但对我们来说真正重要的参数只有一个:Runnable target (Runnable 对象)
Runnable 接口定义如下
package java.lang;@FunctionalInterfacepublic interface Runnable {pubic abstract void run();}
它只有一个抽象方法run方法,而且该接口被@FunctionalInterface修饰,说明该接口是一个函数式的接口,这就意味着我们可以使用Lambda表达式的方式创建Runnable接口的实例。
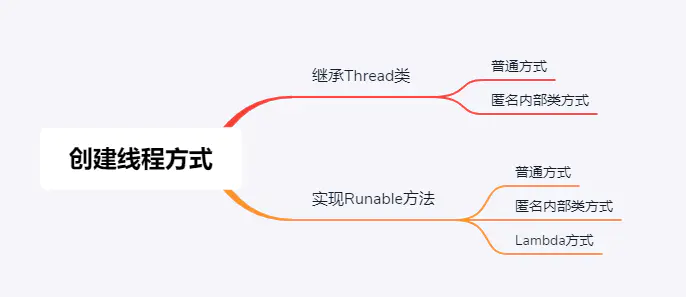
3.1 继承Thread类
其实现继承关系图为:Thread 实现了Runnbale接口,并重写了Run

其中target是一个Runnable对象,使用继承的方式target为null不会调用此方法

继承的创建线程:
(Thread类中的空参数的构造函数就是为了继承的方式)
public class ThreadDemo01 extends Thread {@Overridepublic void run() {super.run();System.out.println("MyThread");}public static void main(String[] args) {ThreadDemo01 thread1 = new ThreadDemo01();thread1.start();}}
我们自己的MyThread线程类继承Thread,重写run方法,这里使用到了Thread的空参构造函数,如果没有Thread的空参构造函数这里是不能创建ThreadDemo01子对象的。
3.2 继承Thread匿名内部类的写法
public class ThreadDemo2 {public static void main(String[] args) {// 初始化线程实例new Thread() {@Overridepublic void run() {System.out.println(getName() + " is running");}}.start();}}
这种方式主要是Thread接口的构造函数的区分,当target不为空的时候,会执行匿名内部类里面的run方法

3.3 实现Runnable方法

基于两个参数的构造函数:
public class CreateThreadDemo3{public static void main(String[] args) {RunnableThreadTest runnableThreadTest = new RunnableThreadTest();new Thread(runnableThreadTest, "线程1").start();new Thread(runnableThreadTest, "线程2").start();}}/*** 实现Runnable接口的方式*/class RunnableThreadTest implements Runnable{private int i = 0;@Overridepublic void run() {for (; i < 100; i++) {System.out.println(Thread.currentThread().getName() + " is running: " + i);}}}
3.4 实现Runable接口匿名内部类的方式
public class ThreadDemo2 {public static void main(String[] args) {// 初始化线程实例Thread thread = new Thread(new Runnable() {@Overridepublic void run() {System.out.println("匿名内部类...");}});thread.start();}}
简化java8的形式
public class ThreadDemo2 {public static void main(String[] args) {// 初始化线程实例Thread thread = new Thread(() -> System.out.println("匿名内部类..."));thread.start();}}
3.5 继承Callable接口创建线程
和Runnable接口不一样,Callable接口提供了一个call()方法作为线程执行体,call()方法比run()方法功能要强大:call()方法可以有返回值,可以声明抛出异常。
public class ThreadDemo5 {public static void main(String[] args) {CallableTest callableTest = new CallableTest();FutureTask futureTask = new FutureTask<>(callableTest);new Thread(futureTask).start();try {System.out.println("子线程返回值:" + futureTask.get());} catch (InterruptedException e) {e.printStackTrace();} catch (ExecutionException e) {e.printStackTrace();}}}class CallableTest implements Callable{@Overridepublic Integer call() throws Exception {int sum = 0;for (int i = 0; i < 100; i++) {sum += i;}System.out.println(Thread.currentThread().getName() + "running: " + sum);return sum;}}
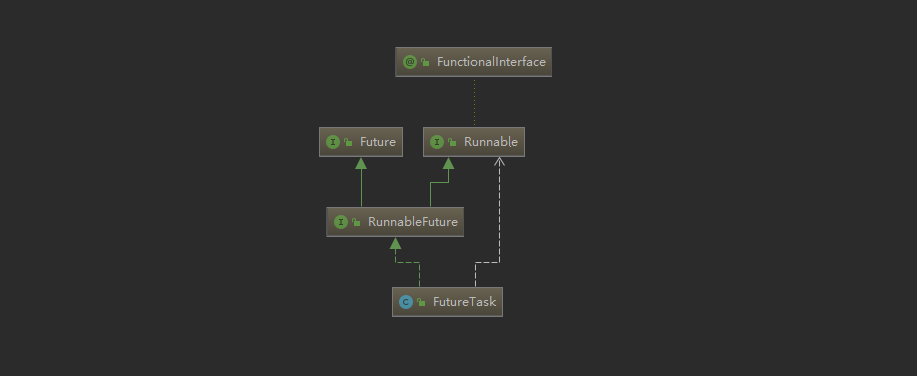
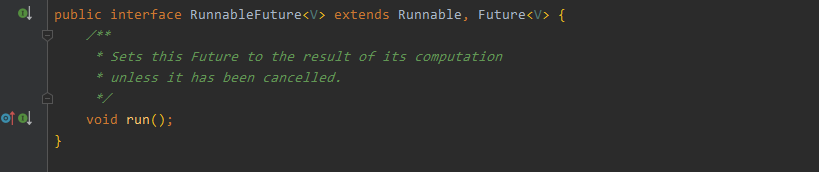
Java5提供了Future接口来接收Callable接口中call()方法的返回值。 Callable接口是 Java5 新增的接口,不是Runnable接口的子接口,所以Callable对象不能直接作为Thread对象的target。
针对这个问题,引入了RunnableFuture接口,RunnableFuture接口是Runnable接口和Future接口的子接口(下图所示),可以作为Thread对象的target (实现RunnableFuture接口的子类可以作为Thread的target)。同时,Java5提供了一个RunnableFuture接口的实现类:FutureTask ,FutureTask可以作为Thread对象的target。
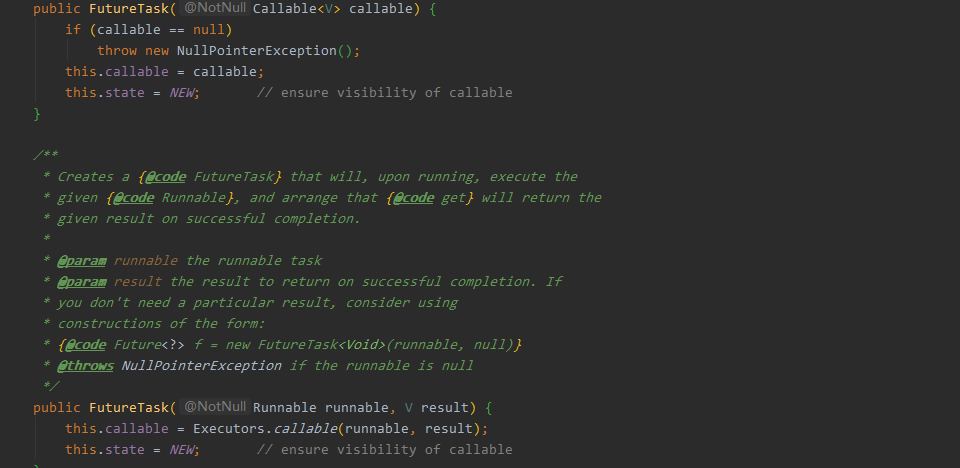
看一下FutrueTask的实现,可以看出FutureTask即支持实现Callable接口的子类,也支持Runnable接口的子类,并且当传过来的是Runnable接口的时候,会执行Executors的callable方法转化为callable接口的,执行的。
至于Future接口的原理,在后面的文章中再作分析,现在只是知道线程的创建方式。
四、创建线程的三种方式的对比
4.1 实现Runnable/Callable接口相比继承Thread类的优势
总体来说一般的业务代码中都是采用实现Runnable接口或者是Callable接口
- 可以避免java中单继承的限制
- 适合多个线程进行资源共享
- 线程池只能放入Runable或Callable接口实现类,不能直接放入继承Thread的类
4.2 Callable和Runnable的区别
- Callable重写的是call()方法,Runnable重写的方法是run()方法
- call()方法执行后可以有返回值,run()方法没有返回值
- call()方法可以抛出异常,run()方法不可以
- 运行Callable任务可以拿到一个Future对象,表示异步计算的结果 。通过Future对象可以了解任务执行情况,可取消任务的执行,还可获取执行结果
五、启动线程
线程对象创建完了之后,接下来就是启动一个线程,在java中,启动一个线程必须调用线程的start方法:
/*** Causes this thread to begin execution; the Java Virtual Machine* calls the <code>run</code> method of this thread.* <p>* The result is that two threads are running concurrently: the* current thread (which returns from the call to the* <code>start</code> method) and the other thread (which executes its* <code>run</code> method).* <p>* It is never legal to start a thread more than once.* In particular, a thread may not be restarted once it has completed* execution.** @exception IllegalThreadStateException if the thread was already* started.* @see #run()* @see #stop()*/public synchronized void start() {/*** This method is not invoked for the main method thread or "system"* group threads created/set up by the VM. Any new functionality added* to this method in the future may have to also be added to the VM.** A zero status value corresponds to state "NEW".*/if (threadStatus != 0)throw new IllegalThreadStateException();/* Notify the group that this thread is about to be started* so that it can be added to the group's list of threads* and the group's unstarted count can be decremented. */group.add(this);boolean started = false;try {start0();started = true;} finally {try {if (!started) {group.threadStartFailed(this);}} catch (Throwable ignore) {/* do nothing. If start0 threw a Throwable thenit will be passed up the call stack */}}}private native void start0()
这个方法本质是调用了native的start0()方法,但是它的注释部分说明一些很重要的信息:
这个方法使得线程开始执行,并由JVM来执行这个线程的run方法,结果就是有两个线程在并发执行,一个是当前线程,也就是调用了Thread#start方法的线程,另一个线程就是当前thread对象代表的线程,它执行了run方法。
也就是说,这个Thread类实例代表的线程最终会执行它的run方法,而上面的分析中我们知道,它的run做的事就是调用Runnable对象的run方法,如果Runnable对象为null, 就啥也不做:
@Overridepublic void run() {if (target != null) {target.run();}}
有的同学就要问了,绕了一大圈,忙了大半天,最后不就是为了执行target对象的run方法吗?为什么我们不直接调用target的run方法?这一层层的调用究竟是为了啥? 答案是:
为了使用多线程 !
我们知道,Thread类从定义上看就是个普通的java类,是什么魔法让它从一个普通的java类晋升为一个可以代表线程的类呢?是native方法!
如果我们直接调用target对象的run方法,或者Thread类的run方法,那就是一个普通调用,因为run方法就是普普通通的类方法,与我们平时调用的其他类方法没有什么不同,这并不会产生多线程。
但是,如果我们调用了start方法,由于它内部使用了native方法来启动线程,它将导致一个新的线程被创建出来, 而我们的Thread实例, 就代表了这个新创建出来的线程, 并且由这个新创建出来的线程来执行Thread实例的run方法。
5.1 继承Thread类,覆写run方法
首先我们自定义一个继承自Thread的类,并覆写run方法:
public class CustomizedThread extends Thread {public void run() {System.out.println("[" + Thread.currentThread().getName() + "线程]: " + "我是定义在CustomizedThread类中的run方法。");}}
然后我们创建类的实例,并调用start方法启动这个线程:
public class CustomizedThreadTest {public static void main(String[] args) {System.out.println("[" + Thread.currentThread().getName() + "线程]: " + "我在main方法里");CustomizedThread myThread = new CustomizedThread();myThread.start();}}
执行结果: :::info
[main线程]: 我在main方法里[Thread-0线程]: 我是定义在CustomizedThread类中的run方法。
:::
可见,这里有两个线程,一个是main线程,它执行了main方法,一个是Thread-0线程,它是我们自定义的线程,它执行了run方法。
如果我们不通过start方法来运行线程会有什么不同呢:
public class CustomizedThreadTest {public static void main(String[] args) {System.out.println("[" + Thread.currentThread().getName() + "线程]: " + "我在main方法里");CustomizedThread myThread = new CustomizedThread();//myThread.start();myThread.run();}}
这里我们直接调用自定义线程的run方法,看看结果有什么不同:
:::info
[main线程]: 我在main方法里
[main线程]: 我是定义在CustomizedThread类中的run方法。
:::
可见,这次只有一个main线程,由main线程执行了我们自定义线程类的run方法,并没有新的线程产生。 其实这个时候,CustomizedThread的run方法就是一个普普通通的类的普普通通的方法,与我们平时定义的方法并没有什么特别之处。
有的同学要问了,上面不是说创建一个线程最重要的是传入一个Runnable对象吗? 我没有看到Runnable对象啊? 别急,我们来分析一下:
首先,我们的CustomizedThread继承自Thread类,则我们会调用父类的无参构造函数:
public Thread() {init(null, null, "Thread-" + nextThreadNum(), 0);}
这个构造函数中,target对象为null;
然后,我们使用了myThread.start(),因为我们在子类中没有定义start方法,所以,这个方法来自父类,而Thread类的start方法的作用我们已经讲过,它将新建一个线程,并调用它的run方法,这个新建的线程的抽象代表就是我们的CustomizedThread,所以它的(CustomizedThread的)run方法将会被调用。
那么,如果我们的子类没有覆写run方法呢?,那自然是继承Thread类自己的run方法了:
@Overridepublic void run() {if (target != null) {target.run();}}
而Thread类的run方法调用的又是target对象的run方法,而target对象现在为null, 所以这个方法啥也不做。
所以到这里我们就很清晰了,创建一个线程最重要的是定义一个run方法,这个run方法要么通过继承Thread类的子类覆写,要么通过直接构造Thread类时传入一个Runnable的target对象。无论它由子类覆写提供还是由target对象提供,start方法最终都会新建一个线程来执行这个run方法。
**
六、ThreadGroup
线程组(ThreadGroup)简单来说就是一个线程集合。线程组的出现是为了更方便地管理线程。
Java API提供了一个线程组类ThreadGroup,这个类提供了一些方法可以让我们方便地对加入这个线程组的多个线程进行操作
想使用线程组首先需要实例化一个线程组对象,并把创建的线程加入到这个线程组中。
ThreadGroup group = new ThreadGroup("Searcher");Thread thread = new Thread(group, Runnable r);
查看Thread的源代码,我们发现在初始化Thread线程对象后,只是把ThreadGroup对象赋值给Thread类的group属性,只有当调用start()方法启动线程的时候,才真正的把线程加入到了线程组中。
/* The group of this thread */private ThreadGroup group;private void init(ThreadGroup g, Runnable target, String name,long stackSize, AccessControlContext acc) {...this.group = g;...)public synchronized void start() {...group.add(this);...)
当我们在创建一个线程的时候,如果没有把设置线程组,那么会执行怎么样的操作呢?
/*** Initializes a Thread.** @param g the Thread group* @param target the object whose run() method gets called* @param name the name of the new Thread* @param stackSize the desired stack size for the new thread, or* zero to indicate that this parameter is to be ignored.* @param acc the AccessControlContext to inherit, or* AccessController.getContext() if null* @param inheritThreadLocals if {@code true}, inherit initial values for* inheritable thread-locals from the constructing thread*/private void init(ThreadGroup g, Runnable target, String name,long stackSize, AccessControlContext acc,boolean inheritThreadLocals) {if (name == null) {throw new NullPointerException("name cannot be null");}this.name = name;Thread parent = currentThread();SecurityManager security = System.getSecurityManager();if (g == null) {/* Determine if it's an applet or not *//* If there is a security manager, ask the security managerwhat to do. */if (security != null) {g = security.getThreadGroup();}/* If the security doesn't have a strong opinion of the matteruse the parent thread group. */if (g == null) {g = parent.getThreadGroup();}}....}
从上述的代码中可以看到当我们在创建线程的时候如果,没有自己显示的设置线程组,那么会把parent的ThreadGroup获取到,此时的parent又是 parent = currentThread() ,而currentThread是创建该线程的线程。此时子线程和父线程会在同一个ThreadGroup中
public class CurrentThread{public static void main(String[] args){Thread t =new Threa();t.start();System.out.println(Thread.currentThread().getName()); // 输出main}}
6.1 ThreadGroup API
先定义一个Runnable类,在这个类中我们让线程休眠一个随机时间,如果在这个休眠时间内线程被中断那么打印中断信息,然后结束线程。如果线程成功执行完毕那么打印线程结束信息。
public class MyRunnable implements Runnable {@Overridepublic void run() {Random random = new Random(new Date().getTime());int value = (int)(random.nextDouble() * 100);System.out.printf("%s: Started and sleep %ds.\n", Thread.currentThread().getName(), value);try {TimeUnit.SECONDS.sleep(value);} catch (InterruptedException e) {System.out.printf("%s: Interrupted.\n", Thread.currentThread().getName());return;}System.out.printf("%s: End.\n", Thread.currentThread().getName());}}
定义主方法类,我们创建10个线程并加入到线程组中。
public class Main {public static void main(String[] args) {ThreadGroup group = new ThreadGroup("ThreadGroup");for (int i = 0; i < 10; i++) {Thread thread = new Thread(group, new MyRunnable());thread.start();try {TimeUnit.MILLISECONDS.sleep(500);} catch (InterruptedException e) {e.printStackTrace();}}//获取线程组中线程数量,并打印每一个线程信息。System.out.printf("%s: Number of threads is %s.\n", Thread.currentThread().getName(), group.activeCount());group.list();//使用一个线程数组接收线程组中的所有线程Thread[] threads = new Thread[group.activeCount()];group.enumerate(threads);for (int i = 0; i < threads.length; i++) {System.out.printf("%s - %s\n", threads[i].getName(), threads[i].getState());}//等待第一个线程结束,然后中断剩余所有线程while (group.activeCount() > 9) {try {TimeUnit.SECONDS.sleep(1);} catch (InterruptedException e) {e.printStackTrace();}}group.interrupt();}}
查看控制台日志来对ThreadGroup类的相关方法做一个解释。
首先创建并启动线程,线程内部打印启动信息:
Thread-0: Started and sleep 37s.Thread-1: Started and sleep 33s.Thread-2: Started and sleep 28s.Thread-3: Started and sleep 13s.Thread-4: Started and sleep 9s.Thread-5: Started and sleep 12s.Thread-6: Started and sleep 7s.Thread-7: Started and sleep 2s.Thread-8: Started and sleep 34s.Thread-9: Started and sleep 30s.
接下来调用了ThreadGroup.activeCount()获取了线程组内的线程数量,并调用ThreadGroup.list()打印线程组内线程信息。
main: Number of threads is 10.java.lang.ThreadGroup[name=ThreadGroup,maxpri=10]Thread[Thread-0,5,ThreadGroup]Thread[Thread-1,5,ThreadGroup]Thread[Thread-2,5,ThreadGroup]Thread[Thread-3,5,ThreadGroup]Thread[Thread-4,5,ThreadGroup]Thread[Thread-5,5,ThreadGroup]Thread[Thread-6,5,ThreadGroup]Thread[Thread-7,5,ThreadGroup]Thread[Thread-8,5,ThreadGroup]Thread[Thread-9,5,ThreadGroup]
下面调用ThreadGroup.enumerate(threads)方法用一个线程数组来接收线程组内的线程,并打印线程状态
Thread-0 - TIMED_WAITINGThread-1 - TIMED_WAITINGThread-2 - TIMED_WAITINGThread-3 - TIMED_WAITINGThread-4 - TIMED_WAITINGThread-5 - TIMED_WAITINGThread-6 - TIMED_WAITINGThread-7 - TIMED_WAITINGThread-8 - TIMED_WAITINGThread-9 - TIMED_WAITING
最后我们等待第一个完成的线程后,利用ThreadGroup.interrupt()中断剩余所有线程。
Thread-7: End.Thread-0: Interrupted.Thread-2: Interrupted.Thread-1: Interrupted.Thread-9: Interrupted.Thread-8: Interrupted.Thread-4: Interrupted.Thread-5: Interrupted.Thread-6: Interrupted.Thread-3: Interrupted.
七、StackSize
Thread的stackSize与-Xss参数都可以控制某个线程的栈内存大小,它们的区别你知道吗?当这两个配置同时存在时,以哪个为准?
7.1 Thread 的 stackSize
Thread的 stackSize 是什么?
- 在Thread的构造器中可以传入stackSize参数。如果不传的话,默认是0。它的作用是控制jvm给线程分配栈内存的大小。
- stackSize与栈深度(stack height,就是方法内调方法的套嵌层数)和同时存在的线程数的关系是与JVM平台相关的,有些平台这个参数无效。具体怎么实现由JVM决定。
- 在HostSpotVM中,值较大时可能会加大线程内栈的深度;值较小时可能加大同时存在的线程数,以避免出现OutOfMemoryError(或者其他Error)
- 如果这个值比JVM规定的最小值还小的话,取JVM的默认值,一般是1M
- 这个值我尝试过最大的设置为2G-1,栈深度达到1.3亿才溢出,所以说我没有找到这个值的上限,但是我觉得一个线程分配2G已经是很变态了。
- 当然栈深度也与栈帧的大小有关,栈深度=stackSize/平均栈帧大小。
7.2 JVM参数-Xss
JVM的-Xss参数也是控制单个栈内存大小的参数7.3 区别
- -Xss是全局的,也就是所有线程共同的设置,当不设置时有默认值,一般为1M。而stackSize是某个线程的属性,只作用在某个线程上。
- 当设置stackSize属于<=0 时,以-Xss为准(一般设置为0即可,java提供的DefaultThreadFactory就是设置的0)。
- 当设置stackSize属于(0, 4k]区间时,设置的-Xss会失效,栈空间取默认值1M。这一点特别容易搞错!
- 当设置stackSize属于(4k, 64k]区间时,设置的-Xss会失效,栈空间取4k。
- 当设置stackSize属于(64k, 128k]区间时,设置的-Xss会失效,栈空间取64k。
- 当设置stackSize属于 >128k 时,设置的-Xss会失效,栈空间取stackSize本身
参考文章
https://juejin.im/post/5d9ab5dae51d4578453274ba
https://juejin.im/post/5ab116875188255561411b8a#heading-29
https://segmentfault.com/a/1190000016029782
https://segmentfault.com/a/1190000020802783

若有收获,就点个赞吧
0 人点赞
