⽹关(翻译过来就叫做GateWay):微服务架构中的重要组成部分
局域⽹中就有⽹关这个概念,局域⽹接收或者发送数据出去通过这个⽹关,⽐如⽤Vmware虚拟机软件搭建虚拟机集群的时候,往往我们需要选择IP段中的⼀个IP作为⽹关地址。
我们学习的GateWay—>Spring Cloud GateWay(它只是众多⽹关解决⽅案中的⼀种)
5.1 GateWay简介
Spring Cloud GateWay是Spring Cloud的⼀个全新项⽬,⽬标是取代Netflflix Zuul,它基于Spring5.0+SpringBoot2.0+WebFlux(基于⾼性能的Reactor模式响应式通信框架Netty,异步⾮阻塞模型)等技术开发,性能⾼于Zuul,官⽅测试,GateWay是Zuul的1.6倍,旨在为微服务架构提供⼀种简单有效的统⼀的API路由管理⽅式。
Spring Cloud GateWay不仅提供统⼀的路由⽅式(反向代理)并且基于 Filter(定义过滤器对请求过滤,完成⼀些功能) 链的⽅式提供了⽹关基本的功能,例如:鉴权、流量控制、熔断、路径重写、⽇志监控等。
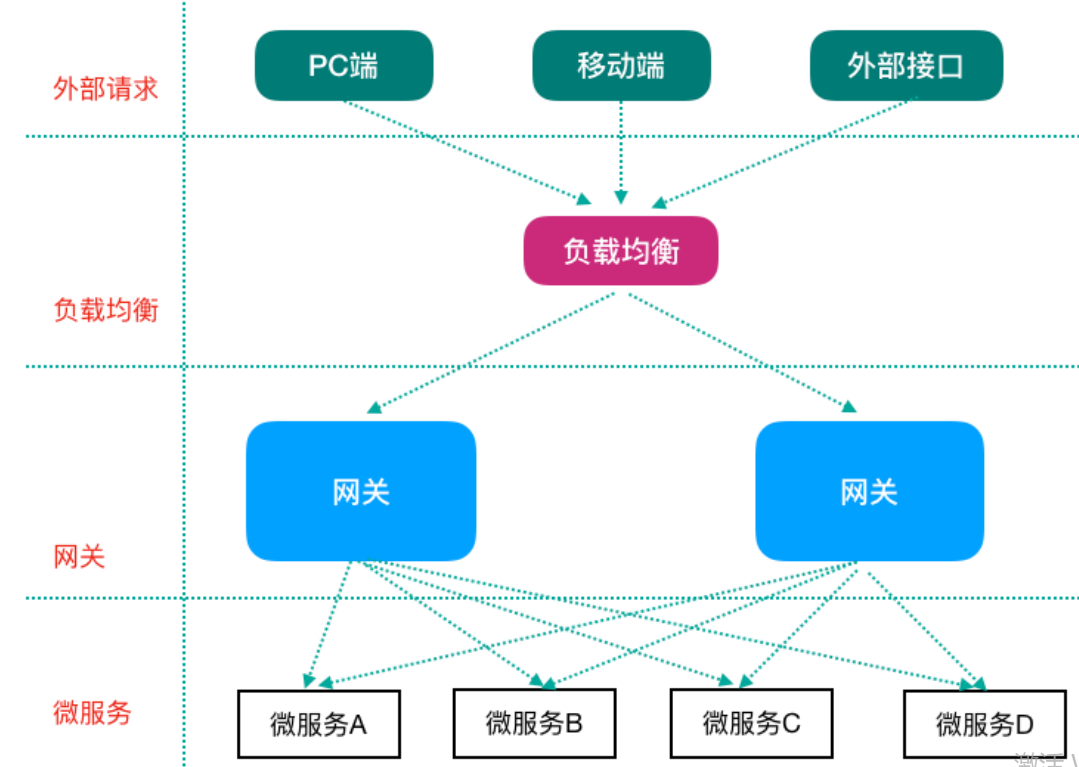
⽹关在架构中的位置
**
5.2 GateWay核⼼概念
Zuul1.x 阻塞式IO 2.x 基于Netty
Spring Cloud GateWay天⽣就是异步⾮阻塞的,基于Reactor模型
⼀个请求—>⽹关根据⼀定的条件匹配—匹配成功之后可以将请求转发到指定的服务地址;⽽在这个过程中,我们可以进⾏⼀些⽐较具体的控制(限流、⽇志、⿊⽩名单)
- 路由(route): ⽹关最基础的部分,也是⽹关⽐较基础的⼯作单元。路由由⼀个ID、⼀个⽬标URL(最终路由到的地址)、⼀系列的断⾔(匹配条件判断)和Filter过滤器(精细化控制)组成。如果断⾔为true,则匹配该路由。
- 断⾔(predicates):参考了Java8中的断⾔java.util.function.Predicate,开发⼈员可以匹配Http请求中的所有内容(包括请求头请求参数等)(类似于nginx中的location匹配⼀样),如果断⾔与请求相匹配则路由。
- 过滤器(fifilter):⼀个标准的Spring webFilter,使⽤过滤器,可以在请求之前或者之后执⾏业务逻辑。
来⾃官⽹的⼀张图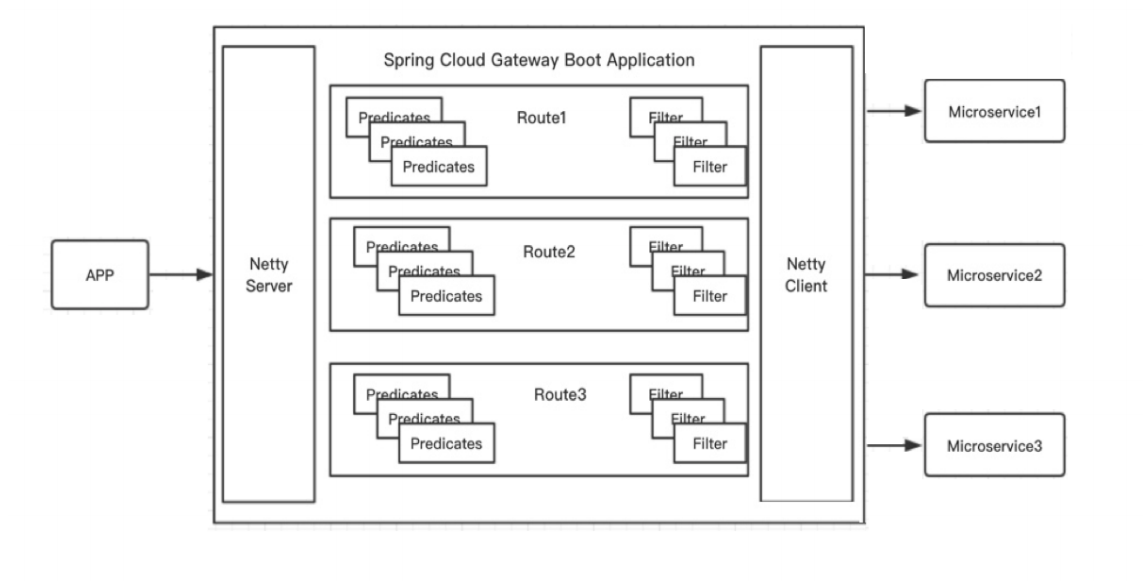

其中,Predicates断⾔就是我们的匹配条件,⽽Filter就可以理解为⼀个⽆所不能的拦截器,有了这两个元素,结合⽬标URL,就可以实现⼀个具体的路由转发。
5.3 GateWay⼯作过程(How It Works)
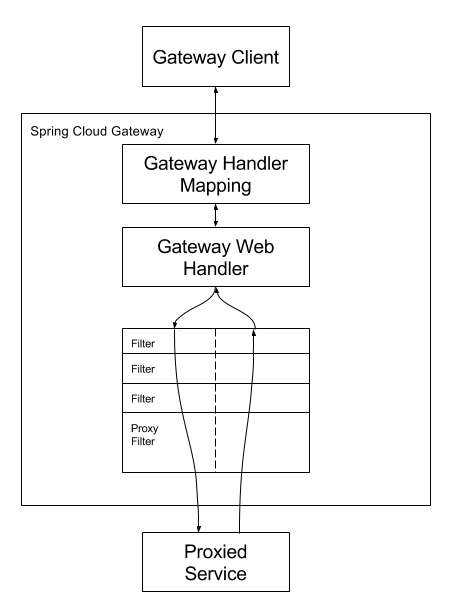
来⾃官⽅的描述图
客户端向Spring Cloud GateWay发出请求,然后在GateWay Handler Mapping中找到与请求相匹配的路由,将其发送到GateWay Web Handler;Handler再通过指定的过滤器链来将请求发送到我们实际的服务执⾏业务逻辑,然后返回。过滤器之间⽤虚线分开是因为过滤器可能会在发送代理请求之前(pre)或者之后(post)执⾏业务逻辑。
Filter在“pre”类型过滤器中可以做参数校验、权限校验、流量监控、⽇志输出、协议转换等,在“post”类型的过滤器中可以做响应内容、响应头的修改、⽇志的输出、流量监控等。
GateWay核⼼逻辑:路由转发+执⾏过滤器链
5.2 GateWay应⽤
使⽤⽹关对⾃动投递微服务进⾏代理(添加在它的上游,相当于隐藏了具体微服务的信息,对外暴露的是⽹关)
创建⼯程lagou-cloud-gateway-server-9002导⼊依赖
GateWay不需要使⽤web模块,它引⼊的是WebFlux(类似于SpringMVC)
<?xml version="1.0" encoding="UTF-8"?><project xmlns="http://maven.apache.org/POM/4.0.0"xmlns:xsi="http://www.w3.org/2001/XMLSchema-instance"xsi:schemaLocation="http://maven.apache.org/POM/4.0.0 http://maven.apache.org/xsd/maven-4.0.0.xsd"><modelVersion>4.0.0</modelVersion><artifactId>lagou-cloud-gateway-9002</artifactId><!--spring boot 父启动器依赖--><parent><groupId>org.springframework.boot</groupId><artifactId>spring-boot-starter-parent</artifactId><version>2.1.6.RELEASE</version></parent><dependencies><dependency><groupId>org.springframework.cloud</groupId><artifactId>spring-cloud-commons</artifactId></dependency><dependency><groupId>org.springframework.cloud</groupId><artifactId>spring-cloud-starter-netflix-eureka-client</artifactId></dependency><!--GateWay 网关--><dependency><groupId>org.springframework.cloud</groupId><artifactId>spring-cloud-starter-gateway</artifactId></dependency><!--引入webflux--><dependency><groupId>org.springframework.boot</groupId><artifactId>spring-boot-starter-webflux</artifactId></dependency><!--日志依赖--><dependency><groupId>org.springframework.boot</groupId><artifactId>spring-boot-starter-logging</artifactId></dependency><!--测试依赖--><dependency><groupId>org.springframework.boot</groupId><artifactId>spring-boot-starter-test</artifactId><scope>test</scope></dependency><!--lombok工具--><dependency><groupId>org.projectlombok</groupId><artifactId>lombok</artifactId><version>1.18.4</version><scope>provided</scope></dependency><!--引入Jaxb,开始--><dependency><groupId>com.sun.xml.bind</groupId><artifactId>jaxb-core</artifactId><version>2.2.11</version></dependency><dependency><groupId>javax.xml.bind</groupId><artifactId>jaxb-api</artifactId></dependency><dependency><groupId>com.sun.xml.bind</groupId><artifactId>jaxb-impl</artifactId><version>2.2.11</version></dependency><dependency><groupId>org.glassfish.jaxb</groupId><artifactId>jaxb-runtime</artifactId><version>2.2.10-b140310.1920</version></dependency><dependency><groupId>javax.activation</groupId><artifactId>activation</artifactId><version>1.1.1</version></dependency><!--引入Jaxb,结束--><!-- Actuator可以帮助你监控和管理Spring Boot应用--><dependency><groupId>org.springframework.boot</groupId><artifactId>spring-boot-starter-actuator</artifactId></dependency><!--热部署--><dependency><groupId>org.springframework.boot</groupId><artifactId>spring-boot-devtools</artifactId><optional>true</optional></dependency><!--链路追踪--><!--<dependency><groupId>org.springframework.cloud</groupId><artifactId>spring-cloud-starter-sleuth</artifactId></dependency>--></dependencies><dependencyManagement><!--spring cloud依赖版本管理--><dependencies><dependency><groupId>org.springframework.cloud</groupId><artifactId>spring-cloud-dependencies</artifactId><version>Greenwich.RELEASE</version><type>pom</type><scope>import</scope></dependency></dependencies></dependencyManagement><build><plugins><!--编译插件--><plugin><groupId>org.apache.maven.plugins</groupId><artifactId>maven-compiler-plugin</artifactId><configuration><source>11</source><target>11</target><encoding>utf-8</encoding></configuration></plugin><!--打包插件--><plugin><groupId>org.springframework.boot</groupId><artifactId>spring-boot-maven-plugin</artifactId></plugin></plugins></build></project>
注意:不要引⼊starter-web模块,需要引⼊web-flflux
application.yml 配置⽂件部分内容
server:
  port: 9002
eureka:
  client:
    serviceUrl: # eureka server的路径
      defaultZone: http://localhost:8761/eureka/,http://localhost:8762/eureka/ #把 eureka 集群中的所有 url 都填写了进来,也可以只写一台,因为各个 eureka server 可以同步注册表
  instance:
    #使用ip注册,否则会使用主机名注册了(此处考虑到对老版本的兼容,新版本经过实验都是ip)
    prefer-ip-address: true
    #自定义实例显示格式,加上版本号,便于多版本管理,注意是ip-address,早期版本是ipAddress
    instance-id: ${spring.cloud.client.ip-address}:${spring.application.name}:${server.port}:@project.version@
spring:
  application:
  name: lagou-cloud-gateway
  cloud:
    gateway:
      routes: # 路由可以有多个
        - id: service-autodeliver-router # 我们自定义的路由 ID,保持唯一
          #uri: http://127.0.0.1:8096  # 目标服务地址  自动投递微服务(部署多实例)  动态路由:uri配置的应该是一个服务名称,而不应该是一个具体的服务实例的地址
          uri: lb://lagou-service-autodeliver                                                                    # gateway网关从服务注册中心获取实例信息然后负载后路由
          predicates:                                         # 断言:路由条件,Predicate 接受一个输入参数,返回一个布尔值结果。该接口包含多种默 认方法来将 Predicate 组合成其他复杂的逻辑(比如:与,或,非)。
            - Path=/autodeliver/**
        - id: service-resume-router      # 我们自定义的路由 ID,保持唯一
          #uri: http://127.0.0.1:8081       # 目标服务地址
          #http://localhost:9002/resume/openstate/1545132

          #http://127.0.0.1:8081/openstate/1545132
          uri: lb://lagou-service-resume
          predicates:                                         # 断言:路由条件,Predicate 接受一个输入参数,返回一个布尔值结果。该接口包含多种默 认方法来将 Predicate 组合成其他复杂的逻辑(比如:与,或,非)。
            - Path=/resume/**
          filters:
            - StripPrefix=1
上⾯这段配置的意思是,配置了⼀个 id 为 service-autodeliver-router 的路由规则,当向⽹关发起请求 http://localhost:9002/autodeliver/checkAndBegin/1545132,请求会被分发路由到对应的微服务上
5.3 GateWay路由规则详解
Spring Cloud GateWay 帮我们内置了很多 Predicates功能,实现了各种路由匹配规则(通过Header、请求参数等作为条件)匹配到对应的路由。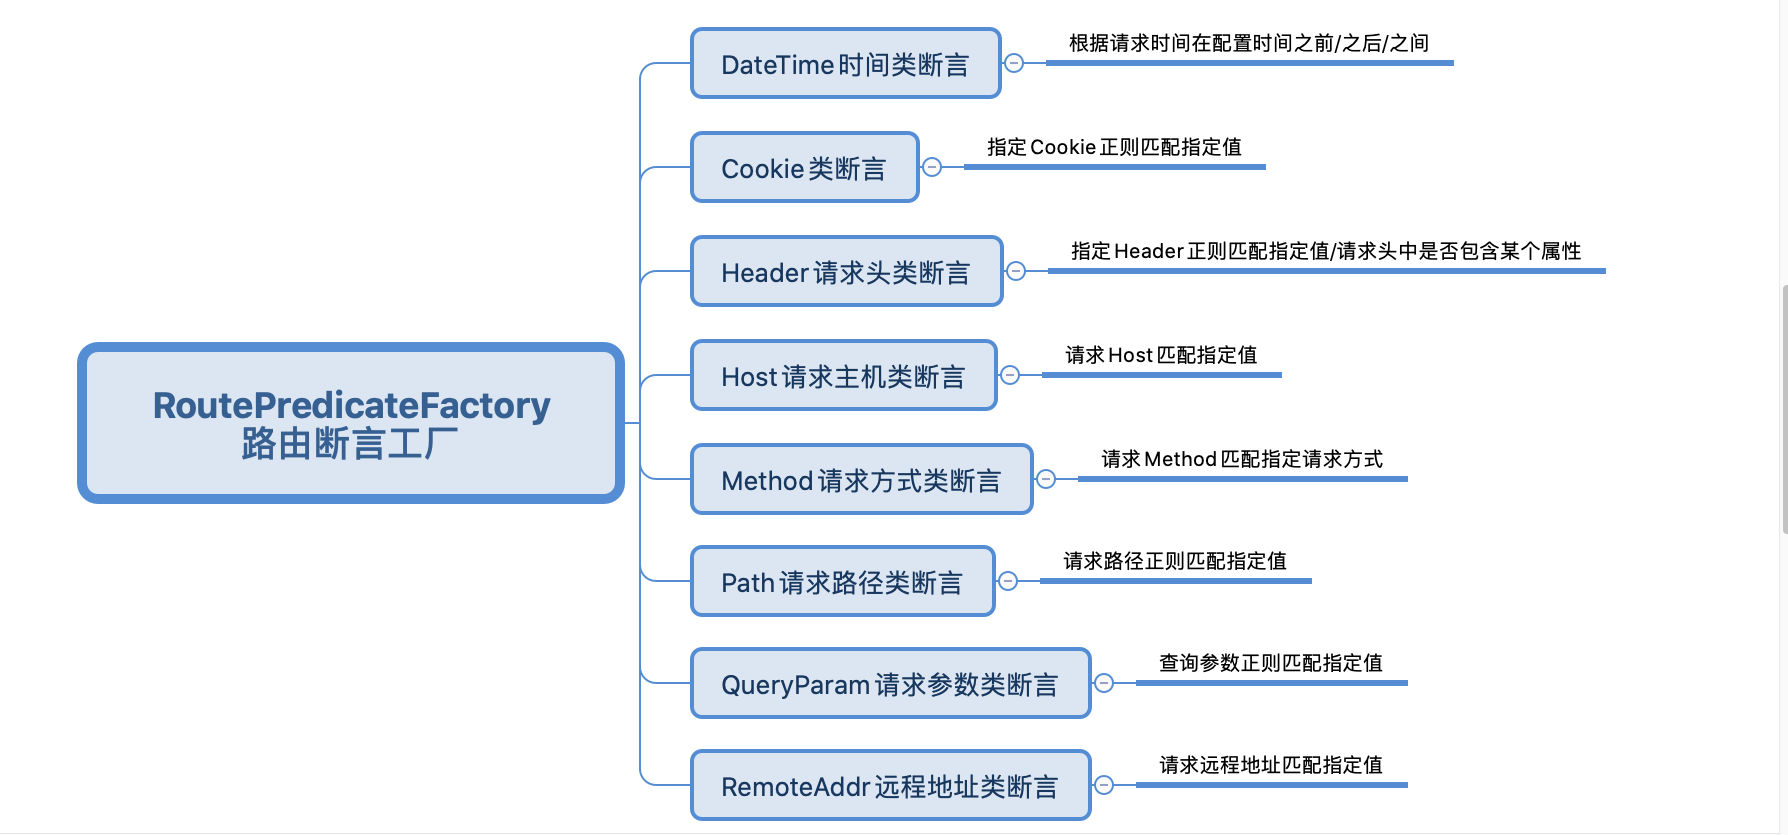
时间点后匹配
spring:
 cloud:
  gateway:
   routes:
    - id: after_route
      uri: https://example.org
      predicates:
       - After=2017-01-20T17:42:47.789-07:00[America/Denver]
时间点前匹配
spring:
 cloud:
  gateway:
   routes:
    - id: before_route
      uri: https://example.org
      predicates:
       - Before=2017-01-20T17:42:47.789-07:00[America/Denver]
时间区间匹配
spring:
 cloud:
  gateway:
   routes:
    - id: between_route
      uri: https://example.org
      predicates:
       -  Between=2017-01-20T17:42:47.789-07:00[America/Denver], 2017-01-21T17:42:47.789-07:00[America/Denver]
指定Cookie正则匹配指定值
spring:
 cloud:
  gateway:
   routes:
    - id: cookie_route
      uri: https://example.org
      predicates:
       - Cookie=chocolate, ch.p
指定Header正则匹配指定值
spring:
 cloud:
  gateway:
   routes:
    - id: header_route
      uri: https://example.org
      predicates:
       - Header=X-Request-Id, \d+
请求Host匹配指定值
spring:
 cloud:
  gateway:
   routes:
    - id: host_route
      uri: https://example.org
      predicates:
       - Host=**.somehost.org,**.anotherhost.org
请求Method匹配指定请求⽅式
spring:
 cloud:
  gateway:
   routes:
    - id: host_route
      uri: https://example.org
      predicates:
       - Method=GET,POST
请求路径正则匹配
spring:
 cloud:
  gateway:
   routes:
    - id: path_route
      uri: https://example.org
      predicates:
       - Path=/red/{segment},/blue/{segment}
请求包含某参数
spring:
 cloud:
  gateway:
   routes:
    - id: query_route
      uri: https://example.org
      predicates:
       - Query=green
请求包含某参数并且参数值匹配正则表达式
spring:
 cloud:
  gateway:
   routes:
    - id: query_route
      uri: https://example.org
      predicates:
       - Query=red, gree.
远程地址匹配
spring:
 cloud:
  gateway:
   routes:
    - id: remoteaddr_route
      uri: https://example.org
      predicates:
       - RemoteAddr=192.168.1.1/24
5.4 GateWay动态路由详解
GateWay⽀持⾃动从注册中⼼中获取服务列表并访问,即所谓的动态路由
实现步骤如下
1)pom.xml中添加注册中⼼客户端依赖(因为要获取注册中⼼服务列表,eureka客户端已经引⼊)
2)动态路由配置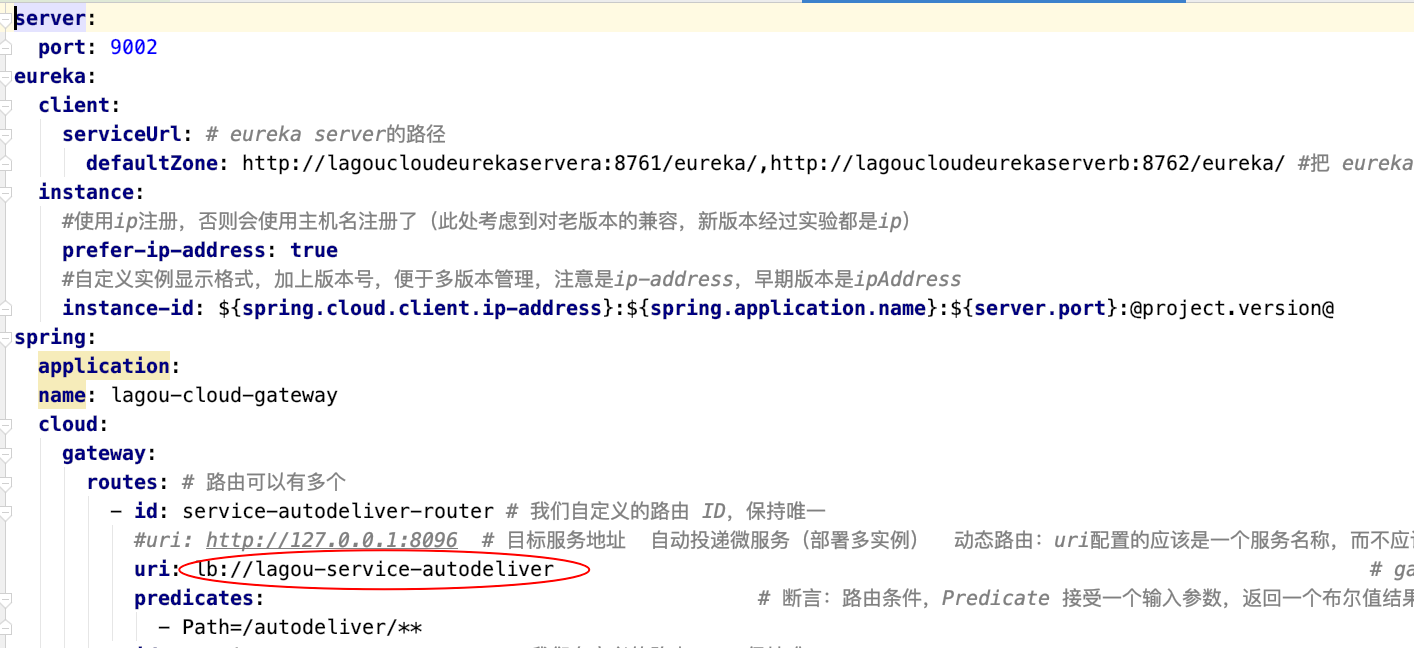
注意:动态路由设置时,uri以 lb: //开头(lb代表从注册中⼼获取服务),后⾯是需要转发到的服务名称
5.5 GateWay过滤器
5.5.1 GateWay过滤器简介
从过滤器⽣命周期(影响时机点)的⻆度来说,主要有两个pre和post: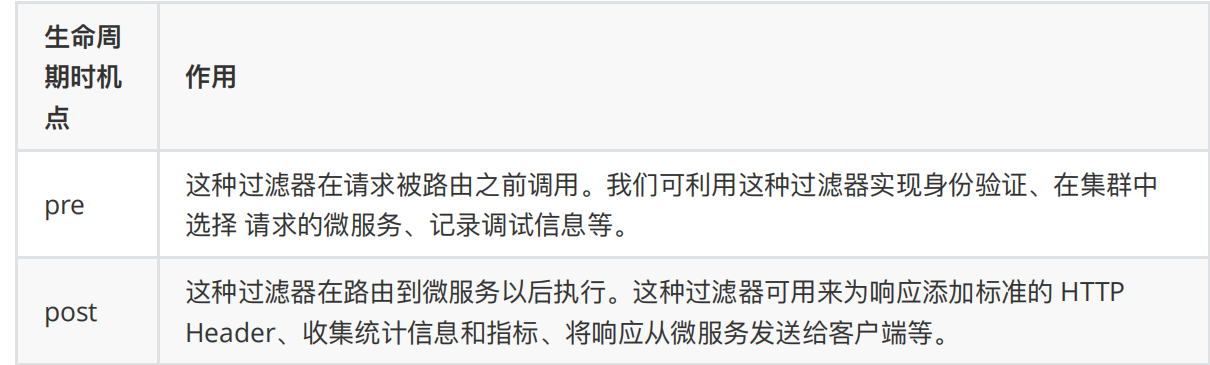
从过滤器类型的⻆度,Spring Cloud GateWay的过滤器分为GateWayFilter和GlobalFilter两种
如Gateway Filter可以去掉url中的占位后转发路由,⽐如
5.5.2 ⾃定义全局过滤器实现IP访问限制(⿊⽩名单)
请求过来时,判断发送请求的客户端的ip,如果在⿊名单中,拒绝访问
⾃定义GateWay全局过滤器时,我们实现Global Filter接⼝即可,通过全局过滤器可以实现⿊⽩名单、限流等功能。
package com.lagou.edu.filter;

import lombok.extern.slf4j.Slf4j;
import org.springframework.cloud.gateway.filter.GatewayFilterChain;
import org.springframework.cloud.gateway.filter.GlobalFilter;
import org.springframework.core.Ordered;
import org.springframework.core.io.buffer.DataBuffer;
import org.springframework.http.HttpStatus;
import org.springframework.http.server.reactive.ServerHttpRequest;
import org.springframework.http.server.reactive.ServerHttpResponse;
import org.springframework.stereotype.Component;
import org.springframework.web.server.ServerWebExchange;
import reactor.core.publisher.Mono;

import java.util.ArrayList;
import java.util.List;

/**
 * 定义全局过滤器,会对所有路由生效
 */
@Slf4j
@Component  // 让容器扫描到,等同于注册了
public class BlackListFilter implements GlobalFilter, Ordered {

    // 模拟黑名单(实际可以去数据库或者redis中查询)
    private static List<String> blackList = new ArrayList<>();

    static {
        blackList.add("0:0:0:0:0:0:0:1");  // 模拟本机地址
    }

    /**
     * 过滤器核心方法
     * @param exchange 封装了request和response对象的上下文
     * @param chain 网关过滤器链(包含全局过滤器和单路由过滤器)
     * @return
     */
    @Override
    public Mono<Void> filter(ServerWebExchange exchange, GatewayFilterChain chain) {
        // 思路:获取客户端ip,判断是否在黑名单中,在的话就拒绝访问,不在的话就放行
        // 从上下文中取出request和response对象
        ServerHttpRequest request = exchange.getRequest();
        ServerHttpResponse response = exchange.getResponse();

        // 从request对象中获取客户端ip
        String clientIp = request.getRemoteAddress().getHostString();
        // 拿着clientIp去黑名单中查询,存在的话就决绝访问
        if(blackList.contains(clientIp)) {
            // 决绝访问,返回
            response.setStatusCode(HttpStatus.UNAUTHORIZED); // 状态码
            log.debug("=====>IP:" + clientIp + " 在黑名单中,将被拒绝访问!");
            String data = "Request be denied!";
            DataBuffer wrap = response.bufferFactory().wrap(data.getBytes());
            return response.writeWith(Mono.just(wrap));
        }

        // 合法请求,放行,执行后续的过滤器
        return chain.filter(exchange);
    }


    /**
     * 返回值表示当前过滤器的顺序(优先级),数值越小,优先级越高
     * @return
     */
    @Override
    public int getOrder() {
        return 0;
    }
}
5.6 GateWay⾼可⽤
⽹关作为⾮常核⼼的⼀个部件,如果挂掉,那么所有请求都可能⽆法路由处理,因此我们需要做GateWay的⾼可⽤。
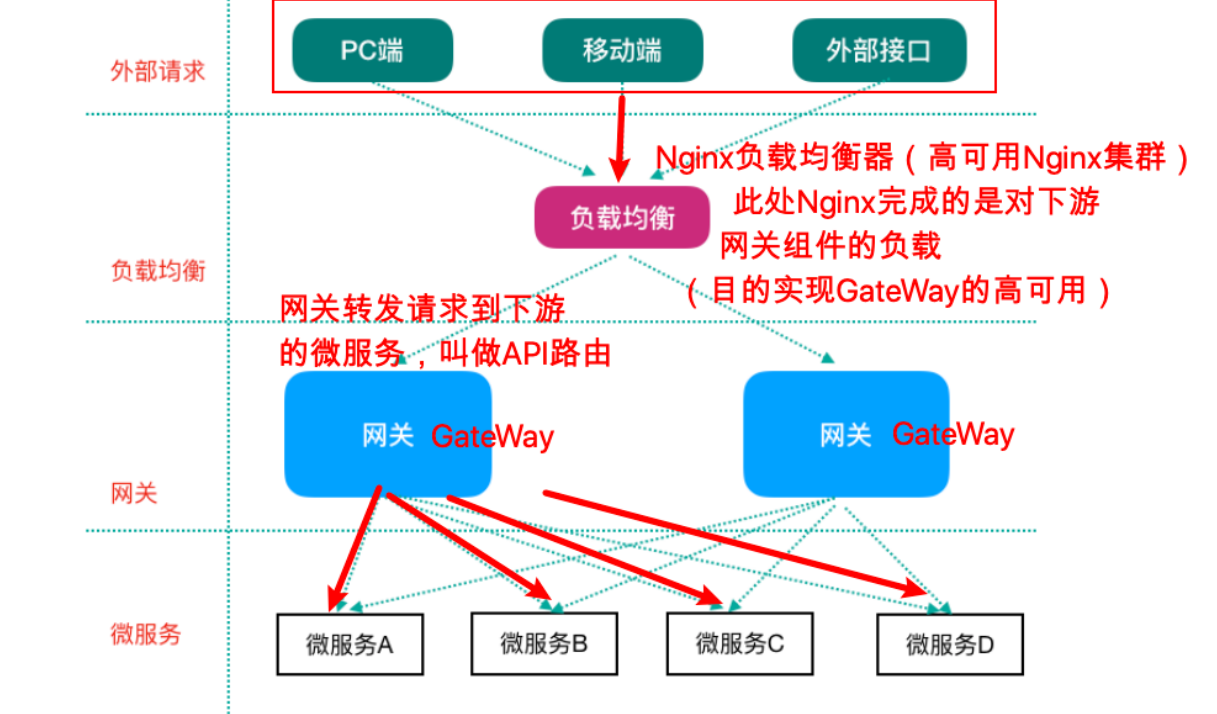
GateWay的⾼可⽤很简单:可以启动多个GateWay实例来实现⾼可⽤,在GateWay的上游使⽤Nginx等负载均衡设备进⾏负载转发以达到⾼可⽤的⽬的。
启动多个GateWay实例(假如说两个,⼀个端⼝9002,⼀个端⼝9003),剩下的就是使⽤Nginx等完成负载代理即可。示例如下
#配置多个GateWay实例
upstream gateway {
 server 127.0.0.1:9002;
 server 127.0.0.1:9003;
}
location / {
 proxy_pass http://gateway;
}
5.6 GateWay⾼可⽤
⽹关作为⾮常核⼼的⼀个部件,如果挂掉,那么所有请求都可能⽆法路由处理,因此我们需要做GateWay的⾼可⽤。
GateWay的⾼可⽤很简单:可以启动多个GateWay实例来实现⾼可⽤,在GateWay的上游使⽤Nginx等负载均衡设备进⾏负载转发以达到⾼可⽤的⽬的。
启动多个GateWay实例(假如说两个,⼀个端⼝9002,⼀个端⼝9003),剩下的就是使⽤Nginx等完成负载代理即可。示例如下
#配置多个GateWay实例
upstream gateway {
 server 127.0.0.1:9002;
 server 127.0.0.1:9003;
}
location / {
 proxy_pass http://gateway;
}

若有收获,就点个赞吧
0 人点赞
