整体布局

@overrideWidget build(BuildContext context) {return SingleChildScrollView(child: Container(padding: EdgeInsets.symmetric(horizontal: 10).copyWith(top: 10),child: Column(children: [_buildFlipCard(),// 预留.... 可以放一些其他需要显示的],),),);}
用到了第三方依赖
反转 flip_card: ^0.4.4 https://pub.flutter-io.cn/packages/flip_card
音频播放 just_audio: ^0.6.5 https://pub.flutter-io.cn/packages/just_audio
格式化时间 date_format: ^1.0.8 https://pub.flutter-io.cn/packages/date_format
FlipCard weiget 分为 front 和 back,可以实现前后旋转效果
FlipCard(direction: FlipDirection.HORIZONTAL, // defaultfront: Container(child: Text('Front'),),back: Container(child: Text('Back'),),);
_buildFlipCard 封装构建 FlipCard
构建 front 使用 Column 包裹,划分不同小的 widget
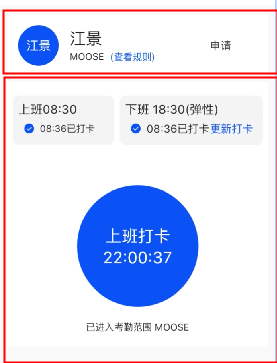
构建第一部分, 使用flutter 自带 Card 包裹,可以提现卡片效果
Card(elevation: 0.0,child: Container(margin: EdgeInsets.symmetric(horizontal: 16.0),padding: EdgeInsets.symmetric(vertical: 16.0),child: Row(children: [Expanded(flex: 4,child: Container(child: Row(children: [ClipOval(child: Container(width: 60,height: 60,alignment: Alignment.center,color: kDTPrimary,child: Text("江景",style: TextStyle(color: Colors.white,fontSize: 18.0,),),),),Container(margin: EdgeInsets.only(left: 16),child: Column(crossAxisAlignment: CrossAxisAlignment.start,children: [Text("江景",style: TextStyle(fontSize: 24.0),),Row(children: [Text("MOOSE"),Padding(padding: EdgeInsets.only(left: 8.0),child: Text("(查看规则)",style: TextStyle(color: kDTPrimary),),),],)],),)],),)),Expanded(flex: 1,child: Container(child: Text("申请",style: TextStyle(fontSize: 16.0),),)),],),),),
第二部分使用 Card 包裹,里边嵌套 Column
Card(elevation: 0.0,child: Column(children: [Container(margin: EdgeInsets.only(top: 20.0,),child: Row(mainAxisAlignment: MainAxisAlignment.spaceAround,children: [Container(width: 150,padding: EdgeInsets.symmetric(vertical: 8.0, horizontal: 8.0),margin: EdgeInsets.only(left: 8.0),decoration: BoxDecoration(color: kDTNormal,borderRadius:BorderRadius.all(Radius.circular(8.0))),child: Column(crossAxisAlignment: CrossAxisAlignment.start,children: [Text("上班08:30",style: TextStyle(fontSize: 18),),Row(children: [SvgPicture.asset('assets/icons/icon_right.svg',width: 32,color: kDTPrimary,),Text("08:36已打卡")],),],),),Expanded(flex: 1,child: Container(padding: EdgeInsets.symmetric(vertical: 8.0, horizontal: 8.0),margin: EdgeInsets.only(left: 8.0, right: 8.0),decoration: BoxDecoration(color: kDTNormal,borderRadius:BorderRadius.all(Radius.circular(8.0))),child: Column(crossAxisAlignment: CrossAxisAlignment.start,children: [Text("下班 18:30(弹性)",style: TextStyle(fontSize: 18),),Row(children: [SvgPicture.asset('assets/icons/icon_right.svg',width: 32,color: kDTPrimary,),Row(children: [Text("08:36已打卡",style: TextStyle(fontSize: 16.0),),Text("更新打卡",style: TextStyle(fontSize: 16.0, color: kDTPrimary),),],)],),],),),)],),),// 构建扫描部分_buildStack(),Container(margin: EdgeInsets.only(top: 20.0,bottom: 20.0,),child: Text("已进入考勤范围 MOOSE"),),],),),
_buildStack() 部分
使用 Stack 层叠布局放置两个大小相同 ClipOval widget
第一个 Container decoration 使用 LinearGradient 渐变
第二个 Container decoration 使用 SweepGradient 渐变
给第二个加上 RotationTransition 动画效果,控制隐藏和显示
给第一个加上 GestureDetector 事件触发动画执行
Container(padding: EdgeInsets.only(top: 60.0),child: Stack(children: [Center(child: GestureDetector(onTap: _onClick,child: ClipOval(child: Container(width: 180,height: 180,alignment: Alignment.center,decoration: BoxDecoration(color: kDTPrimary,gradient: LinearGradient(begin: Alignment.topCenter,end: Alignment.topCenter,colors: [kDTPrimary.withOpacity(0.8),kDTPrimary.withOpacity(1),]),),child: Column(mainAxisAlignment: MainAxisAlignment.center,children: [Text("上班打卡",style: TextStyle(color: Colors.white, fontSize: 24),),Text(_currentTime,style: TextStyle(color: Colors.white, fontSize: 24)),],),),),),),Center(child: _show? RotationTransition(turns: _animationController,child: ClipOval(child: Container(width: 180,height: 180,decoration: BoxDecoration(gradient: SweepGradient(colors: [Colors.white.withOpacity(0.4),Colors.white.withOpacity(0.6),]),),),),): Container(),)],),),
初始化定时器 Timer,动画控制器 AnimationController
class _DTWorksetBodyState extends State<DTWorksetBody>with SingleTickerProviderStateMixin {GlobalKey<FlipCardState> _flipCardKey = GlobalKey<FlipCardState>();AnimationController _animationController;bool _show = false;Timer _timer;String _currentTime = formatDate(DateTime.now(), [HH, ':', nn, ':', ss]);String _downTime = formatDate(DateTime.now(), [HH, ':', nn, ':', ss]);.......@overridevoid initState() {super.initState();_animationController = AnimationController(vsync: this, duration: Duration(milliseconds: 2000));_timer = Timer.periodic(const Duration(seconds: 1), (timer) {setState(() {_currentTime = formatDate(DateTime.now(), [HH, ':', nn, ':', ss]);});});}
点击事件
void _onClick() {// 控制第二个圆 显示setState(() {_show = true;});Future.delayed(Duration.zero, () {_animationController.repeat();Future.delayed(Duration(seconds: 3), () {setState(() {_downTime = formatDate(DateTime.now(), [HH, ':', nn, ':', ss]);// 结束扫描动画_animationController.stop();// 使用 FlipCard 开始反转_flipCardKey.currentState.toggleCard();// 隐藏扫描 widget_show = false;});});});}
FlipCard back 视图简单实现
back: Card(elevation: 0.0,child: Container(padding: EdgeInsets.symmetric(horizontal: 16.0, vertical: 16.0),child: Column(children: [Row(mainAxisAlignment: MainAxisAlignment.spaceBetween,children: [Column(crossAxisAlignment: CrossAxisAlignment.start,children: [Text("下班打卡成功",style: TextStyle(fontSize: 26.0),),Padding(padding: const EdgeInsets.all(8.0),child: Text("打卡时间 $_downTime",style: TextStyle(fontSize: 16.0),),),],),GestureDetector(child: Icon(Icons.close),onTap: () {// 控制反转 FlipCard_flipCardKey.currentState.toggleCard();},)],)],),),),
加上音效
初始化 AudioPlayer
AudioPlayer _player;@overridevoid initState() {super.initState();....._player = AudioPlayer();// 监听 AudioPlayer 播放状态,播放完成之后结束播放,重置播放时间_player.playerStateStream.listen((state) {switch (state.processingState) {case ProcessingState.completed:_player.seek(Duration.zero, index: _player.effectiveIndices.first);_player.stop();break;case ProcessingState.idle:break;case ProcessingState.loading:break;case ProcessingState.buffering:break;case ProcessingState.ready:break;}});_init();}
_init() async {final session = await AudioSession.instance;await session.configure(AudioSessionConfiguration.music());try {var duration = await _player.setAsset('assets/sound/on_duty.mp3');} catch (e) {// catch load errors: 404, invalid url ...print("An error occured $e");}}
点击时间播放音频
void _onClick() {setState(() {_show = true;});if (_player.playing) {return;}Future.delayed(Duration.zero, () {_animationController.repeat();Future.delayed(Duration(seconds: 3), () {setState(() {_downTime = formatDate(DateTime.now(), [HH, ':', nn, ':', ss]);_animationController.stop();_player.play(); // add code_flipCardKey.currentState.toggleCard();_show = false;});});});}
组件销毁生命周期放过释放资源
@overridevoid dispose() {if (null != _timer && _timer.isActive) {_timer.cancel();}if (null != _animationController) {_animationController.dispose();}if (null != _player) {_player.pause();_player.dispose();}super.dispose();}

若有收获,就点个赞吧
0 人点赞
