python都是基于命令模式,虽然也有生成图形界面的tK等工具,但是一个界面一堆代码,头痛,那如何解决呢?
方法是:
用PAGE 拖出要的界面,然后转成 PYTHON代码。
PAGE软件的使用很简单,就是先做好界面,再生成源码即可。
方法如下:
1、PAGE 简要说明:
官方网站:https://sourceforge.net/projects/page/files/
官方简要说明:
PAGE 是一个拖放和拖动工具,它有助于创建 Tkinter GUI 接口,供 Python 程序使用。它是程序 Visual Tcl (Vtcl) 的分叉,它现在生成 Python 代码。它是一个帮助工具。它不构建整个应用程序,而是旨在构建单个 GUI 窗口。它不是 Python 交互式设计环境 (IDE)。换句话说,PAGE 生成一个 Python 类,该类实现单个 GUI 窗口,并提供所有锅炉板代码以执行或实例化 GUI 对象。PAGE 以 Tcl/Tk 编写,但在 Python 包装器中调用。这意味着 PAGE 将在安装了 Python 的任何系统上运行。无需单独安装 Tcl/Tk。生成的输出是纯 Python,将在任何支持 Python 的 Tkinter 系统上运行,并且与 Python 2.7 和 Python 3 兼容。执行生成的 Python 不需要 Tcl/Tk。
核心意思:他只是生成了界面,他需要Python 2.7 和 Python 3 版本及以上支持。
软件安装:
安装PAGE前,需要先安装tcl/tk,这是一个开发框架,和Python没有关系,但运行PAGE需要这个支持,按说明安装好即可。
首先到下面的网站下载并安装最新的 tcl/tk包,
https://www.activestate.com/activetcl/downloads
然后到下面的网站下载并安装最新的 PAGE软件,
https://sourceforge.net/projects/page/
PAGE软件的使用很简单,就是先做好界面,再生成源码即可
如没PYTHO,下载安装:python:
https://www.python.org/downloads/windows/
如果怕麻烦,也可以直接在以下百度云盘链接下载:
https://pan.baidu.com/s/1gl_Ln75UZhVvrk1q8LSMjw#list/path=%2F
2、使用PAGE,像Visual Studio一样设计Python GUI窗体
注:当前使用环境为windows10 64bit/python v3.6/PAGE v4.14/Tcl v8.6.7.0
当前我定义一个目标,最终需要生成一个登录界面的GUI代码,如下: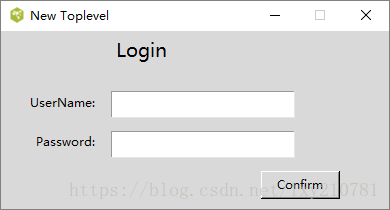
安装好各软件后,就可以运行PAGE来像VB一样所见即可得的拖出我们需要的GUI界面了。
首先。运行PAGE,主界面如下: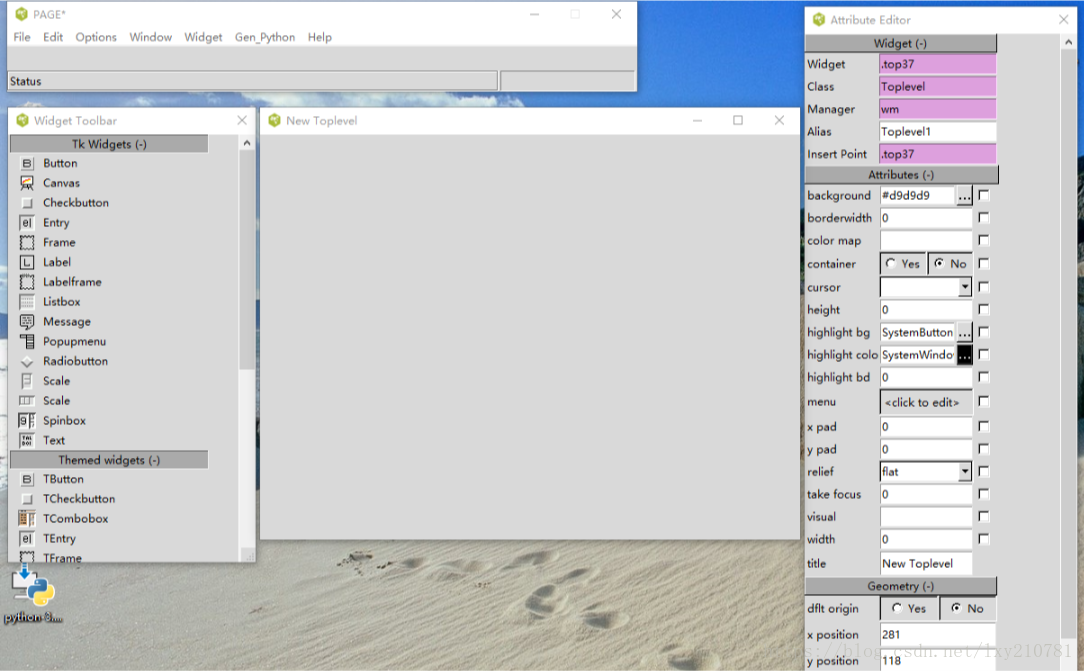
相信这种界面大家都很熟悉,就是可以直接拖放左侧的widget至中间的画板中,右则是各个widget的属性项设置,这个界面就可以所见即可得的拖放出目标定义中需要的python GUI界面了。以下就是我拖放出来的GUI画面:
然后就要生成pythonGUI代码了:
点主菜单\Gen_Python\Generate Python GUI\
会弹出一个对话框,要求保存tcl文件,将其保存在保存上,然后就会弹出一个python GUI代码的框出来,但这个代码还不能直接用,我们点sava先将其保存在桌面.
(通过PAGE生成python GUI界面(用PAGE拖出需要的GUI界面).py)
弹出的GUI代码框如下: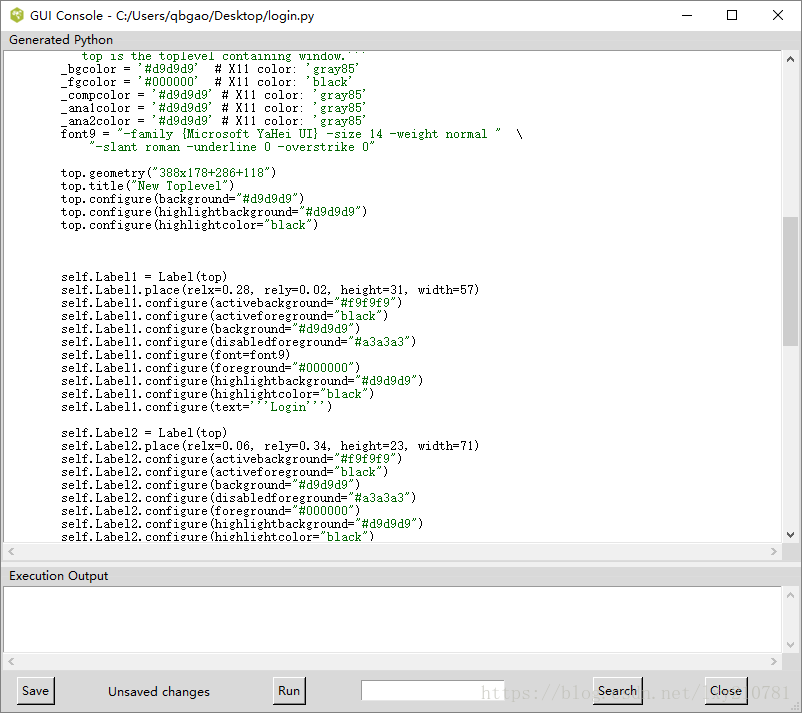
3、生成可用的Python
用notepad+打开刚才保存的py档:
以下这些内容可以全部delete掉.
1. import sys2. import login_support3.4. if __name__ == '__main__':5. vp_start_gui()6. def vp_start_gui():7. '''Starting point when module is the main routine.'''8. global val, w, root9. root = Tk()10. top = New_Toplevel (root)11. login_support.init(root, top)12. root.mainloop()13.14.15. w = None16. def create_New_Toplevel(root, *args, **kwargs):17. '''Starting point when module is imported by another program.'''18. global w, w_win, rt19. rt = root20. w = Toplevel (root)21. top = New_Toplevel (w)22. login_support.init(w, top, *args, **kwargs)23. return (w, top)24.25.26. def destroy_New_Toplevel():27. global w28. w.destroy()29. w = None
以下这些内容也可以视情况精减,由于我们当是python3.x, 故库为tkinter, 也没有用到ttk, ttk的部分也可以del掉
1. try:2. from Tkinter import *3. except ImportError:4. from tkinter import *5.6. try:7. import ttk8. # py3 = False9. except ImportError:10. import tkinter.ttk as ttk11. # py3 = True
故上面的代码只用保留以下这一句即可:
from tkinter import *
至此,现在只有class New_Toplevel这个部分了,去掉以下这部分,并将top.geometry()修改为top.geometry(‘AxB’)的形式
1. # 以下内容直接删除2. # _bgcolor = '#d9d9d9' # X11 color: 'gray85'3. # _fgcolor = '#000000' # X11 color: 'black'4. # _compcolor = '#d9d9d9' # X11 color: 'gray85'5. # _ana1color = '#d9d9d9' # X11 color: 'gray85'6. # _ana2color = '#d9d9d9' # X11 color: 'gray85'7.8.9. font9 = "-family {Microsoft YaHei UI} -size 14 -weight normal " \10. "-slant roman -underline 0 -overstrike 0"11.
# top.geometry("388x178+286+118") 修改为如下形式:
top.geometry("388x178")
最终于留下的可用的GUI代码如下:
1. #! /usr/bin/env python2. # -*- coding: utf-8 -*-3.4. from tkinter import *5.6. font9 = "-family {Microsoft YaHei UI} -size 14 -weight normal " \7. "-slant roman -underline 0 -overstrike 0"8. # 记得加上以下top的声明9. top = Tk()10. # top.geometry("388x178+286+118") 修改为如下形式:11. top.geometry("388x178")12. top.title("New Toplevel")13. top.configure(background="#d9d9d9")14. top.configure(highlightbackground="#d9d9d9")15. top.configure(highlightcolor="black")16.17. # 去掉Label(top)中的top18. # Label1 = Label(top)19. Label1 = Label()20. Label1.place(relx=0.28, rely=0.02, height=31, width=57)21. Label1.configure(activebackground="#f9f9f9")22. Label1.configure(activeforeground="black")23. Label1.configure(background="#d9d9d9")24. Label1.configure(disabledforeground="#a3a3a3")25. Label1.configure(font=font9)26. Label1.configure(foreground="#000000")27. Label1.configure(highlightbackground="#d9d9d9")28. Label1.configure(highlightcolor="black")29. Label1.configure(text='''Login''')30.31. # Label2 = Label(top)32. Label2 = Label()33. Label2.place(relx=0.06, rely=0.34, height=23, width=71)34. Label2.configure(activebackground="#f9f9f9")35. Label2.configure(activeforeground="black")36. Label2.configure(background="#d9d9d9")37. Label2.configure(disabledforeground="#a3a3a3")38. Label2.configure(foreground="#000000")39. Label2.configure(highlightbackground="#d9d9d9")40. Label2.configure(highlightcolor="black")41. Label2.configure(justify=RIGHT)42. Label2.configure(text='''UserName:''')43.44. # Label3 = Label(top)45. Label3 = Label()46. Label3.place(relx=0.08, rely=0.56, height=23, width=65)47. Label3.configure(activebackground="#f9f9f9")48. Label3.configure(activeforeground="black")49. Label3.configure(background="#d9d9d9")50. Label3.configure(disabledforeground="#a3a3a3")51. Label3.configure(foreground="#000000")52. Label3.configure(highlightbackground="#d9d9d9")53. Label3.configure(highlightcolor="black")54. Label3.configure(justify=RIGHT)55. Label3.configure(text='''Password:''')56.57. # Entry1 = Entry(top)58. Entry1 = Entry()59. Entry1.place(relx=0.28, rely=0.34,height=27, relwidth=0.47)60. Entry1.configure(background="white")61. Entry1.configure(disabledforeground="#a3a3a3")62. Entry1.configure(font="TkFixedFont")63. Entry1.configure(foreground="#000000")64. Entry1.configure(highlightbackground="#d9d9d9")65. Entry1.configure(highlightcolor="black")66. Entry1.configure(insertbackground="black")67. Entry1.configure(selectbackground="#c4c4c4")68. Entry1.configure(selectforeground="black")69.70. # Entry2 = Entry(top)71. Entry2 = Entry()72. Entry2.place(relx=0.28, rely=0.56,height=27, relwidth=0.47)73. Entry2.configure(background="white")74. Entry2.configure(disabledforeground="#a3a3a3")75. Entry2.configure(font="TkFixedFont")76. Entry2.configure(foreground="#000000")77. Entry2.configure(highlightbackground="#d9d9d9")78. Entry2.configure(highlightcolor="black")79. Entry2.configure(insertbackground="black")80. Entry2.configure(selectbackground="#c4c4c4")81. Entry2.configure(selectforeground="black")82.83. # Button1 = Button(top)84. Button1 = Button()85. Button1.place(relx=0.7, rely=0.79, height=28, width=79)86. Button1.configure(activebackground="#d9d9d9")87. Button1.configure(activeforeground="#000000")88. Button1.configure(background="#d9d9d9")89. Button1.configure(disabledforeground="#a3a3a3")90. Button1.configure(foreground="#000000")91. Button1.configure(highlightbackground="#d9d9d9")92. Button1.configure(highlightcolor="black")93. Button1.configure(pady="0")94. Button1.configure(text='''Confirm''')95.96. # 记得加上这个97. top.mainloop()
最终运行生成的界面如下:
至此,目标达到,别看写了这么多,其实非常简单,一点儿也不麻烦,如果你动动手,就明白真的很省事
4.PAGE使用的几点注意事项
PAGE生成的PY文件,不能很好支持中文,建议直接把源码拷贝到开发环境下。
需要生成几个窗口时,使用Toplevel生成子窗口,这样能够解决新窗口无法更新的问题。
XXX.vp_start_gui(root)
把root作为参数传给新窗口
def vp_start_gui(r):root = Toplevel(r) #把传入参数作为Toplevel()的参数生成新窗口。……root.mainloop()
这样就能有效解决新窗口中信息无法及时有效更新问题
‘Button’, ‘Checkbutton’等都有Command属性,可以相应的定义函数
‘Text’增加滚动条,可以直接用’Scrolledtext’
控制variable可以设置值,通过get()取得值
PAGE是基于tkinter的,所以,多看tkinter的文档,都能找到答案。

若有收获,就点个赞吧
0 人点赞
