拖拽是一个伟大的界面解决方案。拿着东西拖放是做很多事情的一种清晰而简单的方式,从复制和移动文件(如文件管理器)到订购(将物品丢入购物车)。
在现代HTML标准中,有一个关于拖放的章节,其中有一些特殊事件,如dragstart、dragend等。
这些事件使我们能够支持特殊类型的拖放,例如处理从操作系统的文件管理器中拖动一个文件并将其放入浏览器窗口中。然后JavaScript可以访问这些文件的内容。
但本地拖动事件也有局限性。例如,我们不能阻止从某一区域拖动。我们也不能使拖动只限于 “水平 “或 “垂直”。还有许多其他的拖放任务不能用它们来完成。此外,移动设备对此类事件的支持也非常薄弱。
因此,在这里我们将看到如何使用鼠标事件实现拖放。
拖拽算法
基本的拖拽算法看起来像这样。
- 在mousedown时—如果需要的话,为移动元素做准备(也许创建一个克隆,给它添加一个类或其他什么)。
- 然后在鼠标移动时,通过改变左/顶部的position:absolute来移动它。
- 鼠标上移时—执行所有与完成拖放有关的操作。
这些是最基本的。稍后我们将看到如何使用其他功能,例如在我们拖动当前的底层元素时突出显示它们。
下面是拖动球的实现。
ball.onmousedown = function(event) {// (1) prepare to moving: make absolute and on top by z-indexball.style.position = 'absolute';ball.style.zIndex = 1000;// move it out of any current parents directly into body// to make it positioned relative to the bodydocument.body.append(ball);// centers the ball at (pageX, pageY) coordinatesfunction moveAt(pageX, pageY) {ball.style.left = pageX - ball.offsetWidth / 2 + 'px';ball.style.top = pageY - ball.offsetHeight / 2 + 'px';}// move our absolutely positioned ball under the pointermoveAt(event.pageX, event.pageY);function onMouseMove(event) {moveAt(event.pageX, event.pageY);}// (2) move the ball on mousemovedocument.addEventListener('mousemove', onMouseMove);// (3) drop the ball, remove unneeded handlersball.onmouseup = function() {document.removeEventListener('mousemove', onMouseMove);ball.onmouseup = null;};};
如果我们运行这段代码,我们可以注意到一些奇怪的事情。在开始拖放时,球 “分叉 “了:我们开始拖动它的 “克隆”。
尝试用鼠标拖动,你会看到这样的行为。
这是因为浏览器对图像和其他一些元素有自己的拖放支持。它自动运行并与我们的冲突。
要禁用它。
ball.ondragstart = function() {return false;};
现在一切都会好起来的。
另一个重要的方面是—我们追踪鼠标在文件上的移动,而不是在球上。从第一眼看去,似乎鼠标总是在球上,我们可以把mousemove放在它上面。
但正如我们所记得的,mousemove经常被触发,但不是对每一个像素点。所以在快速移动之后,指针可能会从球上跳到文档中间的某个地方(甚至是窗口外面)。
所以我们应该在文档中监听以捕捉它。
正确的定位
在上面的例子中,球总是被移动,使它的中心在指针之下。
ball.style.left = pageX - ball.offsetWidth / 2 + 'px';ball.style.top = pageY - ball.offsetHeight / 2 + 'px';
不错,但有一个副作用。为了启动拖放,我们可以在球的任何地方用鼠标点击。但是如果从它的边缘 “取 “下来,那么球就会突然 “跳 “到鼠标指针的中心。
如果我们保持元素相对于指针的初始移动,会更好。
例如,如果我们从球的边缘开始拖动,那么在拖动时指针应该保持在边缘上。
让我们更新一下我们的算法。
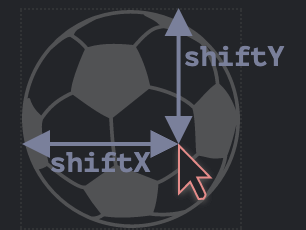
- 当访问者按下按钮(mousedown)时—记住变量shiftX/shiftY中指针到球的左上角的距离。我们将在拖动时保持这个距离。
- 为了得到这些移位,我们可以把坐标减去。
// onmousedownlet shiftX = event.clientX - ball.getBoundingClientRect().left;let shiftY = event.clientY - ball.getBoundingClientRect().top;
- 然后,在拖动的同时,我们将球定位在相对于指针的同一班次上,像这样。
最后的代码有更好的定位。// onmousemove// ball has position:absoluteball.style.left = event.pageX - shiftX + 'px';ball.style.top = event.pageY - shiftY + 'px';
ball.onmousedown = function(event) {let shiftX = event.clientX - ball.getBoundingClientRect().left;let shiftY = event.clientY - ball.getBoundingClientRect().top;ball.style.position = 'absolute';ball.style.zIndex = 1000;document.body.append(ball);moveAt(event.pageX, event.pageY);// moves the ball at (pageX, pageY) coordinates// taking initial shifts into accountfunction moveAt(pageX, pageY) {ball.style.left = pageX - shiftX + 'px';ball.style.top = pageY - shiftY + 'px';}function onMouseMove(event) {moveAt(event.pageX, event.pageY);}// move the ball on mousemovedocument.addEventListener('mousemove', onMouseMove);// drop the ball, remove unneeded handlersball.onmouseup = function() {document.removeEventListener('mousemove', onMouseMove);ball.onmouseup = null;};};ball.ondragstart = function() {return false;};
如果我们用球的右下角拖动它,这种差别就特别明显了。在前面的例子中,球在指针下 “跳跃”。现在,它从当前位置流畅地跟随指针移动。
可能的空目标(droppables)。
在前面的例子中,球可以被扔到任何 “地方 “去停留。在现实生活中,我们通常把一个元素丢到另一个元素上。例如,一个 “文件 “放到一个 “文件夹 “或其他东西上。
抽象地讲,我们把一个 “可拖动 “的元素放到 “可拖动 “的元素上。
我们需要知道。
- 在Drag’n’Drop结束时,该元素被放置在哪里 - 做相应的动作。
- 而且,最好能知道我们拖动的是哪一个dropable,以突出它。
这个解决方案有点有趣,只是有点棘手,所以我们在这里介绍一下。
第一个想法可能是什么?可能是在潜在的droppables上设置mouseover/mouseup处理程序?
但这并不奏效。
问题是,当我们拖动时,可拖动的元素总是在其他元素之上。而鼠标事件只发生在顶部的元素上,而不是在它下面的元素上。
例如,下面有两个
<style>div {width: 50px;height: 50px;position: absolute;top: 0;}</style><div style="background:blue" onmouseover="alert('never works')"></div><div style="background:red" onmouseover="alert('over red!')"></div>
与可拖动元素相同。球总是在其他元素之上,所以事件发生在它身上。无论我们在较低的元素上设置什么处理程序,它们都不会起作用。
这就是为什么最初的想法是在潜在的可弃物上放置处理程序,但在实践中并不奏效。它们不会运行。
那么,该怎么做呢?
有一个方法叫document.elementFromPoint(clientX, clientY)。它返回在给定的窗口相对坐标上的最嵌套的元素(如果给定的坐标不在窗口内,则为空)。
我们可以在我们的任何一个鼠标事件处理程序中使用它来检测指针下潜在的dropable,像这样。
// in a mouse event handlerball.hidden = true; // (*) hide the element that we draglet elemBelow = document.elementFromPoint(event.clientX, event.clientY);// elemBelow is the element below the ball, may be droppableball.hidden = false;
请注意:我们需要在调用(*)之前隐藏球。否则我们通常会在这些坐标上有一个球,因为它是指针下最上面的元素:elemBelow=ball。所以我们隐藏它并立即再次显示。
我们可以用这段代码来检查我们在任何时候 “飞过 “什么元素。并在下降发生时进行处理。
onMouseMove的扩展代码,以寻找 “可下降 “的元素。
// potential droppable that we're flying over right nowlet currentDroppable = null;function onMouseMove(event) {moveAt(event.pageX, event.pageY);ball.hidden = true;let elemBelow = document.elementFromPoint(event.clientX, event.clientY);ball.hidden = false;// mousemove events may trigger out of the window (when the ball is dragged off-screen)// if clientX/clientY are out of the window, then elementFromPoint returns nullif (!elemBelow) return;// potential droppables are labeled with the class "droppable" (can be other logic)let droppableBelow = elemBelow.closest('.droppable');if (currentDroppable != droppableBelow) {// we're flying in or out...// note: both values can be null// currentDroppable=null if we were not over a droppable before this event (e.g over an empty space)// droppableBelow=null if we're not over a droppable now, during this eventif (currentDroppable) {// the logic to process "flying out" of the droppable (remove highlight)leaveDroppable(currentDroppable);}currentDroppable = droppableBelow;if (currentDroppable) {// the logic to process "flying in" of the droppableenterDroppable(currentDroppable);}}}
在下面的例子中,当球被拖到足球门上时,球门被高亮显示。
style.css
#gate {cursor: pointer;margin-bottom: 100px;width: 83px;height: 46px;}#ball {cursor: pointer;width: 40px;height: 40px;}
index.html
<!doctype html><html><head><meta charset="UTF-8"><link rel="stylesheet" href="style.css"></head><body><p>Drag the ball.</p><img src="https://en.js.cx/clipart/soccer-gate.svg" id="gate" class="droppable"><img src="https://en.js.cx/clipart/ball.svg" id="ball"><script>let currentDroppable = null;ball.onmousedown = function(event) {let shiftX = event.clientX - ball.getBoundingClientRect().left;let shiftY = event.clientY - ball.getBoundingClientRect().top;ball.style.position = 'absolute';ball.style.zIndex = 1000;document.body.append(ball);moveAt(event.pageX, event.pageY);function moveAt(pageX, pageY) {ball.style.left = pageX - shiftX + 'px';ball.style.top = pageY - shiftY + 'px';}function onMouseMove(event) {moveAt(event.pageX, event.pageY);ball.hidden = true;let elemBelow = document.elementFromPoint(event.clientX, event.clientY);ball.hidden = false;if (!elemBelow) return;let droppableBelow = elemBelow.closest('.droppable');if (currentDroppable != droppableBelow) {if (currentDroppable) { // null when we were not over a droppable before this eventleaveDroppable(currentDroppable);}currentDroppable = droppableBelow;if (currentDroppable) { // null if we're not coming over a droppable now// (maybe just left the droppable)enterDroppable(currentDroppable);}}}document.addEventListener('mousemove', onMouseMove);ball.onmouseup = function() {document.removeEventListener('mousemove', onMouseMove);ball.onmouseup = null;};};function enterDroppable(elem) {elem.style.background = 'pink';}function leaveDroppable(elem) {elem.style.background = '';}ball.ondragstart = function() {return false;};</script></body></html>
现在,在整个过程中,我们在变量currentDroppable中拥有当前的 “投放目标”,我们正在飞过这个目标,并可以用它来突出显示或其他任何东西。
摘要
我们考虑了一个基本的 “拖 “的算法。
关键的组成部分。
事件流程:ball.mousedown → document.mousemove → ball.mouseup(别忘了取消native ondragstart)。
在拖动开始时—记住指针相对于元素的初始移动:shiftX/shiftY并在拖动过程中保持它。
使用document.elementFromPoint来检测指针下的可放弃的元素。
我们可以在这个基础上奠定很多东西。
- 鼠标上移时,我们可以在智力上最终完成下降:改变数据,移动元素。
- 我们可以突出我们正在飞过的元素。
- 我们可以按某个区域或方向限制拖动。
- 我们可以使用事件委托来处理mousedown/up。一个检查event.target的大面积事件处理程序可以管理数百个元素的Drag’n’Drop。
- 如此等等。
有一些框架在其上构建架构。DragZone, Droppable, Draggable和其他类。它们中的大多数都做了与上面描述的类似的事情,所以现在应该很容易理解它们。或者推出你自己的,因为你可以看到这很容易做到,有时比改编第三方的解决方案更容易。
原文

若有收获,就点个赞吧
0 人点赞
