最近准备学习的下一阶段数据库开发相关,于是便开始了折腾。
本文主要从新手向介绍一个基于Spring Boot2.x,MySQL和myBatis完成简单的用Web操作数据库的演示程序,然后采用两种实现方式:
- 全注解实现SQL持久化方式
- 全xml实现SQL持久化方式
主要支持以下功能:
- 数据库自动建表,如本例中的用户表。
- 数据库CRUD(创建读取更新删除)操作。
-
1.环境准备
IntelliJ IDEA旗舰版
这里建议使用专业版的IDEA,因为它自带数据库操作功能(数据库),可以连接本地MySQL数据库,通过SQL语句操作数据库以及可视化数据库内容。非常方便,从而节省了一个MySQL Workbench的安装。 IDEA Ultimate是科学研究版,没有许可证的个人用户可以参考下Jetbrains系列产品2019.2.4最新激活方法[持续更新]。这也是我之前刷沸点看到的,不然我只能在公司里用专业版的IDEA ,感谢大神分享。
的MySQL
可以通过官方网站下载MySQL社区下载,安装过程中的设置类型通过IntelliJ IDEA Ultimate有数据库的功能,这里直接选择仅服务器即可。如果,你想用MySQL Workbench,可以选择默认的开发版本,会一并安装MySQL工作台。
所使用的数据表是类似如下的内容:CREATE TABLE `user` (`id` int(13) NOT NULL AUTO_INCREMENT,`name` varchar(33) NOT NULL,`age` int(3) NOT NULL,`money` double NOT NULL,PRIMARY KEY (`id`)) ENGINE=InnoDB AUTO_INCREMENT=1 DEFAULT CHARSET=utf8复制代码
Maven + JDK8
建议使用Spring Boot JDK 1.8或更高版本和Maven 3.2+。
2.项目结构
+---src| +---main| | +---java| | | \---hello| | | | MainApplication.java| | | || | | +---bean| | | | User.java| | | || | | +---controller| | | | UserController.java| | | || | | +---dao| | | | UserDao.java| | | || | | \---service| | | UserService.java| | || | \---resources| | application.properties| | mysql.properties| | \---mapper| | UserMapper.xml(xml实现特有)pom.xml复制代码
3.内容解析
pom.xml
pom中需要添加boot-starter-web的依赖,MySQL连接的依赖,myBatis的依赖。
<dependencies><dependency><groupId>org.springframework.boot</groupId><artifactId>spring-boot-starter-web</artifactId></dependency><dependency><groupId>org.mybatis.spring.boot</groupId><artifactId>mybatis-spring-boot-starter</artifactId><version>1.3.2</version></dependency><dependency><groupId>mysql</groupId><artifactId>mysql-connector-java</artifactId></dependency></dependencies>复制代码
- 属性配置
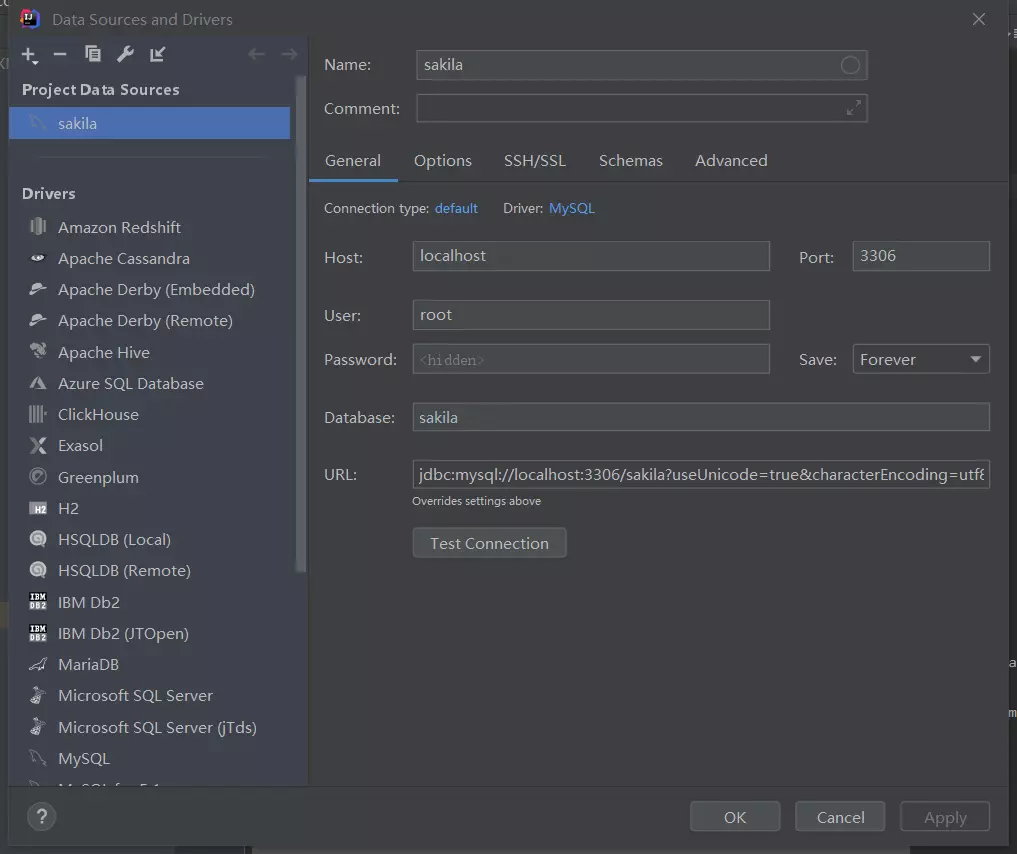
application.properties,连接本地MySQL数据库相关配置。
server.port=8333# 数据库为sakilaspring.datasource.url=jdbc:mysql://127.0.0.1:3306/sakila?useUnicode=true&characterEncoding=utf8&useSSL=false&serverTimezone=GMT%2B8&allowPublicKeyRetrieval=truespring.datasource.username=rootspring.datasource.password=123456spring.datasource.driver-class-name=com.mysql.cj.jdbc.Driver复制代码
mysql.properties,项目中使用的数据集表名,支持修改。
# 自定义所使用的mysql表的表名配置mysql.tableName=user复制代码
- 用户类用户
用户类(POJO)用户,类成员变量对应数据库表中的各个分区。
public class User {private int id;private String name;private int age;private double money;// Set Get方法省略}复制代码
- 道层
这里要注意mybatis动态调用表名和分段名分别是使用$ {}和#{},具体的区别可以参考mybatis动态调用表名和替换名。
/*** 基于注解实现数据库 CRUD(create read update delete)*/@Mapperpublic interface UserDao {/*** 创建一个新表,如果表明不存在*/@Update("create table if not exists ${tableName}(\n" +"id int(13) not null auto_increment,\n" +"`name` varchar(33) not null,\n" +"age int(3) not null,\n" +"money double not NULL,\n" +"PRIMARY KEY (id)\n" +") ENGINE=InnoDB AUTO_INCREMENT=1 DEFAULT CHARSET=utf8")void createTable(@Param("tableName")String tableName);/*** 插入用户信息*/@Insert("INSERT INTO ${tableName}(name, age, money) VALUES(#{name}, #{age}, #{money})")void insertUser(@Param("tableName")String tableName, @Param("name") String name, @Param("age") Integer age,@Param("money") Double money);/*** 通过名字查询用户信息*/@Select("SELECT * FROM ${tableName} WHERE name = #{name}")List<User> findUserByName(@Param("tableName")String tableName, @Param("name") String name);/*** 查询所有用户信息*/@Select("SELECT * FROM ${tableName}")List<User> findAllUser(@Param("tableName")String tableName);/*** 根据 id 更新用户信息*/@Update("UPDATE ${tableName} SET name = #{name},age = #{age},money= #{money} WHERE id = #{id}")void updateUser(@Param("tableName")String tableName, @Param("name") String name, @Param("age") Integer age,@Param("money") Double money, @Param("id") int id);/*** 根据 id 删除用户信息*/@Delete("DELETE from ${tableName} WHERE name = #{name}")void deleteUser(@Param("tableName")String tableName, @Param("name") String name);/*** 删除user表里面的所有数据*/@Delete("DELETE from ${tableName} WHERE 1 = 1")void deleteAllUserData(@Param("tableName")String tableName);}复制代码
- 服务层
UserService.java使用链接数据层(DAO),并实现CRUD的业务逻辑。另外这里的自动建表的表名是通过自定义配置文件mysql.properties中配置的。
@Service@PropertySource({"classpath:mysql.properties"})public class UserService {@Autowiredprivate UserDao userDao;@Value("${mysql.tableName}")private String tableName;/*** 如果表不存在则创建表*/public void createTable() {userDao.createTable(tableName);}/*** 根据名字查找用户*/public List<User> selectUserByName(String name) {return userDao.findUserByName(tableName, name);}/*** 查找所有用户*/public List<User> selectAllUser() {return userDao.findAllUser(tableName);}/*** 插入两个用户*/public void insertService() {userDao.insertUser(tableName, "Ace", 22, 3000.0);userDao.insertUser(tableName, "Blink", 19, 3000.0);}/*** 插入某个指定用户*/public void insertOneService(String name, int age, double money) {userDao.insertUser(tableName, name, age, money);}/*** 通过名字更新用户信息*/@Transactionalpublic void updateService(String name, int age, double money) {List<User> users = userDao.findUserByName(tableName, name);if (users.isEmpty()) {return;}List<Integer> ids = users.stream().map(User::getId).collect(Collectors.toList());ids.forEach(id -> userDao.updateUser(tableName, name, age, money, id));}/*** 根据id 删除用户*/public void deleteService(String name) {userDao.deleteUser(tableName, name);}/*** 清除表内所有数据*/public void clearService() {userDao.deleteAllUserData(tableName);}/*** 模拟事务。由于加上了 @Transactional注解,如果转账中途出了意外 Ace 和 Blink 的钱都不会改变。*/@Transactionalpublic void changemoney() {userDao.updateUser(tableName,"Ace", 22, 2000.0, 3);// 模拟转账过程中可能遇到的意外状况int temp = 1 / 0;userDao.updateUser(tableName,"Blink", 19, 4000.0, 4);}}复制代码
基于全xml实现只需要修改UserDao.java并添加如下的UserMapper.xml就可以了,其他代码和配置完全和注解版本一致。
UserDao.java
/*** 基于xml实现数据库 CRUD(create read update delete)*/@Mapperpublic interface UserDao {/*** 创建一个新表,如果表明不存在*/void createTable(@Param("tableName")String tableName);/*** 插入用户信息*/void insertUser(@Param("tableName")String tableName, String name, Integer age, Double money);/*** 通过名字查询用户信息*/List<User> findUserByName(@Param("tableName")String tableName, String name);/*** 查询所有用户信息*/List<User> findAllUser(@Param("tableName")String tableName);/*** 根据 id 更新用户信息*/void updateUser(@Param("tableName")String tableName, String name, Integer age, Double money, int id);/*** 根据 id 删除用户信息*/void deleteUser(@Param("tableName")String tableName, String name);/*** 删除user表里面的所有数据*/void deleteAllUserData(@Param("tableName")String tableName);}复制代码
UserMapper.xml
<?xml version="1.0" encoding="UTF-8"?><!DOCTYPE mapperPUBLIC "-//mybatis.org//DTD Mapper 3.0//EN""http://mybatis.org/dtd/mybatis-3-mapper.dtd"><mapper namespace="hello.dao.UserDao"><update id="createTable">create table if not exists ${tableName}(id int(13) not null auto_increment,`name` varchar(33) not null,age int(3) not null,money double not null,primary key (id)) ENGINE=InnoDB AUTO_INCREMENT=1 DEFAULT CHARSET=utf8</update><!--这里的name, age 和 money可以自动匹配insertUser(String name, Integer age, Double money)的入参--><insert id="insertUser">insert into ${tableName}(name, age, money) values(#{name}, #{age}, #{money})</insert><select id="findUserByName" resultType="hello.bean.User">SELECT * FROM ${tableName} WHERE name = #{name}</select><select id="findAllUser" resultType="hello.bean.User">select * from ${tableName}</select><update id="updateUser">update ${tableName} set name = #{name}, age = #{age}, money = #{money} where id = #{id}</update><delete id="deleteUser">delete from ${tableName} where name = #{name}</delete><delete id="deleteAllUserData">delete from ${tableName} where 1 = 1</delete></mapper>复制代码
- 控制器层
实现CRUD http请求对应的控制器接口
@RestController@RequestMapping("/user")public class UserController {@Autowiredprivate UserService userService;// http://localhost:8333/user/insert?name=ace&age=18&money=0@GetMapping("/insert")public List<User> insert(@RequestParam(value = "name", required = true) String name,@RequestParam(value = "age", required = true) int age,@RequestParam(value = "money", required = true) double money) {userService.insertOneService(name, age, money);return userService.selectAllUser();}// http://localhost:8333/user/query?name=ace@GetMapping("/query")public List<User> queryByName(@RequestParam(value = "name", required = false) String name) {if (name == null) {return userService.selectAllUser();}return userService.selectUserByName(name);}// http://localhost:8333/user/update?name=ace&age=18&money=999@GetMapping("/update")public List<User> update(@RequestParam(value = "name", required = true) String name,@RequestParam(value = "age", required = true) int age,@RequestParam(value = "money", required = true) double money) {userService.updateService(name, age, money);return userService.selectUserByName(name);}// http://localhost:8333/user/delete?name=ace@GetMapping("/delete")public String delete(@RequestParam(value = "name", required = true) String name) {userService.deleteService(name);return "OK";}// http://localhost:8333/user/clear@GetMapping("/clear")public List<User> testClear() {userService.clearService();return userService.selectAllUser();}@GetMapping("/changemoney")public List<User> testchangemoney() {userService.insertService();userService.changemoney();return userService.selectAllUser();}}复制代码
- Spring Boot启动类
MainApplication.java通过继承CommandLineRunner在Spring Boot启动的时候,在表自动创建完后会在表中插入一些数据。
@SpringBootApplicationpublic class MainApplication implements CommandLineRunner {public static void main(String[] args) {SpringApplication.run(MainApplication.class, args);}@AutowiredUserService userService;@Overridepublic void run(String... args) throws Exception {userService.createTable();userService.insertService();}}复制代码
4.功能演示
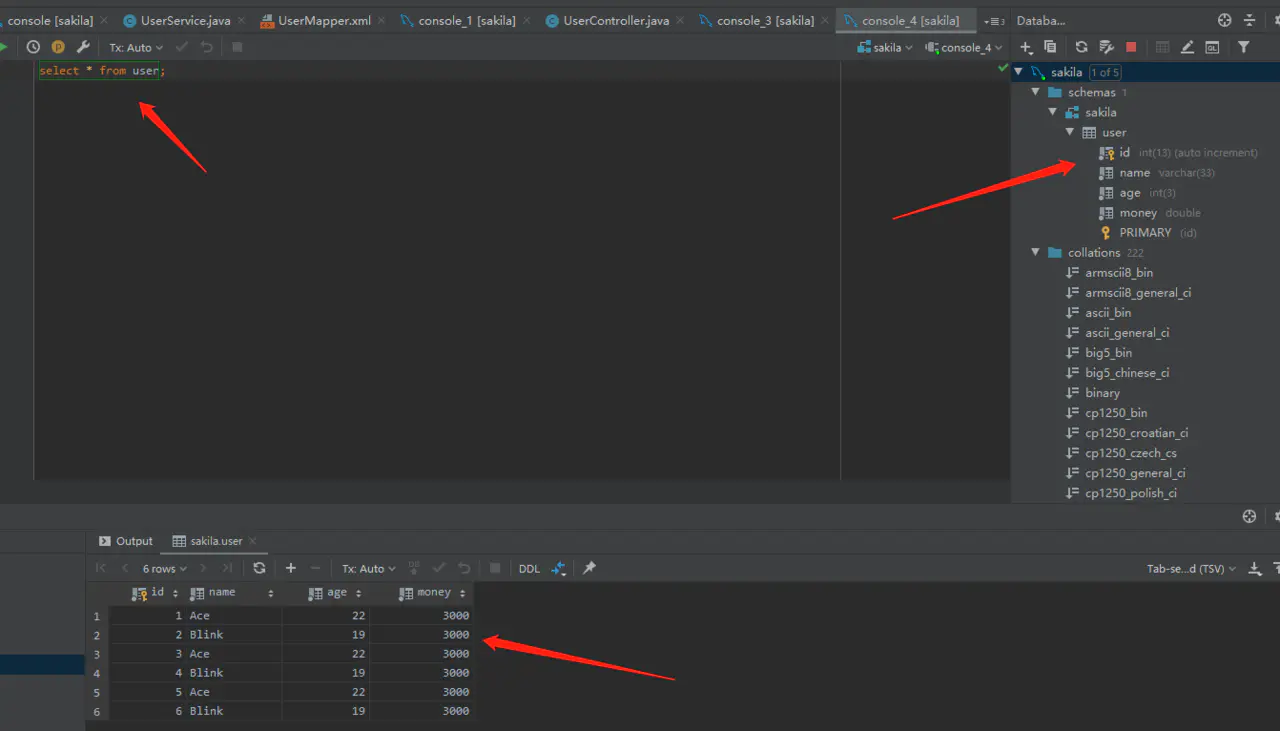
- 数据库表自动创建,可以通过专业版IDEA的数据库功能看到用户表的自动创建。
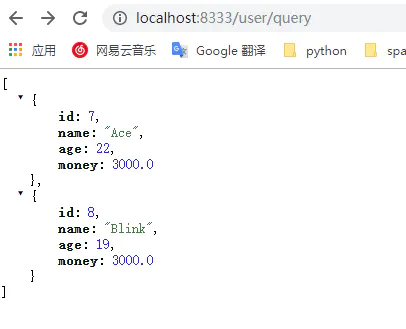
- 查询查询,这里如果要显示一下的json格式,需要给Chrome安装上JsonViewer插件。
- 插入数据insert
 4.更新数据更新
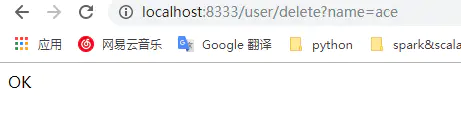
 5.删除数据删除
作者:BlinkAce
链接:https://juejin.im/post/5dcffe53e51d453fc123be07
来源:掘金
著作权归作者所有。商业转载请联系作者获得授权,非商业转载请注明出处。

若有收获,就点个赞吧
0 人点赞
