- 学习目标
- 学习内容
- include
- include
- include
- include “ohos_init.h”
- include “cmsis_os2.h”
- include “iot_gpio.h”
- include “iot_gpio_ex.h”
- include
- include
- include
- include “ohos_init.h”
- include “cmsis_os2.h”
- include “iot_gpio.h”
- include “iot_gpio_ex.h”
- include “iot_pwm.h”
- include
- include
- include
- include “ohos_init.h”
- include “cmsis_os2.h”
- include “iot_gpio.h”
- include “iot_gpio_ex.h”
- include “iot_pwm.h”
- include
- include
- include
- include “ohos_init.h”
- include “cmsis_os2.h”
- include “iot_gpio.h”
- include “iot_gpio_ex.h”
- include “iot_pwm.h”
- include
- include
- include
- include “ohos_init.h”
- include “cmsis_os2.h”
- include “buzzer.h”
- 练习题
学习目标
- 掌握GPIO的开发流程
- 掌握PWM的开发流程
- 掌握蜂鸣器播放音乐
学习内容
IO引脚说明
| 引脚 | Uart | SPI | ADC | PWM | I2S | SDIO | I2C | | —- | —- | —- | —- | —- | —- | —- | —- | | GPIO_07 | CTS_1 | RXD_0 | ADC_3 | PWM_0 | CLK_0 | | | | GPIO_08 | RTS_1 | TXD_0 | | PWM_1 | WS_0 | | | | GPIO_10 | CTS_2 | CLK_0 | | PWM_1 | TX_0 | D3 | SDA_0 | | GPIO_09 | RTS_2 | TXD_0 | ADC_4 | PWM_0 | MCK_0 | D2 | SCL_0 | | GPIO_03 | LOG_TXD_0 | | | | | | | | GPIO_04 | LOG_RXD_0 | | ADC_1 | | | | | | GPIO_02 | | | | PWM_2 | MCK_0 | | | | GPIO_05 | RXD_1 | CSI_0 | ADC_2 | PWM_2 | TX_0 | | | | GPIO_06 | TXD_1 | CLK_0 | | PWM_3 | | | | | GPIO_14 | LOG_RXD_0/CTS_2 | | | PWM_5 | RX_0 | D1 | SCL_0 | | GPIO_11 | TXD_2 | RXD_0 | ADC_5 | PWM_2 | CLK_0 | CMD | | | GPIO_12 | RXD_2 | CSI_0 | ADC_0 | PWM_3 | WS_0 | CLK | | | GPIO_13 | LOG_TXD_0/RTS_2 | | ADC_6 | PWM_4 | | D0 | SDA_0 |
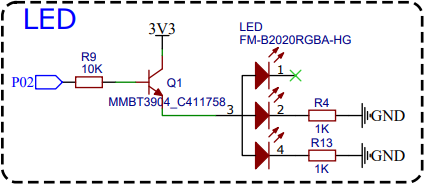
GPIO控制LED
原理图
GPIO配置
//初始化引脚IoTGpioInit(IOT_IO_NAME_2);//设置IO口功能为GPIOIoTGpioSetFunc(IOT_IO_NAME_2, IOT_GPIO_FUNC_GPIO_2_GPIO);//设置IO口输出方向:输出IoTGpioSetDir(IOT_IO_NAME_2, IOT_GPIO_DIR_OUT);
// 高电平输出IoTGpioSetOutputVal(IOT_IO_NAME_2,IOT_GPIO_VALUE1);// 低电平输出IoTGpioSetOutputVal(IOT_IO_NAME_2,IOT_GPIO_VALUE0);
开发流程
来到应用开发的根目录。
我们编写代码的根目录为device/board/itcast/genkipi/app。
- 根目录下新建
gpio_led文件夹,此为项目目录。 - 此项目目录下新建
main.c文件 - 此项目目录下新建
BUILD.gn文件 - 修改根目录下的
BUILD.gn文件代码部分
```cinclude
include
include
include “ohos_init.h”
include “cmsis_os2.h”
include “iot_gpio.h”
include “iot_gpio_ex.h”
static void start(void) { //初始化GPIO口 IoTGpioInit(IOT_IO_NAME_2); //设置IO口功能为GPIO IoTGpioSetFunc(IOT_IO_NAME_2, IOT_GPIO_FUNC_GPIO_2_GPIO); //设置IO口输出方向:输出 IoTGpioSetDir(IOT_IO_NAME_2,IOT_GPIO_DIR_OUT); //不断输出高低电压 while (1){ IoTGpioSetOutputVal(IOT_IO_NAME_2,IOT_GPIO_VALUE1); usleep(1000*1000);
IoTGpioSetOutputVal(IOT_IO_NAME_2,IOT_GPIO_VALUE0);usleep(1000*1000);}
}
APP_FEATURE_INIT(start);
```cstatic_library("gpio_led") {sources = ["main.c"]include_dirs = ["//base/iothardware/peripheral/interfaces/inner_api","../../iot_hardware_hals/include"]}
import("//build/lite/config/component/lite_component.gni")lite_component("app") {features = ["gpio_led"]}
PWM控制LED
PWM配置
//初始化GPIO口IoTGpioInit(IOT_IO_NAME_2);//设置IO口功能为PWMIoTGpioSetFunc(IOT_IO_NAME_2, IOT_GPIO_FUNC_GPIO_2_PWM2_OUT);//设置IO口输出方向:输出IoTGpioSetDir(IOT_IO_NAME_2, IOT_GPIO_DIR_OUT);//不断输出高低电压IoTPwmInit(IOT_PWM_NAME_2);
IoTPwmStart(IOT_PWM_NAME_2, i, 10000);
开发流程
来到应用开发的根目录。
我们编写代码的根目录为device/board/itcast/genkipi/app。
- 根目录下新建
pwm_led文件夹,此为项目目录。 - 此项目目录下新建
main.c文件 - 此项目目录下新建
BUILD.gn文件 - 修改根目录下的
BUILD.gn文件代码部分
```cinclude
include
include
include “ohos_init.h”
include “cmsis_os2.h”
include “iot_gpio.h”
include “iot_gpio_ex.h”
include “iot_pwm.h”
static void start(void) { //初始化GPIO口 IoTGpioInit(IOT_IO_NAME_2); //设置IO口功能为PWM IoTGpioSetFunc(IOT_IO_NAME_2, IOT_GPIO_FUNC_GPIO_2_PWM2_OUT); //设置IO口输出方向:输出 IoTGpioSetDir(IOT_IO_NAME_2, IOT_GPIO_DIR_OUT); //不断输出高低电压 IoTPwmInit(IOT_PWM_NAME_2); while (1){ for (int i = 0; i < 20; i++) { IoTPwmStart(IOT_PWM_NAME_2, i, 10000); usleep(0.05 1000 1000); }
for (int i = 20; i > 0; i--) {IoTPwmStart(IOT_PWM_NAME_2, i, 10000);usleep(0.05 * 1000 * 1000);}}
}
APP_FEATURE_INIT(start);
```cstatic_library("pwm_led") {sources = ["main.c"]include_dirs = ["//base/iothardware/peripheral/interfaces/inner_api","../../iot_hardware_hals/include"]}
import("//build/lite/config/component/lite_component.gni")lite_component("app") {features = ["pwm_led"]}
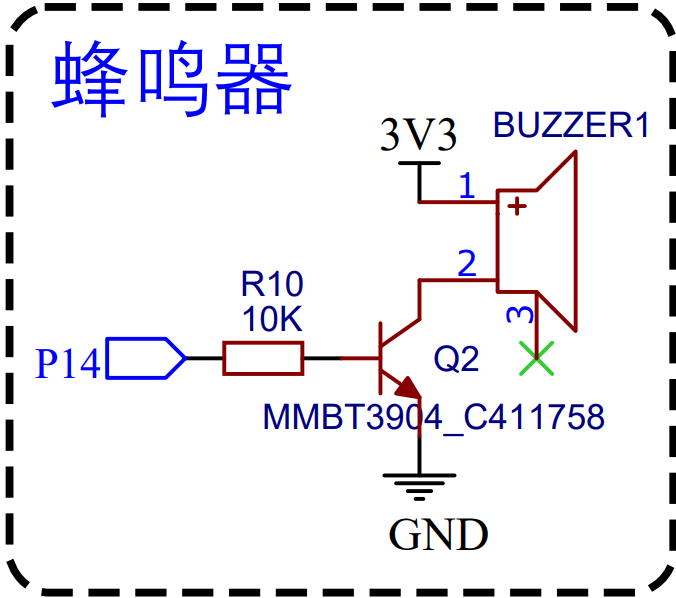
PWM蜂鸣器
开发流程
来到应用开发的根目录。
我们编写代码的根目录为device/board/itcast/genkipi/app。
- 根目录下新建
pwm_buzzer文件夹,此为项目目录。 - 此项目目录下新建
main.c文件 - 此项目目录下新建
BUILD.gn文件 - 修改根目录下的
BUILD.gn文件代码部分
```cinclude
include
include
include “ohos_init.h”
include “cmsis_os2.h”
include “iot_gpio.h”
include “iot_gpio_ex.h”
include “iot_pwm.h”
static void start(void) { //初始化GPIO口 IoTGpioInit(IOT_IO_NAME_14); //设置IO口功能为PWM IoTGpioSetFunc(IOT_IO_NAME_14, IOT_GPIO_FUNC_GPIO_14_PWM5_OUT); //设置IO口输出方向:输出 IoTGpioSetDir(IOT_IO_NAME_14, IOT_GPIO_DIR_OUT); //不断输出高低电压 IoTPwmInit(IOT_PWM_NAME_5); while (1) { IoTPwmStart(IOT_PWM_NAME_5, 50, 10000); usleep(2 1000 1000);
IoTPwmStop(IOT_PWM_NAME_5);usleep(2 * 1000 * 1000);}
}
APP_FEATURE_INIT(start);
```cstatic_library("pwm_buzzer") {sources = ["main.c"]include_dirs = ["//base/iothardware/peripheral/interfaces/inner_api","../../iot_hardware_hals/include"]}
import("//build/lite/config/component/lite_component.gni")lite_component("app") {features = ["pwm_buzzer"]}
音乐播放器
开发流程
来到应用开发的根目录。
我们编写代码的根目录为device/board/itcast/genkipi/app。
- 根目录下新建
music文件夹,此为项目目录。 - 此项目目录下新建
main.c文件 - 此项目目录下新建
BUILD.gn文件 - 修改根目录下的
BUILD.gn文件代码部分
```cinclude
include
include
include “ohos_init.h”
include “cmsis_os2.h”
include “iot_gpio.h”
include “iot_gpio_ex.h”
include “iot_pwm.h”
static uint8_t notes[] = { 1, 2, 3, 1, 1, 2, 3, 1, 3, 4, 5, 3, 4, 5, 5, 6, 5, 4, 3, 1, 5, 6, 5, 4, 3, 1, 1, 5, 1, 1, 5, 1};
static uint8_t durations[] = { 4, 4, 4, 4, 4, 4, 4, 4, 4, 4, 8, 4, 4, 8, 3, 1, 3, 1, 4, 4, 3, 1, 3, 1, 4, 4, 4, 4, 8, 4, 4, 8};
static uint16_t FREQS[] = {0, 523, 587, 659, 698, 784, 880, 988, 523 * 2};
static void start(void) { //初始化GPIO口 IoTGpioInit(IOT_IO_NAME_14); //设置IO口功能为PWM IoTGpioSetFunc(IOT_IO_NAME_14, IOT_GPIO_FUNC_GPIO_14_PWM5_OUT); //设置IO口输出方向:输出 IoTGpioSetDir(IOT_IO_NAME_14, IOT_GPIO_DIR_OUT); //不断输出高低电压 IoTPwmInit(IOT_PWM_NAME_5); while (1) {
for (size_t i = 0; i < sizeof(notes) / sizeof(notes[0]); i++){uint8_t note = notes[i]; // 音符uint16_t hz = FREQS[note] * 8; // 频率uint8_t duration = durations[i]; // 音符节拍IoTPwmStart(IOT_PWM_NAME_5, 50, hz);usleep(duration * 125 * 1000);IoTPwmStop(IOT_PWM_NAME_5);}usleep(5 * 1000 * 1000);}
}
APP_FEATURE_INIT(start);
```cstatic_library("music") {sources = ["main.c"]include_dirs = ["//base/iothardware/peripheral/interfaces/inner_api","../../iot_hardware_hals/include"]}
import("//build/lite/config/component/lite_component.gni")lite_component("app") {features = ["music"]}
蜂鸣器驱动封装
开发流程
来到应用开发的根目录。
我们编写代码的根目录为device/board/itcast/genkipi/app。
- 根目录下新建
music_driver文件夹,此为项目目录。 - 此项目目录下新建
main.c,buzzer.h``buzzer.c文件 - 此项目目录下新建
BUILD.gn文件 - 修改根目录下的
BUILD.gn文件 ```cinclude
include
include
include “ohos_init.h”
include “cmsis_os2.h”
include “buzzer.h”
static uint8_t notes[] = { 1, 2, 3, 1, 1, 2, 3, 1, 3, 4, 5, 3, 4, 5, 5, 6, 5, 4, 3, 1, 5, 6, 5, 4, 3, 1, 1, 5, 1, 1, 5, 1};
static uint8_t durations[] = { 4, 4, 4, 4, 4, 4, 4, 4, 4, 4, 8, 4, 4, 8, 3, 1, 3, 1, 4, 4, 3, 1, 3, 1, 4, 4, 4, 4, 8, 4, 4, 8};
static uint16_t FREQS[] = {0, 523, 587, 659, 698, 784, 880, 988, 523 * 2};
static void start(void) { Buzzer_init(); while (1) {
for (size_t i = 0; i < sizeof(notes) / sizeof(notes[0]); i++){uint8_t note = notes[i]; // 音符uint16_t hz = FREQS[note] * 8; // 频率uint8_t duration = durations[i]; // 音符节拍Buzzer_beep(hz);usleep(duration * 125 * 1000);Buzzer_stop();}usleep(5 * 1000 * 1000);}
}
APP_FEATURE_INIT(start);
```c#ifndef __BUZZER_H__#define __BUZZER_H__#include <stdint.h>#include "iot_gpio.h"#include "iot_gpio_ex.h"#include "iot_pwm.h"#define BUZZER_PIN 14#define BUZZER_PWM_PORT 5#define BUZZER_PIN_FUNC IOT_GPIO_FUNC_GPIO_14_PWM5_OUT#define BUZZER_PIN_INIT() \{ \IoTGpioInit(BUZZER_PIN); \IoTGpioSetFunc(BUZZER_PIN, BUZZER_PIN_FUNC); \IoTGpioSetDir(BUZZER_PIN, IOT_GPIO_DIR_OUT); \IoTPwmInit(BUZZER_PWM_PORT); \}#define BUZZER_PWM_START(HZ) {IoTPwmStart(BUZZER_PWM_PORT, 50, HZ);}#define BUZZER_PWM_STOP() {IoTPwmStop(BUZZER_PWM_PORT);}void Buzzer_init(void);void Buzzer_beep(uint16_t hz);void Buzzer_stop(void);#endif
#include "buzzer.h"void Buzzer_init(void) {BUZZER_PIN_INIT();}void Buzzer_beep(uint16_t hz) {BUZZER_PWM_START(hz);}void Buzzer_stop(void) {BUZZER_PWM_STOP();}
static_library("music_driver") {sources = ["main.c","buzzer.c"]include_dirs = ["//base/iothardware/peripheral/interfaces/inner_api","../../iot_hardware_hals/include"]}
import("//build/lite/config/component/lite_component.gni")lite_component("app") {features = ["music_driver"]}
蜂鸣器驱动封装
练习题
- gpio控制灯
- pwm控制灯
- pwm播放音乐
- buzzer驱动封装

若有收获,就点个赞吧
0 人点赞
