学习目标
- Hi3861的串口2(Uart2)和STC8的串口进行通讯
- HI3861的串口2定时发送消息给STC8
- HI3861的串口2收到消息后,通过printf输出到控制台。
串口初始化
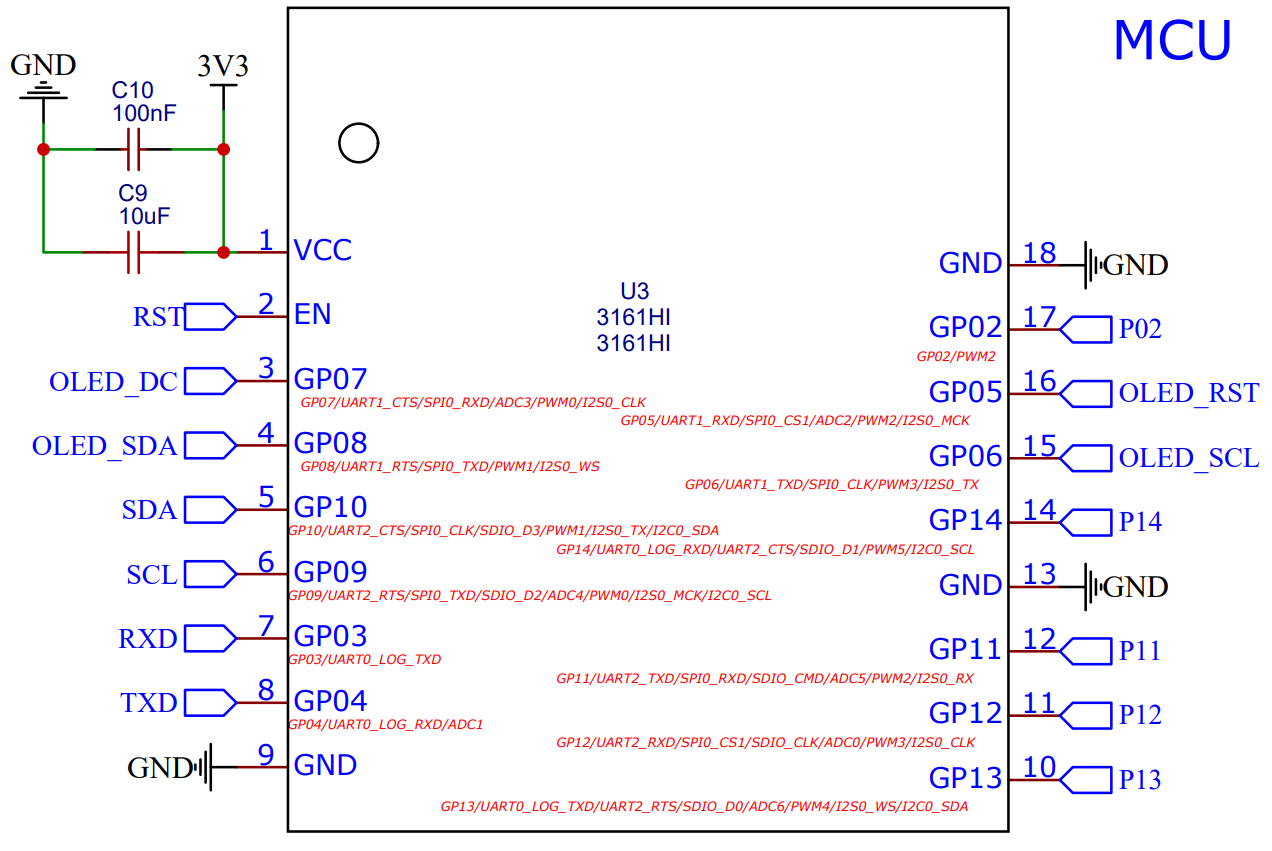
```c //初始化GPIO口 IoTGpioInit(IOT_IO_NAME_11); //设置IO口功能为GPIO IoTGpioSetFunc(IOT_IO_NAME_11, IOT_GPIO_FUNC_GPIO_11_UART2_TXD);
IoTGpioInit(IOT_IO_NAME_12); //设置IO口功能为GPIO IoTGpioSetFunc(IOT_IO_NAME_12, IOT_GPIO_FUNC_GPIO_12_UART2_RXD);
IotUartAttribute attr; attr.baudRate = 115200; //波特率 attr.dataBits = 8; //数据位 attr.stopBits = 1; // 停止位 attr.parity = IOT_UART_PARITY_NONE; //是否奇偶校验 attr.rxBlock = IOT_UART_BLOCK_STATE_NONE_BLOCK; // 是否为阻塞式 attr.txBlock = IOT_UART_BLOCK_STATE_NONE_BLOCK; // 是否为阻塞式 attr.pad = 0;//padding bit,占位空字符 IoTUartInit(IDX, &attr);
<a name="lSmBq"></a>#### 开发流程来到应用开发的**根目录。**<br />我们编写代码的**根目录**为`device/board/itcast/genkipi/app`。1. **根目录**下新建`uart_demo`文件夹,此为**项目目录**。2. 此**项目目录**下新建`main.c`文件3. 此**项目目录**下新建`BUILD.gn`文件4. 修改**根目录**下的`BUILD.gn`文件<a name="pbSC0"></a>#### 代码部分```c/** Copyright (C) 2020 Itcast Co., Ltd. All rights reserved.* Licensed under the Apache License, Version 2.0 (the "License");* you may not use this file except in compliance with the License.* You may obtain a copy of the License at** http://www.apache.org/licenses/LICENSE-2.0** Unless required by applicable law or agreed to in writing, software* distributed under the License is distributed on an "AS IS" BASIS,* WITHOUT WARRANTIES OR CONDITIONS OF ANY KIND, either express or implied.* See the License for the specific language governing permissions and* limitations under the License.*/#include <stdio.h>#include <string.h>#include <unistd.h>#include "cmsis_os2.h"#include "ohos_init.h"#include "iot_gpio.h"#include "iot_gpio_ex.h"#include "iot_uart.h"#define IDX 2static void uart_write(void) {unsigned char data[256];int cnt = 0;while (1){sprintf(data, "nice %d\r\n", cnt++);IoTUartWrite(IDX, data, strlen(data));usleep(2 * 1000 * 1000);}}static void uart_read(void) {unsigned char data[256];int len = 0;while (1){len = IoTUartRead(IDX, data, 256);if(len <= 0) {usleep(20 * 1000);continue;}data[len] = '\0';printf("recv: %s\r\n", data);usleep(20 * 1000);}}static void start_read_task() {osThreadAttr_t attr;attr.name = "read";attr.attr_bits = 0U;attr.cb_mem = NULL;attr.cb_size = 0U;attr.stack_mem = NULL;attr.stack_size = 1024 * 2;attr.priority = 25;// Create the Thread1 taskif (osThreadNew((osThreadFunc_t)uart_read, NULL, &attr) == NULL) {printf("Failed to create read Thread!\n");}}static void start_write_task() {osThreadAttr_t attr;attr.name = "write";attr.attr_bits = 0U;attr.cb_mem = NULL;attr.cb_size = 0U;attr.stack_mem = NULL;attr.stack_size = 1024 * 2;attr.priority = 25;// Create the Thread1 taskif (osThreadNew((osThreadFunc_t)uart_write, NULL, &attr) == NULL) {printf("Failed to create read Thread!\n");}}static void uart(void){printf("Hello World!Hello genkipi\n");//初始化GPIO口IoTGpioInit(IOT_IO_NAME_11);//设置IO口功能为GPIOIoTGpioSetFunc(IOT_IO_NAME_11, IOT_GPIO_FUNC_GPIO_11_UART2_TXD);IoTGpioInit(IOT_IO_NAME_12);//设置IO口功能为GPIOIoTGpioSetFunc(IOT_IO_NAME_12, IOT_GPIO_FUNC_GPIO_12_UART2_RXD);IotUartAttribute attr;attr.baudRate = 115200; //波特率attr.dataBits = 8; //数据位attr.stopBits = 1; // 停止位attr.parity = IOT_UART_PARITY_NONE; //是否奇偶校验attr.rxBlock = IOT_UART_BLOCK_STATE_NONE_BLOCK; // 是否为阻塞式attr.txBlock = IOT_UART_BLOCK_STATE_NONE_BLOCK; // 是否为阻塞式attr.pad = 0;//padding bit,占位空字符IoTUartInit(IDX, &attr);start_read_task();start_write_task();}static void main(void){osThreadAttr_t attr;attr.name = "uart";attr.attr_bits = 0U;attr.cb_mem = NULL;attr.cb_size = 0U;attr.stack_mem = NULL;attr.stack_size = 1024;attr.priority = 25;// Create the Thread1 taskif (osThreadNew((osThreadFunc_t)uart, NULL, &attr) == NULL) {printf("Failed to create say hello Thread!\n");}}APP_FEATURE_INIT(main);
static_library("uart——demo") {sources = [ "main.c" ]include_dirs = ["//base/iothardware/peripheral/interfaces/inner_api","../../iot_hardware_hals/include"]}
import("//build/lite/config/component/lite_component.gni")lite_component("app") {features = ["uart_demo"]}
校验方式
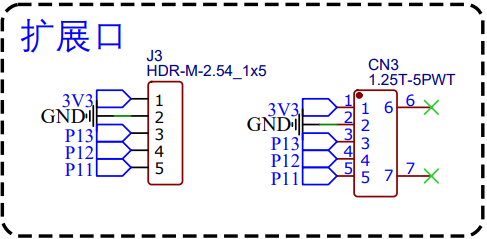
接线: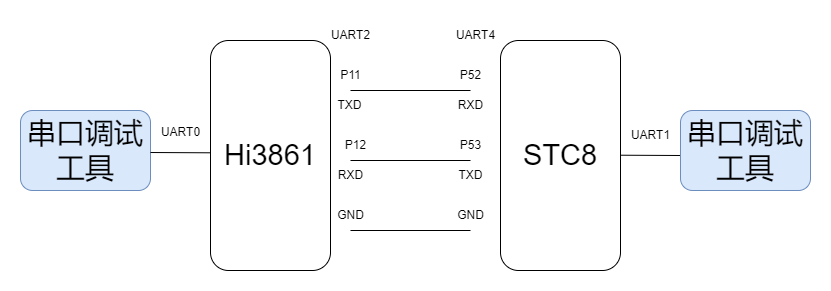
通过串口调试工具,测试两端是否联通。
练习题
- 调试不同芯片间的串口

若有收获,就点个赞吧
0 人点赞
