
虚拟开发环境
虚拟环境就是一个目录树,在这其中安装特定的python版本以及其它的包
对于不同的应用使用不同的虚拟环境,可以解决需求相冲突的情况。
使用Virtualenv
pip install virtualenvvirtualenv --versionvirtualenv -p python3 venv #虚拟环境命名为venv
此时文件夹下会创建一个venv全新的文件夹,使用时只需要激活即可:
- windows激活:venv\Script\activate
- linux激活:source venv/bin/activate
-
使用pip包管理工具
安装包:pip install 包名==版本号
- 显示全部安装的包:pip list
- 显示可升级的包:pip list —outdate
- 升级包:pip install —upgrade 包名 可以使用==,>=,<=,>,<将包升级到指定版本
-
包的路径
python找第三方包的时候会出现问题,有时候会出现找不到包的情况,这个时候需要排除路径,一般python找包通过sys.path这个值来依次加载找寻
import syssys.path

如果出现包找不到,那么包所在的路径如果不存在就需要添加,有如下方法:
1、sys.path.append() 临时添加,如果退出就失效
2、在site-packages路径下添加一个路径配置文件,文件的扩展名为.pth,内容为要添加的路径即可
在/usr/lib/python3.6/site-packages下添加一个path.pth文件,写入内容即可(推荐)
3、添加环境变量PYTHONPATH,python会添加此路径下的模块在.bash_profile文件中添加如下类似行:
export PYTHONPATH=$PYTHONPATH:/usr/local/lib/python2.7/site-packages(不推荐,这个方法添加的包一定会在路径最前面,有时候会导致原生的包无法正常时候)移植工具
将一个已经开放完成的项目迁移到另一个全新的python环境时,可以将原项目中的包逐一安装的新环境中,可以使用如下的方式:
- 使用如下命令将已经安装好的包输出到requirements.txt文件中
pip freeze > requirements.txt
requirement.txt包含了包名以及版本号
b. 在全新的python环境下,一次安装requirements.txt文件中所有包:
pip install -r requirements.txt
使用镜像源加速
使用pip下载安装第三方包时,可以使用国内镜像来解决超时的问题
- 清华:https://pypi.tuna.tsinghua.edu.cn/simple
- 阿里:https://mirrors.aliyun.com/pypi/simple
- 豆瓣:https://pypi.douban.com/simple
- 临时使用
pip install -i https://pypi.tuna.tsinghua.edu.cn/simple beautifultable
- 默认使用
可以设置为配置文件,
Windows : C:\Users\Administrator\pip\pip.ini
Linux:~/.config/pip/pip.conf
[global]
index-url=https://pypi.tuna.tsinghua.edu.cn/simple
[install]
trusted-host=mirrors.aliyun.com
Docker
卸载
sudo apt-get --purge remove docker-cesudo rm -rf /var/lib/docker
安装
sudo apt-get updatesudo apt-get install apt-transport-https ca-certificates curl gnup g-agent soft ware-properties-commoncurl -fsSL https://download.docker.com/linux/ubuntu/gpg | sudo apt-key add -sudo apt-key fingerprint 0EBFCD88sudo add-apt-repository "deb [arch=amd64] https://download.docker.com/linux/ubuntu $(lsb_release -cs) stable"sudo apt-get install docker-ce docker-ce-cli containerd.io#指定版本apt-cache madison docker-cesudo apt-get install docker-ce=<VERSION_STRING> docker-ce-cli=<VERSION_STRING> containerd.io
增加普通用户权限
sudo usermod -aG docker <your-user>
制作docker容器
sudo docker build --rm --network=host --no-cache --build-arg "username=$(whoami)" --build-arg "host_uid=$(id -u)" --build-arg "host_gid=$(id -g)" --tag "yocto:latest" <your-dockerfilepath>#容器制作成镜像docker save -o yocto.tar.gz yocto:latest#镜像还原docker load --input yocto.tar.gz
使用docker
—network=host 挂载主机网络
—privileged -v /dev:/dev 挂载主机驱动
—device=/dev/ttyUSB1 只挂载一个
sudo docker run -ti --network=host -v /home/q/docker/gerrit:/home/q/workspace yocto:latest /bin/bashdocker run -dit --network=host --privileged -v /dev:/dev -v /home/q/gregory.peng/gerrit/ql_auto_check:/home/quectel/version_check autocheck:v1.0 /bin/bashdocker ps -adocker attach [CONTAINER_NAME or CONTAINER_ID]#使用[ctrl + D],这样会结束docker当前线程,容器结束,可以使用[ctrl + P][ctrl + Q]退出而不终止容器运行
这样可以进入上一次的docker容器里面,在这个容器里面装的东西不会被删除
docker start e3979acedd61docker attach e3979acedd61
删除
#删除进程docker ps -adocker rm -f e7bf15dfb241#删除容器docker imagesdocker image rm docker d313d836f552 -f
dockerfile
# Copyright 2019, Burkhard Stubert (DBA Embedded Use)# In any directory on the docker host, perform the following actions:# * Copy this Dockerfile in the directory.# * Create input and output directories: mkdir -p yocto/output yocto/input# * Build the Docker image with the following command:# docker build --no-cache --build-arg "host_uid=$(id -u)" --build-arg "host_gid=$(id -g)" \# --tag "cuteradio-image:latest" .# * Run the Docker image, which in turn runs the Yocto and which produces the Linux rootfs,# with the following command:# docker run -it --rm -v $PWD/yocto/output:/home/cuteradio/yocto/output cuteradio-image:latest# Use Ubuntu 16.04 LTS as the basis for the Docker image.FROM ubuntu:18.04COPY keyboard /etc/default/keyboardRUN echo "console-setup console-setup/codeset47 select Guess optimal character set" | debconf-set-selections && \echo "console-setup console-setup/fontface47 select Fixed" | debconf-set-selections && \echo "console-setup console-setup/fontsize-text47 select 16" | debconf-set-selections && \echo "console-setup console-setup/charmap47 select UTF-8" | debconf-set-selections && \echo "console-setup console-setup/store_defaults_in_debconf_db boolean true" | debconf-set-selections && \echo "console-setup console-setup/fontsize-fb47 select 16" | debconf-set-selections && \echo "console-setup console-setup/fontsize string 16" | debconf-set-selections# Install all the Linux packages required for Yocto builds. Note that the packages python3,# tar, locales and cpio are not listed in the official Yocto documentation. The build, however,# without them.RUN sed -i s/archive.ubuntu.com/mirrors.ustc.edu.cn/g /etc/apt/sources.list \&& sed -i s/security.ubuntu.com/mirrors.ustc.edu.cn/g /etc/apt/sources.list \&& apt-get update && apt-get -y install autoconf cryptsetup-bin checkpolicy squashfs-tools dos2unix \python python3 python3-pip python3-pexpect libncurses5-dev unzip locales sudo iputils-ping tar vim git \make git-core wget ssh dpkg tree bc m4 libc6-dev-i386 libswitch-perl automake cmake cpio curl minicom zip# gawk wget git-core diffstat texinfo gcc-multilib \# build-essential chrpath socat cpio \# xz-utils debianutils iputils-ping tar locales sudo gcc-4.9 gettext vim cryptsetup mtd-utils squashfs-tools \# libncurses5-dev bc m4 bear openjdk-8-jre rpm2cpio libc6-dev-i386 libxml-simple-perl libswitch-perl \# autoconf automake bsdiff chrpath cmake cpio \# diffstat flex gcovr git gperf rpm2cpio curl \# iputils-ping libbz2-dev libcurl4-gnutls-dev libncurses5-dev \# libncursesw5-dev libsdl-dev libssl-dev libtool libxml2-utils \# ninja-build python python-git python-jinja2 python-pkg-resources \# zlib1g-dev doxygen graphviz python3-crypto libfile-copy-recursive-perl device-tree-compiler \# bison subversion quilt intltool ruby fastjar zip unzip \# coreutils cvs desktop-file-utils docbook-utils fakeroot libgmp3-dev help2man libmpfr-dev libreadline6-dev \# libxml2-dev python-pysqlite2 make texi2html aptitude# vim configure# RUN pip3 install scons -i https://pypi.tuna.tsinghua.edu.cn/simple# RUN aptitude install libc6-i386 libstdc++6:i386# RUN update-alternatives --install /usr/bin/gcc gcc /usr/bin/gcc-5 50 && \# update-alternatives --install /usr/bin/gcc gcc /usr/bin/gcc-4.9 40# RUN curl -s https://packagecloud.io/install/repositories/github/git-lfs/script.deb.sh | bash \# && apt-get install git-lfs# By default, Ubuntu uses dash as an alias for sh. Dash does not support the source command# needed for setting up the build environment in CMD. Use bash as an alias for sh.RUN rm /bin/sh && ln -s /bin/bash /bin/sh# Set the locale to en_US.UTF-8, because the Yocto build fails without any locale set.RUN locale-gen en_US.UTF-8 && update-locale LC_ALL=en_US.UTF-8 LANG=en_US.UTF-8ENV LANG en_US.UTF-8ENV LC_ALL en_US.UTF-8# Perform the Yocto build as user yoctouser (not as root).# NOTE: The USER command does not set the environment variable HOME.ARG username=yoctouserARG host_uid=1000ARG host_gid=1000RUN groupadd -g $host_gid $username && \useradd -G sudo -m -s /bin/bash -u $host_uid -g $host_gid $username && \echo "$username:123" | chpasswd && \echo '%sudo ALL=(ALL) NOPASSWD:ALL' >> /etc/sudoersCOPY vimrc /home/$username/.vimrc#autocheck env# COPY google-chrome-stable_current_amd64.deb /home/$username/COPY allure-commandline-2.13.8.tgz /usr/local/COPY ql_crosstools.tar.gz /opt/COPY pip.conf /home/$username/.config/pip/COPY requirement.txt /home/$username/COPY QFirehose /usr/bin/COPY jdk-8u201-linux-x64.tar.gz /usr/local/RUN cd /home/$username/ && pip3 install -r requirement.txt -i https://pypi.tuna.tsinghua.edu.cn/simple \&& cd /usr/local && tar -xf jdk-8u201-linux-x64.tar.gz && ln -s /usr/local/jdk1.8.0_201/bin/java /usr/bin/java \&& tar -xf allure-commandline-2.13.8.tgz && ln -s /usr/local/allure-2.13.8/bin/allure /usr/bin/allure \&& cd /opt && tar -xf ql_crosstools.tar.gz && chown -R $username:$username ql_crosstools /usr/bin/allure /usr/bin/QFirehose /usr/bin/java# By default, docker runs as root. However, Yocto builds should not be run as root, but as a# normal user. Hence, we switch to the newly created user cuteradio.USER $usernameWORKDIR /home/$usernameCMD /bin/bash
框架部署
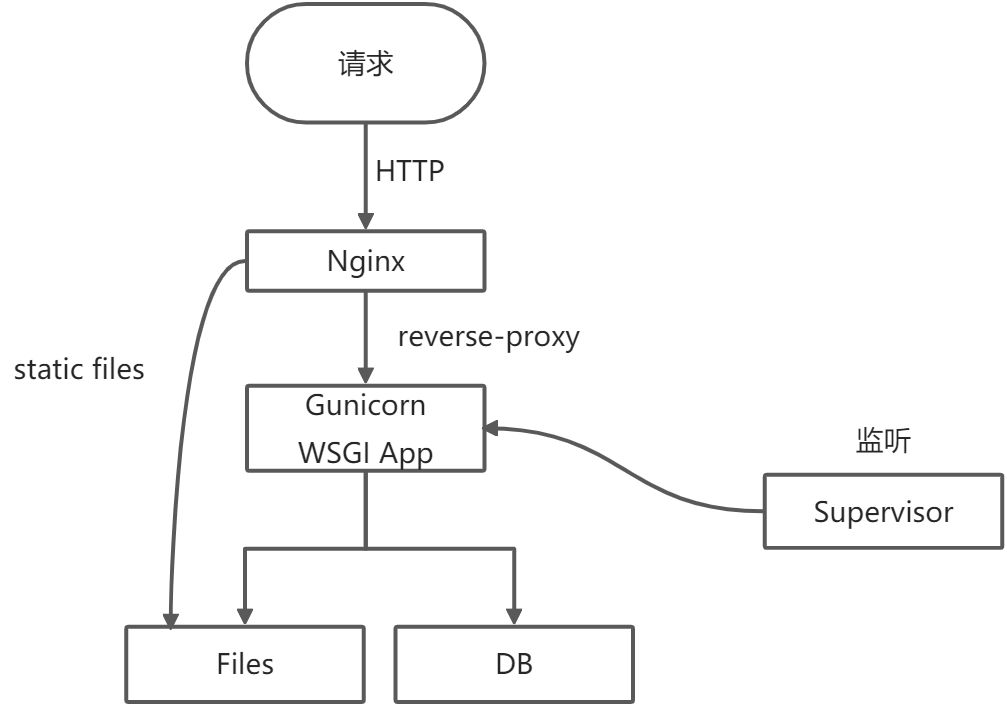
Gunicorn
安装,直接在虚拟环境venv下安装Gunicorn
pip install gunicorn
添加参数启动服务
gunicorn -w 3 -b 0.0.0.0:9100 run:app
run:执行python文件run.py
app:Flask app应用名称
常用启动参数及说明
| 参数 | 说明 |
|---|---|
| -c/—config=CONFIG | 指定配置文件 |
| -b/—bind=BIND | 绑定运行的主机加端口 |
| -w/—workers INT | 用于处理工作进程的数量,整数默认为1 |
| -k/—worker-class STRTING | 要使用的工作模式,默认为sync异步,类型可以为:sync,eventlet,gevent,tornado,gthread,gaiohttp |
| —threads INT | 处理请求的工作线程数,使用指定数量的线程去运行每个worker,默认为1 |
| —worker-connections INT | 最大客户端并发数量,默认为1000 |
| —backlog INT | 等待连接的最大数,默认为2048 |
| -p/—pid FILE | 设置pid文件的文件名,不设置不会创建pid文件 |
| —access-logfile FILE | 日志文件路径 |
| —access-log_format STRING | 日志格式,—access-log_format’%(h)s%(l)s%(u)s%(t)s’ |
| —error-logfile FILE,—log-file FILE | 错误日志文件路径 |
| —log-level LEVEL | 日志输出等级 |
| —limit-request-line INT | 限制HTTP请求行的允许大小,默认为4096,取值范围0-8190,可以防止任何DDOS攻击 |
| —limit-request-fields INT | 限制HTTP请求头字段的数量,默认100,最大值为32768 |
| —limit-request-field-size INT | 限制HTTP请求中头的大小,默认为8190,该值为0时表示不对请求头大小做限制 |
| -t/—timeout INT | 设置超时,超过后工作将被杀掉并重新启动,默认为30s,Nginx为60s |
| —reload | 在代码改变时自动重启,默认为False |
| —daemon | 是否以守护进程启动,默认为False |
| —chdir | 在加载应用程序之前切换目录 |
| —graceful-timeout INT | 默认30,超时(从接收到重启信号开始)之后仍活在的工作将被强行杀死,一般采用默认值 |
| —keep-alive INT | 在keep-alive连接上等待请求的描述,默认为2s,一般设定为1~5s |
| —spew | 打印服务器执行过的每一条语句,默认为False |
| —check-config | 显示当前配置,默认为False,即不显示 |
| -e/—env ENV | 设置环境变量 |
- 加载配置文件启动服务
如果Gunicorn时加载的参数很多,那么第一种方式就不适用了,此时使用配置文件的方式来启动Gunicorn
mkdir /var/www/html/flask_test/gunicornvi /var/www/html/flask_test/gunicorn/gunicorn_conf.py
import loggingimport osimport multiprocessingBASE_DIR = os.path.abspath(os.path.dirname(__file__))port = [自行设定端口]bind = f'0.0.0.0:{port}'backlog = 512chdir = BASE_DIRtimeout = 30daemon = 'false'worker_connections = 2000loglevel = 'warning'threads = 2workers = multiprocessing.cpu_count()access_log_format = '%(t)s %(p)s %(h)s "%(r)s" %(s)s %(L)s %(b)s %(f)s" "%(a)s"'accesslog = os.path.join(BASE_DIR, "log/gunicorn_access.log")errorlog = os.path.join(BASE_DIR, "log/gunicorn_error.log")
gunicorn -c gunicorn/gunicorn_conf.py run:app
Nginx
nginx是轻量级的web服务器和反向代理服务器,占用内存小,启动极快,高并发能力强
Nginx在做反向代理时,提供性能稳定,并且能够提供配置灵活的转发功能。Nginx可以根据不同的正则匹配,采取不同的转发策略,比如图片文件结尾的走文件服务器,动态页面走web服务器,只要你正则写的没问题,又有相对应的服务器解决方案,你就可以随心所欲的玩。并且Nginx对返回结果进行错误页跳转,异常判断等。如果被分发的服务器存在异常,他可以将请求重新转发给另外一台服务器,然后自动去除异常服务器
nginx -V
nginx version: nginx/1.10.3 (Ubuntu)
built with OpenSSL 1.0.2g 1 Mar 2016
TLS SNI support enabled
configure arguments: —with-cc-opt=’-g -O2 -fPIE -fstack-protector-strong -Wformat -Werror=format-security -Wdate-time -D_FORTIFY_SOURCE=2’ —with-ld-opt=’-Wl,-Bsymbolic-functions -fPIE -pie -Wl,-z,relro -Wl,-z,now’ —prefix=/usr/share/nginx —conf-path=/etc/nginx/nginx.conf —http-log-path=/var/log/nginx/access.log —error-log-path=/var/log/nginx/error.log —lock-path=/var/lock/nginx.lock —pid-path=/run/nginx.pid —http-client-body-temp-path=/var/lib/nginx/body —http-fastcgi-temp-path=/var/lib/nginx/fastcgi —http-proxy-temp-path=/var/lib/nginx/proxy —http-scgi-temp-path=/var/lib/nginx/scgi —http-uwsgi-temp-path=/var/lib/nginx/uwsgi —with-debug —with-pcre-jit —with-ipv6 —with-http_ssl_module —with-http_stub_status_module —with-http_realip_module —with-http_auth_request_module —with-http_addition_module —with-http_dav_module —with-http_geoip_module —with-http_gunzip_module —with-http_gzip_static_module —with-http_image_filter_module —with-http_v2_module —with-http_sub_module —with-http_xslt_module —with-stream —with-stream_ssl_module —with-mail —with-mail_ssl_module —with-threads
其中可以看到 —prefix=/etc/nginx,nginx 安装时会把相关数据文件写入到该目录,如我们的配置文件 —conf-path。
每次更改 nginx 的配置文件,你需要执行一下操作:
#验证配置文件的正确性nginx -T#重新加载配置文件nginx -s reload
安装完 nginx ,我们先来看一看 nginx 的默认配置 /etc/nginx/nginx.conf,当然可能与你的默认配置不同,不过大同小异:
# worker以什么身份运行user nginx; // default nobody# worker进程个数,一般为 CPU 个数,也可选 autoworker_processes 1; # default 1# 每个worker可打开的描述符限制worker_rlimit_nofile 8192;# 错误日志保存路径和级别error_log /var/log/nginx/error.log warn;# 进程pid保存路径pid /var/run/nginx.pid;# 指定dns服务器resolver 10.0.0.1;events {# 每个worker最大连接数worker_connections 1024; # default 1024}# http 服务定义http {# 加载 mime 类型include /etc/nginx/mime.types;# 定义默认数据类型default_type application/octet-stream;# 日志格式log_format main '$remote_addr - $remote_user [$time_local] "$request" ''$status $body_bytes_sent "$http_referer"''"$http_user_agent" "$http_x_forwarded_for"';# 访问日志access_log /var/log/nginx/access.log main;# 是否调用sendfile函数(zero copy 方式)来输出文件,如果磁盘IO重负载应用,可设置为offsendfile on;# 此选项允许或禁止使用socke的TCP_CORK的选项,此选项仅在使用sendfile的时候使用#tcp_nopush on;keepalive_timeout 65;# 代理相关设置# proxy_connect_timeout 90;# proxy_read_timeout 180;# proxy_send_timeout 180;# proxy_buffer_size 256k;# proxy_buffers 4 256k;# proxy_busy_buffers_size 256k;# proxy_temp_file_write_size 256k;# tcp_nodelay on;# gzip 压缩#gzip on;# 加载其它配置,这样我们在 conf.d 下写的文件才会生效include /etc/nginx/conf.d/*.conf;include /etc/nginx/sites-enabled/*;}
内置变量
内置变量,nginx 各个模块都将请求的一些参数进行变量化,通过 $ + 变量名 即可使用。每个模块或多或少都有自己的变量。着重介绍下核心模块的 内置变量:
# 通过arg_<name>的方式可取出相关参数,若请求 /foo?name=Tony&age=2,则 arg_name=tony arg_age=2$arg_name$args# 客户端IP地址二进制$binary_remote_addr# 发送到客户端的字节数,不包括响应头$body_bytes_sent# 发送给客户端字节数$bytes_sent# 连接序列号$connection# 当前已经连接的请求书$connection_requests# Content-Length 请求头$content_length# Content-Type 请求头$content_type# cookie 名称$cookie_name# 当前请求的 root 或 alias 的值$document_root# 与 $uri 相同$document_uri# 优先级:请求行中的 host name,请求头中的 Host,请求匹配的 server name$host# host name$hostname# 任意请求头字段。变量名的最后一部分是转换为小写的字段名,用下划线替换破折号$http_name# 如果连接在 SSL 模式下运行,则为 on,否则为空字符串$https# ? 后如果请求行有参数,或者空字符串$is_args# 设置此变量可以限制响应速度$limit_rate# 当前时间(秒),分辨率为毫秒$msec# nginx 版本号$nginx_version# 当前 worker 进程号$pid# 如果是 pipelined 则为 p,否则为 .$pipe# 代理协议头中的客户端地址,否则为空字符串,代理协议之前必须通过在listen指令中设置 proxy_protocol 参数来启用$proxy_protocol_addr# 来自代理协议头的客户端端口,否则为空字符串,代理协议之前必须通过在listen指令中设置 proxy_protocol 参数来启用$proxy_protocol_port# 与 $args 相同$query_string# 与当前请求的 root 或 alias 指令值对应的绝对路径名,所有符号链接都解析为实际路径$realpath_root# 客户端地址$remote_addr# 客户端端口$remote_port# 使用 Basic auth 的用户名$remote_user# 完整的请求行$request# 请求体,当将请求体读入内存缓冲区时,proxy_pass、fastcgi_pass、uwsgi_pass和scgi_pass指令处理的位置可以使用变量的值$request_body# 具有请求主体的临时文件的名称$request_body_file# 如果请求完成则为 OK,否则为空$request_completion# 当前请求的文件路径,基于 root 或 alias 和请求 URI$request_filename# 由16个随机字节生成的惟一请求标识符,以十六进制表示$request_id# 请求长度(包括请求行、头和请求体)$request_length# 请求方法,如 GET 或 POST$request_method# 请求处理时间,从客户端读取第一个字节以来的时间$request_time# 若请求 /foo?a=1&b=2,则 request_uri=/foo?a=1&b=2$request_uri# 如 http 或 https$scheme# 任意响应报头字段,变量名的最后一部分是转换为小写的字段名,用下划线替换破折号$sent_http_name# 响应结束时发送的任意字段,变量名的最后一部分是转换为小写的字段名,用下划线替换破折号$sent_trailer_name# 接受请求的服务器的地址$server_addr# 接受请求的 server 名称$server_name# 接受请求的 server 端口$server_port# 请求协议,如 HTTP/1.0 或 HTTP/1.1 或 HTTP/2.0$server_protocol# 响应状态$status$tcpinfo_rtt,$tcpinfo_rttvar,$tcpinfo_snd_cwnd,$tcpinfo_rcv_space# 本地时间ISO 8601标准格式$time_iso8601# 通用日志格式的本地时间$time_local# 若请求 /foo?a=1&b=2,则 uri=/foo$uri# 用户代理$http_user_agent# cookie$http_cookie
server定义
server 即虚拟服务,它用来描述我们站点一些访问规则。需要填写在 http 标签中,可定义多个,如:
http{resolver 127.0.0.1;# 负载均衡upstream dynamic {zone upstream_dynamic 64k;server backend1.example.com weight=5;server backend2.example.com:8080 fail_timeout=5s slow_start=30s;server 127.0.0.1:8080 max_fails=3;server backend3.example.com resolve;server backend4.example.com service=http resolve;server backup1.example.com:8080 backup;server backup2.example.com:8080 backup;}server{listen 80;server_name example.com www.example.com;location / {rewrite https://$host; # 重定向到https}}server {listen 443 ssl; # 监听端口server_name example.com www.example.com; # 匹配域名# ssl证书ssl_protocols TLSv1 TLSv1.1 TLSv1.2;ssl_ciphers AES128-SHA:AES256-SHA:RC4-SHA:DES-CBC3-SHA:RC4-MD5;ssl_certificate /usr/local/nginx/conf/cert.pem;ssl_certificate_key /usr/local/nginx/conf/cert.key;ssl_session_cache shared:SSL:10m;ssl_session_timeout 10m;# 静态服务location / {root /usr/share/nginx/html;index index.html index.htm;}# 反向代理location /api {proxy_pass http://dynamic;health_check;}}}
- http_upstream_module
说白了就是做负载均衡,它可以帮助我们定义一组相同服务的别名,如backend,当请求到来的时候可以通过相关策略帮我们选一组服务提供响应。
目前只能被 proxy_pass,fastcgi_pass,uwsgi_pass,scgi_pass,memcached_pass,grpc_pass 使用。
形式如下:
upstream <name> { # 命名server <address> [parameters]; # 服务server <address> [parameters];...}
[parameters]可选以下值:
- weight=number,default 1,设置 server 的权重
- max_conns=number,default 0,限制 server 的活跃连接数,0 代表不限制
- max_fails=number,default 1,设置在 fail_timeout 时间内失败的最大次数,可由 proxy_next_upstream,fastcgi_next_upstream,uwsgi_next_upstream,scgi_next_upstream,memcached_next_upstream,grpc_next_upstream 指定下组 upstream,0 值代表不启用
- fail_timeout=time,default 10s,设置多长时间判定无连接服务器失败
- backup,标记 server 为备用 server,当 primary server 不可用时启用
- down,标记 server 下线不可用
- resolve,用来监视与服务器域名对应IP地址的更改,它会自动更改上游配置,upstream 必须驻留在共享内存中,必须写在 http 标签中。
- route=string,设置 server 路由名称
- server=name,
- slow_start=time,慢启动,server 非正常状态恢复到正常需要的时间
- drain,设置为 drain 模式
其它负载均衡设置:
- zone name [size],设置共享内存的名称和大小
- state file,
- hash key [consistent],负载均衡方式,key 可以为文本,变量,或其组合
- ip_hash,负载均衡方式,根据IP地址范围分布 server,用 IPv4 前三个8位或整个IPv6
- keepalive connections,设置到上游 server 保持最大空闲连接
- keepalive_requests number,设置最大请求连接数
- keepalive_timeout timeout,连接超时时间
-
Listen
listen 监听设置,来看一看可选参数:
默认:listen :80 | :8000;
IPv6:listen [::]:8000; listen [::1];
参数说明: default_server,如果指定,server 将会成为默认 server
- ssl,开启 ssl 模式,即 https
- http2,正常情况开启 http2 都应该开始 ssl,但 nginx 也支持不开启 ssl 下的 http2 协议
- spdy,和 http2 一样,建议开启 ssl
- setfib=number,监听套接字设置关联的路由表FIB (SO_SETFIB选项)。这目前只适用于FreeBSD
- fastopen=number,为监听套接字启用“TCP Fast Open”(1.5.8),并限制尚未完成三方握手的连接队列的最大长度
- backlog=number
- rcvbuf=size,接受 buffer 的大小(SO_CRCVBUF)
- sndbuf=size,发送 buffer 的大小(SO_SNDBUF)
- accept_filter=filter,可选 dataready 和 httpready,在 accept() 前过滤
- deferred,指示在Linux上使用deferred accept() (TCP_DEFER_ACCEPT套接字选项)
- bind,标记指定 address:port 单独的绑定
- ipv6only on|off,只接受 IPv6 连接
- reuseport
- so_keepaliv on|off|[keepidle]:[keepintv1]:[keepcnt],”TCP keepalive” 开关
server_name
server_name,设置虚拟主机的名称。
穷举域名
server {server_name example.com www.example.com;}
通配符写法
server {server_name example.com *.example.com www.example.*;}
正则表达式,以~开头
server {server_name ~^www\d+\.example\.com$;}
正则表达式捕获
server {server_name ~^(www\.)?(.+)$;}
正则表达式变量
server {server_name ~^(www\.)?(?<domain>.+)$;}
与空名称使用
server {server_name www.example.com "";}
如果当一个名称匹配多个 server 的是时候,匹配优先级如下:
确切的名称
- 以 * 开头的最长的通配符名称
- 以 * 结尾的最长通配符名称
-
location
location 是用来干嘛的,它是用来根据 URI 进行配置设置的,如:
server{location / { # 普通请求网页root /usr/share/nginx/html;index index.html index.htm;}location /api { # API请求代理proxy_pass http://dynamic;health_check;}}
形式如下
location [ = | ~ | ~* | ^~ ] url{ ... }
- none,如果没有修饰符,则将该位置解释为前缀匹配。这意味着给定的位置将根据请求URI的开头进行匹配,以确定匹配
- =,代表精确匹配,完全相等即匹配
- ~,区分大小写的正则表达式匹配
- ~*,不区分大小写的正则表达式匹配
- ^~,普通字符匹配,如果该选项匹配,只匹配该选项
nginx 的匹配过程如下:
- 精确匹配 =,如果匹配成功,搜索停止
- 前缀匹配,最长位置匹配,如果该匹配具有 ^~,搜索停止
- 正则匹配,按配置文件中定义的顺序进行匹配。
- 如果第3条规则产生匹配的话,结果被使用。否则,使用第2条规则的结果。
#精准匹配,只匹配/location = / {[ configuration A ]}#请求/index.html会匹配到Blocation / {[ configuration B ]}#请求/documentes/document.html 将匹配到Clocation /documents/ {[ configuration C ]}#请求/images/1.gif将会匹配到Dlocation ^~ /images/ {[ configuration D ]}#请求 /documents/1.jpg 将会匹配 Elocation ~* \.(gif|jpg|jpeg)$ {[ configuration E ]}
ssl modem
ssl 模式可以让我们站点启用 HTTPS,具体详细请参考 http_ssl_module。
想要开启 ssl 模式,需要在 listen 关键字处添加上 ssl,如:
上面的例子是部署双证书,当某一证书因某种原因失效不至于导致站点不能访问。下面来看看参数解释:server {listen 443 ssl;server_name example.com;ssl_certificate example.com.rsa.crt;ssl_certificate_key example.com.rsa.key;ssl_certificate example.com.ecdsa.crt;ssl_certificate_key example.com.ecdsa.key;}
- ssl_buffer_size size,default 16k,发送数据的缓冲区的大小
- ssl_certificate file,PEM 格式证书文件
- ssl_certificate_key file,PEM 格式私钥文件
- ssl_ciphers ciphers,default HIGH:!aNULL:!MD5,ssl套件 openssl ciphers
- ssl_client_certificate file,用于验证客户端证书的 CA 文件
- ssl_crl file,用于验证客户端证书的吊销文件
- ssl_dhparam file,为DHE密码指定具有DH参数的文件
- ssl_early_data on|off,default on
- ssl_ecdh_curve curve,default auto,为ECDHE密码指定一条曲线
- ssl_password_file file,私钥密码文件
- ssl_prefer_server_ciphers on|off,是否启用服务器套件偏好
- ssl_protocols [SSLv2] [SSLv3] [SSLv3] [TLSv1] [TLSv1.1] [TLSv1.2] [TLSv1.3],default TLSv1 TLSv1.1 TLSv1.2,可选的ssl协议
ssl_session_cache off|none|[builtin[:size]] [shared:name:size],default none,设置 session cache 的类型和大小
ssl_session_cache builtin:1000 shared:SSL:10m;
ssl_session_ticket_key file,设置一个文件,其中包含用于加密和解密TLS会话票据的密钥
ssl_session_ticket_key current.key;ssl_session_ticket_key previous.key;
ssl_session_tickets on|off,default on,是否启用 session ticket
- ssl_session_timeout time,default 5m,超时时间
- ssl_stapling on|off,default off,ocsp 装订 ssl_stapling on; resolver 192.0.2.1;
- ssl_stapling_file file
- ssl_stapling_responder url
- ssl_stapling_verify on|off,default off
- ssl_trusted_certificate file,指定验证客户端证书的 CA 文件
- ssl_verify_client on|off|optional|optional_no_ca,default off,是否验证客户端证书
- ssl_verify_depth number,default 1,设置客户端证书链的验证深度
相关变量:
$ssl_cipher,已建立连接使用的 ciphers
$ssl_ciphers,客户端支持的 ciphers
$ssl_client_escaped_cert,urlencoded 客户端证书
$ssl_client_fingerprint,SHA1指纹
$ssl_client_i_dn,issuer DN
$ssl_client_i_dn_legacy,同上,1.11.6之后使用
$ssl_client_raw_cert,PEM格式客户端证书
$ssl_client_s_dn,subject DN
$ssl_client_s_dn_legacy,同上,1.11.6之后使用
$ssl_client_serial,客户端证书序列号
$ssl_client_v_end,客户端证书结束时间
$ssl_client_v_remain,剩余多少天
$ssl_client_v_start,证书开始时间
$ssl_client_verify,客户端证书是否验证成功,”SUCCESS” 或 “FAILED:reason” 或 “NONE”
$ssl_curves,客户端支持的曲线
$ssl_early_data$ssl_protocol,连接使用的协议
$ssl_server_name,从 SNI 获取的 server name
$ssl_session_id,连接的 session id
$ssl_session_reused,session是否重用,”r” 重用,”.” 没有
Supervisor
但是nohup运行的后台程序并不能够可靠的在后台运行,我们最好让我们的后台程序能够监控进程状态,还能在意外结束时自动重启,这就可以使用一个使用Python开发的进程管理程序
安装
virtualenv -p python3 venvsource venv/bin/activatepip install supervisor或者使用:sudo apt-get install supervisor
安装完成后,我们在/etc/supervisor/conf.d/目录下创建我们控制进程的配置文件,并以.conf结尾,这样将会自动应用到主配置文件当中,创建后添加如下的配置内容:
[program:demo]command=/q/home/gregory.peng/venv/bin/gunicorn -c ../gunicorn/gconfig.py run:appdirectory=/q/home/gregory.peng/venv //项目目录user=rootautorestart=true //设置自动重启startretires=3 //重启失败3次
在上面的配置文件中,[program:demo]设置了进程名,这与之后操作进程的状态名称有关,为demo;command为进程运行的命令,必须使用绝对路径,并且使用虚拟环境下的gunicorn命令;user指定了运行进程的用户,这里设置为root
接下来,使用如下命令启动supervisor:
sudo supervisord -c /etc/supervisor/supervisor.conf
查看进程状态
sudo supervisorctl status>>foo RUNNING pid 17704, uptime 0:21:21
常用命令:
| 参数 | 说明 |
|---|---|
| status | |
| status |
|
| start | |
| stop | |
| restart | |
| stop all | |
| reload | |
| reread | |
| add |
|
| remove |
|
| update | |
| tail | |
| shutdown |

若有收获,就点个赞吧
0 人点赞
