分布式架构概述
本阶段规划
- 分布式中间件 Redis
- 分布式会话与单点登录
- 分布式搜索引擎Elasticsearch
- 分布式文件系统
- 数据库的读写分离与分库分表
- 数据库表全局唯一主键id设计
- 分布式事务与数据一致性
- 接口幂等性设计与分布式限流
什么是分布式架构
- 不同的业务(功能模块)分散部署在不同的服务器
- 购物车服务、订单服务、商品服务
- 每个子系统负责一个或多个不同的业务模块
- 购物车模块,专门负责购物车相关业务
- 优惠券模块,专门负责优惠券相关业务
- 服务之间可以相互交互与通信
- 能发请求给到其他服务
- 自身服务也能接受到其他服务发送的请求
- 分布式系统设计对用户透明
可以发展成为集群分布式系统架构
- 购物车集群、订单集群
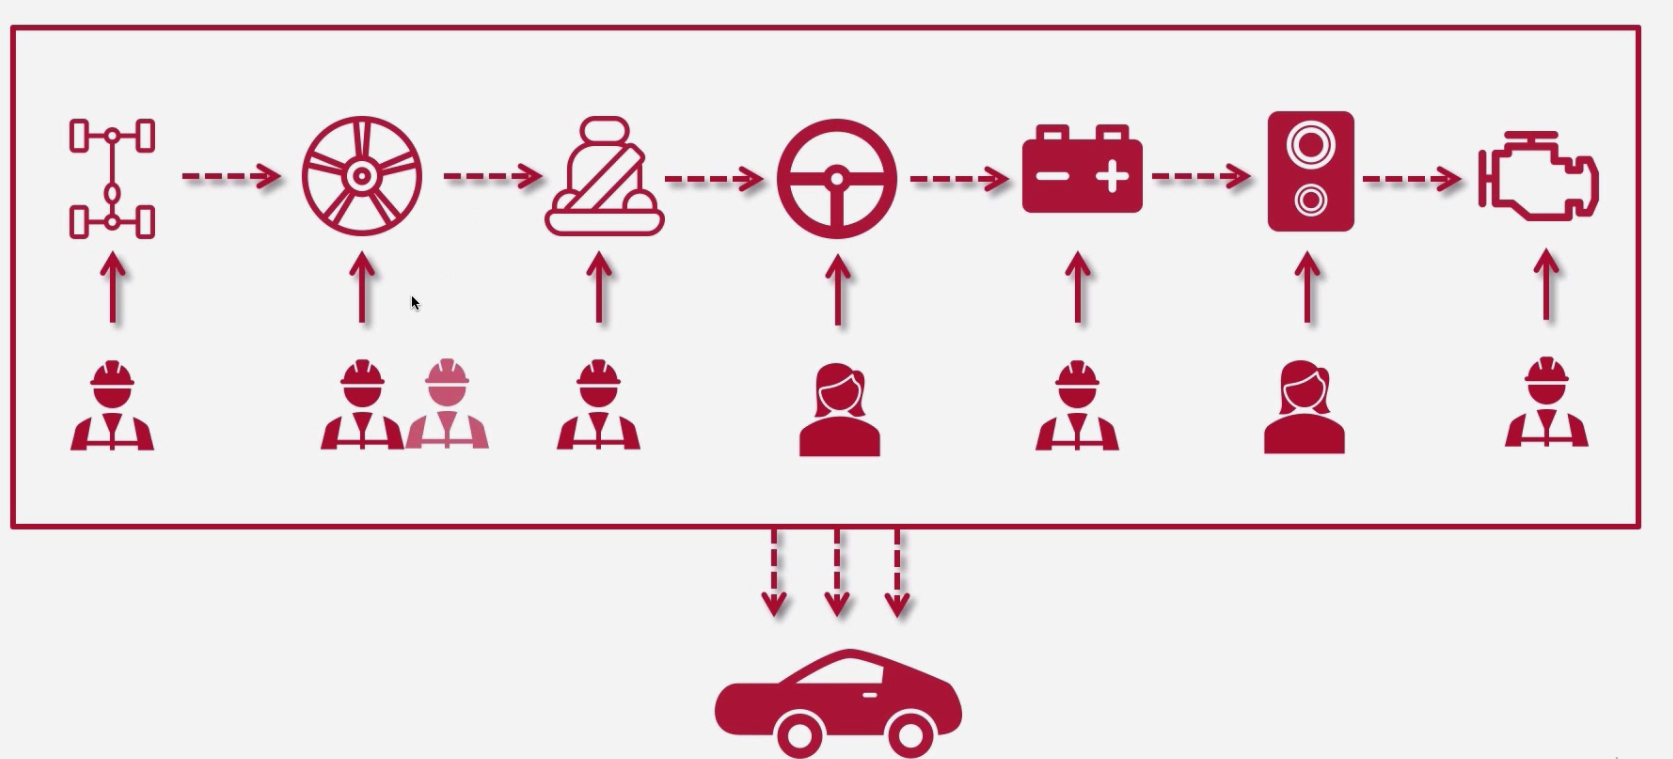
分布式架构
每个人单独负责对应的汽车组件

分布式架构优点
- 业务解耦
- 系统模块化、可重用化
- 提升系统并发量
- 优化运维部署效率
- 架构复杂
- 部署多个子系统复杂
- 系统之间耗时
分布式架构缺点
- 新人融合团队缓慢
- 调试复杂
设计原则
- 异步解耦
- 幂等一致性
- 拆分原则
- 融合分布式中间件
- 容错高可用
Redis 安装
1、下载
https://redis.io/download/
选择文档版本进行下载
上传至 Linux 中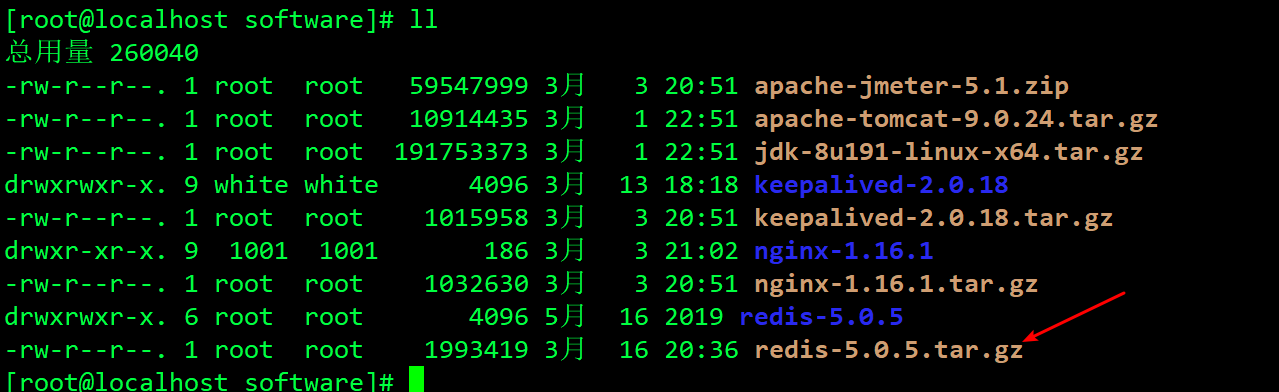
1、解压 redis
tar -zxvf redis-5.0.5.tar.gz
2、安装gcc编译环境,如果已经安装过,则是nothing todo
yum install gcc-c++
3、进入 redis 目录中,进行安装
make && make install
4、在原 redis 文件中的 utils 目录下 拷贝 redis_init_script 到 /etc/init.d 目录,目的要把 redis 作为开机启动
拷贝到 /etc 目录后需要设置文件权限
chmod redis_init_script 777
#!/bin/sh## Simple Redis init.d script conceived to work on Linux systems# as it does use of the /proc filesystem.### BEGIN INIT INFO# Provides: redis_6379# Default-Start: 2 3 4 5# Default-Stop: 0 1 6# Short-Description: Redis data structure server# Description: Redis data structure server. See https://redis.io### END INIT INFO#chkconfig: 22345 10 90#description: Start and Stop redis # 开机自启动REDISPORT=6379 # redis 端口EXEC=/usr/local/bin/redis-server # redis 服务器CLIEXEC=/usr/local/bin/redis-cli # redis 命令PIDFILE=/var/run/redis_${REDISPORT}.pid # pidCONF="/usr/local/redis/redis.conf" # 指定redis配置文件地址
设置开机自启动
chkconfig redis_init_script on
2、redis相关命令
redis-cli -a password shutdown :关闭redis./redis_init_script stop :关闭redis start : 启动redisredis-cli :进入到redis客户端auth pwd :输入密码redis-cli -a password ping :查看是否存活
3、redis.conf 更改
# By default Redis does not run as a daemon. Use 'yes' if you need it.# Note that Redis will write a pid file in /var/run/redis.pid when daemonized.daemonize yes# 前台运行还是后台运行# The working directory.## The DB will be written inside this directory, with the filename specified# above using the 'dbfilename' configuration directive.## The Append Only File will also be created inside this directory.## Note that you must specify a directory here, not a file name.dir /usr/local/redis/working# 工作空间## IF YOU ARE SURE YOU WANT YOUR INSTANCE TO LISTEN TO ALL THE INTERFACES# JUST COMMENT THE FOLLOWING LINE.# ~~~~~~~~~~~~~~~~~~~~~~~~~~~~~~~~~~~~~~~~~~~~~~~~~~~~~~~~~~~~~~~~~~~~~~~~#bind 127.0.0.1bind 0.0.0.0# 想要被外部进行访问 需要更改为0.0.0.0 上线后更改为127# Warning: since Redis is pretty fast an outside user can try up to# 150k passwords per second against a good box. This means that you should# use a very strong password otherwise it will be very easy to break.## redis 链接密码requirepass 123456

为何引 Redis
现有架构弊端
请求都是直接访问到数据库中,请求量一大,数据库压力倍增,因此需要引入 redis 作为缓存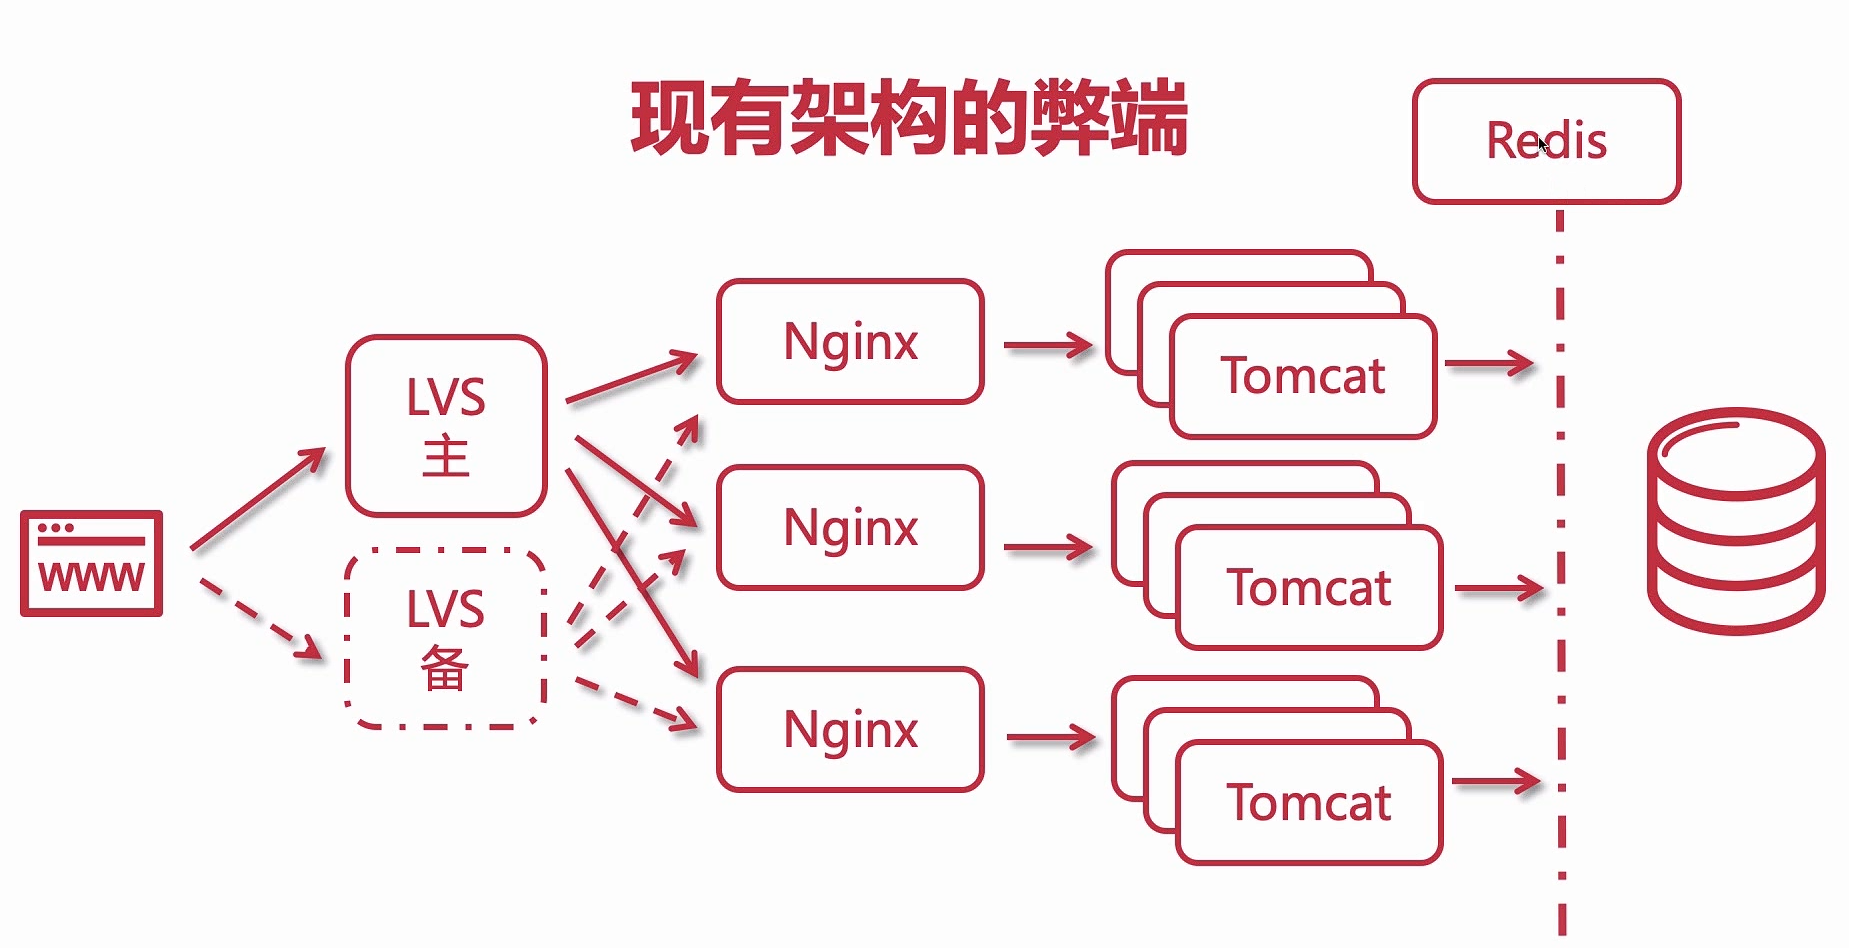
举例
动物与管理员
需要知道动物园有多少个动物,只需要通过已经记录好的笔记查看,不需要一头一头去数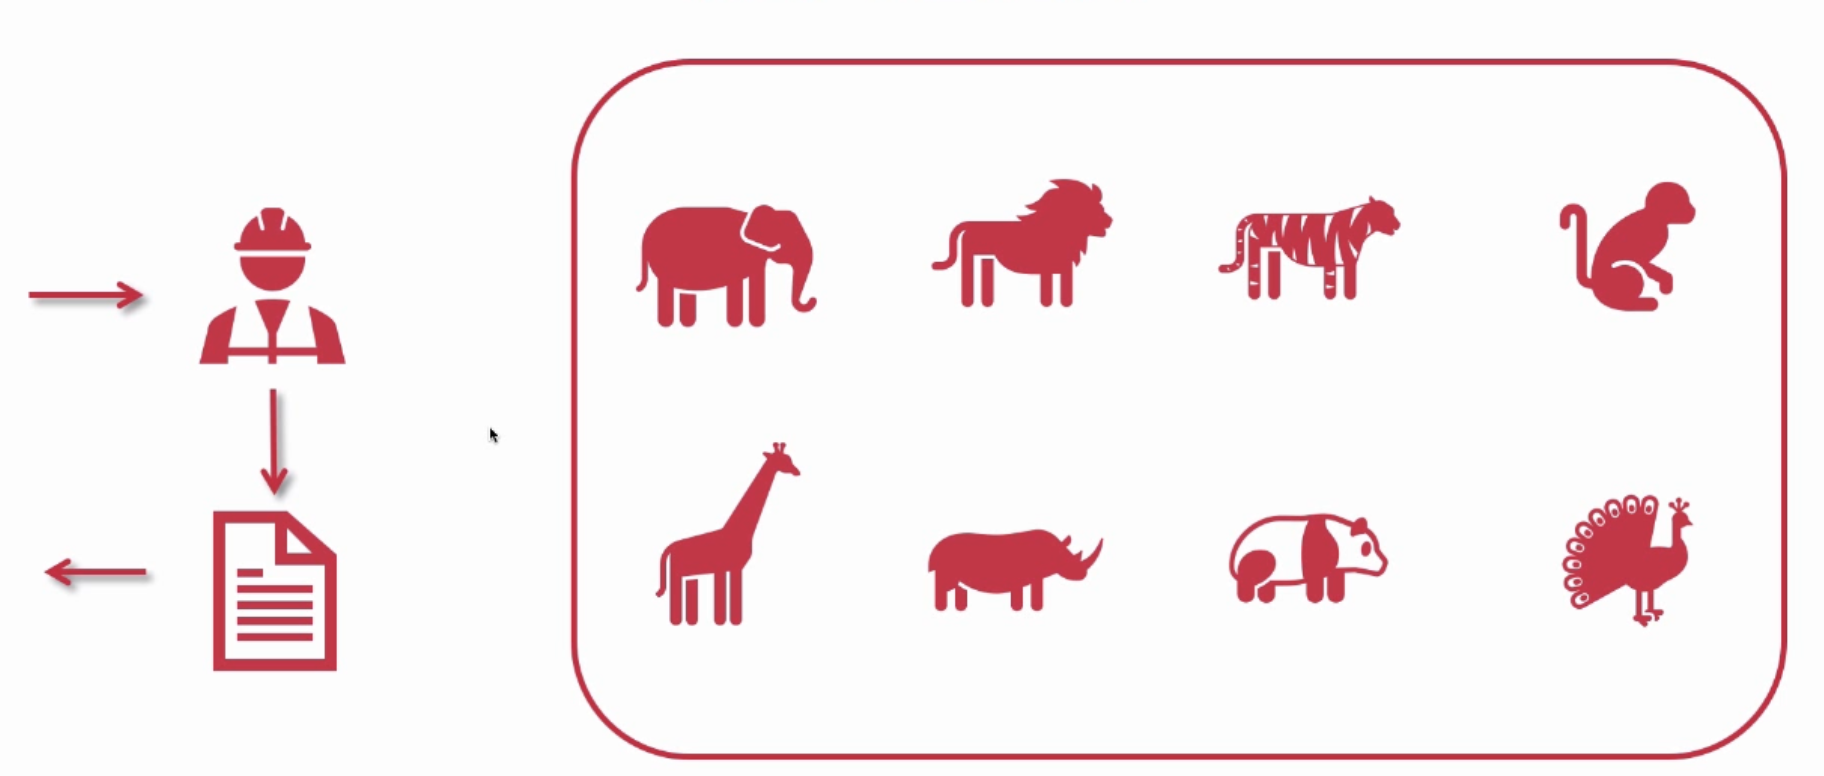
什么是 NoSQL
- Not Only Sql
- 传统项目使用纯数据库
- 为互联网和大数据而生
- 水平(横向)扩展方便高效
- 高性能
- 高可用
- 存数据,做缓存
NoSql的常见分类
| 键值对数据库 | Redis、Memcache |
|---|---|
| 列存储数据库 | Hbase、Cassandra |
| 文档型数据库 | MongoDB、CouchDB |
| 图形数据库 | Neo4J、FlockDB |
什么是分布式缓存
Redis的发布与订阅
Redis的持久化机制
1、RDB
每隔一段时间,把内存中的数据写入磁盘的临时文件,作为快照,恢复的时候把快照文件读进内存。如果宕机重启,那么内存里的数据肯定会没有的,那 redis 重启后,则会恢复。
2、备份与恢复
3、RDB优劣势
优势
- 每隔一段时间备份,全量备份
- 灾备简单,可以远程传输
- 子进程备份的时候,主进程不会有任何io操作(不会有写入修改或删除),保证备份数据的的完整性
- 相对AOF来说,当有更大文件的时候可以快速重启恢复
劣势
- 发生故障是,有可能会丢失最后一次的备份数据
- 子进程所占用的内存比会和父进程一模一样,如会造成CPU负担
- 由于定时全量备份是重量级操作,所以对于实时备份,就无法处理了。
4、RDB配置
1. 保存位置,可以在redis.conf自定义:
/user/local/redis/working/dump.rdb
2. 保存机制:
```shellsave 900 1save 300 10save 60 10000save 10 3
- 如果1个缓存更新,则15分钟后备份
- 如果10个缓存更新,则5分钟后备份
- 如果10000个缓存更新,则1分钟后备份
- 演示:更新3个缓存,10秒后备份
- 演示:备份dump.rdb,删除重启 ```
1. stop-writes-on-bgsave-error
yes:如果save过程出错,则停止写操作
no:可能造成数据不一致
2. rdbcompression
yes:开启rdb压缩模式
no:关闭,会节约cpu损耗,但是文件会大,道理同nginx
3. rdbchecksum
AOF
引子
RDB会丢失最后一次备份的rdb文件,但是其实也无所谓,其实也可以忽略不计,毕竟是缓存,丢了就丢了,但是如果追求数据的完整性,那就的考虑使用AOF了
AOF特点
- 以日志的形式来记录用户请求的写操作。读操作不会记录,因为写操作才会存存储。
- 文件以追加的形式而不是修改的形式。
redis的aof恢复其实就是把追加的文件从开始到结尾读取执行写操作。
优势
AOF更加耐用,可以以秒级别为单位备份,如果发生问题,也只会丢失最后一秒的数据,大大增加了可靠性和数据完整性。所以AOF可
- 一次,使用fsync操作。
- 以log日志形式追加,如果磁盘满了,会执行 redis-check-aof 工具
- 当数据太大的时候,redis可以在后台自动重写aof。当redis继续把日志追加到老的文件中去时,重写也是非常安全的,不会影响客户端作。
AOF 日志包含的所有写操作,会更加便于redis的解析恢复。
劣势
相同的数据,同一份数据,AOF比RDB大
- 针对不同的同步机制,AOF会比RDB慢,因为AOF每秒都会备份做写操作,这样相对与RDB来说就略低。 每秒备份fsync没毛病,但是xx的每次写入就做一次备份fsync的话,那么redis的性能就会下降。
- AOF发生过bug,就是数据恢复的时候数据不完整,这样显得AOF会比较脆弱,容易出现bug,因AOF没有RDB那么简单,但是呢为能防止错误的的产生,AOF就不会根据旧的指令去重构,而是根据当时缓存中存在的数据指令去做重构,这样就更加健壮和可靠了。
AOF的配置
```shellAOF 默认关闭,yes可以开启
appendonly no
AOF 的文件名
appendfilename “appendonly.aof”
no:不同步
everysec:每秒备份,推荐使用
always:每次操作都会备份,安全并且数据完整,但是慢性能差
appendfsync everysec
重写的时候是否要同步,no可以保证数据安全
no-appendfsync-on-rewrite no
重写机制:避免文件越来越大,自动优化压缩指令,会fork一个新的进程去完成重写动作,新进程里的内存数据会被重写,此时
当前AOF文件的大小是上次AOF大小的100% 并且文件体积达到64m,满足两者则触发重写
auto-aof-rewrite-percentage 100 auto-aof-rewrite-min-size 64mb
<a name="Ijrp1"></a>##### 到底采用RDB还是AOF呢?1. 如果你能接受一段时间的缓存丢失,那么可以使用RDB <br />2. 如果你对实时性的数据比较care,那么就用AOF---<a name="UzaJI"></a>### **Redis 缓存过期处理与内存淘汰机制**<a name="gWxts"></a>#### 引子计算机内存有限,越大越贵,Redis的高并发高性能都是基于内存的,用硬盘的话GG。<a name="XOCFA"></a>#### 已过期的key如何处理?设置了expire的key缓存过期了,但是服务器的内存还是会被占用,这是因为redis所基于的两种删除策略 <br />redis有两种策略: <br />1、(主动)定时删除 <br />定时随机的检查过期的key,如果过期则清理删除。(每秒检查次数在redis.conf中的hz配置) <br />2、(被动)惰性删除 <br />当客户端请求一个已经过期的key的时候,那么redis会检查这个key是否过期,如果过期了,则删除,然后返回一个nil。这种策略 友好,不会有太多的损耗,但是内存占用会比较高。 所以,虽然key过期了,但是只要没有被redis清理,那么其实内存还是会被占用着的。<a name="sqWvy"></a>#### 那么如果内存被Redis缓存占用慢了咋办?内存占满了,可以使用硬盘,来保存,但是没意义,因为硬盘没有内存快,会影响redis性能。 <br />所以,当内存占用满了以后,redis提供了一套缓存淘汰机制:MEMORY MANAGEMENT <br />maxmemory :当内存已使用率到达,则开始清理缓存```shell* noeviction:旧缓存永不过期,新缓存设置不了,返回错误* allkeys-lru:清除最少用的旧缓存,然后保存新的缓存(推荐使用)* allkeys-random:在所有的缓存中随机删除(不推荐)* volatile-lru:在那些设置了expire过期时间的缓存中,清除最少用的旧缓存,然后保存新的缓存* volatile-random:在那些设置了expire过期时间的缓存中,随机删除缓存* volatile-ttl:在那些设置了expire过期时间的缓存中,删除即将过期的
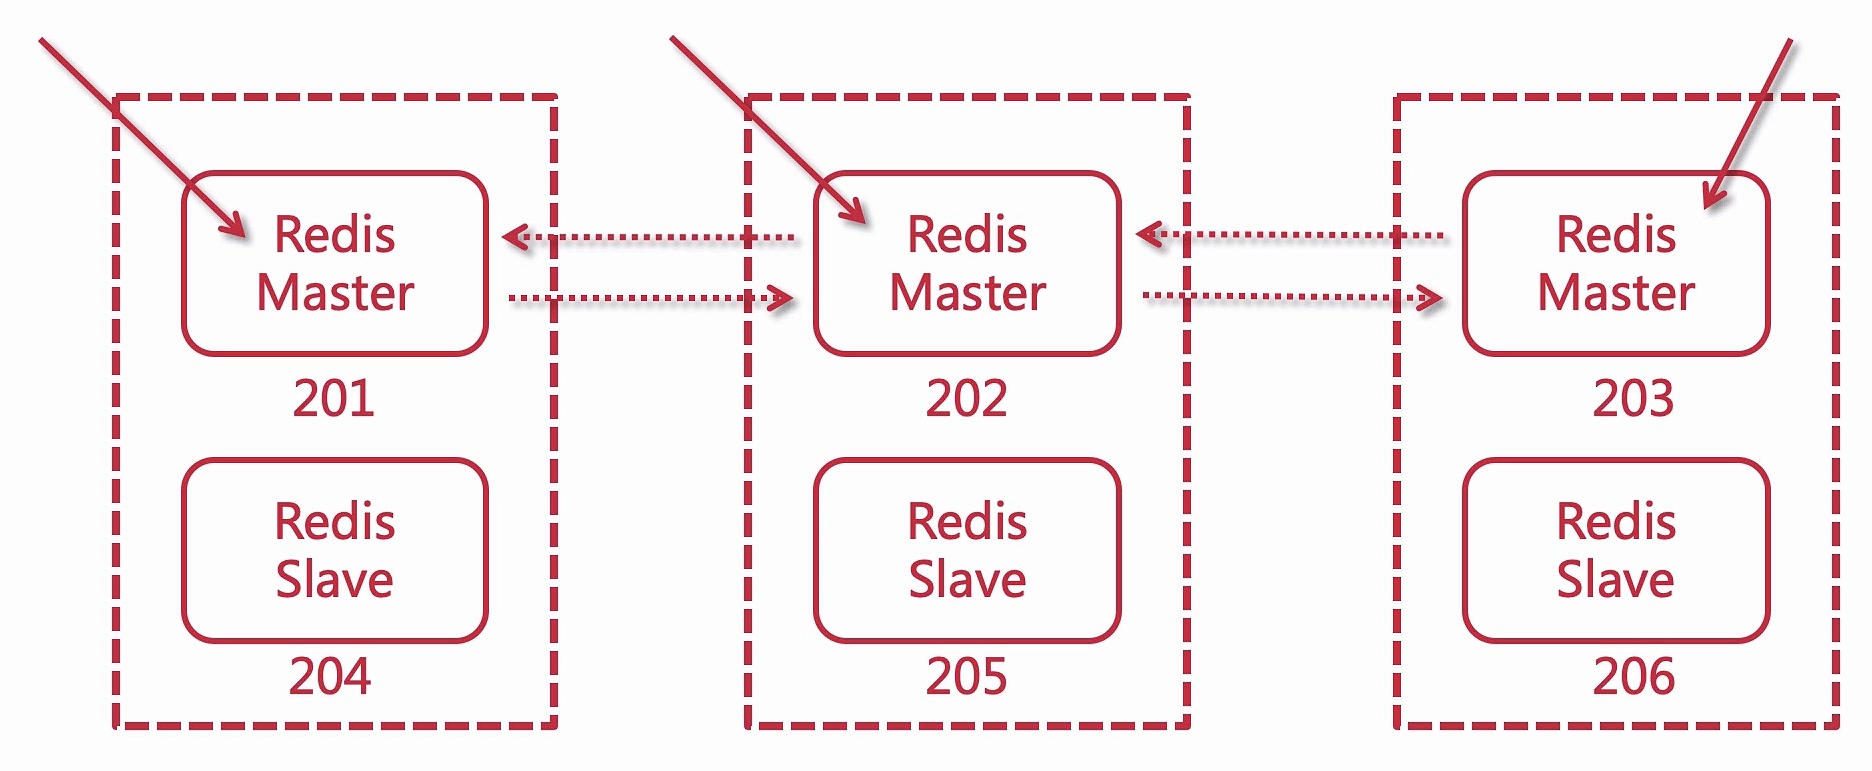
主从架构原理
一主一从
一主多从
搭建Redis主从复制
1、准备三台带有redis环境的主机(redis版本一致
2、 更改Redis.conf
################################# REPLICATION ################################## 主从复制# Master-Replica replication. Use replicaof to make a Redis instance a copy of# another Redis server. A few things to understand ASAP about Redis replication.## +------------------+ +---------------+# | Master | ---> | Replica |# | (receive writes) | | (exact copy) |# +------------------+ +---------------+## 1) Redis replication is asynchronous, but you can configure a master to# stop accepting writes if it appears to be not connected with at least# a given number of replicas.# 2) Redis replicas are able to perform a partial resynchronization with the# master if the replication link is lost for a relatively small amount of# time. You may want to configure the replication backlog size (see the next# sections of this file) with a sensible value depending on your needs.# 3) Replication is automatic and does not need user intervention. After a# network partition replicas automatically try to reconnect to masters# and resynchronize with them.## replicaof <masterip> <masterport># 配置主节点 ip 以及端口# replicaof 129.168.128.128 6379# If the master is password protected (using the "requirepass" configuration# directive below) it is possible to tell the replica to authenticate before# starting the replication synchronization process, otherwise the master will# refuse the replica request.## masterauth <master-password># master 主节点密码# When a replica loses its connection with the master, or when the replication# is still in progress, the replica can act in two different ways:## 1) if replica-serve-stale-data is set to 'yes' (the default) the replica will# still reply to client requests, possibly with out of date data, or the# data set may just be empty if this is the first synchronization.## 2) if replica-serve-stale-data is set to 'no' the replica will reply with# an error "SYNC with master in progress" to all the kind of commands# but to INFO, replicaOF, AUTH, PING, SHUTDOWN, REPLCONF, ROLE, CONFIG,# SUBSCRIBE, UNSUBSCRIBE, PSUBSCRIBE, PUNSUBSCRIBE, PUBLISH, PUBSUB,# COMMAND, POST, HOST: and LATENCY.#replica-serve-stale-data yes
相关命令
info replication # 查看redis主从信息# Replicationrole:master # 当前是主节点connected_slaves:0 # 从节点数量master_replid:5b6ff656b828c42428e7ec3f777d13055d55e495 # master节点id,用于区分节点master_replid2:0000000000000000000000000000000000000000master_repl_offset:0second_repl_offset:-1repl_backlog_active:0repl_backlog_size:1048576repl_backlog_first_byte_offset:0repl_backlog_histlen:0
无磁盘复制原理解析
从内存中写入另一个内存,基于网络
默认是关闭
缺点:
机械硬盘读取满
开启
# 无磁盘复制# Replication SYNC strategy: disk or socket.## -------------------------------------------------------# WARNING: DISKLESS REPLICATION IS EXPERIMENTAL CURRENTLY# -------------------------------------------------------## New replicas and reconnecting replicas that are not able to continue the replication# process just receiving differences, need to do what is called a "full# synchronization". An RDB file is transmitted from the master to the replicas.# The transmission can happen in two different ways:# ## 1) Disk-backed: The Redis master creates a new process that writes the RDB# file on disk. Later the file is transferred by the parent# process to the replicas incrementally.# 2) Diskless: The Redis master creates a new process that directly writes the# RDB file to replica sockets, without touching the disk at all.## With disk-backed replication, while the RDB file is generated, more replicas# can be queued and served with the RDB file as soon as the current child producing# the RDB file finishes its work. With diskless replication instead once# the transfer starts, new replicas arriving will be queued and a new transfer# will start when the current one terminates.## When diskless replication is used, the master waits a configurable amount of# time (in seconds) before starting the transfer in the hope that multiple replicas# will arrive and the transfer can be parallelized.## With slow disks and fast (large bandwidth) networks, diskless replication# works better.repl-diskless-sync no# 默认是关闭的 磁盘较慢不建议使用# When diskless replication is enabled, it is possible to configure the delay# the server waits in order to spawn the child that transfers the RDB via socket# to the replicas.## This is important since once the transfer starts, it is not possible to serve# new replicas arriving, that will be queued for the next RDB transfer, so the server# waits a delay in order to let more replicas arrive.## The delay is specified in seconds, and by default is 5 seconds. To disable# it entirely just set it to 0 seconds and the transfer will start ASAP.repl-diskless-sync-delay 5# 等待时间## Replicas send PINGs to server in a predefined interval. It's possible to change# this interval with the repl_ping_replica_period option. The default value is 10# seconds.## repl-ping-replica-period 10# When diskless replication is enabled, it is possible to configure the delay# the server waits in order to spawn the child that transfers the RDB via socket# to the replicas.## This is important since once the transfer starts, it is not possible to serve# new replicas arriving, that will be queued for the next RDB transfer, so the server# waits a delay in order to let more replicas arrive.## The delay is specified in seconds, and by default is 5 seconds. To disable# it entirely just set it to 0 seconds and the transfer will start ASAP.repl-diskless-sync-delay 5# 等待时间#
Redis缓存过期机制
定期删除-主动
惰性删除-被动
内存淘汰管理机制
MEMORY MANAGEMENT
MAX_MEMORY
############################## MEMORY MANAGEMENT ################################# Set a memory usage limit to the specified amount of bytes.# When the memory limit is reached Redis will try to remove keys# according to the eviction policy selected (see maxmemory-policy).## If Redis can't remove keys according to the policy, or if the policy is# set to 'noeviction', Redis will start to reply with errors to commands# that would use more memory, like SET, LPUSH, and so on, and will continue# to reply to read-only commands like GET.## This option is usually useful when using Redis as an LRU or LFU cache, or to# set a hard memory limit for an instance (using the 'noeviction' policy).## WARNING: If you have replicas attached to an instance with maxmemory on,# the size of the output buffers needed to feed the replicas are subtracted# from the used memory count, so that network problems / resyncs will# not trigger a loop where keys are evicted, and in turn the output# buffer of replicas is full with DELs of keys evicted triggering the deletion# of more keys, and so forth until the database is completely emptied.## In short... if you have replicas attached it is suggested that you set a lower# limit for maxmemory so that there is some free RAM on the system for replica# output buffers (but this is not needed if the policy is 'noeviction').## maxmemory <bytes># 最大内存# MAXMEMORY POLICY: how Redis will select what to remove when maxmemory# is reached. You can select among five behaviors:## 缓存过期机制# volatile-lru -> Evict using approximated LRU among the keys with an expire set.# allkeys-lru -> Evict any key using approximated LRU.# volatile-lfu -> Evict using approximated LFU among the keys with an expire set.# allkeys-lfu -> Evict any key using approximated LFU.# volatile-random -> Remove a random key among the ones with an expire set.# allkeys-random -> Remove a random key, any key.# volatile-ttl -> Remove the key with the nearest expire time (minor TTL)# noeviction -> Don't evict anything, just return an error on write operations.## LRU means Least Recently Used# LFU means Least Frequently Used## Both LRU, LFU and volatile-ttl are implemented using approximated# randomized algorithms.## Note: with any of the above policies, Redis will return an error on write# operations, when there are no suitable keys for eviction.## At the date of writing these commands are: set setnx setex append# incr decr rpush lpush rpushx lpushx linsert lset rpoplpush sadd# sinter sinterstore sunion sunionstore sdiff sdiffstore zadd zincrby# zunionstore zinterstore hset hsetnx hmset hincrby incrby decrby# getset mset msetnx exec sort## The default is:## maxmemory-policy noeviction# LRU, LFU and minimal TTL algorithms are not precise algorithms but approximated# algorithms (in order to save memory), so you can tune it for speed or# accuracy. For default Redis will check five keys and pick the one that was# used less recently, you can change the sample size using the following# configuration directive.## The default of 5 produces good enough results. 10 Approximates very closely# true LRU but costs more CPU. 3 is faster but not very accurate.## maxmemory-samples 5# Starting from Redis 5, by default a replica will ignore its maxmemory setting# (unless it is promoted to master after a failover or manually). It means# that the eviction of keys will be just handled by the master, sending the# DEL commands to the replica as keys evict in the master side.## This behavior ensures that masters and replicas stay consistent, and is usually# what you want, however if your replica is writable, or you want the replica to have# a different memory setting, and you are sure all the writes performed to the# replica are idempotent, then you may change this default (but be sure to understand# what you are doing).## Note that since the replica by default does not evict, it may end using more# memory than the one set via maxmemory (there are certain buffers that may# be larger on the replica, or data structures may sometimes take more memory and so# forth). So make sure you monitor your replicas and make sure they have enough# memory to never hit a real out-of-memory condition before the master hits# the configured maxmemory setting.## replica-ignore-maxmemory yes
哨兵机制
- 未使用:在一主二从中,如果master节点挂了后咋办?因此需要引入哨兵机制
- 使用后:master 节点宕机后,从节点会选出一个作为 master 节点,有一次组成主从模式
sentinel.conf
注意点:master名称要一模一样
# Base# 端口号port 26379# pid 文件pidfile "/usr/local/redis/sentinel/redis-sentinel.pid"# 工作目录dir "/usr/local/redis/sentinel"# 守护进程daemonize yes# 保护模式protected-mode no# 日志文件logfile "/usr/local/redis/sentinel/redis-sentinel.log"# core# 配置哨兵sentinel monitor mymaster 127.0.0.1 6379 2# 密码sentinel auth-pass <master-name> <password># master被sentinel认定为失效的间隔时间sentinel down-after-milliseconds mymaster 30000# 剩余的slaves重新和新的master做同步的并行个数sentinel parallel-syncs mymaster 1# 主备切换的超时时间,哨兵要去做故障转移,这个时候哨兵也是一个进程,如果他没有去执行,超过这个时间后,会由其他sentinel failover-timeout mymaster 180000
scp 远程拷贝
scp sentinel.conf root@192.168.128.128:/usr/local/redis/然后输入密码
sentinel 启动
redis-sentinel sentinel.conf# 第一次启动需要创建文件夹mkdir /usr/local/redis/sentinel -p
查看日志文件
tail -f redis.sentinel.log
SpringBoot 配置Redis哨兵
Redis 集群
优点
搭建三主三从集群模式
工作中暂时用不到,待用到后,在进行学习,因此不做详细记录

若有收获,就点个赞吧
0 人点赞
