官网:https://spring.io/projects/spring-boot/
springboot学习网站:http://www.springboot.wiki/
注:学习该文章需要掌握maven,并且最好使用过springmvc
官网学习
1、项目—学习—参考文件
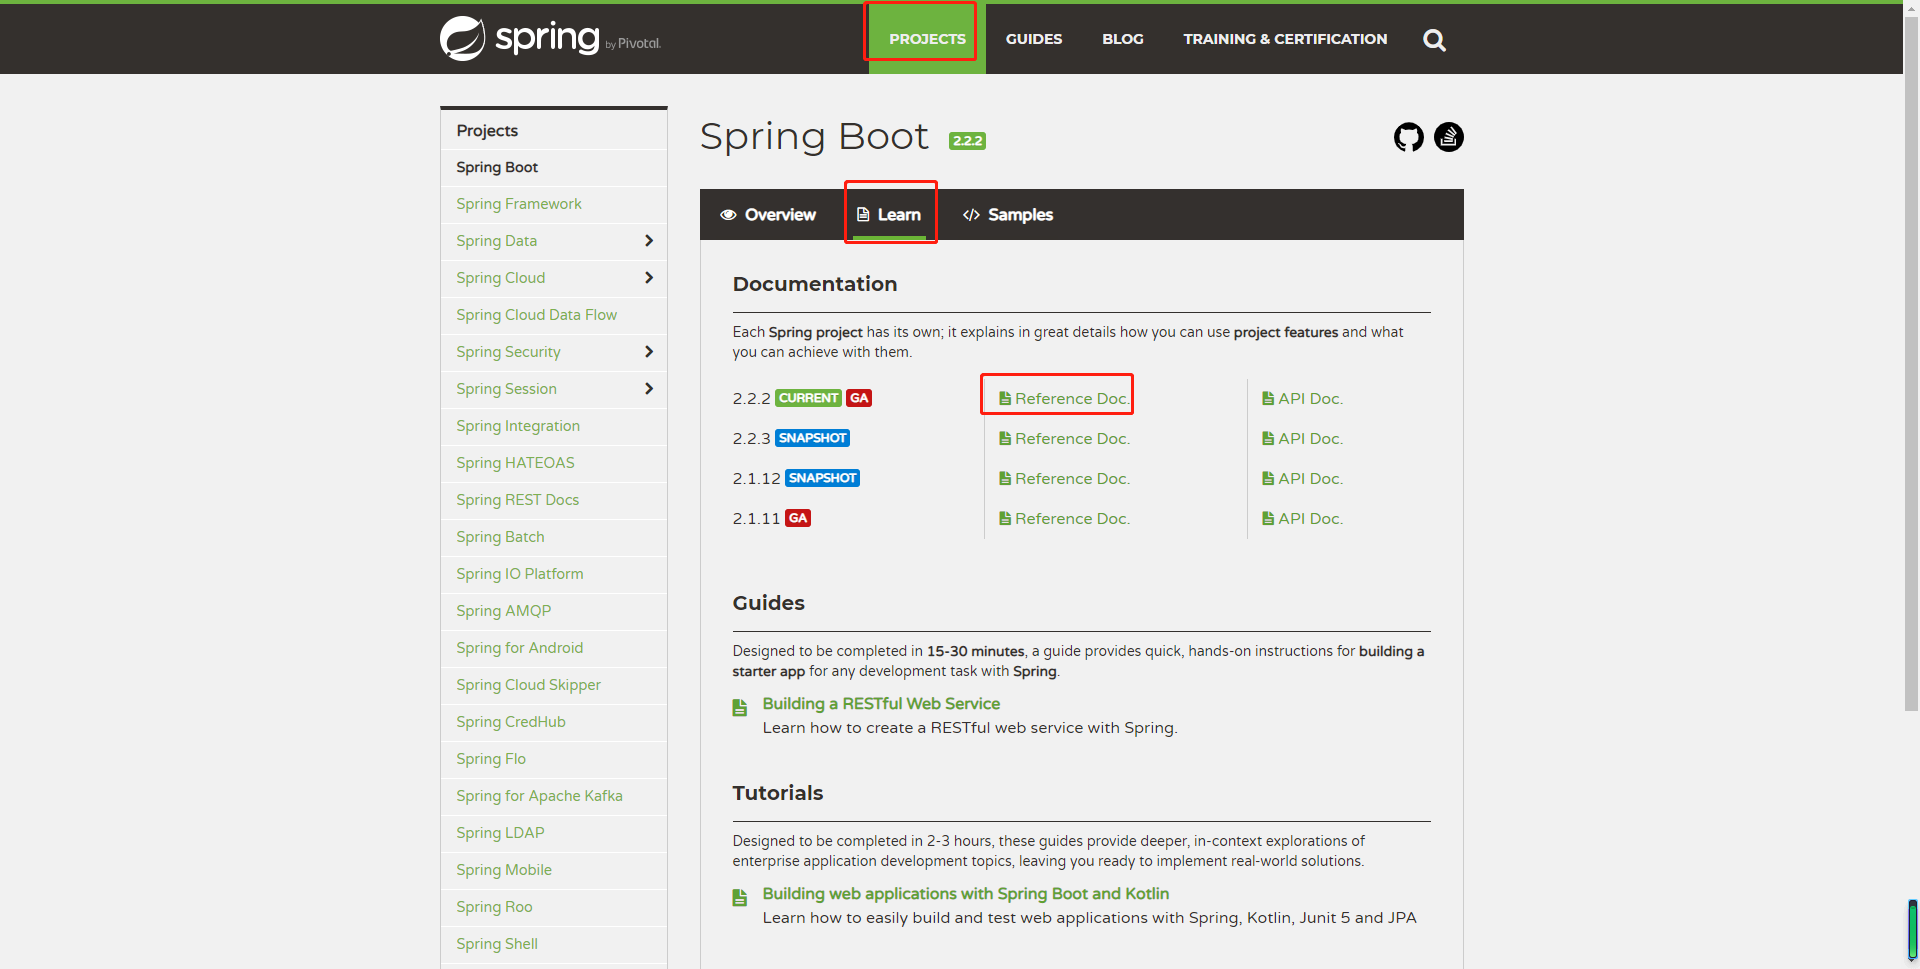
2、进入启动项目参考文件

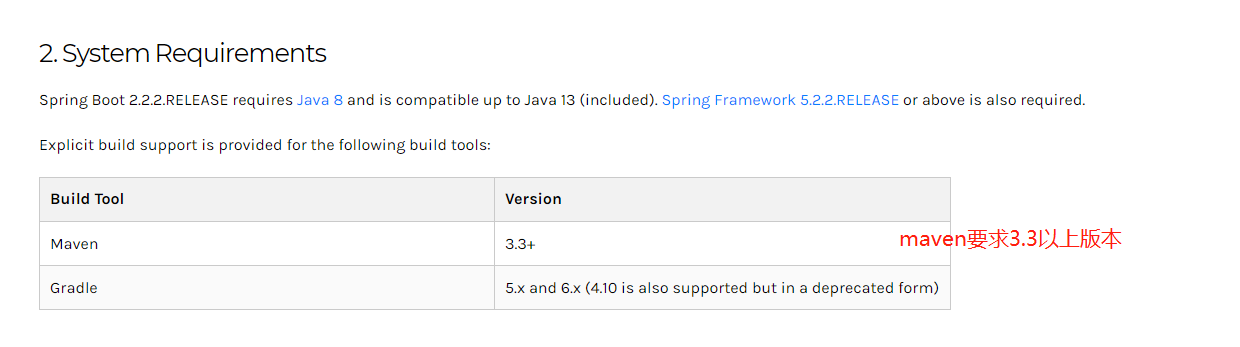
3、配置要求

4.1、创建pom文件
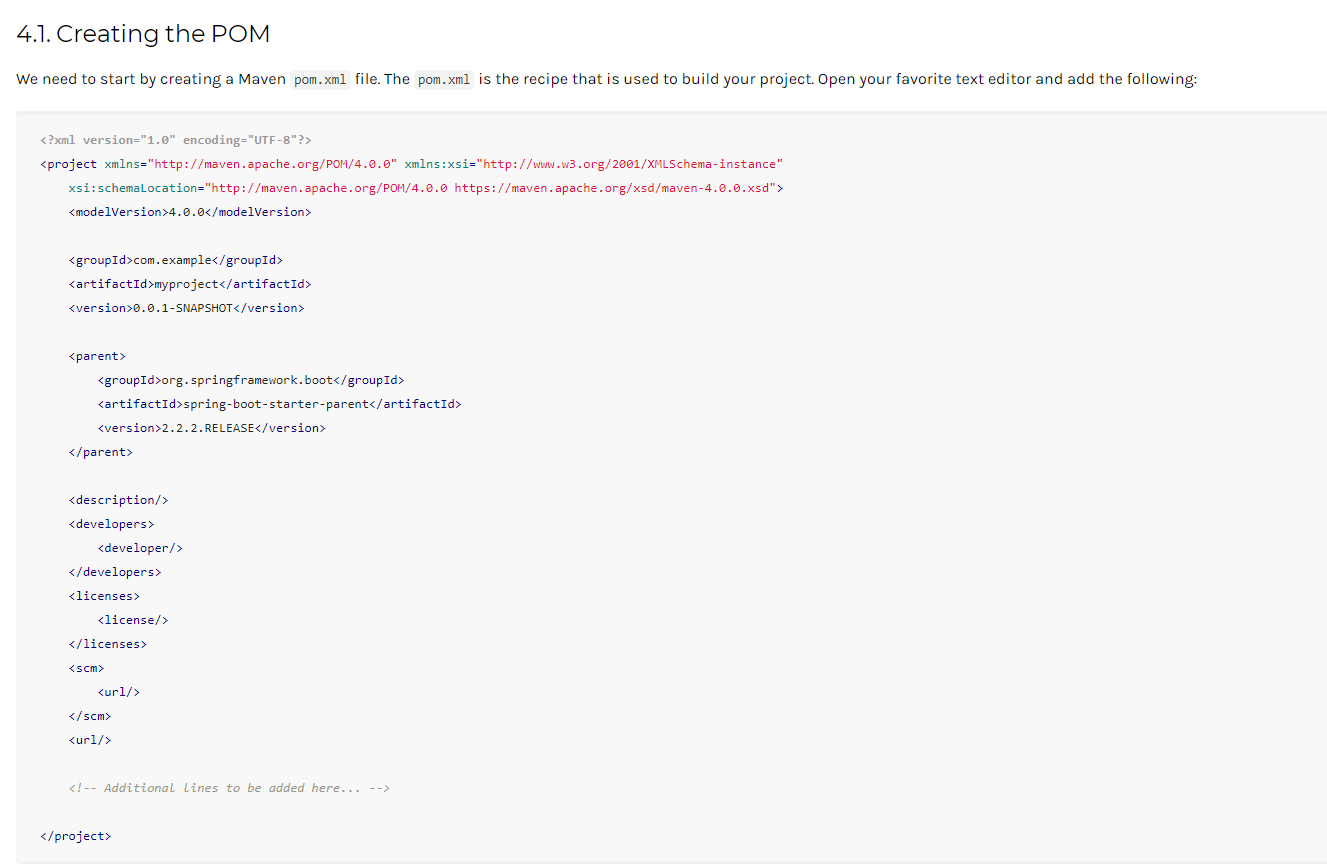
注:这里最主要的是parent,如果不按照上面模板的话,就自己手动把parent给添加上,这步是指定父工程
(建议去官网自行复制)
<?xml version="1.0" encoding="UTF-8"?><project xmlns="http://maven.apache.org/POM/4.0.0" xmlns:xsi="http://www.w3.org/2001/XMLSchema-instance"xsi:schemaLocation="http://maven.apache.org/POM/4.0.0 https://maven.apache.org/xsd/maven-4.0.0.xsd"><modelVersion>4.0.0</modelVersion><groupId>com.example</groupId><artifactId>myproject</artifactId><version>0.0.1-SNAPSHOT</version><parent><groupId>org.springframework.boot</groupId><artifactId>spring-boot-starter-parent</artifactId><version>2.2.2.RELEASE</version></parent><description/><developers><developer/></developers><licenses><license/></licenses><scm><url/></scm><url/><!-- Additional lines to be added here... --></project>
4.2、添加依赖
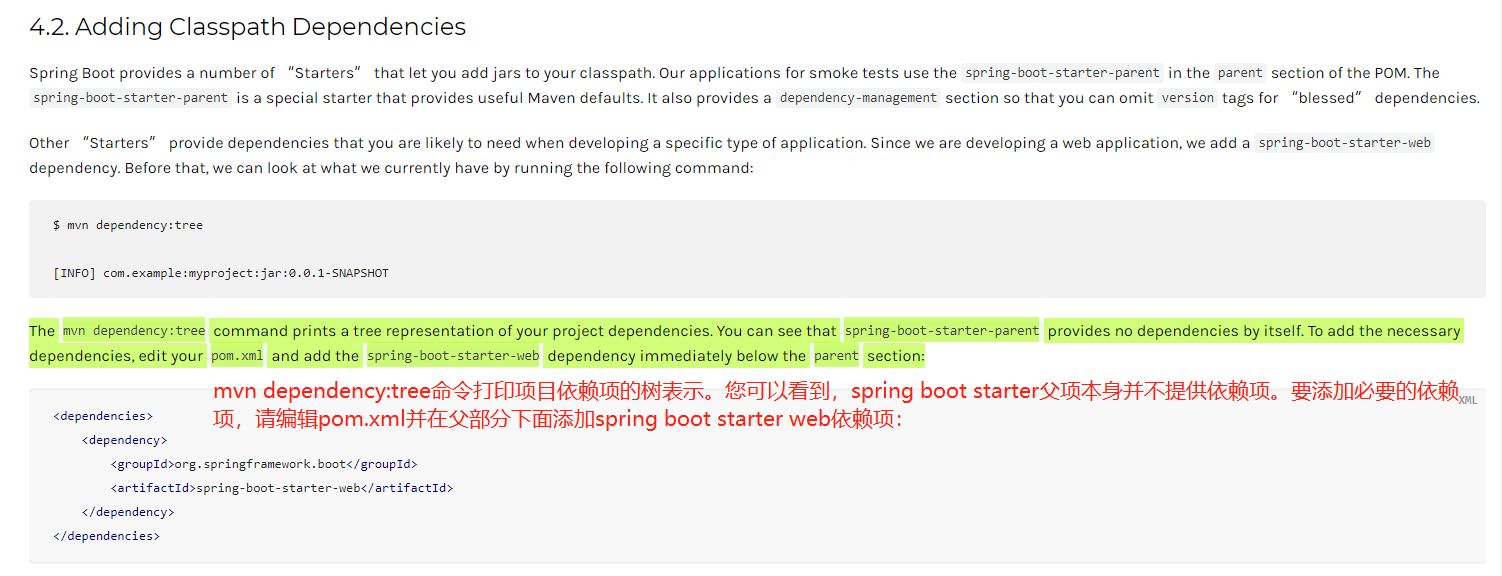
<dependencies><dependency><groupId>org.springframework.boot</groupId><artifactId>spring-boot-starter-web</artifactId></dependency></dependencies>
5、编写启动代码

import org.springframework.boot.SpringApplication;import org.springframework.boot.autoconfigure.EnableAutoConfiguration;import org.springframework.web.bind.annotation.RequestMapping;import org.springframework.web.bind.annotation.RestController;@RestController@EnableAutoConfigurationpublic class Example {@RequestMapping("/")String home() {return "Hello World!";}public static void main(String[] args) {SpringApplication.run(Example.class, args);}}
@RestController:@Controller和@ResponseBody的合体,说明他是一个controller类,并且响应是Json对象
@EnableAutoConfiguration:自动配置注解,该注解集成了各种热门的依赖(核心配置,springboot和springmvc的差距基本就是依靠这个注解拉开的)
@RequestMapping(“/“):该注解说明这个方法是url的映射方法,通过url访问这个方法
SpringApplication.run(Example.class, args);:这句代码的意思是启动该应用的入口
6、启动项目
spring-boot默认内嵌tomcat容器,所以不需要独立安装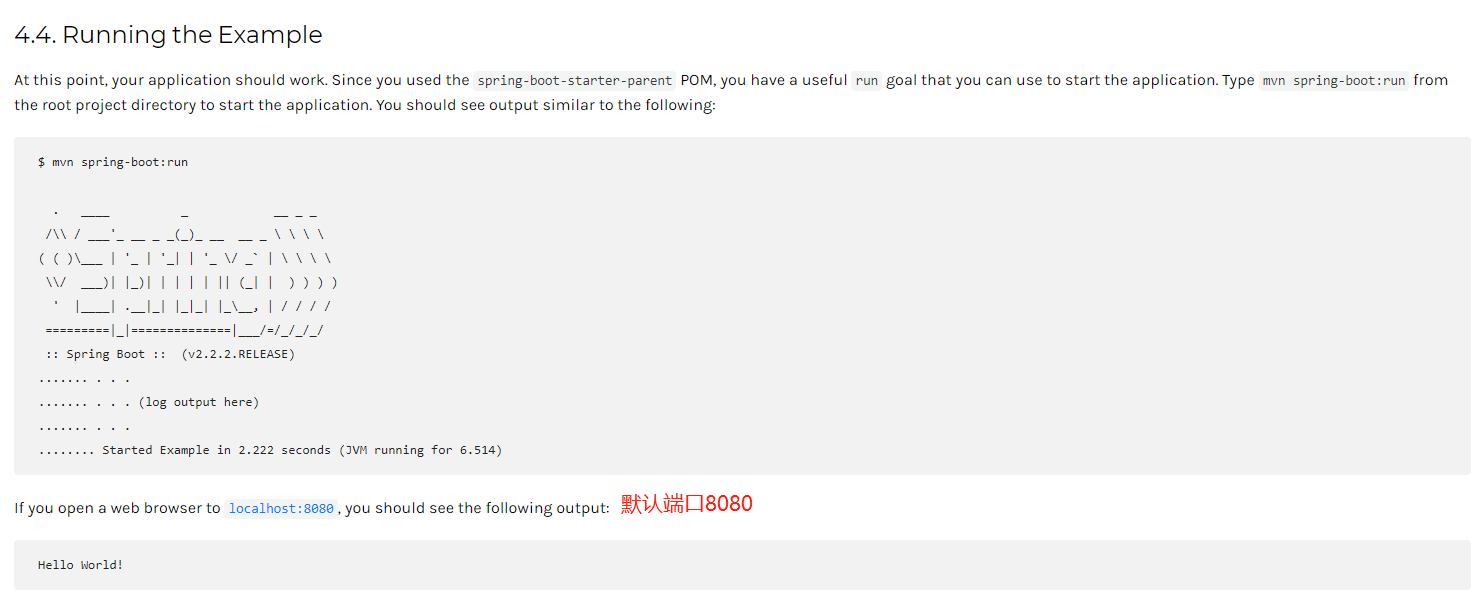
注:默认启动8080端口,如果端口被占用会启动失败
server.port=9099
这个是我写的包,可以作为参考(实际开发不是这样写的)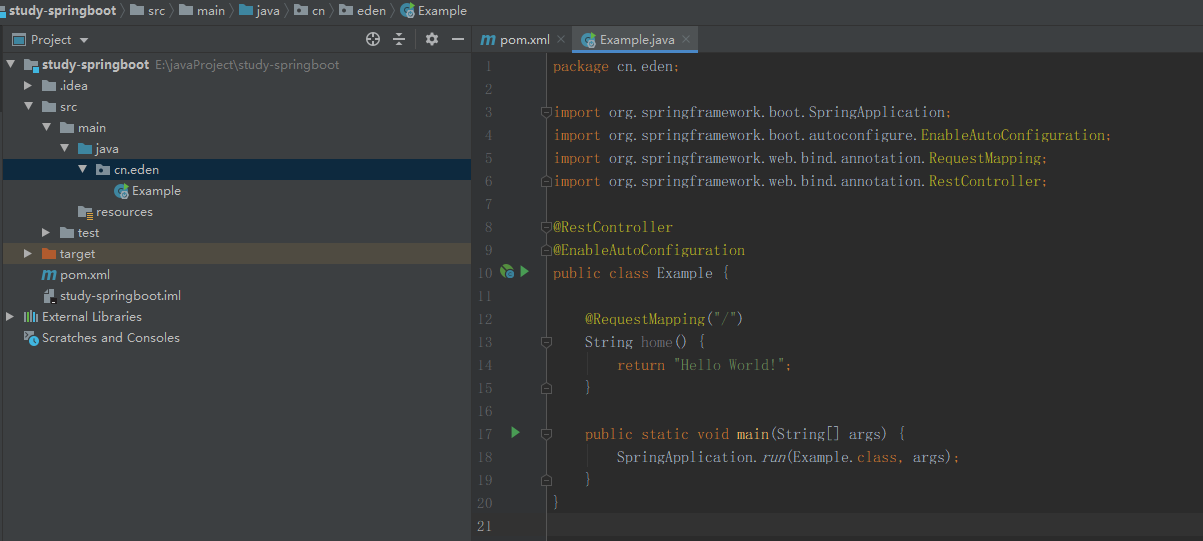
第一个hello world
刚刚是从官网找到的资料并启动了第一个springboot项目,但实际还是稍微有点出入,这时候我们需要进行一些修改
pom.xml配置修改
<?xml version="1.0" encoding="UTF-8"?><project xmlns="http://maven.apache.org/POM/4.0.0"xmlns:xsi="http://www.w3.org/2001/XMLSchema-instance"xsi:schemaLocation="http://maven.apache.org/POM/4.0.0 http://maven.apache.org/xsd/maven-4.0.0.xsd"><modelVersion>4.0.0</modelVersion><groupId>eden</groupId><artifactId>study-springboot</artifactId><version>1.0-SNAPSHOT</version><!-- 指定jdk版本 --><properties><project.build.sourceEncoding>UTF-8</project.build.sourceEncoding><maven.compiler.source>1.8</maven.compiler.source><maven.compiler.target>1.8</maven.compiler.target></properties><!-- 指定父工程 --><parent><groupId>org.springframework.boot</groupId><artifactId>spring-boot-starter-parent</artifactId><version>2.1.2.RELEASE</version></parent><!-- 依赖jar包 --><dependencies><dependency><groupId>org.springframework.boot</groupId><artifactId>spring-boot-starter-web</artifactId></dependency></dependencies><!-- 插件 --><build><plugins><plugin><groupId>org.springframework.boot</groupId><artifactId>spring-boot-maven-plugin</artifactId></plugin></plugins></build></project>
Example类修改成AppStart
package cn.eden;import org.springframework.boot.SpringApplication;import org.springframework.boot.autoconfigure.SpringBootApplication;import org.springframework.web.bind.annotation.RestController;//@EnableAutoConfiguration@SpringBootApplicationpublic class AppStart {public static void main(String[] args) {SpringApplication.run(AppStart.class, args);}}
这里更换了一个注解,@EnableAutoConfiguration注解更换成了@SpringBootApplication,实际上@SpringBootApplication内嵌了@EnableAutoConfiguration注解,并且在此基础上添加了@ComponentScan注解,@ComponentScan注解是用来扫包的,可以将该类包下以及它的子包中的controller都扫描进入IOC容器当中
并且删除了一个方法,url映射全部转移到controller类中
总结:也就是说更换的注解,新注解可以在原有的注解上添加了一个扫包的功能
编写controller类
package cn.eden.controller;import org.springframework.web.bind.annotation.RequestMapping;import org.springframework.web.bind.annotation.RestController;@RestControllerpublic class helloController {@RequestMapping("/hello")public Object hello() {return "Hello World!";}}
到这一步的时候就完成了一个最基础的demo,启动应用就能访问了
下面这个是我的项目结构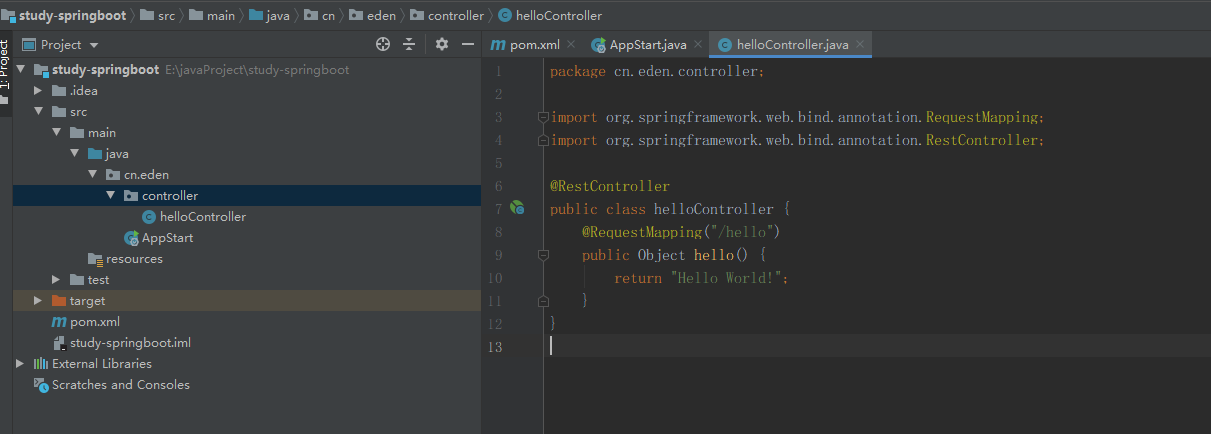
配置
配置文件方式
1、application.properties
2、yml配置
端口
固定端口:server.port=9099
随机端口:server.port=${random.int[1024,9999])}
自定义属性配置
@Value(${“keyName”})
可以获取application.properties中的配置keyName映射的属性
集成mybatis
pom依赖
查看依赖的官网:http://mybatis.org/spring-boot-starter/mybatis-spring-boot-autoconfigure/index.html#
pom.xml
        <dependency>
            <groupId>org.mybatis.spring.boot</groupId>
            <artifactId>mybatis-spring-boot-starter</artifactId>
            <version>1.3.2</version>
        </dependency>
        <dependency>
            <groupId>mysql</groupId>
            <artifactId>mysql-connector-java</artifactId>
        </dependency>
application.yml
# 连接池配置
spring:
  datasource:
      driver-class-name: com.mysql.jdbc.Driver
    url: jdbc:mysql://localhost:3306/database?serverTimezone=UTC&useUnicode=true&characterEncoding=utf8&useSSL=false
    username: root
    password: root

# mapping扫描路径
mybatis:
  mapper-locations: classpath:mapping/*.xml
springboot-start-logging

若有收获,就点个赞吧
0 人点赞
