参考资料
疑问
- 为什么已经有了链路层的交换机,还要有网络层的路由器呢?
- 为什么主机之间需要 MAC 地址才能进行通信?
- 有了 MAC 地址,为什么不直接通过 MAC : port进行发送数据?
- 简述在 docker 中被隔离的 container 如何与其他 Network Namespace 里的 container 进行交互?
- docker 使用宿主机网络栈(host 模式)会引起什么问题?
基础概念(可以先跳过)
操作指令
# 查看路由表,根据目标地址查找使用的网卡$ routeKernel IP routing tableDestination Gateway Genmask Flags Metric Ref Use Ifacedefault _gateway 0.0.0.0 UG 100 0 0 enp1s010.10.0.0 0.0.0.0 255.255.255.0 U 0 0 0 enp1s0_gateway 0.0.0.0 255.255.255.255 UH 100 0 0 enp1s0172.17.0.0 0.0.0.0 255.255.0.0 U 0 0 0 docker0# 查看 veth pier 设备和网桥的连接信息,下面暂时无 veth pire$ brctl showbridge name bridge id STP enabled interfacesdocker0 8000.0242773d2ddc no# 查看查看网卡信息$ ip link show# 查看当前设别网卡绑定信息$ cat /sys/class/net/etho/iflnk1: lo: <LOOPBACK,UP,LOWER_UP> mtu 65536 qdisc noqueue state UNKNOWN mode DEFAULT group default qlen 1000link/loopback 00:00:00:00:00:00 brd 00:00:00:00:00:002: enp1s0: <BROADCAST,MULTICAST,UP,LOWER_UP> mtu 1500 qdisc fq_codel state UP mode DEFAULT group default qlen 1000link/ether 00:e0:67:11:6b:06 brd ff:ff:ff:ff:ff:ff3: docker0: <NO-CARRIER,BROADCAST,MULTICAST,UP> mtu 1500 qdisc noqueue state DOWN mode DEFAULT group defaultlink/ether 02:42:77:3d:2d:dc brd ff:ff:ff:ff:ff:ff# 显示数据包到主机的路径$ traceroute# 查看指定网卡的信息$ ip neigh show dev docker010.233.96.1 lladdr aa:7a:7e:d0:be:fa REACHABLE
网络栈
每个被隔离的 container 都有一套网络栈包含:包含网卡(Network Interface),回环设备,路由表(Routing Table)和 iptables 规则。
网桥
网桥是工作在 数据链路层 的设备,主要功能是根据 MAC 地址来将数据包转发到网桥的不同 Port 上。
交换机工作原理
当交换机接收到一个数据帧,提取出该数据帧的目的 MAC 地址,并依此为根据进行 CAM 表(IP和MAC关系表)查询,如果能查找到结果,则根据结果进行数据帧的转发,如果不能命中则(向除接收端口外的)所有端口进行 UDP 广播 。如果有端口匹配的 MAC 地址匹配,则会进行响应,交换机会将该 MAC 地址和接收到该 MAC 地址的端口绑定起来,插入CAM表项,这样当接收到一个发送到该MAC地址的数据帧时,就不需要向所有端口广播。
二层设备只认帧中的源和目的 MAC 地址进行数据传输,当传到第三层路由器,三层设备却是基于数据报文中的 IP 进行数据转发。
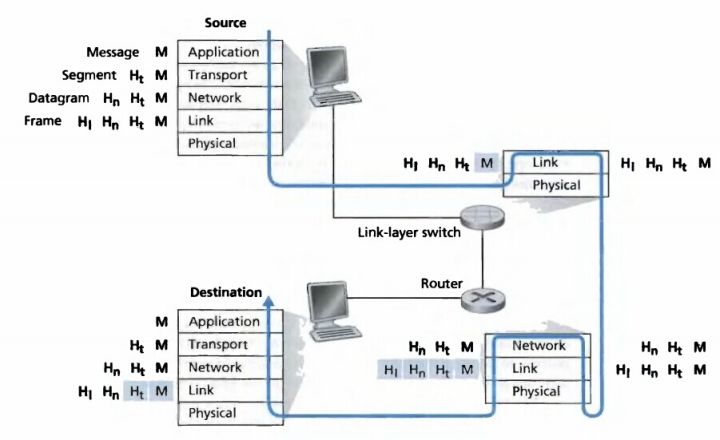
在 OSI 网络模型中,每层都是对上一层的数据包包装并且加入自己的内容,反之则对每层的数据进行解包,流程如下:
docker 网络
首先需要了解,docker 内置的三种网络
$ docker network ls5a6eb0dbf210 bridge bridge local06e92e3d36fc host host local325b6c89555c none null local
- bridge 桥接模式
- host 直连使用宿主机网络栈,不开启 Network Namespace
- none 不进行设置,网络为隔离状态
Bridge Network
docker 会默认在宿主机上创建一个 docker0 网桥,实现连接在 docker0 网桥上的容器通讯。而容器与 docker0 网桥的连接需要通过 Veth Pire 虚拟设备,它的特点是:总是成对出现,并且会将一头网卡的数据包转发到另一头网卡,即使这两个网卡在不同的 Network Namespace。
docker 使用 Veth Pire 和 docker0 组成三层交换机,实现数据传输:
- 物理层 —- veth pire
- 链路层 —- 网桥 docker0 —- 交换机
- 网络层 —- 根据 IP 地址进行通讯 —- 路由器
测试容器网络连接
创建用于测试的2个不同 network namespace 的 container,查看2个 container 的 ip 地址,并且进行 ping 验证是否能连接
# 创建容器$ docker run -d --name busybox-1 busybox tail -f$ docker run -d --name busybox-2 busybox tail -f# 查看 container ip 地址$ docker inspect bridge"Containers": {"2942d0f9f19de0eda505d8da0c7a6be0ddffc0e35059426578e0465e7cb00a91": {"Name": "busybox-2","EndpointID": "16c3871e1470cb0924297e33acc7c6ba2cda8366673a2daf73d2862d7e8c4b1e","MacAddress": "02:42:ac:11:00:03","IPv4Address": "172.17.0.3/16","IPv6Address": ""},"cb5f1945a02f28074367c07b641b0291f29d5e854add13f12960930952cc390e": {"Name": "busybox-1","EndpointID": "37b30e6b22463208edf0de8458a55218712ff4752413cded81e7b8e9c28976e2","MacAddress": "02:42:ac:11:00:02","IPv4Address": "172.17.0.2/16","IPv6Address": ""}},# 验证两个 container 之间的网络连接$ docker exec busybox-1 ping 172.17.0.3PING 172.17.0.3 (172.17.0.3): 56 data bytes64 bytes from 172.17.0.3: seq=0 ttl=64 time=0.456 ms64 bytes from 172.17.0.3: seq=1 ttl=64 time=0.064 ms64 bytes from 172.17.0.3: seq=2 ttl=64 time=0.059 ms
宿主机网络
以下宿主机输出内容去除了部分无关信息,发现宿主机上多了 docker0 网桥和两个 Veth Pire 虚拟设备,并且通过指令可以看到 2个虚拟设备已经和 docker0 完成连接
$ ifconfigdocker0: flags=4163<UP,BROADCAST,RUNNING,MULTICAST> mtu 1500inet 172.17.0.1 netmask 255.255.0.0 broadcast 172.17.255.255inet6 fe80::42:19ff:feef:cd35 prefixlen 64 scopeid 0x20<link>ether 02:42:19:ef:cd:35 txqueuelen 0 (Ethernet)RX packets 1 bytes 28 (28.0 B)RX errors 0 dropped 0 overruns 0 frame 0TX packets 5 bytes 446 (446.0 B)TX errors 0 dropped 0 overruns 0 carrier 0 collisions 0veth99590bf: flags=4163<UP,BROADCAST,RUNNING,MULTICAST> mtu 1500inet6 fe80::d0b1:feff:fec3:dcd3 prefixlen 64 scopeid 0x20<link>ether d2:b1:fe:c3:dc:d3 txqueuelen 0 (Ethernet)RX packets 0 bytes 0 (0.0 B)RX errors 0 dropped 0 overruns 0 frame 0TX packets 15 bytes 1242 (1.2 KB)TX errors 0 dropped 0 overruns 0 carrier 0 collisions 0vethb91c825: flags=4163<UP,BROADCAST,RUNNING,MULTICAST> mtu 1500inet6 fe80::d836:cbff:fe89:985a prefixlen 64 scopeid 0x20<link>ether da:36:cb:89:98:5a txqueuelen 0 (Ethernet)RX packets 0 bytes 0 (0.0 B)RX errors 0 dropped 0 overruns 0 frame 0TX packets 14 bytes 1152 (1.1 KB)TX errors 0 dropped 0 overruns 0 carrier 0 collisions 0$ apt install bridge-utils# 查看网桥信息一bridge name bridge id STP enabled interfacesdocker0 8000.0242f88d9fbd no veth99590bfvethb91c825# 查看网络连接方式二$ ip link show3: docker0: <BROADCAST,MULTICAST,UP,LOWER_UP> mtu 1500 qdisc noqueue state UP mode DEFAULT group default149: veth5b40cb5@if148: <BROADCAST,MULTICAST,UP,LOWER_UP> mtu 1500 qdisc noqueue master docker0 state UP mode DEFAULT group defaultlink/ether 4e:06:30:16:4a:0e brd ff:ff:ff:ff:ff:ff link-netnsid 2151: veth099d3cd@if150: <BROADCAST,MULTICAST,UP,LOWER_UP> mtu 1500 qdisc noqueue master docker0 state UP mode DEFAULT group defaultlink/ether 2a:a6:6d:61:a1:fe brd ff:ff:ff:ff:ff:ff link-netnsid 0
容器网络
进入 container busybox-1 查看网络信息,可以看到 container 的 etho 网卡是连接在宿主机上的 149 veth pire 虚拟设备上,也就是说通过 etho 的数据包最终会发到宿主机的 docker0 上进行处理
$ ifconfigeth0 Link encap:Ethernet HWaddr 02:42:AC:11:00:04inet addr:172.17.0.4 Bcast:172.17.255.255 Mask:255.255.0.0UP BROADCAST RUNNING MULTICAST MTU:1500 Metric:1RX packets:11 errors:0 dropped:0 overruns:0 frame:0TX packets:0 errors:0 dropped:0 overruns:0 carrier:0collisions:0 txqueuelen:0RX bytes:866 (866.0 B) TX bytes:0 (0.0 B)lo Link encap:Local Loopbackinet addr:127.0.0.1 Mask:255.0.0.0UP LOOPBACK RUNNING MTU:65536 Metric:1RX packets:0 errors:0 dropped:0 overruns:0 frame:0TX packets:0 errors:0 dropped:0 overruns:0 carrier:0collisions:0 txqueuelen:1000RX bytes:0 (0.0 B) TX bytes:0 (0.0 B)$ cat /sys/class/net/eth0/iflink149$ routeKernel IP routing tableDestination Gateway Genmask Flags Metric Ref Use Ifacedefault 172.17.0.1 0.0.0.0 UG 0 0 0 eth0172.17.0.0 * 255.255.0.0 U 0 0 0 eth0
进入 container busybox-2 查看网络,发现结果也一样
$ ifconfigeth0 Link encap:Ethernet HWaddr 02:42:AC:11:00:02inet addr:172.17.0.2 Bcast:172.17.255.255 Mask:255.255.0.0UP BROADCAST RUNNING MULTICAST MTU:1500 Metric:1RX packets:11 errors:0 dropped:0 overruns:0 frame:0TX packets:0 errors:0 dropped:0 overruns:0 carrier:0collisions:0 txqueuelen:0RX bytes:866 (866.0 B) TX bytes:0 (0.0 B)lo Link encap:Local Loopbackinet addr:127.0.0.1 Mask:255.0.0.0UP LOOPBACK RUNNING MTU:65536 Metric:1RX packets:0 errors:0 dropped:0 overruns:0 frame:0TX packets:0 errors:0 dropped:0 overruns:0 carrier:0collisions:0 txqueuelen:1000RX bytes:0 (0.0 B) TX bytes:0 (0.0 B)$ cat /sys/class/net/eth0/iflink151
网络架构

总结
单机 container 之间的网络数据流通方式总结:
- container 数据包从 ip router 规则匹配 eth0,
- 通过连接在 eth0 和 宿主机 docker0 之间的 veth pire,将数据发送到宿主机 docker0 网桥
- docker 通过查询 CAM表,或者 UDP 广播获得指定目标地址的 MAC 地址
- 将数据包通过指定目标地址的连接在 docker0 上的 veth pire 设备,发到到 container 内部的 eth0 网卡
- etho 网卡根据 ip router 规则匹配,完成数据转发

若有收获,就点个赞吧
0 人点赞
