1 张量数据类型
All is about Tensor
int、float等类型可以直接转tensor
How to denote string
如果遇到string类型,则需要先转码: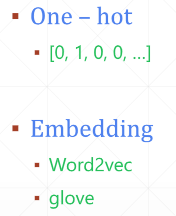
Data type
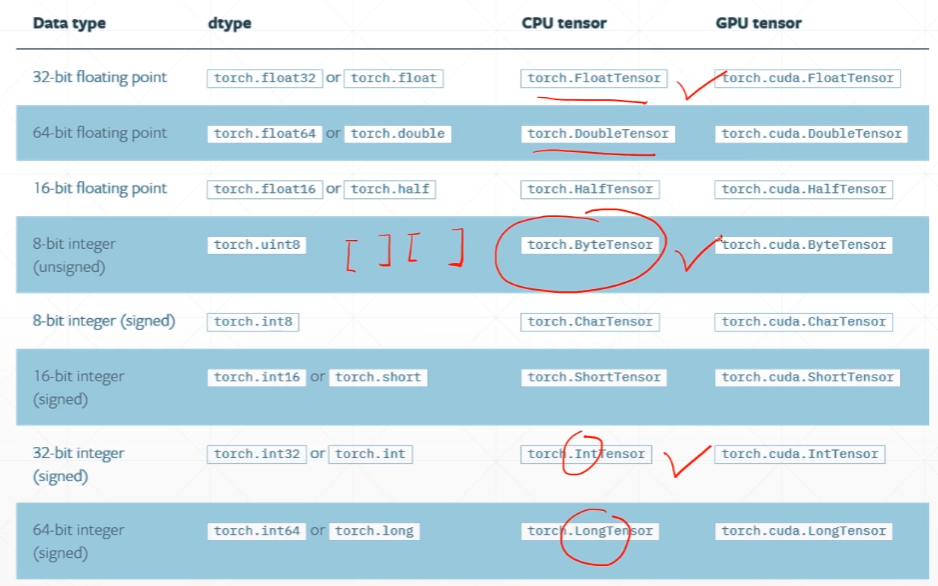
Type Check
# 1 用正态分布N(0,1)创建一个2*3的矩阵a = torch.randn(2, 3)# tensor([[-0.2497, -0.5836, -2.8750],# [-1.0568, 1.6411, 1.7850]])a.type()# 'torch.FloatTensor'isinstance(a, torch.FloatTensor)# True# 2 cpu类型不同于gpu类型isinstance(a, torch.cuda.FloatTensor)# Falseb = a.cuda()# tensor([[-0.2497, -0.5836, -2.8750],# [-1.0568, 1.6411, 1.7850]], device='cuda:0')isinstance(b, torch.cuda.FloatTensor)# True
Dimension 0 / rank 0
一般用在计算loss、误差等场合
a = torch.tensor(1.3)# tensor(1.3000)a.shape# torch.Size([])len(a.shape)# 0a.size()# torch.Size([])
(pytorch v0.3不支持dim0的tensor,只会返回dim1)
Dim 1 / rank 1
一般用于:bias,以及线性输入 linear Input
例如28*28的图片展开就是[784]的长度
在数学里称三阶的为张量,在pytorch里没管那么多,统一叫张量
torch.tensor([1.1])# tensor([1.1000])torch.tensor([1.1, 2.2])# tensor([1.1000, 2.2000])torch.FloatTensor(1) # 注意这里调用的是类,不是成员函数tensor# tensor([1.4013e-45])# 随机获取一个张量值(这个不是随机初始化,而是根本没初始化,直接取得内存中的值)torch.FloatTensor(2)# tensor([0.0000e+00, 4.7684e-06])data = np.ones(2) # array([1., 1.])a = torch.from_numpy(data) # tensor([1., 1.], dtype=torch.float64)a.shape # torch.Size([2])
Dim 2
一般用于:linear input batch
例如512张叠在一起,就是[512, 784]
a = torch.randn(2, 3)# tensor([[-1.0512, 0.6410, -1.4110],# [ 0.1649, 0.9751, -0.1582]])a.shape # torch.Size([2, 3])a.size(0) # Tensor.size()可以输入参数,表示返回第几维的长度值# 2a.size(-1) # 可以输入-1# 3a.shape[1] # shape也可以索引下标# 3
Dim 3
一般用于:rnn input batch
例如:[10, 20, 100],送20个句子,每个句子10个单词,每个单词由100的one-hot标记
a = torch.rand(1, 2, 3)# tensor([[[0.4035, 0.1340, 0.1053],# [0.9514, 0.9777, 0.0185]]])a.shape # torch.Size([1, 2, 3])a[0]# tensor([[0.4035, 0.1340, 0.1053],# [0.9514, 0.9777, 0.0185]])a[0][1]# tensor([0.9514, 0.9777, 0.0185])list(a.shape) # 可以转成更便于交互的list结构# [10, 20, 100]
Dim 4
一般用于:图片 cnn
例如:[b, c, h, w],[batch, channel, height, width]
a = torch.rand(2, 3, 28, 28)# tensor([[[[0.5155, 0.5305, 0.2388, ..., 0.6615, 0.6529, 0.3227],# [0.5186, 0.5424, 0.3623, ..., 0.6004, 0.5058, 0.2824],# [0.9580, 0.3860, 0.4782, ..., 0.0773, 0.1418, 0.6281],# ...,## ...,# [0.5031, 0.2785, 0.6886, ..., 0.9170, 0.2524, 0.6236],# [0.4367, 0.6765, 0.5586, ..., 0.1175, 0.1006, 0.9174],# [0.8860, 0.9688, 0.5787, ..., 0.6527, 0.0809, 0.3984]]]])
Mixed
a.numel() # 返回元素总数,number of element# 4704 # 2*3*28*28=4704a.dim() # a.ndim 也行# 4torch.tensor(1.3).ndim# 0
2 创建Tensor
Import from numpy
torch.from_numpy(np.array([2, 3.3]))# tensor([2.0000, 3.3000], dtype=torch.float64)torch.from_numpy(np.ones([2, 3]))# tensor([[1., 1., 1.],# [1., 1., 1.]], dtype=torch.float64)torch.from_numpy(np.ones([3], dtype=float)) # np的浮点默认就是double,即float64# tensor([1., 1., 1.], dtype=torch.float64)torch.from_numpy(np.ones([3], dtype=int))# tensor([1, 1, 1], dtype=torch.int32)torch.from_numpy(np.ones([3], dtype='int'))# tensor([1, 1, 1], dtype=torch.int32)torch.from_numpy(np.ones([3], dtype='float16'))# tensor([1., 1., 1.], dtype=torch.float16)
Import from List
torch.tensor([2., 3.2]) # tensor接收现有的数据# tensor([2.0000, 3.2000])torch.FloatTensor([2., 3.2]) # 另:Tensor也支持维度参数(shape)# tensor([2.0000, 3.2000])torch.tensor([[2., 3.2], [1., 22.3]]) # 二维的也可以# tensor([[ 2.0000, 3.2000],# [ 1.0000, 22.3000]])
uninitialized
只需要内存空间,不需要初始化数据
torch.empty(2, 3)# tensor([[-1.0512, 0.6410, -1.4110],# [ 0.1649, 0.9751, -0.1582]])torch.FloatTensor(2, 3, 4)torch.IntTensor(2, 3, 4)
set default type
torch.empty(2, 3).type()# 'torch.FloatTensor'# 修改数据默认类型torch.set_default_tensor_type(torch.DoubleTensor)torch.empty(2, 3).type()# 'torch.DoubleTensor'
rand/rand_like, randint
rand:产生[0, 1)的均值随机数
randint:[min, max)
*_like
a = torch.rand(3, 3)
# tensor([[0.0703, 0.2437, 0.7409],
#         [0.6482, 0.9421, 0.9465],
#         [0.2431, 0.6328, 0.9232]])

# 取a的尺寸作为torch.rand参数,生成新的随机矩阵
b = torch.rand_like(a)

# 可以放大倍数来生成更大范围内的随机小数
x = 10*torch.rand(d1, d2)

torch.randint(1, 10, [3, 3])
# tensor([[7, 8, 8],
#         [2, 6, 7],
#         [2, 4, 1]])
randn
# 正态分布 N(0,1)
torch.randn(3, 3)
# tensor([[ 0.5680, -0.9848,  0.8524],
#         [-0.6386, -1.0780,  0.5931],
#         [ 0.6851,  1.1849,  1.3996]])

# 自定义均值、方差
torch.normal(10, 1, [2, 3])
# tensor([[ 9.5351, 11.1090, 11.8030],
#         [11.1465,  9.0627, 10.8932]])
full
torch.full([2, 3], 7, dtype=int)  # 未来的full,会返回跟值相同的类型,目前默认还是float
# tensor([[7, 7, 7],
#         [7, 7, 7]])

torch.full([], 7, dtype=int)  # dim 0
# tensor(7)
arange
torch.arange(0, 10)
# tensor([0, 1, 2, 3, 4, 5, 6, 7, 8, 9])

torch.arange(0, 10, 2)
# tensor([0, 2, 4, 6, 8])
linspace/logspace
arange第三个参数给的是公差,linspace第三个参数给的是数量
torch.linspace(0, 10, steps=4)
# tensor([ 0.0000,  3.3333,  6.6667, 10.0000])

torch.linspace(10, 0, steps=4)
# tensor([10.0000,  6.6667,  3.3333,  0.0000])

# 以10为底数(有base参数可以改底数),指数间隔取值
torch.logspace(0, -1, steps=4)
# tensor([1.0000, 0.4642, 0.2154, 0.1000])
ones/zeros/eye
torch.eye(3)
# tensor([[1., 0., 0.],
#         [0., 1., 0.],
#         [0., 0., 1.]])

torch.eye(3, 4)
# tensor([[1., 0., 0., 0.],
#         [0., 1., 0., 0.],
#         [0., 0., 1., 0.]])

# 都有ones_like、zeros_lie、eye_like系列的函数
randperm
类似random.shuffle
torch.randperm(10)
# tensor([9, 4, 3, 5, 1, 6, 0, 7, 2, 8])

# 假如有a, b两端数据,需要协同shuffle
a = torch.rand(2, 3)
# tensor([[0.3930, 0.8298, 0.7797],
#         [0.1940, 0.9372, 0.8856]])
b = torch.rand(2, 3)
# tensor([[0.9718, 0.8722, 0.0805],
#         [0.5722, 0.0986, 0.4673]])
idx = torch.randperm(2)  # tensor([1, 0])
a[idx]
# tensor([[0.1940, 0.9372, 0.8856],
#         [0.3930, 0.8298, 0.7797]])
b[idx]  # 同理
# tensor([[0.5722, 0.0986, 0.4673],
#         [0.9718, 0.8722, 0.0805]])
3 索引与切片
indexing
dim 0 first
a = torch.rand(4, 3, 28, 28)
a[0].shape  # torch.Size([3, 28, 28])
a[0, 0].shape  # torch.Size([28, 28])
a[0, 0, 2, 4]  # tensor(0.9504)
select first/last N
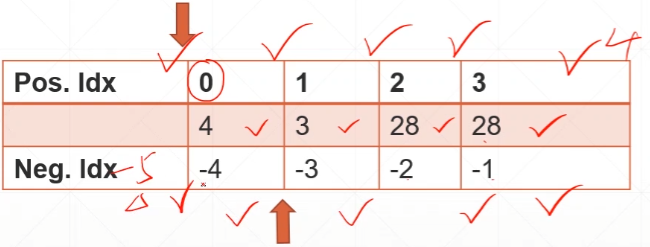
a[:2].shape  # torch.Size([2, 3, 28, 28])
a[:2, :1, :, :].shape  # torch.Size([2, 1, 28, 28])  # 通道顺序是R G B
a[:2, -1:, :, :].shape  # torch.Size([2, 1, 28, 28])  # 只取最后一个通道
select by steps
其实只有一种通用形式:start:end:step
a[:, :, 0:28:2, 0:28:2].shape  # torch.Size([4, 3, 14, 14]),0:28等同于0:28:1
a[:, :, ::2, ::2].shape  # torch.Size([4, 3, 14, 14])
select by specific index
a.index_select(0, torch.tensor([0,2])).shape
# torch.Size([2, 3, 28, 28]),等价于如下写法:
a[[0, 2], :, :, :].shape

a[:, [0, 2], :, :].shape
# torch.Size([4, 2, 28, 28])

a[:, 0, :, :].shape
# torch.Size([4, 28, 28])  # 注意,如果某个维度这样明确只取了一个维度值,则会从四阶降为三阶
…
一种省略简便写法,会自动推测未补足的索引值
a[...].shape  # torch.Size([4, 3, 28, 28])
a[0,...].shape  # torch.Size([3, 28, 28])
a[:,1,...].shape  # torch.Size([4, 28, 28])
a[...,:2].shape  # torch.Size([4, 3, 28, 2])
select by mask
x = torch.randn(3, 4)
# tensor([[-0.6698,  1.4595, -1.3606,  1.0567],
#         [ 0.7682,  0.1062,  0.4344, -0.2302],
#         [-0.3148, -1.5669, -0.4029,  0.1517]])

mask = x.ge(0.5)
# tensor([[False,  True, False,  True],
#         [ True, False, False, False],
#         [False, False, False, False]])

torch.masked_select(x, mask)
# tensor([1.4595, 1.0567, 0.7682])  # 取出值后会打平
select by flatten index
src = torch.tensor([[1, 2, 3], [4, 5, 6]])
# 必须用tensor,否则 TypeError: take(): argument 'index' (position 2) must be Tensor, not list
torch.take(src, torch.tensor([0, 2, 4]))  # 打平后取元素值
# tensor([1, 3, 5])
4 维度变换
reshape/view
reshape、view这两个函数功能几乎是一样的,只是0.3以前用view,后来为了和numpy一致,改为reshape
a = torch.rand(4, 1, 28, 28)

# reshape的限制是只要numel数量一致即可
b = a.reshape(4, 28*28)  # 注意要存储返回值
b.shape
# torch.Size([4, 784])

a.reshape(4, 1, 1, 28*28).shape
# torch.Size([4, 1, 1, 784])

# Flexible but prone to corrupt
a.reshape(4, 783)  # 少分配了一点
# RuntimeError: shape '[4, 783]' is invalid for input of size 3136
这里可以搜索详解 Numpy 中的视图和副本等相关文章,了解view和reshape的区别,对后面的transpose操作的contiguous问题会更好理解。
1、
类numpy的这类矩阵、数组类中的数据可以指向其它数组中的数据,这样多个数组可以共用同一个数据
ndarray.base用于判断数组中的数据是否来自于别的数组
ndarray.flags.owndata用于判断数组是否是数据的所有者
2、
arr = np.arange(12)
cite_of_arr = arr  # 这里cite_of_arr将只是多一个别名,和arr的id是一样的
3、
虽然view_of_arr和reshape_of_arr两个数组共用arr数组的数据,但是由于它们有属于自己的数据结构信息区,因此可以将arr数组中的原始数据以自己的方式进行表达(指定不同的 shape 以及 dtype 等)
4、
视图:赋值引用,Numpy 的切片操作,调用view()函数,调用reshape()函数;
副本:Fancy Indexing(花式索引,例如a[[1, 2]]),调用copy()函数
unsqueeze/squeeze
挤压/展开
没有改变数据内容,但是改变了数据理解方式
unsqueeze
a = torch.rand(4, 1, 28, 28)

a.unsqueeze(0).shape
# torch.Size([1, 4, 1, 28, 28]),数据没增加,但是在idx=0左边插入一个新的1

a.unsqueeze(-1).shape  # -1是在-1右边插入,即插入后的元素本身下标即为idx的值
# torch.Size([4, 1, 28, 28, 1])

a.unsqueeze(4).shape  # 在3右边假想一个4,4的左边插入,也就成了实际的4的坐标
# torch.Size([4, 1, 28, 28, 1])

a.unsqueeze(-4).shape
# torch.Size([4, 1, 1, 28, 28])

a.unsqueeze(-5).shape
# torch.Size([1, 4, 1, 28, 28]),最左边插入了一个

a.unsqueeze(5).shape
# IndexError: Dimension out of range (expected to be in range of [-5, 4], but got 5)
For example,
b = torch.rand(32)  # bias,每个chanel都有一个偏置项
f = torch.rand(4, 32, 14, 14)  # feature map数据值。要让f + b,维度必须相同

# b_ = b.unsqueeze(1).unsqueeze(2).unsqueeze(0)  # 龙原来是这样写的
# 但是就这个问题,我觉得这样写也行,而且更简洁:
b_ = b.reshape(1, 32, 1, 1)
b_.shape
# torch.Size([1, 32, 1, 1])
还有个 unsqueeze_ 功能是一样,但是原地操作
squeeze
b = torch.rand(1, 32, 1, 1)

b.squeeze().shape
# torch.Size([32]),默认删除所有长度为1的维度

b.squeeze(0).shape
# torch.Size([32, 1, 1]),删除第一维

b.squeeze(-1).shape
# torch.Size([1, 32, 1])
expand/repeat
expand
broadcasting(推荐),改变了理解,但并没有增加数据
前后ndim必须一致,且只能是size(idx)==1的维度才能扩展
b = torch.rand(1, 32, 1, 1)

b.expand(4, 32, 14, 14).shape
# torch.Size([4, 32, 14, 14])

b.expand(-1, 32, -1, -1).shape
# torch.Size([1, 32, 1, 1]),不主动写维度,要计算时才知道

b.expand(-1, 32, -1, -4).shape
# torch.Size([1, 32, 1, -4]),这样写-4也行,但不要这样写,可以理解成bug。用-1就好。

b.expand(4, 64, 14, 14).shape
# RuntimeError: The expanded size of the tensor (64) must match the existing size (32) at non-singleton dimension 1.  Target sizes: [4, 64, 14, 14].  Tensor sizes: [1, 32, 1, 1]
repeat
memory copied,确实复制了数据
b.repeat(4, 2, 6, 8).shape  # repeat是给出每个维度要拷贝的次数
# torch.Size([4, 64, 6, 8])
t/transpose/permute
t
b.t()  # 矩阵转置只能对ndim==2的进行
# RuntimeError: t() expects a tensor with <= 2 dimensions, but self is 4D

a = torch.randn(2, 3)
# tensor([[ 1.0164,  1.2924, -0.9559],
#         [ 0.3022,  1.5632, -0.0481]])
a.t()
# tensor([[ 1.0164,  0.3022],
#         [ 1.2924,  1.5632],
#         [-0.9559, -0.0481]])
transpose
比t()更通用,可以交换任意两个维度
a = torch.rand(4, 3, 32, 32)

# 只有连续的数据才能使用view,要可以使用.contiguous改数据连续性
a.transpose(1, 3).view(4, 3*32*32).shape
# RuntimeError: view size is not compatible with input tensor's size and stride (at least one dimension spans across two contiguous subspaces). Use .reshape(...) instead.
a.transpose(1, 3).contiguous().view(4, 3*32*32).shape
# torch.Size([4, 3072])

# 和reshape结合则不用考虑.contiguous问题
a.transpose(1, 3).reshape(4, 3*32*32).shape
# torch.Size([4, 3072])

# 注意下述变换,a1不等于a了
a1 = a.transpose(1, 3).reshape(4, 3*32*32).reshape(4, 3, 32, 32)
a2 = a.transpose(1, 3).reshape(4, 3*32*32).reshape(4, 32, 32, 3).transpose(1, 3)

# 我们可以用torch.all来验证张量相等
torch.all(torch.eq(a, a1))
# tensor(False)
torch.all(torch.eq(a, a2))
# tensor(True)
为什么view需要contiguous而reshape不需要,我是这样猜想的:
首先他们都是修改了不同的观察数据结构的角度,并不是数据的副本,没有拷贝。
reshape是对完整的原数据进行重新结构化,所以无论何种角度,其实都是一整块连续的内存数据。
但是view支持切片功能,是可以单映射到某几个子维度的,如果数据不连续,管理起来会很麻烦。
即reshape和view都要求管理的数据必须是连续的,只是reshape的张量大小跟原来一样,所以都是一整块,但view可能是某个子部分,会出现两块不连续内存的可能。
下述实验证明,reshape和transpose是可以结合,共同起作用的,虽然数据估计没拷贝,但是数据结构、理解角度变了:
a = torch.arange(24).reshape(2, 3, 4)
# tensor([[[ 0,  1,  2,  3],
#          [ 4,  5,  6,  7],
#          [ 8,  9, 10, 11]],
#         [[12, 13, 14, 15],
#          [16, 17, 18, 19],
#          [20, 21, 22, 23]]])

a.transpose(0, 2)  # torch.Size([4, 3, 2])
# tensor([[[ 0, 12],
#          [ 4, 16],
#          [ 8, 20]],
#         [[ 1, 13],
#          [ 5, 17],
#          [ 9, 21]],
#         [[ 2, 14],
#          [ 6, 18],
#          [10, 22]],
#         [[ 3, 15],
#          [ 7, 19],
#          [11, 23]]])

# 转置、reshape都是有起作用的!
a.transpose(0, 2).reshape(3, 4, 2)
# tensor([[[ 0, 12],
#          [ 4, 16],
#          [ 8, 20],
#          [ 1, 13]],
#         [[ 5, 17],
#          [ 9, 21],
#          [ 2, 14],
#          [ 6, 18]],
#         [[10, 22],
#          [ 3, 15],
#          [ 7, 19],
#          [11, 23]]])

a.reshape(3, 4, 2)
# tensor([[[ 0,  1],
#          [ 2,  3],
#          [ 4,  5],
#          [ 6,  7]],
#         [[ 8,  9],
#          [10, 11],
#          [12, 13],
#          [14, 15]],
#         [[16, 17],
#          [18, 19],
#          [20, 21],
#          [22, 23]]])
permute
numpy是以 [b, h, w, c]的形式存储图片的
如果使用transpose,要操作两次才能把 [b, c, h, w]变过来,使用permute只要一步
b = torch.rand(4, 3, 28, 32)
b.permute(0, 2, 3, 1).shape
# torch.Size([4, 28, 32, 3])

若有收获,就点个赞吧
0 人点赞
