- 安装Traefik
- 测试路由
- The official Traefik docker image
- Enables the web UI and tells Traefik to listen to docker
- Configuration sample for Traefik v2.
- https://github.com/containous/traefik/blob/v1.7/traefik.sample.toml">For Traefik v1: https://github.com/containous/traefik/blob/v1.7/traefik.sample.toml
- 全局设置
- 默认为true
- 入口点设置
- 日志设置
- 日志级别,默认 ERROR
- 日志默认会打印到stdout,如果不指定filePath,默认使用stdout
- 访问日志 配置
- 日志默认会打印到stdout,如果不指定filePath,默认使用 os.Stdout
- 格式目前支持 “json” 和 “common”(默认)
- API 及控制台配置
- Enable the API in insecure mode
- Optional
- Default: true
- insecure = false
- 开启控制台(默认开启)
- Ping 配置
- 入口点名称,默认为traefik
- entryPoint = “traefik”
- Docker 后端配置
- Docker服务后端,默认为unix:///var/run/docker.sock,也可以设置为tcp://10.10.10.10:2375
- Default host rule.
- Optional
- Default: “Host(
{{ normalize .Name }})” - defaultRule = “Host(
{{ normalize .Name }}.docker.localhost)” - 对容器默认进行暴露(默认开启)
- exposedByDefault = false
- 日志级别,默认 ERROR
- 日志默认会打印到stdout,如果不指定filePath,默认使用stdout
- 日志默认会打印到stdout,如果不指定filePath,默认使用 os.Stdout
- 格式目前支持 “json” 和 “common”(默认)
- 过滤日志
- 定义日志的字段,有三种模式:keep、drop、redact
- 如果为true,则会使用名称为traefik的entryPoint,如果该entryPoint不存在,则会自动创建一个名称为traefik端口为8080的entryPoint
- 开启dashboard,默认为true http://
:8080/dashboard/ - 开启Endpoints调试,默认为false http://
:8080/debug/ - Dynamic Configuration
- http://traefik.domain.com, http://traefik.domain.com/api">Matches http://traefik.domain.com, http://traefik.domain.com/api
- http://traefik.domain.com/hello">or http://traefik.domain.com/hello
- http://api.traefik.domain.com/api or http://domain.com/api">Matches http://api.traefik.domain.com/api or http://domain.com/api
- http://api.traefik.domain.com/hello">but does not match http://api.traefik.domain.com/hello
- http://traefik.domain.com/api or http://traefik.domain.com/dashboard">Matches http://traefik.domain.com/api or http://traefik.domain.com/dashboard
- http://traefik.domain.com/hello">but does not match http://traefik.domain.com/hello
- Configuration加载频率
- Docker服务后端,默认为unix:///var/run/docker.sock,也可以设置为tcp://10.10.10.10:2375
- Default host rule.
- Optional
- Default: “Host(
{{ normalize .Name }})” - 如果没有配置 Rule,将默认通过
.docker.localhost 来发现路由 - defaultRule = “Host(
{{ normalize .Name }}.docker.localhost)” - 对容器默认进行暴露(默认开启)
- exposedByDefault = false
- 开启swarmMode模式,默认为 false
- swarmMode = false
- 默认为empty
- network = “test”
- 设置Docker TLS
- …
- 用户:test 密码:test
- 安装:自动创建 cronjob, 每天 0:00 点自动检测所有的证书
- https://console.dnspod.cn/account/token">https://console.dnspod.cn/account/token
- !/bin/bash
- https://medium.com/@rajanmaharjan/secure-your-mongodb-connections-ssl-tls-92e2addb3c89">From https://medium.com/@rajanmaharjan/secure-your-mongodb-connections-ssl-tls-92e2addb3c89
- Should Error because no TLS
- Should work
- Mongo 1
- Mongo2
- Mongo 1
- Mongo2
- Mongo 1
- 参考文章
traefik 是一个开源的反向代理和负载均衡工具,现在官方介绍中将其定位为云原生的边缘路由器,且用了一堆修饰词:简单、自动、高速、全面、开源、产品级、内置监控指标和主流集群技术集成等等。
本文使用的Traefik版本为V2.1.1。中文文档,请参考 https://www.qikqiak.com/traefik-book/
安装Traefik
使用Docker安装
docker run -d -p 8080:8080 -p 80:80 --name traefik\-v $PWD/traefik.toml:/etc/traefik/traefik.toml traefik:latest
说明:
- traefik使用8080和80端口,因为宿主机这两个被使用,所以将这两个映射到其他端口
- traefik镜像使用最新版本,镜像都是基于 Alpine Linux Official image
- 默认traefik会寻找/etc/traefik/traefik.toml下的配置文件
因为初次接触traefik,所以对traefik.toml的配置不熟悉,如果上面启动的traefik出现问题,没有关系,可以跳过,往下看,等对traefik有了全面的立即之后,再回过头来配置traefik.toml。
使用docker-compose安装
我们使用 traefik:latest 作为镜像启动traefik 服务。docker-compose.yaml 配置文件如下
version: '3'services:traefik:# The official Traefik docker imageimage: traefik:latest# Enables the web UI and tells Traefik to listen to dockercommand: --api.insecure=true --providers.dockerports:# The HTTP port- "80:80"# The Web UI (enabled by --api.insecure=true)- "8080:8080"volumes:# So that Traefik can listen to the Docker events- /var/run/docker.sock:/var/run/docker.sock
此时我们使用命令 docker-compose up -d 开启 traefik 服务:
docker-compose up -d
查看状态:
$ docker-compose psName Command State Ports--------------------------------------------------------------------------------------------root_traefik_1 /entrypoint.sh --api.insec ... Up 0.0.0.0:80->80/tcp, 0.0.0.0:8080->8080/tcp
通过命令行访问traefik对外暴露的http接口:
curl -s "http://localhost:8080/api/rawdata" | python -m json.tool{"middlewares": {"dashboard_redirect@internal": {"redirectRegex": {"permanent": true,"regex": "^(http:\\/\\/[^:]+(:\\d+)?)/$","replacement": "${1}/dashboard/"},"status": "enabled","usedBy": ["dashboard@internal"]},"dashboard_stripprefix@internal": {"status": "enabled","stripPrefix": {"prefixes": ["/dashboard/","/dashboard"]},"usedBy": ["dashboard@internal"]}},"routers": {"api@internal": {"entryPoints": ["traefik"],"priority": 2147483646,"rule": "PathPrefix(`/api`)","service": "api@internal","status": "enabled","using": ["traefik"]},"dashboard@internal": {"entryPoints": ["traefik"],"middlewares": ["dashboard_redirect@internal","dashboard_stripprefix@internal"],"priority": 2147483645,"rule": "PathPrefix(`/`)","service": "dashboard@internal","status": "enabled","using": ["traefik"]},"traefik-root@docker": {"rule": "Host(`traefik-root`)","service": "traefik-root","status": "enabled","using": ["http","traefik"]}},"services": {"api@internal": {"status": "enabled","usedBy": ["api@internal"]},"dashboard@internal": {"status": "enabled","usedBy": ["dashboard@internal"]},"traefik-root@docker": {"loadBalancer": {"passHostHeader": true,"servers": [{"url": "http://172.18.0.2:80"}]},"serverStatus": {"http://172.18.0.2:80": "UP"},"status": "enabled","usedBy": ["traefik-root@docker"]}}}
通过宿主机访问dashboard:http://192.168.56.11:8080/dashboard,可以看到: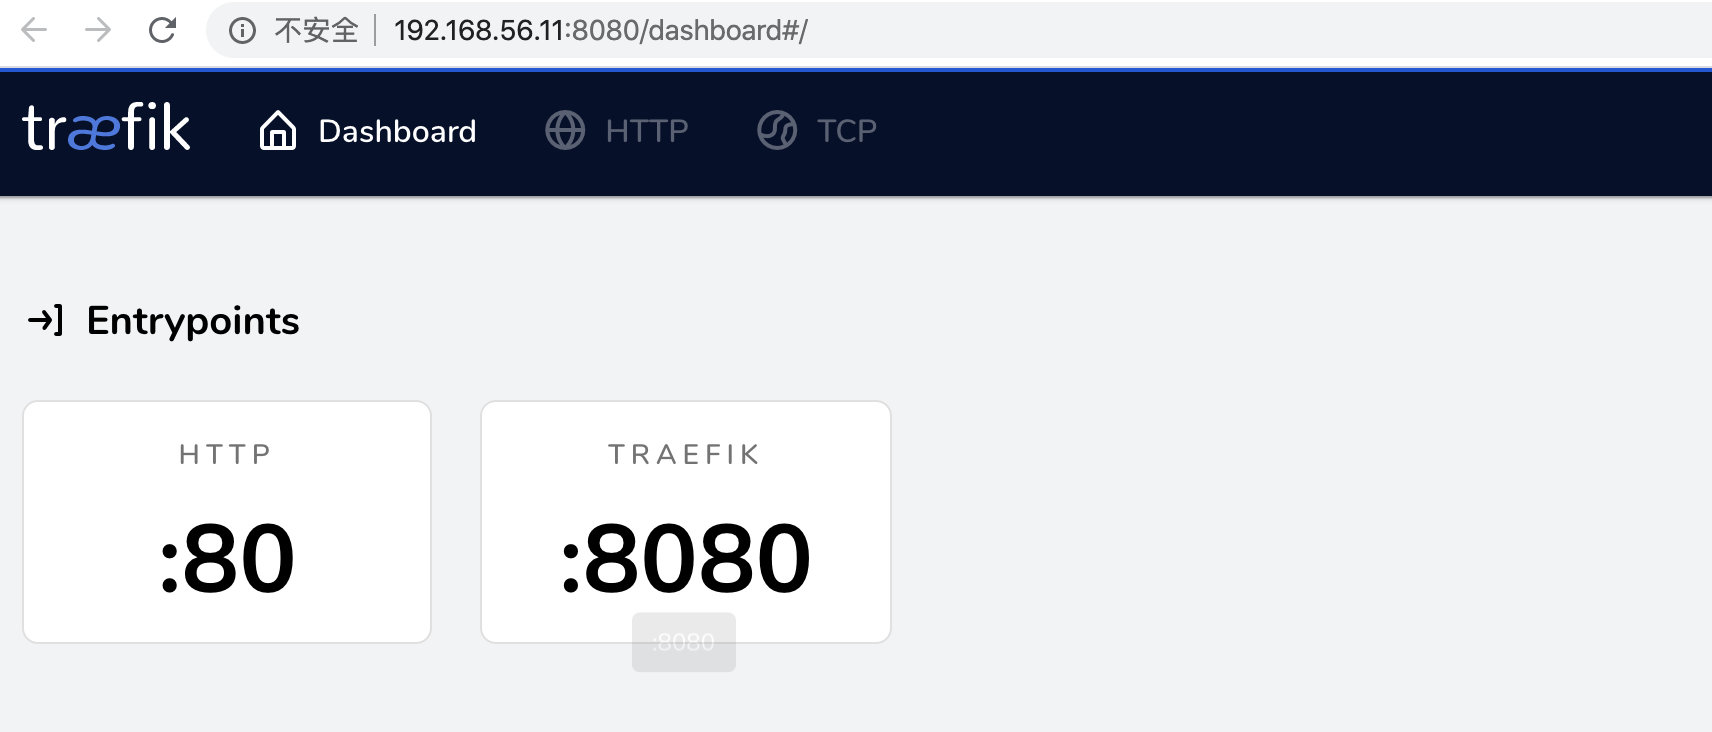
可以看到traefik创建了两个Entrypoints:
- HTTP:端口为80
TRAEFIK:端口为8080,是Dashboard的入口端点
测试路由
接下来我们使用
docker-compose启动一个简单的http服务,docker-compose.yaml配置文件如下 ``` version: ‘3’ services: traefik:The official Traefik docker image
image: traefik:latest
Enables the web UI and tells Traefik to listen to docker
command: —api.insecure=true —providers.docker ports:
# The HTTP port- "80:80"# The Web UI (enabled by --api.insecure=true)- "8080:8080"
volumes:
# So that Traefik can listen to the Docker events- /var/run/docker.sock:/var/run/docker.sock
whoami: image: containous/whoami labels:
# Explicitly tell Traefik to expose this container- "traefik.enable=true"# The domain the service will respond to- "traefik.http.routers.whoami.rule=Host(`whoami.docker.localhost`)"# Allow request only from the predefined entry point named "http"- "traefik.http.routers.whoami.entrypoints=http"
- 如果设置了 `--providers.docker.exposedbydefault=false`,则必须设置traefik.enable=true,才会暴露容器给traefik。- 配置了容器的 `labels`,设置该服务的 `Host` 为 `whoami.docker.localhost`,给 `traefik` 提供标记创建服务
docker-compose up -d
查看新创建的服务:
docker-compose ps
Name Command State Ports
root_traefik_1 /entrypoint.sh —api.insec … Up 0.0.0.0:80->80/tcp, 0.0.0.0:8080->8080/tcp root_whoami_1 /whoami Up 80/tcp
再次查看traefik中的路由信息(就会发现服务自动加载进去了)
curl -s “http://localhost:8880/api/rawdata“ | python -m json.tool
查看dashboard:<br /><br />此时我们可以通过主机名 `whoami.docker.localhost` 来访问 `whoami` 服务,我们使用 `curl` 做测试
curl -H Host:whoami.docker.localhost http://localhost
返回内容:
Hostname: ac6e8f48820e IP: 127.0.0.1 IP: 172.18.0.3 RemoteAddr: 172.18.0.2:38018 GET / HTTP/1.1 Host: whoami.docker.localhost User-Agent: curl/7.29.0 Accept: / Accept-Encoding: gzip X-Forwarded-For: 172.18.0.1 X-Forwarded-Host: whoami.docker.localhost X-Forwarded-Port: 80 X-Forwarded-Proto: http X-Forwarded-Server: 1410f6164208 X-Real-Ip: 172.18.0.1
服务正常访问。此时如果把 `Host` 配置为自己的域名,则已经可以使用自己的域名来提供服务。<br />单机扩容:
docker-compose up -d —scale whoami=2
再次访问(就会发现自动负载到两个不同的实例上去了)
$ curl -H Host:whoami.docker.localhost http://localhost Hostname: ac6e8f48820e IP: 127.0.0.1 IP: 172.18.0.3 RemoteAddr: 172.18.0.2:38018 GET / HTTP/1.1 Host: whoami.docker.localhost User-Agent: curl/7.29.0 Accept: / Accept-Encoding: gzip X-Forwarded-For: 172.18.0.1 X-Forwarded-Host: whoami.docker.localhost X-Forwarded-Port: 80 X-Forwarded-Proto: http X-Forwarded-Server: 1410f6164208 X-Real-Ip: 172.18.0.1
$ curl -H Host:whoami.docker.localhost http://localhost Hostname: 3f64539c40b0 IP: 127.0.0.1 IP: 172.18.0.4 RemoteAddr: 172.18.0.2:44564 GET / HTTP/1.1 Host: whoami.docker.localhost User-Agent: curl/7.29.0 Accept: / Accept-Encoding: gzip X-Forwarded-For: 172.18.0.1 X-Forwarded-Host: whoami.docker.localhost X-Forwarded-Port: 80 X-Forwarded-Proto: http X-Forwarded-Server: 1410f6164208 X-Real-Ip: 172.18.0.1
查看dashboard上的**whoami-traefik** Service:<br /><br />可以查看镜像的ip:
$ docker inspect root_whoami_1|grep IPAddress “SecondaryIPAddresses”: null, “IPAddress”: “”, “IPAddress”: “172.18.0.3”,
$ docker inspect root_whoami_2|grep IPAddress “SecondaryIPAddresses”: null, “IPAddress”: “”, “IPAddress”: “172.18.0.4”,
# Traefik配置## 静态配置-File配置:[https://docs.traefik.io/v2.0/reference/static-configuration/file/](https://docs.traefik.io/v2.0/reference/static-configuration/file/)-CLI参数:[https://docs.traefik.io/v2.0/reference/static-configuration/cli/](https://docs.traefik.io/v2.0/reference/static-configuration/cli/)-环境变量:[https://docs.traefik.io/v2.0/reference/static-configuration/env/](https://docs.traefik.io/v2.0/reference/static-configuration/env/)Traefik在以下为主查找配置文件:- `/etc/traefik/`- `$XDG_CONFIG_HOME/`- `$HOME/.config/`- `.` (_the working directory_).可以通过环境变量参数覆盖配置文件:
traefik —configFile=foo/bar/myconfigfile.toml
## 动态配置-File配置:[https://docs.traefik.io/v2.0/reference/dynamic-configuration/file/](https://docs.traefik.io/v2.0/reference/dynamic-configuration/file/)-Docker配置:[https://docs.traefik.io/v2.0/reference/dynamic-configuration/docker/](https://docs.traefik.io/v2.0/reference/dynamic-configuration/docker/)-Kubernetes配置:[https://docs.traefik.io/v2.0/reference/dynamic-configuration/kubernetes-crd/](https://docs.traefik.io/v2.0/reference/dynamic-configuration/kubernetes-crd/)-Marathon:[https://docs.traefik.io/v2.0/reference/dynamic-configuration/marathon/](https://docs.traefik.io/v2.0/reference/dynamic-configuration/marathon/)-Rancher:[https://docs.traefik.io/v2.0/reference/dynamic-configuration/rancher/](https://docs.traefik.io/v2.0/reference/dynamic-configuration/rancher/)## traefik.toml一个示例traefik.toml内容如下:
#
#
Configuration sample for Traefik v2.
#
For Traefik v1: https://github.com/containous/traefik/blob/v1.7/traefik.sample.toml
#
#
#
全局设置
#
[global] checkNewVersion = true
默认为true
sendAnonymousUsage = false
[serversTransport] insecureSkipVerify = true rootCAs = [“foobar”, “foobar”] maxIdleConnsPerHost = 42 [serversTransport.forwardingTimeouts] dialTimeout = 42 responseHeaderTimeout = 42 idleConnTimeout = 42
#
入口点设置
#
[entryPoints] [entryPoints.http] address = “:80”
[entryPoints.https] address = “:443”
[entryPoints.traefik] address = “:8080”
#
日志设置
#
[log]
日志级别,默认 ERROR
level = “DEBUG”
日志默认会打印到stdout,如果不指定filePath,默认使用stdout
filePath = “/data/logs/traefik.log” format = “common”
#
访问日志 配置
#
[accessLog]
日志默认会打印到stdout,如果不指定filePath,默认使用 os.Stdout
filePath = “/data/logs/access.log”
格式目前支持 “json” 和 “common”(默认)
format = “common”
#
API 及控制台配置
#
[api]
Enable the API in insecure mode
#
Optional
Default: true
#
insecure = false
开启控制台(默认开启)
dashboard = true
#
Ping 配置
#
[ping]
入口点名称,默认为traefik
entryPoint = “traefik”
[providers.file] directory = “/etc/traefik/dynamic-conf.toml”
#
Docker 后端配置
#
[providers.docker]
Docker服务后端,默认为unix:///var/run/docker.sock,也可以设置为tcp://10.10.10.10:2375
endpoint = “unix:///var/run/docker.sock”
Default host rule.
#
Optional
Default: “Host({{ normalize .Name }})”
#
defaultRule = “Host({{ normalize .Name }}.docker.localhost)”
对容器默认进行暴露(默认开启)
# 如果关闭选项,则容器不包含 `traefik.enable=true` 标签,就不会被暴露
exposedByDefault = false
### global
[global] checkNewVersion = true #检查新版本 sendAnonymousUsage = true #发送匿名使用数据
### serversTransport
[serversTransport] insecureSkipVerify = true rootCAs = [“foobar”, “foobar”] maxIdleConnsPerHost = 42 [serversTransport.forwardingTimeouts] dialTimeout = 42 responseHeaderTimeout = 42 idleConnTimeout = 42
### entryPoints考虑到隐私以及安全,不对外公开的服务可以配置 `Basic Auth`,`Digest Auth` 或者 `WhiteList`,或者直接搭建 VPN,在内网内进行访问。至于 `Basic Auth` 等,可以参考 **traefik middlewares**<br />
[entryPoints] [entryPoints.http] address = “:80”
[entryPoints.https] address = “:443”
[entryPoints.traefik] address = “:8080”
上面定义了三个entryPoints,名称分别为web、websecure、traefik,关于entryPoints完整的定义如下:
Static configuration
[entryPoints] [entryPoints.name] address = “:8888” [entryPoints.name.transport] [entryPoints.name.transport.lifeCycle] requestAcceptGraceTimeout = 42 graceTimeOut = 42 [entryPoints.name.transport.respondingTimeouts] readTimeout = 42 writeTimeout = 42 idleTimeout = 42 [entryPoints.name.proxyProtocol] insecure = true trustedIPs = [“127.0.0.1”, “192.168.0.1”] [entryPoints.name.forwardedHeaders] insecure = true trustedIPs = [“127.0.0.1”, “192.168.0.1”]
### log
[log]
日志级别,默认 ERROR
level = “DEBUG”
日志默认会打印到stdout,如果不指定filePath,默认使用stdout
filePath = “/data/logs/traefik.log” format = “common” # 格式目前支持 “json” 和 “common”(默认)
### accessLog
[accessLog]
日志默认会打印到stdout,如果不指定filePath,默认使用 os.Stdout
filePath = “/data/logs/access.log” bufferingSize = 100
格式目前支持 “json” 和 “common”(默认)
format = “common”
过滤日志
[accessLog.filters]
statusCodes = [“200”, “300-302”]
retryAttempts = true
minDuration = “10ms”
定义日志的字段,有三种模式:keep、drop、redact
[accessLog.fields] defaultMode = “keep” [accessLog.fields.names] “ClientUsername” = “drop” [accessLog.fields.headers] defaultMode = “keep” [accessLog.fields.headers.names] “User-Agent” = “redact” “Authorization” = “drop” “Content-Type” = “keep”
可用的字段:|Field| Description|| --- | --- ||`StartUTC`| The time at which request processing started.||`StartLocal`| The local time at which request processing started.||`Duration`| The total time taken (in nanoseconds) by processing the response, including the origin server's time but not the log writing time.||`FrontendName`| The name of the Traefik frontend.||`BackendName`| The name of the Traefik backend.||`BackendURL`| The URL of the Traefik backend.||`BackendAddr`| The IP:port of the Traefik backend (extracted from `BackendURL`)||`ClientAddr`| The remote address in its original form (usually IP:port).||`ClientHost`| The remote IP address from which the client request was received.||`ClientPort`| The remote TCP port from which the client request was received.||`ClientUsername`| The username provided in the URL, if present.||`RequestAddr`| The HTTP Host header (usually IP:port). This is treated as not a header by the Go API.||`RequestHost`| The HTTP Host server name (not including port).||`RequestPort`| The TCP port from the HTTP Host.||`RequestMethod`| The HTTP method.||`RequestPath`| The HTTP request URI, not including the scheme, host or port.||`RequestProtocol`| The version of HTTP requested.||`RequestLine`| `RequestMethod` + `RequestPath` + `RequestProtocol`||`RequestContentSize`| The number of bytes in the request entity (a.k.a. body) sent by the client.||`OriginDuration`| The time taken by the origin server ('upstream') to return its response.||`OriginContentSize`| The content length specified by the origin server, or 0 if unspecified.||`OriginStatus`| The HTTP status code returned by the origin server. If the request was handled by this Traefik instance (e.g. with a redirect), then this value will be absent.||`OriginStatusLine`| `OriginStatus` + Status code explanation||`DownstreamStatus`| The HTTP status code returned to the client.||`DownstreamStatusLine`| `DownstreamStatus` + Status code explanation||`DownstreamContentSize`| The number of bytes in the response entity returned to the client. This is in addition to the "Content-Length" header, which may be present in the origin response.||`RequestCount`| The number of requests received since the Traefik instance started.||`GzipRatio`| The response body compression ratio achieved.||`Overhead`| The processing time overhead caused by Traefik.||`RetryAttempts`| The amount of attempts the request was retried.|### metrics支持以下几种:- [Datadog](https://docs.traefik.io/v2.0/observability/metrics/datadog/)- [InfluxDB](https://docs.traefik.io/v2.0/observability/metrics/influxdb/)- [Prometheus](https://docs.traefik.io/v2.0/observability/metrics/prometheus/)- [StatsD](https://docs.traefik.io/v2.0/observability/metrics/statsd/)
[metrics] [metrics.prometheus] buckets = [42.0, 42.0] addEntryPointsLabels = true addServicesLabels = true entryPoint = “foobar” [metrics.datadog] address = “foobar” pushInterval = “10s” addEntryPointsLabels = true addServicesLabels = true [metrics.statsD] address = “foobar” pushInterval = “10s” addEntryPointsLabels = true addServicesLabels = true [metrics.influxDB] address = “foobar” protocol = “foobar” pushInterval = “10s” database = “foobar” retentionPolicy = “foobar” username = “foobar” password = “foobar” addEntryPointsLabels = true addServicesLabels = true
### tracing支持以下几种:- [Jaeger](https://docs.traefik.io/v2.0/observability/tracing/jaeger/)- [Zipkin](https://docs.traefik.io/v2.0/observability/tracing/zipkin/)- [Datadog](https://docs.traefik.io/v2.0/observability/tracing/datadog/)- [Instana](https://docs.traefik.io/v2.0/observability/tracing/instana/)- [Haystack](https://docs.traefik.io/v2.0/observability/tracing/haystack/)
[tracing] serviceName = “foobar” spanNameLimit = 42 [tracing.jaeger] samplingServerURL = “foobar” samplingType = “foobar” samplingParam = 42.0 localAgentHostPort = “foobar” gen128Bit = true propagation = “foobar” traceContextHeaderName = “foobar” [tracing.jaeger.collector] endpoint = “foobar” user = “foobar” password = “foobar” [tracing.zipkin] httpEndpoint = “foobar” sameSpan = true id128Bit = true sampleRate = 42.0 [tracing.datadog] localAgentHostPort = “foobar” globalTag = “foobar” debug = true prioritySampling = true traceIDHeaderName = “foobar” parentIDHeaderName = “foobar” samplingPriorityHeaderName = “foobar” bagagePrefixHeaderName = “foobar” [tracing.instana] localAgentHost = “foobar” localAgentPort = 42 logLevel = “foobar” [tracing.haystack] localAgentHost = “foobar” localAgentPort = 42 globalTag = “foobar” traceIDHeaderName = “foobar” parentIDHeaderName = “foobar” spanIDHeaderName = “foobar” baggagePrefixHeaderName = “foobar”
### api暴露API,在生产环境不建议开启。
[api]
如果为true,则会使用名称为traefik的entryPoint,如果该entryPoint不存在,则会自动创建一个名称为traefik端口为8080的entryPoint
insecure = true
开启dashboard,默认为true http://:8080/dashboard/
dashboard = true
开启Endpoints调试,默认为false http://:8080/debug/
debug = true
如果开启了API,则一个名称为api@internal的特别服务将会被创建,并且可在route中被引用。<br />例如:在Traefik上通过docker定义动态配置:
Dynamic Configuration
labels:
- “traefik.http.routers.api.rule=Host(
traefik.domain.com)” - “traefik.http.routers.api.service=api@internal”
- “traefik.http.routers.api.middlewares=auth”
- “traefik.http.middlewares.auth.basicauth.users=test:$$apr1$$H6uskkkW$$IgXLP6ewTrSuBkTrqE8wj”
注意:<br />路由规则必须指定**/api**的请求:
Matches http://traefik.domain.com, http://traefik.domain.com/api
or http://traefik.domain.com/hello
rule = “Host(traefik.domain.com)”
Matches http://api.traefik.domain.com/api or http://domain.com/api
but does not match http://api.traefik.domain.com/hello
rule = “PathPrefix(/api)”
Matches http://traefik.domain.com/api or http://traefik.domain.com/dashboard
but does not match http://traefik.domain.com/hello
rule = “Host(traefik.domain.com) && (PathPrefix(/api) || PathPrefix(/dashboard))”
所有Endpoints如下:|Path| Description|| --- | --- ||`/api/http/routers`| Lists all the HTTP routers information.||`/api/http/routers/{name}`| Returns the information of the HTTP router specified by `name`.||`/api/http/services`| Lists all the HTTP services information.||`/api/http/services/{name}`| Returns the information of the HTTP service specified by `name`.||`/api/http/middlewares`| Lists all the HTTP middlewares information.||`/api/http/middlewares/{name}`| Returns the information of the HTTP middleware specified by `name`.||`/api/tcp/routers`| Lists all the TCP routers information.||`/api/tcp/routers/{name}`| Returns the information of the TCP router specified by `name`.||`/api/tcp/services`| Lists all the TCP services information.||`/api/tcp/services/{name}`| Returns the information of the TCP service specified by `name`.||`/api/entrypoints`| Lists all the entry points information.||`/api/entrypoints/{name}`| Returns the information of the entry point specified by `name`.||`/api/overview`| Returns statistic information about http and tcp as well as enabled features and providers.||`/api/version`| Returns information about Traefik version.||`/debug/vars`| See the [expvar](https://golang.org/pkg/expvar/) Go documentation.||`/debug/pprof/`| See the [pprof Index](https://golang.org/pkg/net/http/pprof/#Index) Go documentation.||`/debug/pprof/cmdline`| See the [pprof Cmdline](https://golang.org/pkg/net/http/pprof/#Cmdline) Go documentation.||`/debug/pprof/profile`| See the [pprof Profile](https://golang.org/pkg/net/http/pprof/#Profile) Go documentation.||`/debug/pprof/symbol`| See the [pprof Symbol](https://golang.org/pkg/net/http/pprof/#Symbol) Go documentation.||`/debug/pprof/trace`| See the [pprof Trace](https://golang.org/pkg/net/http/pprof/#Trace) Go documentation.|### ping开启健康检查,/ping,对应entryPoint名称默认为traefik
[ping] entryPoint = “traefik” #默认为traefik
可以自定义一个`entryPoint`:
[entryPoints] [entryPoints.ping] address = “:8082”
[ping] entryPoint = “ping”
### providers支持的providers:|Provider| Type| Configuration Type|| --- | --- | --- ||[Docker](https://docs.traefik.io/v2.0/providers/docker/)| Orchestrator| Label||[Kubernetes](https://docs.traefik.io/v2.0/providers/kubernetes-crd/)| Orchestrator| Custom Resource||[Marathon](https://docs.traefik.io/v2.0/providers/marathon/)| Orchestrator| Label||[Rancher](https://docs.traefik.io/v2.0/providers/rancher/)| Orchestrator| Label||[File](https://docs.traefik.io/v2.0/providers/file/)| Manual| TOML/YAML format|配置:
[providers]
Configuration加载频率
providers.providersThrottleDuration = 10s
#### Docker
[providers.docker]
Docker服务后端,默认为unix:///var/run/docker.sock,也可以设置为tcp://10.10.10.10:2375
endpoint = “unix:///var/run/docker.sock”
Default host rule.
#
Optional
Default: “Host({{ normalize .Name }})”
如果没有配置 Rule,将默认通过 .docker.localhost 来发现路由
defaultRule = “Host({{ normalize .Name }}.docker.localhost)”
对容器默认进行暴露(默认开启)
# 如果关闭选项,则容器不包含 `traefik.enable=true` 标签,就不会被暴露
exposedByDefault = false
开启swarmMode模式,默认为 false
swarmMode = false
默认为empty
network = “test”
设置Docker TLS
[providers.docker.tls] ca = “path/to/ca.crt” caOptional = true cert = “path/to/foo.cert” key = “path/to/foo.key” insecureSkipVerify = true
在docker-compose的配置中可以这样使用:
version: “3” services: my-container:
# ...labels:- traefik.http.routers.my-container.rule=Host(`mydomain.com`)
<br />支持的http routers标签:
- “traefik.http.routers.myrouter.rule=Host(
mydomain.com)” - “traefik.http.routers.myrouter.entrypoints=ep1,ep2”
- “traefik.http.routers.myrouter.middlewares=auth,prefix,cb”
- “traefik.http.routers.myrouter.service=myservice”
- “traefik.http.routers.myrouter.tls=true”
- “traefik.http.routers.myrouter.tls.certresolver=myresolver”
- “traefik.http.routers.myrouter.tls.domains[0].main=foobar.com”
- “traefik.http.routers.myrouter.tls.domains[0].sans=test.foobar.com,dev.foobar.com”
- “traefik.http.routers.myrouter.tls.options=foobar”
- “traefik.http.routers.myrouter.priority=42”
<br />支持的Services标签:
- “traefik.http.services.myservice.loadbalancer.server.port=8080”
- “traefik.http.services.myservice.loadbalancer.server.scheme=http”
- “traefik.http.services.myservice.loadbalancer.passhostheader=true”
- “traefik.http.services.myservice.loadbalancer.healthcheck.headers.X-Foo=foobar”
- “traefik.http.services.myservice.loadbalancer.healthcheck.hostname=foobar.com”
- “traefik.http.services.myservice.loadbalancer.healthcheck.interval=10”
- “traefik.http.services.myservice.loadbalancer.healthcheck.path=/foo”
- “traefik.http.services.myservice.loadbalancer.healthcheck.port=42”
- “traefik.http.services.myservice.loadbalancer.healthcheck.scheme=http”
- “traefik.http.services.myservice.loadbalancer.healthcheck.timeout=10”
- “traefik.http.services.myservice.loadbalancer.sticky=true”
- “traefik.http.services.myservice.loadbalancer.sticky.cookie.httponly=true”
- “traefik.http.services.myservice.loadbalancer.sticky.cookie.name=foobar”
- “traefik.http.services.myservice.loadbalancer.sticky.cookie.secure=true”
- “traefik.http.services.myservice.loadbalancer.responseforwarding.flushinterval=10”
<br />支持的Middleware标签:
- traefik.http.middlewares.my-redirect.redirectscheme.scheme=https
支持的tcp routers标签:
- “traefik.tcp.routers.mytcprouter.rule=HostSNI(
mydomain.com)” - “traefik.tcp.routers.mytcprouter.entrypoints=ep1,ep2”
- “traefik.tcp.routers.mytcprouter.middlewares=auth,prefix,cb”
- “traefik.tcp.routers.mytcprouter.service=myservice”
- “traefik.tcp.routers.mytcprouter.tls=true”
- “traefik.tcp.routers.mytcprouter.tls.certresolver=myresolver”
- “traefik.tcp.routers.mytcprouter.tls.domains[0].main=foobar.com”
- “traefik.tcp.routers.mytcprouter.tls.domains[0].sans=test.foobar.com,dev.foobar.com”
- “traefik.tcp.routers.mytcprouter.tls.options=foobar”
- “traefik.tcp.routers.mytcprouter.tls.passthrough=true”
支持的TCP Services标签
- “traefik.tcp.services.mytcpservice.loadbalancer.server.port=423”
- “traefik.tcp.services.mytcpservice.loadbalancer.terminationdelay=100”
#### File
[providers.file] directory = “/etc/traefik/conf” filename = “dynamic_conf.toml” watch = true debugLogGeneratedTemplate = true
动态配置文件可以设置如下内容:
[http]
# Add the router[http.routers][http.routers.routerfoo]rule = "Host(`snitest.com`) && Path(`/foo`)"[http.routers.routerfoo.tls]certResolver = "foo"[http.routers.routerbar]rule = "Host(`snitest.com`) && Path(`/bar`)"[http.routers.routerbar.tls]certResolver = "bar"[[http.routers.routerbar.tls.domains]]main = "snitest.com"sans = ["*.snitest.com"]# Add the middleware[http.middlewares][http.middlewares.my-basic-auth.basicAuth]users = ["test:$apr1$H6uskkkW$IgXLP6ewTrSuBkTrqE8wj/","test2:$apr1$d9hr9HBB$4HxwgUir3HP4EsggP/QNo0"]usersFile = "/etc/traefik/.htpasswd"# Add the service[http.services][http.services.service-foo][http.services.service-foo.loadBalancer][[http.services.service-foo.loadBalancer.servers]]url = "http://foo/"[[http.services.service-foo.loadBalancer.servers]]url = "http://bar/"
[tls] [[tls.certificates]] certFile = “path/to/cert.crt” keyFile = “path/to/cert.key” stores = [“foobar”, “foobar”]
[[tls.certificates]] certFile = “path/to/cert.crt” keyFile = “path/to/cert.key” stores = [“foobar”, “foobar”] [tls.options] [tls.options.Options0] minVersion = “VersionTLS12” cipherSuites = [“TLS_ECDHE_RSA_WITH_AES_128_GCM_SHA256”] sniStrict = true [tls.options.Options0.clientAuth] caFiles = [“tests/clientca1.crt”, “tests/clientca2.crt”] clientAuthType = “RequireAndVerifyClientCert” [tls.options.Options1] minVersion = “VersionTLS13” cipherSuites = [“TLS_ECDHE_RSA_WITH_AES_128_GCM_SHA256”] sniStrict = true [tls.options.Options1.clientAuth] ccaFiles = [“tests/clientca1.crt”, “tests/clientca2.crt”] clientAuthType = “RequireAndVerifyClientCert” [tls.stores] [tls.stores.Store0] [tls.stores.Store0.defaultCertificate] certFile = “path/to/cert.crt” keyFile = “path/to/cert.key” [tls.stores.Store1] [tls.stores.Store1.defaultCertificate] certFile = “path/to/cert.crt” keyFile = “path/to/cert.key”
clientAuth.clientAuthType:- NoClientCert- RequestClientCert- RequireAnyClientCert- VerifyClientCertIfGiven- RequireAndVerifyClientCert### hostResolver### certificatesResolvers设置证书:
[certificatesResolvers] [certificatesResolvers.CertificateResolver0] [certificatesResolvers.CertificateResolver0.acme] email = “foobar” caServer = “https://acme-staging-v02.api.letsencrypt.org/directory“ storage = “acme.json” keyType = “foobar” [certificatesResolvers.CertificateResolver0.acme.dnsChallenge] provider = “foobar” delayBeforeCheck = 42 resolvers = [“foobar”, “foobar”] disablePropagationCheck = true [certificatesResolvers.CertificateResolver0.acme.httpChallenge] entryPoint = “foobar” [certificatesResolvers.CertificateResolver0.acme.tlsChallenge] [certificatesResolvers.CertificateResolver1] [certificatesResolvers.CertificateResolver1.acme] email = “foobar” caServer = “https://acme-staging-v02.api.letsencrypt.org/directory“ storage = “acme.json” keyType = “foobar” [certificatesResolvers.CertificateResolver1.acme.dnsChallenge] provider = “foobar” delayBeforeCheck = 42 resolvers = [“foobar”, “foobar”] disablePropagationCheck = true [certificatesResolvers.CertificateResolver1.acme.httpChallenge] entryPoint = “foobar” [certificatesResolvers.CertificateResolver1.acme.tlsChallenge]
#### 配置示例1、启用acme
[entryPoints] [entryPoints.http] address = “:80”
[entryPoints.https] address = “:443”
[certificatesResolvers] [certificatesResolvers.sample] [certificatesResolvers.sample.acme] email = “your-email@your-domain.org” storage = “acme.json” [certificatesResolvers.sample.acme.dnsChallenge] provider = “dnspod” delayBeforeCheck = 42 resolvers = [“sample”] disablePropagationCheck = true
2、docker中设置路由规则标签<br />单域名:
Dynamic configuration
labels:
- traefik.http.routers.blog.rule=Host(
company.com) && Path(/blog) - traefik.http.routers.blog.tls=true
- traefik.http.routers.blog.tls.certresolver=sample
多域名:
Dynamic configuration
labels:
- traefik.http.routers.blog.rule=(Host(
company.com) && Path(/blog)) || Host(blog.company.org) - traefik.http.routers.blog.tls=true
- traefik.http.routers.blog.tls.certresolver=sample
或者:
Dynamic configuration
labels:
- traefik.http.routers.blog.rule=Host(
company.com) && Path(/blog) - traefik.http.routers.blog.tls=true
- traefik.http.routers.blog.tls.certresolver=sample
- traefik.http.routers.blog.tls.domains[0].main=company.org
- traefik.http.routers.blog.tls.domains[0].sans=*.company.org
3、也可以在动态配置中设置路由规则
Dynamic configuration
[http.routers]
[http.routers.routerfoo]
rule = “Host(company.com) && Path(/blog)”
[http.routers.routerfoo.tls]
certResolver = “sample”
#### ACME ChallengesACME Challenges有以下几种类型:- `tlsChallenge`- `httpChallenge`- `dnsChallenge`:支持泛域名,支持的`providers`见 [https://docs.traefik.io/v2.0/https/acme/#providers](https://docs.traefik.io/v2.0/https/acme/#providers)`dnsChallenge`示例:
[certificatesResolvers.sample.acme]
…
[certificatesResolvers.sample.acme.dnsChallenge] provider = “digitalocean” delayBeforeCheck = 0
# 示例## docker通过traefik.toml部署traefik编辑traefik.toml
Static configuration
[global] checkNewVersion = true sendAnonymousUsage = false
[entryPoints] [entryPoints.http] address = “:80”
[entryPoints.traefik] address = “:8080”
[log] level = “DEBUG” filePath = “/data/logs/traefik.log” format = “common”
[accessLog] filePath = “/data/logs/access.log” format = “common”
[api] insecure = true dashboard = true
[ping]
[providers]
[providers.docker]
endpoint = “unix:///var/run/docker.sock”
defaultRule = “Host({{ normalize .Name }}.docker.localhost)”
# 如果设置为 false, 则没有 traefik.enable=true 标签的容器将从生成的路由配置中忽略exposedByDefault = false
部署:
version: ‘3’
services: traefik: image: traefik:latest ports:
# The HTTP port- "80:80"# The Web UI (enabled by --api.insecure=true)- "8080:8080"networks:- traefikvolumes:- /var/run/docker.sock:/var/run/docker.sock- ./traefik.toml:/etc/traefik/traefik.toml- ./logs:/data/logs
networks: traefik: external: true
需要先创建网络:
docker network create traefik
访问 [http://192.168.56.11:8080/](http://192.168.56.11:8080/) ,会跳到 [http://192.168.56.11:8080/dashboard/#/](http://192.168.56.11:8080/dashboard/#/) ,可以看到页面如下:<br /><br />查看HTTP路由:<br /><br />可以看到有三个HTTP路由规则,名称为XXX@internal,表明这是内部的服务。- PathPrefix(`/dashboard`) 和 PathPrefix(`/api`) 是在静态配置[api]定义的- PathPrefix(`/ping`) 是通过静态配置 [ping] 定义的- traefik这个Entrypoints上有三个访问规则:- [http://192.168.56.11:8080/api](http://192.168.56.11:8080/api) 访问traefik提供的api- [http://192.168.56.11:8080/](http://192.168.56.11:8080/) 跳转到dashboard页面- [http://192.168.56.11:8880/ping](http://192.168.56.11:8880/ping) 健康检查访问 [http://192.168.56.11:8080/api/version](http://192.168.56.11:8080/api/version)<br /><br />访问ping接口:[http://192.168.56.11:8080/ping](http://192.168.56.11:8080/ping)<br /><br />查看访问日志:
$ tailf logs/access.log 192.168.2.107 - - [24/Dec/2019:11:41:20 +0000] “GET /api/overview HTTP/1.1” 200 341 “-“ “-“ 6 “api@internal” - 0ms 192.168.2.107 - - [24/Dec/2019:11:41:21 +0000] “GET /api/overview HTTP/1.1” 200 341 “-“ “-“ 7 “api@internal” - 0ms 192.168.2.107 - - [24/Dec/2019:11:41:21 +0000] “GET /api/http/routers?search=&status=&per_page=10&page=1 HTTP/1.1” 200 651 “-“ “-“ 8 “api@internal” - 0ms 192.168.2.107 - - [24/Dec/2019:11:41:35 +0000] “GET /ping HTTP/1.1” 200 2 “-“ “-“ 9 “ping@internal” - 0ms
## 开启prometheus metrics修改traefik.yml:
Static configuration
[global] checkNewVersion = true sendAnonymousUsage = false
[entryPoints] [entryPoints.http] address = “:80”
[entryPoints.traefik] address = “:8080”
[log] level = “DEBUG” filePath = “/data/logs/traefik.log” format = “common”
[accessLog] filePath = “/data/logs/access.log” format = “common”
[api] insecure = true dashboard = true
[ping]
[providers]
[providers.docker]
endpoint = “unix:///var/run/docker.sock”
defaultRule = “Host({{ normalize .Name }}.docker.localhost)”
# 如果设置为 false, 则没有 traefik.enable=true 标签的容器将从生成的路由配置中忽略exposedByDefault = false
[metrics] [metrics.prometheus]
访问 [http://192.168.56.11:8080/dashboard/#/](http://192.168.56.11:8080/dashboard/#/)<br /><br />查看路由:<br /><br />访问:[http://192.168.56.11:8080/metrics](http://192.168.56.11:8080/metrics) ,可以看到<br />## Traefik开启TLStraefik.tom如下:
Static configuration
[global] checkNewVersion = true sendAnonymousUsage = false
[entryPoints] [entryPoints.http] address = “:80”
[entryPoints.https] address = “:443”
[entryPoints.traefik] address = “:8080”
[log] level = “DEBUG” filePath = “/data/logs/traefik.log” format = “common”
[accessLog] filePath = “/data/logs/access.log” format = “common”
[api] insecure = true dashboard = true
[ping]
[providers] [providers.file] filename = “/etc/traefik/dynamic-conf.toml” watch = true
[providers.docker]
endpoint = “unix:///var/run/docker.sock”
defaultRule = “Host({{ normalize .Name }}.docker.localhost)”
# 如果设置为 false, 则没有 traefik.enable=true 标签的容器将从生成的路由配置中忽略exposedByDefault = false
[metrics] [metrics.prometheus]
主要做以下改动:-添加端口为443的entryPoints-api.insecure改为false,所以不能通过8080端口访问/api和/dashboard,需要使用443端口通过域名访问,并且通过80端口访问,会跳转到443端口。/ping接口还是通过8080端口访问- [https://traefik.javachen.xyz/api/version](https://traefik.javachen.xyz/api/version)- [https://traefik.javachen.xyz/dashboard/#/](https://traefik.javachen.xyz/dashboard/#/)- [http://192.168.56.11:8080/ping](http://192.168.56.11:8080/ping) 或者 [http://traefik.javachen.xyz:8080/ping](http://traefik.javachen.xyz:8080/ping)-添加动态配置文件 dynamic_conf.toml,用于设置动态路由和TLS。动态配置dynamic-conf.toml 内容如下:
Dynamic configuration
[http.routers.traefik-https]
rule = “Host(traefik.javachen.xyz)”
entryPoints = [“https”]
service = “api@internal”
middlewares = [“auth”]
[http.routers.traefik-https.tls]
用户:test 密码:test
[http.middlewares.auth.basicAuth] users = [ “test:$apr1$H6uskkkW$IgXLP6ewTrSuBkTrqE8wj/“, ]
[tls] [[tls.certificates]] certFile = “/etc/ssl/javachen.xyz.cer” keyFile = “/etc/ssl/javachen.xyz.key” [tls.stores] [tls.stores.default] [tls.stores.default.defaultCertificate] certFile = “/etc/ssl/javachen.xyz.cer” keyFile = “/etc/ssl/javachen.xyz.key”
需要准备证书:
安装:自动创建 cronjob, 每天 0:00 点自动检测所有的证书
curl https://get.acme.sh | sh source ~/.bashrc
https://console.dnspod.cn/account/token
export DP_Id=”127880” export DP_Key=”6847f9a4cdba562f574fe55944f689e7” acme.sh —issue —dns dns_dp -d javachen.xyz -d *.javachen.xyz
mkdir ssl cp ~/.acme.sh/javachen.xyz/javachen.xyz.cer ssl/ cp ~/.acme.sh/javachen.xyz/javachen.xyz.key ssl/
修改docker-compose:
version: ‘3’
services: traefik: image: traefik:latest ports:
# The HTTP port- "80:80"- "443:443"# The Web UI (enabled by --api.insecure=true)- "8080:8080"networks:- traefikvolumes:- /var/run/docker.sock:/var/run/docker.sock- ./traefik.toml:/etc/traefik/traefik.toml- ./dynamic-conf.toml:/etc/traefik/dynamic-conf.toml- ./logs:/data/logs- ./ssl:/etc/ssl
networks: traefik: external: true
启动:
docker-compose up -d
查看http路由:<br /><br />访问 [http://traefik.javachen.xyz/](http://traefik.javachen.xyz/) 和 [https://traefik.javachen.xyz/](https://traefik.javachen.xyz/)<br />修改配置文件中api.insecure=false,再次查看http路由:<br /><br />访问ping接口<br />## 给应用配置LetsEncrypt证书<br />修改traefik.tom,启用acme的dnsChallenge:
Static configuration
[global] checkNewVersion = true sendAnonymousUsage = false
[entryPoints] [entryPoints.http] address = “:80”
[entryPoints.https] address = “:443”
[entryPoints.traefik] address = “:8080”
[log] level = “DEBUG” filePath = “/data/logs/traefik.log” format = “common”
[accessLog] filePath = “/data/logs/access.log” format = “common”
[api] insecure = false dashboard = true
[ping]
[providers] [providers.file] filename = “/etc/traefik/dynamic-conf.toml” watch = true
[providers.docker]
endpoint = “unix:///var/run/docker.sock”
defaultRule = “Host({{ normalize .Name }}.docker.localhost)”
# 如果设置为 false, 则没有 traefik.enable=true 标签的容器将从生成的路由配置中忽略exposedByDefault = false
[metrics] [metrics.prometheus]
[certificatesResolvers] [certificatesResolvers.sample] [certificatesResolvers.sample.acme] email = “junecloud@163.com” storage = “/etc/traefik/acme.json” caServer = “https://acme-staging-v02.api.letsencrypt.org/directory“ [certificatesResolvers.sample.acme.dnsChallenge] provider = “dnspod” delayBeforeCheck = 42 resolvers = [“sample”] disablePropagationCheck = true
使用docker-compose安装:
version: ‘3’
services: traefik: image: traefik:latest ports:
# The HTTP port- "80:80"- "443:443"# The Web UI (enabled by --api.insecure=true)- "8080:8080"environment:- DNSPOD_API_KEY="127880,6847f9a4cdba562f574fe55944f689e7"networks:- traefikvolumes:# So that Traefik can listen to the Docker events- /var/run/docker.sock:/var/run/docker.sock- ./traefik.toml:/etc/traefik/traefik.toml- ./dynamic-conf.toml:/etc/traefik/dynamic-conf.toml- ./acme.json:/etc/traefik/acme.json- ./logs:/data/logs- ./ssl:/etc/ssl
whoami: image: containous/whoami labels:
- traefik.enable=true- traefik.docker.network=traefik- traefik.http.routers.whoami.rule=Host(`whoami.javachen.xyz`)- traefik.http.routers.whoami.entrypoints=http- traefik.http.routers.whoami-https.rule=Host(`whoami.javachen.xyz`)- traefik.http.routers.whoami-https.entrypoints=https- traefik.http.routers.whoami-https.tls=true- traefik.http.routers.whoami-https.tls.certresolver=sample# http 重定向到 https- traefik.http.routers.whoami.middlewares=whoami- traefik.http.middlewares.whoami.redirectscheme.scheme=https- traefik.http.middlewares.whoami.redirectscheme.port=443networks:- traefik
networks: traefik: external: true
至此traefik的配置工作已经准备好了,可以启动traefik容器了。
touch acme.json
docker-compose up -d
进行测试:
$ curl -H Host:whoami.javachen.xyz http://127.0.0.1 Found
$ curl -kH Host:whoami.javachen.xyz https://127.0.0.1 Hostname: 7c944d7cadef IP: 127.0.0.1 IP: 172.22.0.3 RemoteAddr: 172.22.0.2:54580 GET / HTTP/1.1 Host: whoami.javachen.xyz User-Agent: curl/7.29.0 Accept: / Accept-Encoding: gzip X-Forwarded-For: 172.22.0.1 X-Forwarded-Host: whoami.javachen.xyz X-Forwarded-Port: 443 X-Forwarded-Proto: https X-Forwarded-Server: aad4e7f1395d X-Real-Ip: 172.22.0.1
浏览器访问 [http://whoami.javachen.xyz/](http://whoami.javachen.xyz/) 会跳转到 [https://whoami.javachen.xyz/](https://whoami.javachen.xyz/)<br />## 测试Mongo TCP路由以 [https://github.com/containous/slides/tree/master/demo/traefik-v2](https://github.com/containous/slides/tree/master/demo/traefik-v2) 为例子进行测试。<br />1、测试简单TCP路由<br />docker-compose.yml
version: ‘3’ services: reverse-proxy: image: traefik:latest command:
- --api- --api.insecure- --providers.docker- --entrypoints.mongo.address=:27017ports:- "27017:27017"- "8080:8080"volumes:- /var/run/docker.sock:/var/run/docker.sock
mongo: image: mongo:4.0 hostname: mongo.local labels:
- "traefik.tcp.routers.mongo.rule=HostSNI(`*`)"- "traefik.tcp.routers.mongo.entrypoints=mongo"
启动:
docker-compose up -d
设置/etc/hosts:
127.0.0.1 mongo.local
使用mongo客户端连接:
mongo —host mongo.local —port 27017
show dbs exit
清理:
docker-compose down -v
其实,可以修改mongo暴露的端口为80:
version: ‘3’ services: reverse-proxy: image: traefik:latest command:
- --api- --api.insecure- --providers.docker- --entrypoints.http.address=:80ports:- "80:80"- "8080:8080"volumes:- /var/run/docker.sock:/var/run/docker.sock
mongo: image: mongo:4.0 hostname: mongo.local labels:
- "traefik.tcp.routers.mongo.rule=HostSNI(`*`)"- "traefik.tcp.routers.mongo.entrypoints=http"
使用mongo客户端连接:
mongo —host mongo.local —port 80
show dbs exit
2、配置TLS<br />docker-compose.yml
version: ‘3’
services: reverse-proxy: image: traefik:latest command:
- --api- --api.insecure- --providers.docker- --providers.file.filename=/etc/ssl/traefik-tls.toml- --entrypoints.mongo.address=:27017ports:- "8080:8080"- "27017:27017"volumes:- /var/run/docker.sock:/var/run/docker.sock- ../ssl:/etc/ssl
mongo1: image: mongo:4.0 hostname: mongo1.local restart: always labels:
- "traefik.tcp.routers.mongo1.rule=HostSNI(`*`)"- "traefik.tcp.routers.mongo1.tls=true"- "traefik.tcp.routers.mongo1.entrypoints=mongo"
traefik-tls.toml
[[tls.certificates]] certFile = “/etc/ssl/cert.pem” keyFile = “/etc/ssl/key.pem”
生成证书:
rm -rf *.pem sh ../ssl/generate-certificates.sh mongo1.local ./
**generate-certificates.sh**内容如下:
!/bin/bash
#
From https://medium.com/@rajanmaharjan/secure-your-mongodb-connections-ssl-tls-92e2addb3c89
set -eu -o pipefail
DOMAINS=”${1}” CERTS_DIR=”${2}” [ -d “${CERTS_DIR}” ] CURRENT_DIR=”$(cd “$(dirname “${0}”)” && pwd -P)”
GENERATION_DIRNAME=”$(echo “${DOMAINS}” | cut -d, -f1)”
rm -rf “${CERTS_DIR}/${GENERATION_DIRNAME:?}” “${CERTS_DIR}/ssl”
echo “== Checking Requirements…” command -v go >/dev/null 2>&1 || echo “Golang is required” command -v minica >/dev/null 2>&1 || go get github.com/jsha/minica >/dev/null
echo “== Generating Certificates for the following domains: ${DOMAINS}…” cd “${CERTS_DIR}” minica —ca-cert “${CURRENT_DIR}/minica.pem” —ca-key=”${CURRENT_DIR}/minica-key.pem” —domains=”${DOMAINS}” mv “${GENERATION_DIRNAME}” “ssl” cat ssl/key.pem ssl/cert.pem > ssl/mongo.pem
echo “== Certificates Generated in the directory ${CERTS_DIR}/ssl”
启动:
docker-compose up -d
设置/etc/hosts:
127.0.0.1 mongo1.local
使用mongo客户端连接:
Should Error because no TLS
mongo —host mongo1.local —port 27017
Should work
mongo —host mongo1.local —port 27017 —tls —tlsCAFile=./ssl/minica.pem —tlsCertificateKeyFile=./ssl/mongo.pem
show dbs exit
清理:
docker-compose down -v
3、配置TCP TLS通过域名访问<br />docker-compose.yml
version: ‘3’
services: reverse-proxy: image: traefik:latest command:
- --api- --api.insecure- --providers.docker- --providers.file.filename=/etc/traefik/traefik-tls.toml- --entrypoints.mongo.address=:27017ports:- "8080:8080"- "27017:27017"volumes:- /var/run/docker.sock:/var/run/docker.sock- ./ssl:/etc/ssl- ./traefik-tls.toml:/etc/traefik/traefik-tls.toml
mongo1: image: mongo:4.0 hostname: mongo1.local restart: always labels:
- "traefik.tcp.routers.mongo1.rule=HostSNI(`mongo1.local`)"- "traefik.tcp.routers.mongo1.tls=true"- "traefik.tcp.routers.mongo1.entrypoints=mongo"
mongo2: image: mongo:4.0 hostname: mongo2.local restart: always labels:
- "traefik.tcp.routers.mongo2.rule=HostSNI(`mongo2.local`)"- "traefik.tcp.routers.mongo2.tls.passthrough=true"- "traefik.tcp.routers.mongo2.entrypoints=mongo"command:- "mongod"- "--sslMode=requireSSL"- "--sslPEMKeyFile=/etc/ssl/mongo.pem"volumes:- ./ssl:/etc/ssl
traefik-tls.toml
[[tls.certificates]] certFile = “/etc/ssl/cert.pem” keyFile = “/etc/ssl/key.pem”
生成证书:
cd ssl rm -rf .pem sh generate-certificates.sh “mongo1.local,mongo2.local” ./ mv certs/ .
启动:
docker-compose up -d
设置/etc/hosts:
127.0.0.1 mongo1.local mongo2.local
使用mongo客户端连接:
Mongo 1
mongo —host mongo1.local —port 27017 —ssl —sslCAFile=./ssl/minica.pem —sslPEMKeyFile=./ssl/mongo.pem
show dbs use meetup db.movie.insert({“name”:”Traefik-Awesome”}) db.movie.find() show dbs exit
Mongo2
mongo —host mongo2.local —port 27017 —ssl —sslCAFile=./ssl/minica.pem —sslPEMKeyFile=./ssl/mongo.pem
show dbs exit
清理:
docker-compose down -v
3、配置TCP 和 HTTP TLS通过域名访问<br />docker-compose.yml
version: ‘3’
services: reverse-proxy: image: traefik:latest command:
- --api- --api.insecure- --providers.docker- --providers.file.filename=/etc/traefik/traefik-tls.toml- --entrypoints.mongo.address=:27017ports:- "8080:8080"- "27017:27017"volumes:- /var/run/docker.sock:/var/run/docker.sock- ./ssl:/etc/ssl- ./traefik-tls.toml:/etc/traefik/traefik-tls.toml
mongo1: image: mongo:4.0 hostname: mongo1.local restart: always labels:
- "traefik.tcp.routers.mongo1.rule=HostSNI(`mongo1.local`)"- "traefik.tcp.routers.mongo1.tls=true"- "traefik.tcp.routers.mongo1.entrypoints=mongo"
mongo2: image: mongo:4.0 hostname: mongo2.local restart: always labels:
- "traefik.tcp.routers.mongo2.rule=HostSNI(`mongo2.local`)"- "traefik.tcp.routers.mongo2.tls.passthrough=true"- "traefik.tcp.routers.mongo2.entrypoints=mongo"command:- "mongod"- "--sslMode=requireSSL"- "--sslPEMKeyFile=/etc/ssl/mongo.pem"volumes:- ./ssl:/etc/ssl
mongo-express: image: mongo-express:0.49 restart: always labels:
- "traefik.http.routers.mongo-express.rule=Host(`dashboard-mongo1.local`)"- "traefik.http.routers.mongo-express.tls=true"- "traefik.http.routers.mongo-express.entrypoints=mongo"environment:ME_CONFIG_MONGODB_SERVER: mongo1
traefik-tls.toml
[[tls.certificates]] certFile = “/etc/ssl/cert.pem” keyFile = “/etc/ssl/key.pem”
生成证书:
cd ssl rm -rf .pem sh generate-certificates.sh “mongo1.local,mongo2.local,dashboard-mongo1.local” ./ mv certs/ .
启动:
docker-compose up -d
设置/etc/hosts:
127.0.0.1 mongo1.local mongo2.local dashboard-mongo1.local
使用mongo客户端连接:
Mongo 1
mongo —host mongo1.local —port 27017 —ssl —sslCAFile=./ssl/minica.pem —sslPEMKeyFile=./ssl/mongo.pem
show dbs use meetup db.movie.insert({“name”:”Traefik-Awesome”}) db.movie.find() show dbs exit
Mongo2
mongo —host mongo2.local —port 27017 —ssl —sslCAFile=./ssl/minica.pem —sslPEMKeyFile=./ssl/mongo.pem
show dbs exit
浏览器访问 [https://dashboard-mongo1.local:27017/](https://dashboard-mongo1.local:27017/) ,检查 meetup 数据库是否存在。<br /><br />证书不受信任,需要将 minica.pem ROOT CA证书加到浏览器。<br />清理:
docker-compose down -v
5、使用ACME生成证书<br />docker-compose.yml:
version: ‘3’
services: reverse-proxy: image: traefik:latest command:
- --api- --api.insecure- --providers.docker- --providers.file.filename=/etc/ssl/traefik-tls.toml- --entrypoints.mongo.address=:27017- --certificatesResolvers.sample.acme.dnsChallenge.provider=dnspod- --certificatesResolvers.sample.acme.email=chenzj@wesine.com- --certificatesResolvers.sample.acme.storage=/etc/traefik/acme.json- --certificatesResolvers.sample.acme.caServer=https://acme-staging-v02.api.letsencrypt.org/directoryports:- "27017:27017"- "8080:8080"volumes:- /var/run/docker.sock:/var/run/docker.sock- ../ssl:/etc/ssl
mongo1: image: mongo:4.0 hostname: mongo1.local restart: always labels:
- traefik.tcp.routers.mongo1.rule=HostSNI(`mongo1.local`)- traefik.tcp.routers.mongo1.entrypoints=http- traefik.http.routers.mongo1-https.rule=HostSNI(`mongo1.local`)- traefik.http.routers.mongo1-https.entrypoints=https- traefik.http.routers.mongo1-https.tls=true- traefik.http.routers.mongo1-https.tls.certresolver=sample# http 重定向到 https- traefik.http.routers.mongo1.middlewares=redirect-http- traefik.http.middlewares.redirect-http.redirectscheme.scheme=https- traefik.http.middlewares.redirect-http.redirectscheme.port=443
启动:
docker-compose up -d
设置/etc/hosts:
127.0.0.1 mongo1.local mongo2.local dashboard-mongo1.local
使用mongo客户端连接:
Mongo 1
mongo —host mongo1.local —port 443 —ssl
show dbs use meetup db.movie.insert({“name”:”Traefik-Awesome”}) db.movie.find() show dbs exit
## 测试Mysql TCP路由1、测试简单TCP路由<br />docker-compose.yml
version: ‘3’ services: reverse-proxy: image: traefik:latest command:
- --api- --api.insecure- --providers.docker- --entrypoints.mysql.address=:3306ports:- "3306:3306"- "8080:8080"volumes:- /var/run/docker.sock:/var/run/docker.sock
mysql: image: mysql:5.7 labels:
- "traefik.tcp.routers.mysql.rule=HostSNI(`*`)"- "traefik.tcp.routers.mysql.entrypoints=mysql"command: --character-set-server=utf8mb4 --collation-server=utf8mb4_unicode_cienvironment:MYSQL_ROOT_PASSWORD: 123456MYSQL_DATABASE: gogsMYSQL_USER: gogsMYSQL_PASSWORD: 123456TZ: Asia/Shanghai
启动:
docker-compose up -d
设置/etc/hosts:
127.0.0.1 mysql.local
使用mongo客户端连接:
mysql -h 127.0.0.1 -uroot -P3306 -p
show databases; exit
清理:
docker-compose down -v
```
参考文章
- https://docs.traefik.io/v2.0/
- https://blog.containo.us/back-to-traefik-2-0-2f9aa17be305
- traefik v1 迁移 到treafik v2.0.0 配置
- 基于 traefik v2 的本地开发、部署一致环境方案
- Traefik 2.0 tcp 路由试用
- http://wiki.xglabc.com/Traefik
- Traefik Tutorial: Traefik Reverse Proxy with LetsEncrypt for Docker Media Server
- https://stackoverflow.com/questions/59264410/how-to-connect-to-traefik-tcp-services-with-tls-configuration-enabled
- https://github.com/containous/slides/tree/master/demo/traefik-v2

若有收获,就点个赞吧
0 人点赞
