vuecli2 和 vuecli3
csdn vuecli2 和 vuecli3 区别
2.0 和 3.0 项目结构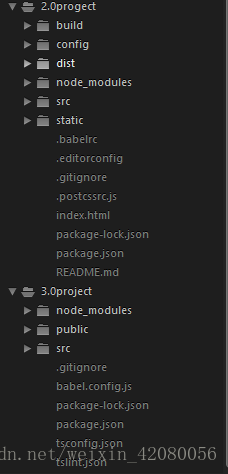
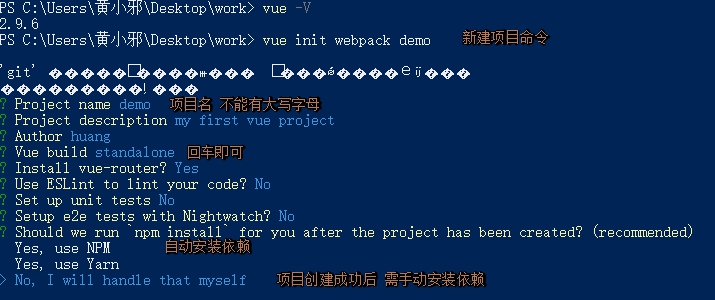
2.0 项目安装 vue init webpack 2.0peojectName
3.0 项目安装 vue create 3.0projectName
2.0 项目启动 npm run dev
3.0 项目启动 npm run serve
vuecli2 版本
安装使用
## 这种安装vuecli的写法默认安装的是vue-cli2.Xnpm i -g vue-cli## 需要配合 webpack 使用npm i webpack webpack-dev-server -g## 初始化项目vue init webpack project_name
项目描述
目录介绍:
创建成功后的目录结构
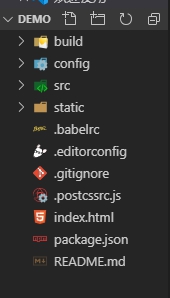
【build 文件夹】
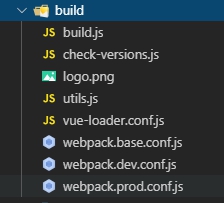
1、【build.js】
'use strict' // js的严格模式require('./check-versions')() // node和npm的版本检查process.env.NODE_ENV = 'production' // 设置环境变量为生产环境// 导进各模块const ora = require('ora') // loading模块const rm = require('rimraf') // 用于删除文件const path = require('path') // 文件路径工具const chalk = require('chalk') // 在终端输出带颜色的文字const webpack = require('webpack') // 引入webpack.jsconst config = require('../config') // 引入配置文件const webpackConfig = require('./webpack.prod.conf') // 引入生产环境配置文件// 在终端显示loading效果, 并输出提示const spinner = ora('building for production...')spinner.start()/*rm方法删除dist/static文件夹若删除中有错误则抛出异常并终止程序若没有错误则继续执行,构建webpack结束动画若有异常则抛出标准输出流,类似于console.log*/rm(path.join(config.build.assetsRoot, config.build.assetsSubDirectory), err => {if (err) throw errwebpack(webpackConfig, (err, stats) => {spinner.stop()if (err) throw errprocess.stdout.write(stats.toString({colors: true, // 增加控制台颜色开关modules: false, // 是否增加内置模块信息children: false, // If you are using ts-loader, setting this to true will make TypeScript errors show up during build.chunks: false, // 允许较少的输出chunkModules: false // 不将内置模块信息加到包信息}) + '\n\n') // 编译过程持续打印// 编译出错的信息if (stats.hasErrors()) {console.log(chalk.red(' Build failed with errors.\n'))process.exit(1)}// 编译成功的信息console.log(chalk.cyan(' Build complete.\n'))console.log(chalk.yellow(' Tip: built files are meant to be served over an HTTP server.\n' +' Opening index.html over file:// won\'t work.\n'))})})
2、【check-versions.js】
node和npm的版本检测, 实现版本依赖
'use strict' // js的严格模式// 导进各模块const chalk = require('chalk')const semver = require('semver') // 检测版本const packageConfig = require('../package.json')const shell = require('shelljs') // shell.js插件,执行unix系统命令function exec (cmd) {// 脚本可以通过child_process模块新建子进程,从而执行Unix系统命令// 将cmd参数传递的值转换成前后没有空格的字符串,也就是版本号return require('child_process').execSync(cmd).toString().trim()}//声明常量数组,数组内容为有关node相关信息的对象const versionRequirements = [{name: 'node', //对象名称为nodecurrentVersion: semver.clean(process.version), //使用semver插件,把版本信息转换成规定格式versionRequirement: packageConfig.engines.node //规定package.json中engines选项的node版本信息}]if (shell.which('npm')) { //which为linux指令,在$path规定的路径下查找符合条件的文件versionRequirements.push({name: 'npm',currentVersion: exec('npm --version'), //调用npm --version命令,并且把参数返回给exec函数获取纯净版本versionRequirement: packageConfig.engines.npm //规定package.json中engines选项的node版本信息})}module.exports = function () {const warnings = []for (let i = 0; i < versionRequirements.length; i++) {const mod = versionRequirements[i]// 如果版本号不符合package.json文件中指定的版本号,就执行warning.push...// 当前版本号用红色标识,要求版本号用绿色标识if (!semver.satisfies(mod.currentVersion, mod.versionRequirement)) {warnings.push(mod.name + ': ' +chalk.red(mod.currentVersion) + ' should be ' +chalk.green(mod.versionRequirement))}}//如果为真,则打印提示用户升级新版本if (warnings.length) {console.log('')console.log(chalk.yellow('To use this template, you must update following to modules:'))console.log()for (let i = 0; i < warnings.length; i++) {const warning = warnings[i]console.log(' ' + warning)}console.log()process.exit(1)}}
3、【utils.js】
utils 是工具的意思,是一个用来处理css的文件,这个文件包含了三个工具函数:
- 生成静态资源的路径
- 生成 ExtractTextPlugin对象或loader字符串
- 生成 style-loader的配置
```javascript
‘use strict’
const path = require(‘path’)
const config = require(‘../config’) // 引入config下的index.js文件
const ExtractTextPlugin = require(‘extract-text-webpack-plugin’) // 一个插件,抽离css样式,防止将样式打包在js中引起样式加载错乱
const packageConfig = require(‘../package.json’)
// 导出assetsPath
/** @method assertsPath 生成静态资源的路径(判断开发环境和生产环境,为config文件中index.js文件中定义assetsSubDirectory)
- @param {String} _path 相对于静态资源文件夹的文件路径
- @return {String} 静态资源完整路径 */ exports.assetsPath = function (_path) { const assetsSubDirectory = process.env.NODE_ENV === ‘production’ ? config.build.assetsSubDirectory : config.dev.assetsSubDirectory //nodeJs path提供用于处理文件路径的工具;path.posix提供对路径方法的POSIX(可移植性操作系统接口)特定实现的访问(可跨平台); path.posix.join与path.join一样,不过总是以 posix 兼容的方式交互 return path.posix.join(assetsSubDirectory, _path) // path.join返回绝对路径(在电脑上的实际位置);path.posix.join返回相对路径 }
/**
- @method cssLoaders 生成处理css的loaders配置,使用css-loader和postcssLoader,通过options.usePostCSS属性来判断是否使用postcssLoader中压缩等方法
- @param {Object} option = {sourceMap: true,// 是否开启 sourceMapextract: true // 是否提取css}生成配置
@return {Object} 处理css的loaders配置对象 */ exports.cssLoaders = function (options) { options = options || {}
const cssLoader = { loader: ‘css-loader’, options: { sourceMap: options.sourceMap } }
const postcssLoader = { loader: ‘postcss-loader’, options: { sourceMap: options.sourceMap } }
// generate loader string to be used with extract text plugin /**@method generateLoaders 生成 ExtractTextPlugin对象或loader字符串
- @param {Array} loaders loader名称数组
@return {String|Object} ExtractTextPlugin对象或loader字符串 */ function generateLoaders (loader, loaderOptions) { const loaders = options.usePostCSS ? [cssLoader, postcssLoader] : [cssLoader]
if (loader) { loaders.push({ loader: loader + ‘-loader’, options: Object.assign({}, loaderOptions, {
sourceMap: options.sourceMap
}) }) }
// ExtractTextPlugin提取css(当上面的loaders未能正确引入时,使用vue-style-loader) if (options.extract) {// 生产环境中,默认为true return ExtractTextPlugin.extract({
use: loaders,fallback: 'vue-style-loader'
}) } else {//返回vue-style-loader连接loaders的最终值 return [‘vue-style-loader’].concat(loaders) } }
// https://vue-loader.vuejs.org/en/configurations/extract-css.html return { css: generateLoaders(),//需要css-loader 和 vue-style-loader postcss: generateLoaders(),//需要css-loader、postcssLoader 和 vue-style-loader less: generateLoaders(‘less’),//需要less-loader 和 vue-style-loader sass: generateLoaders(‘sass’, { indentedSyntax: true }),//需要sass-loader 和 vue-style-loader scss: generateLoaders(‘sass’),//需要sass-loader 和 vue-style-loader stylus: generateLoaders(‘stylus’),//需要stylus-loader 和 vue-style-loader styl: generateLoaders(‘stylus’)//需要stylus-loader 和 vue-style-loader } }
/**@method styleLoaders 生成 style-loader的配置
- @param {Object} options 生成配置
@return {Array} style-loader的配置 */ exports.styleLoaders = function (options) { const output = [] const loaders = exports.cssLoaders(options) //将各种css,less,sass等综合在一起得出结果输出output for (const extension in loaders) { const loader = loaders[extension] output.push({ test: new RegExp(‘\.’ + extension + ‘$’), use: loader }) }
return output }
exports.createNotifierCallback = () => { const notifier = require(‘node-notifier’)
return (severity, errors) => { if (severity !== ‘error’) return
const error = errors[0]const filename = error.file && error.file.split('!').pop()notifier.notify({title: packageConfig.name,message: severity + ': ' + error.name,subtitle: filename || '',icon: path.join(__dirname, 'logo.png')})
} }
<a name="pYWrc"></a>#### 4、【vue-loader.conf.js】处理.vue文件,解析这个文件中的每个语言块(template、script、style),转换成js可用的js模块```javascript'use strict'const utils = require('./utils')const config = require('../config')const isProduction = process.env.NODE_ENV === 'production'//生产环境,提取css样式到单独文件const sourceMapEnabled = isProduction? config.build.productionSourceMap: config.dev.cssSourceMapmodule.exports = {loaders: utils.cssLoaders({sourceMap: sourceMapEnabled,extract: isProduction}),cssSourceMap: sourceMapEnabled,cacheBusting: config.dev.cacheBusting,//编译时将“引入路径”转换为require调用,使其可由webpack处理transformToRequire: {video: ['src', 'poster'],source: 'src',img: 'src',image: 'xlink:href'}}
5、【webpack.base.conf.js】
'use strict'const path = require('path')// node自带的文件路径工具const utils = require('./utils')// 工具函数集合const config = require('../config')// 配置文件const vueLoaderConfig = require('./vue-loader.conf')// 工具函数集合/*** 获取"绝对路径"* @method resolve* @param {String} dir 相对于本文件的路径* @return {String} 绝对路径*/function resolve(dir) {return path.join(__dirname, '..', dir)}module.exports = {context: path.resolve(__dirname, '../'),//入口js文件(默认为单页面所以只有app一个入口)entry: {app: './src/main.js'},//配置出口output: {path: config.build.assetsRoot,//打包编译的根路径(dist)filename: '[name].js',publicPath: process.env.NODE_ENV === 'production'? config.build.assetsPublicPath: config.dev.assetsPublicPath//发布路径},resolve: {extensions: ['.js', '.vue', '.json'],// 自动补全的扩展名//别名配置alias: {'vue$': 'vue/dist/vue.esm.js','@': resolve('src'),// eg:"src/components" => "@/components"}},module: {rules: [//使用vue-loader将vue文件编译转换为js{test: /\.vue$/,loader: 'vue-loader',options: vueLoaderConfig},//通过babel-loader将ES6编译压缩成ES5{test: /\.js$/,loader: 'babel-loader',include: [resolve('src'), resolve('test'), resolve('node_modules/webpack-dev-server/client')]},//使用url-loader处理(图片、音像、字体),超过10000编译成base64{test: /\.(png|jpe?g|gif|svg)(\?.*)?$/,loader: 'url-loader',options: {limit: 10000,name: utils.assetsPath('img/[name].[hash:7].[ext]')}},{test: /\.(mp4|webm|ogg|mp3|wav|flac|aac)(\?.*)?$/,loader: 'url-loader',options: {limit: 10000,name: utils.assetsPath('media/[name].[hash:7].[ext]')}},{test: /\.(woff2?|eot|ttf|otf)(\?.*)?$/,loader: 'url-loader',options: {limit: 10000,name: utils.assetsPath('fonts/[name].[hash:7].[ext]')}}]},//nodeJs全局变量/模块,防止webpack注入一些nodeJs的东西到vue中node: {setImmediate: false,dgram: 'empty',fs: 'empty',net: 'empty',tls: 'empty',child_process: 'empty'}}
6、【webpack.dev.conf.js】
webpack配置开发环境中的入口
'use strict'const utils = require('./utils')const webpack = require('webpack')const config = require('../config')const merge = require('webpack-merge')//webpack-merge实现合并const path = require('path')const baseWebpackConfig = require('./webpack.base.conf')const CopyWebpackPlugin = require('copy-webpack-plugin')const HtmlWebpackPlugin = require('html-webpack-plugin')const FriendlyErrorsPlugin = require('friendly-errors-webpack-plugin')//webpack的提示错误和日志信息的插件const portfinder = require('portfinder')// 查看空闲端口位置,默认情况下搜索8000这个端口const HOST = process.env.HOSTconst PORT = process.env.PORT && Number(process.env.PORT)const devWebpackConfig = merge(baseWebpackConfig, {module: {rules: utils.styleLoaders({ sourceMap: config.dev.cssSourceMap, usePostCSS: true })},devtool: config.dev.devtool,//调试模式devServer: {clientLogLevel: 'warning',historyApiFallback: {//使用 HTML5 History API 时, 404 响应替代为 index.htmlrewrites: [{ from: /.*/, to: path.posix.join(config.dev.assetsPublicPath, 'index.html') },],},hot: true,//热重载contentBase: false, // 提供静态文件访问compress: true,//压缩host: HOST || config.dev.host,port: PORT || config.dev.port,open: config.dev.autoOpenBrowser,//npm run dev 时自动打开浏览器overlay: config.dev.errorOverlay? { warnings: false, errors: true }: false,// 显示warning 和 error 信息publicPath: config.dev.assetsPublicPath,proxy: config.dev.proxyTable,//api代理quiet: true, //控制台打印警告和错误(用FriendlyErrorsPlugin 为 true)watchOptions: {// 检测文件改动poll: config.dev.poll,}},plugins: [new webpack.DefinePlugin({'process.env': require('../config/dev.env')}),new webpack.HotModuleReplacementPlugin(),//模块热替换插件,修改模块时不需要刷新页面new webpack.NamedModulesPlugin(), // HMR shows correct file names in console on update.new webpack.NoEmitOnErrorsPlugin(),//webpack编译错误的时候,中断打包进程,防止错误代码打包到文件中// 将打包编译好的代码插入index.htmlnew HtmlWebpackPlugin({filename: 'index.html',template: 'index.html',inject: true}),// 提取static assets 中css 复制到dist/static文件new CopyWebpackPlugin([{from: path.resolve(__dirname, '../static'),to: config.dev.assetsSubDirectory,ignore: ['.*']//忽略.*的文件}])]})module.exports = new Promise((resolve, reject) => {portfinder.basePort = process.env.PORT || config.dev.portportfinder.getPort((err, port) => { //查找端口号if (err) {reject(err)} else {//端口被占用时就重新设置evn和devServer的端口process.env.PORT = portdevWebpackConfig.devServer.port = port// npm run dev成功的友情提示devWebpackConfig.plugins.push(new FriendlyErrorsPlugin({compilationSuccessInfo: {messages: [`Your application is running here: http://${devWebpackConfig.devServer.host}:${port}`],},onErrors: config.dev.notifyOnErrors? utils.createNotifierCallback(): undefined}))resolve(devWebpackConfig)}})})
7、【webpack.dev.prod.js】
webpack配置生产环境中的入口
'use strict'const path = require('path')const utils = require('./utils')const webpack = require('webpack')const config = require('../config')const merge = require('webpack-merge')const baseWebpackConfig = require('./webpack.base.conf')const CopyWebpackPlugin = require('copy-webpack-plugin')const HtmlWebpackPlugin = require('html-webpack-plugin')const ExtractTextPlugin = require('extract-text-webpack-plugin')const OptimizeCSSPlugin = require('optimize-css-assets-webpack-plugin')const UglifyJsPlugin = require('uglifyjs-webpack-plugin')const env = require('../config/prod.env')const webpackConfig = merge(baseWebpackConfig, {module: {rules: utils.styleLoaders({sourceMap: config.build.productionSourceMap,extract: true,usePostCSS: true})},devtool: config.build.productionSourceMap ? config.build.devtool : false,//是否开启调试模式output: {path: config.build.assetsRoot,filename: utils.assetsPath('js/[name].[chunkhash].js'),chunkFilename: utils.assetsPath('js/[id].[chunkhash].js')},plugins: [new webpack.DefinePlugin({'process.env': env}),new UglifyJsPlugin({//压缩jsuglifyOptions: {compress: {warnings: false}},sourceMap: config.build.productionSourceMap,parallel: true}),new ExtractTextPlugin({//提取静态文件,减少请求filename: utils.assetsPath('css/[name].[contenthash].css'),allChunks: true,}),new OptimizeCSSPlugin({//提取优化压缩后(删除来自不同组件的冗余代码)的csscssProcessorOptions: config.build.productionSourceMap? { safe: true, map: { inline: false } }: { safe: true }}),new HtmlWebpackPlugin({ //html打包压缩到index.htmlfilename: config.build.index,template: 'index.html',inject: true,minify: {removeComments: true,//删除注释collapseWhitespace: true,//删除空格removeAttributeQuotes: true//删除属性的引号},chunksSortMode: 'dependency'//模块排序,按照我们需要的顺序排序}),new webpack.HashedModuleIdsPlugin(),new webpack.optimize.ModuleConcatenationPlugin(),new webpack.optimize.CommonsChunkPlugin({ // node_modules中的任何所需模块都提取到vendorname: 'vendor',minChunks (module) {return (module.resource &&/\.js$/.test(module.resource) &&module.resource.indexOf(path.join(__dirname, '../node_modules')) === 0)}}),new webpack.optimize.CommonsChunkPlugin({name: 'manifest',minChunks: Infinity}),new webpack.optimize.CommonsChunkPlugin({name: 'app',async: 'vendor-async',children: true,minChunks: 3}),new CopyWebpackPlugin([//复制static中的静态资源(默认到dist里面){from: path.resolve(__dirname, '../static'),to: config.build.assetsSubDirectory,ignore: ['.*']}])]})if (config.build.productionGzip) {const CompressionWebpackPlugin = require('compression-webpack-plugin')webpackConfig.plugins.push(new CompressionWebpackPlugin({asset: '[path].gz[query]',algorithm: 'gzip',test: new RegExp('\\.(' +config.build.productionGzipExtensions.join('|') +')$'),threshold: 10240,minRatio: 0.8}))}if (config.build.bundleAnalyzerReport) {const BundleAnalyzerPlugin = require('webpack-bundle-analyzer').BundleAnalyzerPluginwebpackConfig.plugins.push(new BundleAnalyzerPlugin())}module.exports = webpackConfig
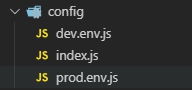
【config文件夹】
1、【dev.env.js和prod.env.js】
分别配置:开发环境和生产环境。这个可以根据公司业务结合后端需求配置需要区分开发环境和测试环境的属性
'use strict'// webpack-merge用于实现合并类似于ES6的Object.assign()const merge = require('webpack-merge')const prodEnv = require('./prod.env')module.exports = merge(prodEnv, {NODE_ENV: '"development"'})
'use strict'module.exports = {NODE_ENV: '"production"'}
注意属性值要用”‘’”双层引住,访问(获取值)时直接用:process.env.属性名 process(进程)是nodejs的一个全局变量,process.env 属性返回一个用户环境信息的对象。
2、【index.js】
'use strict';const path = require('path');module.exports = {// ===================开发环境配置dev: {assetsSubDirectory: 'static',//静态资源文件夹(一般存放css、js、image等文件)assetsPublicPath: '/',//根目录proxyTable: {},//配置API代理,可利用该属性解决跨域的问题host: 'localhost', // 可以被 process.env.HOST 覆盖port: 3030, // 可以被 process.env.PORT 覆盖autoOpenBrowser: true,//编译后自动打开浏览器页面 http://localhost:3030/("port + host",默认"false"),设置路由重定向自动打开您的默认页面errorOverlay: true,//浏览器错误提示notifyOnErrors: true,//跨平台错误提示poll: false, //webpack提供的使用文件系统(file system)获取文件改动的通知devServer.watchOptions(监控文件改动)devtool: 'cheap-module-eval-source-map',//webpack提供的用来调试的模式,有多个不同值代表不同的调试模式cacheBusting: true,// 配合devtool的配置,当给文件名插入新的hash导致清除缓存时是否生成source-mapcssSourceMap: true //记录代码压缩前的位置信息,当产生错误时直接定位到未压缩前的位置,方便调试},// ========================生产环境配置build: {index: path.resolve(__dirname, '../dist/index.html'),//编译后"首页面"生成的绝对路径和名字assetsRoot: path.resolve(__dirname, '../dist'),//打包编译的根路径(默认dist,存放打包压缩后的代码)assetsSubDirectory: 'static',//静态资源文件夹(一般存放css、js、image等文件)assetsPublicPath: '/',//发布的根目录(dist文件夹所在路径)productionSourceMap: true,//是否开启source-mapdevtool: '#source-map',//(详细参见:https://webpack.docschina.org/configuration/devtool)productionGzip: false,//是否压缩productionGzipExtensions: ['js', 'css'],//unit的gzip命令用来压缩文件(gzip模式下需要压缩的文件的扩展名有js和css)bundleAnalyzerReport: process.env.npm_config_report //是否开启打包后的分析报告}};
【assets 文件夹】
用于存放静态资源(css、image等),assets 打包是路径会经过webpack中的 file-loader 编译成 js。(所以,assets 需要使用绝对路径)
【static 文件夹】
默认存放静态资源(css、image等)的文件夹,与 assets 不同的是:static 在打包的时候会直接复制到一个同名的文件夹到 dist 文件夹里。(不会经过编译,可使用相对路径)
【其他文件】
(1).babelrc:
浏览器解析的兼容配置,该文件主要是对预设(presets)和插件(plugins)进行配置,因此不同的转译器作用不同的配置项,大致可分为:语法转义器、补丁转义器、sx和flow插件
(2).editorconfig:
用于配置代码格式(配合代码检查工具使用,如:ESLint,团队开发时可统一代码风格),这里配置的代码规范规则优先级高于编辑器默认的代码格式化规则 。
(3).gitignore:
(4)postcssrc.js:
autoprefixer(自动补全css样式的浏览器前缀);postcss-import(@import引入语法)、CSS Modules(规定样式作用域)
(5)index.html:
(6)package.json:
npm的配置文件(npm install根据package.json下载对应版本的安装包)
(7)package.lock.json:
(8)README.md:
vuecli3 安装
全局安装:
npm install -g @vue/cli
使用3.0版本 创建 2.0 版本的项目
安装了3.0版本还想使用2.0版本创建项目 无需卸载3.0版本。直接安装npm i -g @vue/cli-init
就可以创建cli2的项目了。
Vue2构建项目实战
Vue2项目的建立和目录的简单介绍
查看版本:
vue --version
创建项目:
vue create 命令
vue create [options] <app-name>
or 使用图形化界面
vue ui
目录结构
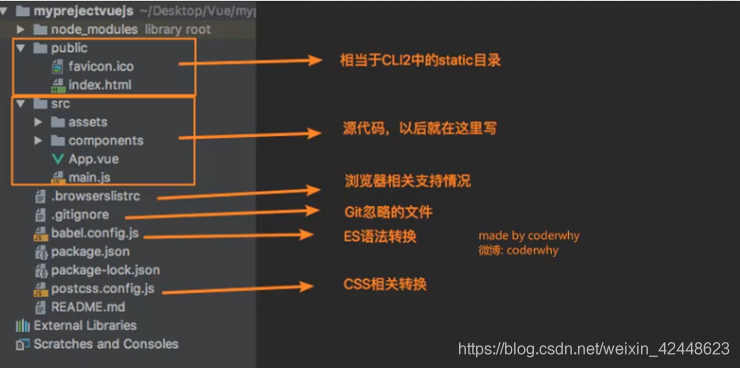
【public】
相当于 cli2 版本的 static 文件夹
资源会原封不动的 复制到 dist 文件夹下
【assets】
静态资源,会经过 webpack 打包过程
【babel.config.js】
转移ES6高级语法,相当于之前的 .babelrc 文件
配置
通过 vue-cli 3.0 工具生成的项目,默认隐藏了所有 webpack 的配置。
通过 在项目根目录新建 vue.config.js文件 修改 webpack 的默认配置。
module.exports = {// baseUrl 从 Vue CLI 3.3 起已弃用,请使用publicPathbaseUrl: process.env.NODE_ENV === 'production' ? '/online/' : '/',// outputDir: 在npm run build时 生成文件的目录 type:string, default:'dist'// outputDir: 'dist',// pages:{ type:Object,Default:undfind }devServer: {port: 8888, // 端口号host: 'localhost',https: false, // https:{type:Boolean}open: true, //配置自动启动浏览器// proxy: 'http://localhost:4000' // 配置跨域处理,只有一个代理proxy: {'/api': {target: '<url>',ws: true,changeOrigin: true,},'/foo': {target: '<other_url>',},}, // 配置多个代理},}
cli3.0 配置
别名配置
// vue.config.jsconst path = require('path')function resolve(dir){return path.join(__dirname, dir)}module.export = {chainWebpack: config => {config.resolve.alias// 配置别名.set('@', resolve('src'))}}
cli4.0 配置
vant 在不同版本下的配置

若有收获,就点个赞吧
0 人点赞
