Java基础
Java中Runnable与Callable的区别
1.概述
自Java早期以来,多线程一直是该语言的一个主要方面。Runnable是用于表示多线程任务的核心接口,Callable是在Java 1.5中添加的Runnable的改进版本。
在本文中,我们将探讨两种接口的差异和应用。
2.执行机制
两个接口都旨在表示可由多个线程执行的任务。Runnable的任务都可以使用运行线程类或ExecutorService的,而可调用只能用后者来运行。
3.返回值
让我们深入了解这些接口处理返回值的方式。
3.1 使用Runnable
Runnable接口是一个功能接口,并且具有单一的run()不接受任何参数,并且不返回任何值的方法。
这适用于我们不查找线程执行结果的情况,例如,传入事件日志记录:
public interface Runnable {public void run();}
让我们通过一个例子来理解这个:
public class EventLoggingTask implements Runnable{private Logger logger = LoggerFactory.getLogger(EventLoggingTask.class);@Overridepublic void run() {logger.info("Message");}}
在此示例中,线程将只读取队列中的消息并将其记录在日志文件中。任务没有返回任何值; 可以使用ExecutorService启动任务:
public void executeTask() {executorService = Executors.newSingleThreadExecutor();Future future = executorService.submit(new EventLoggingTask());executorService.shutdown();}
在这种情况下,Future对象不会保留任何值。
3.2 使用Callable
Callable接口是包含单一的通用call()调用方法-它返回一个通用值V:
public interface Callable<V> {V call() throws Exception;}
我们来看看计算数字的阶乘:
public class FactorialTask implements Callable<Integer> {int number;// standard constructorspublic Integer call() throws InvalidParamaterException {int fact = 1;// ...for(int count = number; count > 1; count--) {fact = fact * count;}return fact;}}
call()方法的结果在Future对象中返回:
@Testpublic void whenTaskSubmitted_ThenFutureResultObtained(){FactorialTask task = new FactorialTask(5);Future<Integer> future = executorService.submit(task);assertEquals(120, future.get().intValue());}
4.异常处理
让我们看看它们对异常处理的适用程度。
4.1 使用Runnable
由于方法签名没有指定“throws”子句, 因此无法传播进一步异常的检查。
4.2 使用Callable
Callable的call()方法包含“throws Exception”子句,因此我们可以轻松地进一步传播已检查的异常:
public class FactorialTask implements Callable<Integer> {// ...public Integer call() throws InvalidParamaterException {if(number < 0) {throw new InvalidParamaterException("Number should be positive");}// ...}}
如果你期望有返回值,那么这个情况下建议使用Callable,例外是在所收集的未来对象,这可以通过进行呼叫到被检查的Future.get()方法。这将抛出它包装的原始异常ExecutionException:
@Test(expected = ExecutionException.class)public void whenException_ThenCallableThrowsIt() {FactorialCallableTask task = new FactorialCallableTask(-5);Future<Integer> future = executorService.submit(task);Integer result = future.get().intValue();}
在上面的测试中,抛出ExecutionException,因为我们传递的是无效数字。我们可以在此异常对象上调用getCause()方法来获取原始的已检查异常。
如果我们不调用Future类的get()方法- 那么call()方法抛出的异常将不会被报告回来,并且该任务仍将被标记为已完成:
@Testpublic void whenException_ThenCallableDoesntThrowsItIfGetIsNotCalled(){FactorialCallableTask task = new FactorialCallableTask(-5);Future<Integer> future = executorService.submit(task);assertEquals(false, future.isDone());}
即使我们已将参数的负值抛出到FactorialCallableTask,上述测试也会成功通过。
5.结论
在本文中,我们探讨了Runnable和Callable接口之间的差异。
Optional
JDK 1.8加入了 Optional 类。用于避免用if判空时出现空指针异常,它就是一个包裹着对象的容器。如果值存在则 isPresent()方法会返回 true,调用 get() 方法会返回该对象。
JDK 提供三个静态方法来构造一个 Optional:
- Optional.of(T value) 该方法通过一个非 null 的 value 来构造一个 Optional,返回的 Optional 包含了 value 这个值。对于该方法,传入的参数一定不能为 null,否则便会抛出 NullPointerException。
- Optional.ofNullable(T value) 该方法和 of 方法的区别在于,传入的参数可以为 null,进行三目运算,判断传入的参数是否为 null,如果为 null 的话,返回的就是 Optional.empty()。
- Optional.empty()该方法用来构造一个空的 Optional,即该 Optional 中不包含值 —— 其实底层实现还是 如果 Optional 中的 value 为 null 则该 Optional 为不包含值的状态,然后在 API 层面将 Optional 表现的不能包含 null 值,使得 Optional 只存在 包含值 和 不包含值 两种状态。
ofNullable
Optional.ofNullable()
public static void main(String[] args) {List<String> list = null;List<String> newList = Optional.ofNullable(list).orElse(Lists.newArrayList());newList.forEach(x -> System.out.println(x));}
�先解释代码含义:如果list集合不为空,将list集合赋值给newList;如果list集合为空创建一个空对象集合赋值给newList,保证list集合永远不为空,也就避免了空指针异常。(为了更好的理解,分开写了,比较庸俗,实际工作中都是一行搞定,哈哈哈)
�
ifPresent
ifPresent
java 8新特性
instant 和 LocalDateTime
Instant和LocalDate的区别
“Instant“是即时时刻,是代表时间轴中某一特定的时刻点。一般适合替换传统的“java.util.Date”和“java.sql.Timestamp”,用来表示时间戳记。
“LocalDateTime“ 表示本地日期和时间,因为不具备时区和UTC偏移的概念,所以无法代表一个特定的时刻,通常被视为年月日和小时分钟秒。一般可以描述像生日的日期,以及在墙上时钟上看到的本地时间。
Instant
java.time 包中的 Instant 类代表的是某个时间(有点像 java.util.Date),准确的说是:”是不带时区的即时时间点“,它是精确到纳秒的(而不是象旧版本的Date精确到毫秒)。如果使用纳秒去表示一个时间则原来使用一位Long类型是不够的,需要占用更多一点的存储空间,实际上其内部是由两个Long字段组成,第一个部分保存的是自标准Java计算时代(就是1970年1月1日开始)到现在的秒数,第二部分保存的是纳秒数(永远不会超过999,999,999)。
实例代码如下:
public static void main(String[] args) {//instant 相当于 dateInstant instant = Instant.now();System.out.println(instant);Date date = new Date();System.out.println(date);//instant转date 类方法(java.util.date)Date from = Date.from(instant);System.out.println(date);//datet转instant 对象方法(java.util.date)Instant instant1 = date.toInstant();System.out.println(instant1);//instant 根据毫秒值或者date转换为instant 类方法 (java.time)Instant instant2 = Instant.ofEpochMilli(date.getTime());System.out.println(instant2);//instant 根据秒值或者date转换为instant 类方法 (java.time)Instant instant3 = Instant.ofEpochSecond(60 * 60L);Instant instant4 = Instant.ofEpochSecond(60 * 60 * 24L);System.out.println(instant3);System.out.println(instant4);//instant 第一个参数指定秒数,第二个单位指定纳秒数,这样得到的instant会包含纳秒的数据 1000000000纳秒(9位)=1秒Instant instant5 = Instant.ofEpochSecond(60 * 60 * 24L, 1000000000*60L);System.out.println(instant5);//instant 将字符串类型的instant转换为instantd对象,如:1970-01-02T00:01:00Z,但是date的结果字符串不可以转换,会报错DateTimeParseException//注意:必须传入的是符合 UTC格式的字符串Instant parse = Instant.parse("1970-01-01T01:00:00Z");System.out.println(parse+"parse");//instant 在现有的instant的时间上追加些时间,下面例子追加了5小时10分钟,这里plus会产生新的instant对象Instant plus = instant.plus(Duration.ofHours(5).plusMinutes(10));System.out.println(instant+" instant "+plus+"plus");System.out.println(instant == plus);//plus会产生新的instant对象 所以结果位false//instant 获取其5天前的instant(此刻)Instant minus = instant.minus(5, ChronoUnit.HOURS);System.out.println(instant+" instant "+minus+" minus");//也可以直接调用相关减法方法,效果跟上面的方法一样Instant instant6 = instant.minusSeconds(60 * 60 * 5);System.out.println(instant+" instant "+instant6+" instant6");//减法方法,效果跟上面的方法一样Instant minus1 = instant.minus(Duration.ofHours(5));System.out.println(instant+" instant "+minus1+" minus1");//计算两个Instant之间的秒数, ChronoUnit用的什么,得到的结果就是什么单位System.out.println(instant+" instant "+instant6+" instant6");long between = ChronoUnit.SECONDS.between(instant6, instant);System.out.println(between);//比较两个instant 相等 0, 前者时间纳秒值大于后者 1,小于后者 -1或小于0int i = instant.compareTo(instant6);System.out.println(i);//判断instant时间前后,前者在后者之后返回true,反之falseboolean after = instant.isAfter(instant6);System.out.println(after);//判断instant时间前后,前者在后者之前返回true,反之false,正好与上面相反boolean before = instant.isBefore(instant6);System.out.println(before);}
说明:Java.time 这个包是线程安全的,所以可以替换之前的date类的使用。
注意:
Instant now = Instant.now();System.out.println("now:"+now);
控制台输出:now:2018-07-09T08:59:08.853Z
通过这种方式获取的时间戳与北京时间相差8个时区,需要修正为北京时间,通过查看源代码发现Instant.now()使用等是UTC时间Clock.systemUTC().instant()。LocalDate、LocalDateTime 的now()方法使用的是系统默认时区 不存在Instant.now()的时间问题。
解决方法
如果要对应北京时间,需要增加8个小时
1
Instantnow=Instant.now().plusMillis(TimeUnit.HOURS.toMillis(8));
2
System.out.println(“now:”+now);
控制台输出:now:2018-07-09T16:58:48.188Z
LocalDateTime
它表示的是不带时区的 日期及时间,替换之前的Calendar。看上去,LocalDateTime和Instant很象,但记得的是“Instant中是不带时区的即时时间点。可能有人说,即时的时间点 不就是日期+时间么?看上去是这样的,但还是有所区别,比如LocalDateTime对于用户来说,可能就只是一个简单的日期和时间的概念,考虑如下的 例子:两个人都在2013年7月2日11点出生,第一个人是在英国出生,而第二个是在加尼福利亚,如果我们问他们是在什么时候出生的话,则他们看上去都是 在同样的时间出生(就是LocalDateTime所表达的),但如果我们根据时间线(如格林威治时间线)去仔细考察,则会发现在出生的人会比在英国出生的人稍微晚几个小时(这就是Instant所表达的概念,并且要将其转换为UTC格式的时间)。
实例代码如下:
public static void main(String[] args) {//LocalDateTime 相当于calendarLocalDateTime localDateTime = LocalDateTime.now();System.out.println(localDateTime+" localDateTime1");//当前时间加上5小时,分钟等一样的用法,支持链式编程LocalDateTime localDateTime1 = localDateTime.plusHours(5);System.out.println(localDateTime1+" localDateTime1");//当前时间加上5小时,分钟等一样的用法,支持链式编程 但是这里localtime只是时间,不展示年月日,只展示如:15:26:50.398 时分秒毫秒LocalTime localDateTime2 = localDateTime.toLocalTime().plusHours(5);//当前时间加上5天,只展示年月日,不展示时分秒毫秒,下面是两种写法,都可以LocalDate localDate = localDateTime.toLocalDate().plusDays(5);System.out.println(localDateTime2+" localDateTime2 "+localDate+ " localDate");LocalDate plus = localDateTime.toLocalDate().plus(Period.ofDays(5));System.out.println(plus+" plus");}
格式化日期
1
LocalDateTime localDateTime = LocalDateTime.ofInstant(Instant.now(),ZoneId.systemDefault());String format = localDateTime.format(DateTimeFormatter.ofPattern("yyyy:MM:dd HH:mm:ss"));System.out.println(format);
另一种方式使用会报错:
Instant now = Instant.now();String format = DateTimeFormatter.ofPattern("yyyy:MM:dd HH:mm:ss").format(now);system.out.println(format);
格式化日期并获取这一周内的数据
1
LocalDateTime localDateTime = LocalDateTime.ofInstant(Instant.now(),ZoneId.systemDefault());String createStartTp =localDateTime.plusDays(-6).format(DateTimeFormatter.ofPattern("yyyy/MM/dd 00:00:00"));system.out.println(createStartTp);
报错信息:
java.time.temporal.UnsupportedTemporalTypeException: Unsupported field: YearOfEraat java.time.Instant.getLong(Instant.java:608)
转换
Java 8中 java.util.Date 类新增了两个方法,分别是from(Instant instant)和toInstant()方法
// Obtains an instance of Date from an Instant object.public static Date from(Instant instant) {try {return new Date(instant.toEpochMilli());} catch (ArithmeticException ex) {throw new IllegalArgumentException(ex);}}// Converts this Date object to an Instant.public Instant toInstant() {return Instant.ofEpochMilli(getTime());}
Date-->Instant//将java.util.Date转换为InstantInstant instant = Instant.ofEpochMilli(new Date().getTime());
Instant mysql用什么类型
因为long为长整型数据类型,所以mysql对应的是bigint或者numeric(x,y)也可以。
bigint:字节8个,当需要存储超大的整数才用。
numeric(x,y):其中x代表精度,y代表标度,精度表示保存值的主要位数,标度表示小数点后面可以保存的位数。你可以自定义你想要数据的大小
底层
说一下JVM内存模型,有哪些区,分别干什么。
JVM运行时内存划分
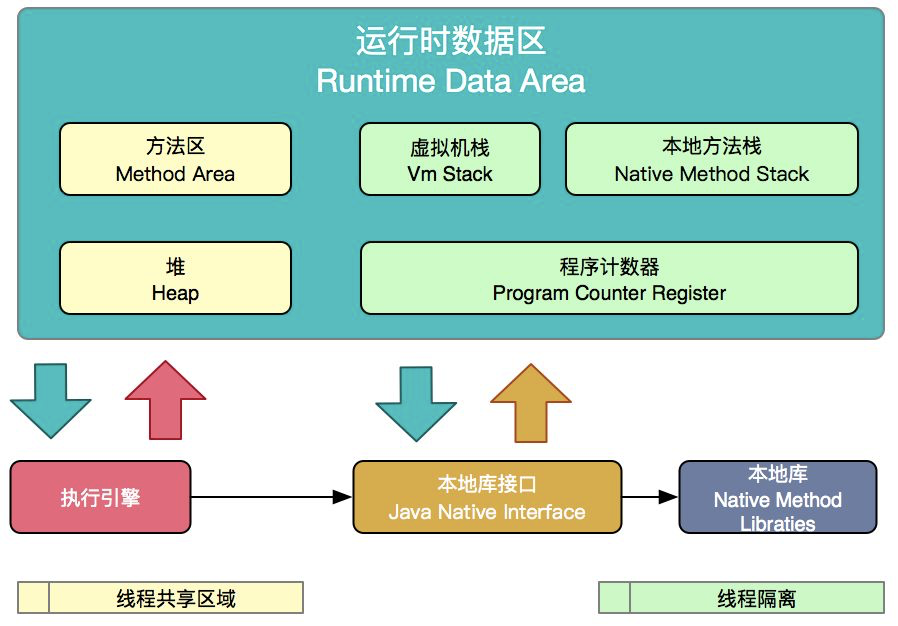
1.1 程序计数器当前线程所执行的字节码的行号指示器。字节码解释器工作的时候就是通过改变这个计数值来选取下一条要执行的字节码指令。
1.2 虚拟机栈(java方法栈)线程私有,java方法执行时的内存模型,每个方法执行的时候都会创建一个栈帧用于存储局部变量表、操作数栈、方法出口等信息局部变量表其实就是一个方法内的局部变量对应的指针。
1.3 本地方法栈Native 方法执行的线程栈
1.4 方法区线程共享区域,存储已经被虚拟机加载的类信息,常量,静态变量,即时编译后的代码等数据。运行时常量池 方法区的一块,保存Class文件中描述的符号引用,也会把翻译出来的直接引用也存储在这里。它的主要特征是具备动态性,编译器和运行时的常量都可以进入,比如的string 字符串常量池 intern()方法,就是利用的该特性。
1.5 堆JVM里所管理的内存中最大的一块,线程共享,存放所有对象实例。GC也是针对该区进行回收。
分代垃圾回收:
分代垃圾回收策略基于这样一个事实:不同对象的生命周期是不一样的。因此,不同生命周期的对象可以采取不同的收集方式,以提高效率。
年轻代
年轻代分为1个Eden区,2个Survivor区(from和to)。大部分对象在Eden区中生成。当Eden区满时,还存活的对象将被复制到Survivor区(两个中的一个),当一个Survivor区满时,此区的存活对象将被复制到另外一个Survivor区,当另一个Survivor区也满了的时候,从前一个Survivor区复制过来的并且此时还存活的对象,将可能被复制到年老代。
年老代
在年轻代中经历了N次(可配置)垃圾回收后仍然存活的对象,就会被复制到年老代中。因此,可以认为年老代中存放的都是一些生命周期较长的对象。
持久代
用于存放静态类型数据,如Java Class,Method等。持久代对垃圾回收没有显著影响。但是有些应用可能动态生成或调用一些Class,例如Hibernate CGLib等,在这种时候往往需要设置一个比较大的持久代空间来存放这些运行过程中动态增加的类型。
简单介绍一下安全框架Shiro如何进行认证
核心概念
1.Subject
subject 被Shiro描述为一个主体,对于web应用来说,可以简单理解为用户。
2.SecurityManager
Subject 的幕后推手是SecurityManager,Subject 代表了当前用户的安全操作,SecurityManager则管理所有用户的安全操作。
3.Realm
Realm 充当了 Shiro 与应用安全数据间的“桥梁”或者“连接器”。当切实与像用户帐户这类安全相关数据进行交互,执行认证(登录)和授权(访问控制)时,Shiro 会从应用配置的 Realm 中查找很多内容。
认证
这是一个典型的三步过程:
1、收集用户身份信息,成为当事人(principal),以及身份的支持证明,称为证书(Credential)。
2、将当事人和证书提交给系统。
3、如果提交的证书与系统期望的该用户身份(当事人)匹配,该用户就被认为是经过认证的,反之则被认为未经认证的。
Shiro 以简单直观的方式支持同样的流程。Shiro 有一套以Subject 为中心的API,几乎你想要用 Shiro 在运行时完成的所有事情都能通过与当前执行的 Subject 进行交互而达成。因此,要登录 Subject,只需要简单地调用它的 login 方法。传入表示被提交当事人和证书(在这种情况下,就是用户名和密码)的 AuthenticationToken 实例。
//1. 接受提交的当事人和证书:
AuthenticationToken token = new UsernamePasswordToken(username, password);
//2. 获取当前 Subject:
Subject currentUser = SecurityUtils.getSubject();
//3. 登录:
currentUser.login(token);
可以看到,Shiro的操作及其简洁和自然,这也是Shiro 惯有的风格。在调用 login()方法后,SecurityManager 会收到AuthenticationToken,并将其发送给已配置的 Realm,执行必须的认证检查,以往我们手动去数据库中进行校验和匹配的时代已经过去了,这些所有的操作,全部由Shiro 帮我们自动完成。当数据经过Realm 的检查后发现无法匹配,那么Shiro 就会返回 AuthenticationException 异常的子类,通过这些子类,我们可以精确的控制想要返回给用户的错误信息:
try {
currentUser.login(token);
} catch (IncorrectCredentialsException ice) {
…
} catch (LockedAccountException lae) {
…
}
…
catch (AuthenticationException ae) {…
}
如果没有抛出任何异常,则证明 Subject 登录成功,就被认为是已认证的。
授权
授权实质上就是访问控制,控制已认证的用户能够访问应用的哪些内容,如资源、页面等。
多数用户执行访问控制是通过 角色 + 权限 的概念来完成的。角色是所有用户个体的一个分组,如管理员、普通用户、商家等;而权限 则表示具体能够操作的行为,比如查询所有用户、删除某些用户、修改信息等等,是与具体应用资源直接挂钩的。
用户、角色和 权限三者往往通过 角色 来进行转换,用户和权限之间通常不进行直接绑定:
我们可以通过shiro的校验方法,来便捷地实现分支语句:
if ( subject.hasRole(“administrator”) ) {
// 显示‘Create User’按钮
} else {
// 按钮置灰?
}
虽然,在概念上,权限与角色直接挂钩,但其最终效果还是要落实到具体的某个用户是否具有某个权限,为此,Shiro也为我们提供了相应的校验方法:
if ( subject.isPermitted(“user:create”) ) {
// 显示‘Create User’按钮
} else {
// 按钮置灰?
}
这样,任何具有“user:create”权限的角色或用户都可以点击‘Create User’按钮,并且这些角色和指派甚至可以在运行时改变,这给你提供了一个非常灵活的安全模型。
上例中,”user:create” 字符串是一种遵循特定规则的权限描述符,这在后面的文章中会单独介绍。具体详情可了解:http://shiro.apache.org/permissions.html
上面这些权限的调用,最终都会发送到SecurityManager中,它会咨询 Realm 做出自己的访问控制决定。必要时,还允许单个 Realm 同时响应认证和授权操作。
其它
Java获取当前项目目录
Maven获取resources的文件路径、读取resources的文件
写法一:
// 编译后,项目根路径,写法1String url1 = A.class.getClassLoader().getResource("").toString();// 编译后,项目根路径,写法2String url2 = A.class.getResource("/").toString();// 编译后,文件根路径String url3 = A.class.getResource("").toString();
输出:
file:/D:/IdeaWorkspace/test-null-project/target/classes/
file:/D:/IdeaWorkspace/test-null-project/target/classes/
file:/D:/IdeaWorkspace/test-null-project/target/classes/com/convict/
写法二:
// 还有一种getResource 后调用 getFile方法,就没有 [file:],而是以 [/D:xxx] 这样的格式String url4 = A.class.getClassLoader().getResource("").getFile();String url5 = A.class.getResource("/").getFile();String url6 = A.class.getResource("").getFile();System.out.println(url4);System.out.println(url5);System.out.println(url6);
输出:
/D:/IdeaWorkspace/test-null-project/target/classes/
/D:/IdeaWorkspace/test-null-project/target/classes/
/D:/IdeaWorkspace/test-null-project/target/classes/com/convict/
写法三:
String url7 = A.class.getClassLoader().getResource("").getPath();String url8 = A.class.getResource("/").getPath();String url9 = A.class.getResource("").getPath();System.out.println(url7);System.out.println(url8);System.out.println(url9);
输出:
/D:/IdeaWorkspace/test-null-project/target/classes/
/D:/IdeaWorkspace/test-null-project/target/classes/
/D:/IdeaWorkspace/test-null-project/target/classes/com/convict/
至此,上面已经有多种获取文件路径的方式,既然拿到路径,就可以读取File 文件,进而读取文件了,如这是my.txt 的内容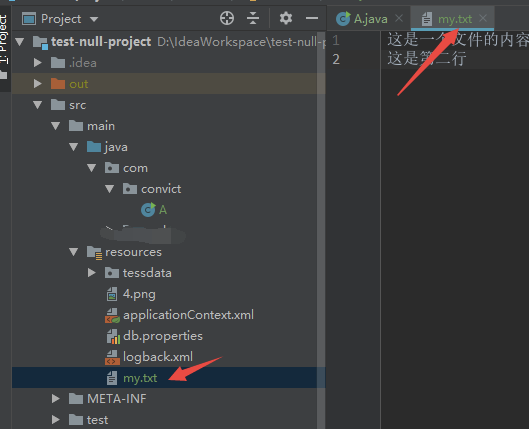
则读取文件内容的代码可以如下:
// 获取路径String filePath = A.class.getClassLoader().getResource("my.txt").getFile();File my = new File(filePath);InputStreamReader isr = new InputStreamReader(new FileInputStream(my), StandardCharsets.UTF_8);BufferedReader br = new BufferedReader(isr);String lineTxt;while ((lineTxt = br.readLine()) != null) {System.out.println(lineTxt);}br.close();
输出:
扩展:
写法②getFile 跟写法③getPath 是有区别的,getResource 方法后返回的是一个 java.net.URL对象,那手动构造一个java.net.URL
URL url = new URL("https://www.baidu.com/img/baidu_jgylogo3.gif?param=1111¶m2=aaaaa");System.out.println("getFile ==> " + url.getFile());System.out.println("getPath ==> " + url.getPath());
输出:
getFile == > /img/baidu_jgylogo3.gif?param=1111¶m2=aaaaa
getPath ==> /img/baidu_jgylogo3.gif
可以看出,getFile() 方法可以拿到参数值,而getPath() 就是只取文件名,JDK中文文档相关api如下:

Java获取当前路径
package com.grid.spider.common.generator;import java.io.File;import java.io.IOException;public class Test {public static void main(String[] args) throws IOException {//当前项目下路径: /Users/jiadongpo/Workspaces/grid-appstore/grid-spider-jaFile file = new File("");String filePath = file.getCanonicalPath();System.out.println("当前项目下路径: " + filePath);//当前项目下xml文件夹: /Users/jiadongpo/Workspaces/grid-appstore/grid-spider-ja/xml\File file1 = new File("");String filePath1 = file1.getCanonicalPath() + File.separator + "xml\\";System.out.println("当前项目下xml文件夹: " + filePath1);//获取类加载的根路径: /Users/jiadongpo/Workspaces/grid-appstore/grid-spider-ja/grid-spider-ja-common/target/classesFile file3 = new File("获取类加载的根路径: " + Test.class.getResource("/").getPath());System.out.println(file3);//获取当前类的所在工程路径: /Users/jiadongpo/Workspaces/grid-appstore/grid-spider-ja/grid-spider-ja-common/target/classes/com/grid/spider/common/generatorFile file4 = new File("获取当前类的所在工程路径: " + Test.class.getResource("").getPath());System.out.println(file4);//用户的主目录:/Users/jiadongpoSystem.out.println("用户的主目录:" + System.getProperty("user.home"));//用户的当前工作目录:/Users/jiadongpo/Workspaces/grid-appstore/grid-spider-jaSystem.out.println("用户的当前工作目录:" + System.getProperty("user.dir"));//当前的classpath的绝对路径的URI表示法:file:/Users/jiadongpo/Workspaces/grid-appstore/grid-spider-ja/grid-spider-ja-common/target/classes/System.out.println("当前的classpath的绝对路径的URI表示法:" + Thread.currentThread().getContextClassLoader().getResource(""));//得到的是当前的classpath的绝对URI路径:file:/Users/jiadongpo/Workspaces/grid-appstore/grid-spider-ja/grid-spider-ja-common/target/classes/System.out.println("得到的是当前的classpath的绝对URI路径:" + Test.class.getResource("/"));//得到的是当前类Tfff.class文件的URI目录:file:/Users/jiadongpo/Workspaces/grid-appstore/grid-spider-ja/grid-spider-ja-common/target/classes/com/grid/spider/common/generator/System.out.println("得到的是当前类Tfff.class文件的URI目录:" + Test.class.getResource(""));}}
日期格式化
DateTimeFormat注解不起作用
@DateTimeFormat注解不起作用。
怎么解决呢?
- 添加joda-time-xxx.jar包。
- 注意,Date类应该用sql里面的,不应该用util里面的。emmm,主要是因为格式的问题。import java.sql.Date;
- 在dispatcher-servlet.xml中配置: mvc:annotation-driven
还有一种方法可以在不使用@DateTImeFormat的情况下实现需求:
https://stackoverflow.com/questions/30163144/datetimeformatpattern-yyyy-mm-dd-with-spring-mvc-rest-service-gives-error
导入joda-time 2.5版本以上的包即可
附上:
joda-time
joda-time
2.9
@DateTimeFormat无效原因
一般都是使用@DateTimeFormat把传给后台的时间字符串转成Date,使用@JsonFormat把后台传出的Date转成时间字符串,但是@DateTimeFormat只会在类似@RequestParam的请求参数(url拼接的参数才生效,如果是放到RequestBody中的form-data也是无效的)上生效,如果@DateTimeFormat放到@RequestBody下是无效的。
在@RequestBody中则可以使用@JsonFormat把传给后台的时间字符串转成Date,也就是说@JsonFormat其实既可以把传给后台的时间字符串转成Date也可以把后台传出的Date转成时间字符串。
/*** Controller**/@SpringBootApplication@RestControllerpublic class Application {@RequestMapping("/server")public Result home(@RequestBody Param param, HttpServletRequest request) {return new Result().setRtime(param.getTime());}@RequestMapping("/server1")public Result home1(Param1 param, HttpServletRequest request) {return new Result().setRtime(param.getTime());}public static void main(String[] args) {new SpringApplicationBuilder(Application.class).web(true).run(args);}}
/*** 在@RequestBody中使用@JsonFormat将入参时间字符串转Date**/public class Param {@JsonFormat(pattern = "yyyy-MM-dd HH:mm:ss", timezone = "GMT+8")private Date time;public Date getTime() {return time;}public void setTime(Date time) {this.time = time;}}
/*** 在类似@RequestParam中将入参时间字符串转Date**/public class Param1 {@DateTimeFormat(pattern = "yyyy-MM-dd HH:mm:ss")private Date time;public Date getTime() {return time;}public void setTime(Date time) {this.time = time;}}
/*** 使用@JsonFormat将Date转成时间字符串传给前端**/public class Result {@JsonFormat(pattern = "yyyy/MM/dd HH:mm:ss", timezone = "GMT+8")private Date rtime;public Date getRtime() {return rtime;}public Result setRtime(Date time) {this.rtime = time;return this;}}
@JsonFormat与@DateTimeFormat注解的使用
背景:从数据库获取时间传到前端进行展示的时候,我们有时候可能无法得到一个满意的时间格式的时间日期,在数据库中显示的是正确的时间格式,获取出来却变成了很丑的时间戳,@JsonFormat注解很好的解决了这个问题,我们通过使用@JsonFormat可以很好的解决:后台到前台时间格式保持一致的问题,其次,另一个问题是,我们在使用WEB服务的时,可能会需要用到,传入时间给后台,比如注册新用户需要填入出生日期等,这个时候前台传递给后台的时间格式同样是不一致的,而我们的与之对应的便有了另一个注解,@DataTimeFormat便很好的解决了这个问题,接下来记录一下具体的@JsonFormat与DateTimeFormat的使用过程。
声明:关于@JsonFormat的使用,一定要导入正确完整的包。
1.注解@JsonFormat
1.使用maven引入@JsonFormat所需要的jar包,我贴一下我这里的pom文件的依赖
<!--JsonFormat--><dependency><groupId>com.fasterxml.jackson.core</groupId><artifactId>jackson-annotations</artifactId><version>2.8.8</version></dependency><dependency><groupId>com.fasterxml.jackson.core</groupId><artifactId>jackson-databind</artifactId><version>2.8.8</version></dependency><dependency><groupId>org.codehaus.jackson</groupId><artifactId>jackson-mapper-asl</artifactId><version>1.9.13</version></dependency>
2.在你需要查询出来的时间的数据库字段对应的实体类的属性上添加@JsonFormat
import java.util.Date;import com.fasterxml.jackson.annotation.JsonFormat;public class TestClass {//设置时区为上海时区,时间格式自己据需求定。@JsonFormat(pattern="yyyy-MM-dd",timezone = "GMT+8")private Date testTime;public Date gettestTime() {return testTime;}public void settestTime(Date testTimee) {this.testTime= testTime;}}
这里解释一下:@JsonFormat(pattern=”yyyy-MM-dd”,timezone = “GMT+8”)
pattern:是你需要转换的时间日期的格式
timezone:是时间设置为东八区,避免时间在转换中有误差
提示:@JsonFormat注解可以在属性的上方,同样可以在属性对应的get方法上,两种方式没有区别
3.完成上面两步之后,我们用对应的实体类来接收数据库查询出来的结果时就完成了时间格式的转换,再返回给前端时就是一个符合我们设置的时间格式了
2.注解@DateTimeFormat
1.@DateTimeFormat的使用和@jsonFormat差不多,首先需要引入是spring还有jodatime,spring我就不贴了
<!-- joda-time --><dependency><groupId>joda-time</groupId><artifactId>joda-time</artifactId><version>2.3</version></dependency>
2.在controller层我们使用spring mvc 表单自动封装映射对象时,我们在对应的接收前台数据的对象的属性上加@@DateTimeFormat
@DateTimeFormat(pattern = "yyyy-MM-dd")@JsonFormat(pattern = "yyyy-MM-dd HH:mm:ss",timezone="GMT+8")private Date symstarttime;@DateTimeFormat(pattern = "yyyy-MM-dd")@JsonFormat(pattern = "yyyy-MM-dd HH:mm:ss",timezone="GMT+8")private Date symendtime;
我这里就只贴这两个属性了,这里我两个注解都同时使用了,因为我既需要取数据到前台,也需要前台数据传到后台,都需要进行时间格式的转换,可以同时使用
3.通过上面两个步骤之后,我们就可以获取一个符合自定义格式的时间格式存储到数据库了
总结:
注解@JsonFormat主要是后台到前台的时间格式的转换
注解@DataFormAT主要是前后到后台的时间格式的转换
joda钱的实现方式
jpa-complex-demo
@Type(type = "org.jadira.usertype.moneyandcurrency.joda.PersistentMoneyAmount",parameters = {@org.hibernate.annotations.Parameter(name = "currencyCode", value = "CNY")})private Money price;
<dependency><groupId>org.joda</groupId><artifactId>joda-money</artifactId><version>1.0.1</version></dependency><dependency><groupId>org.jadira.usertype</groupId><artifactId>usertype.core</artifactId><version>6.0.1.GA</version></dependency>

若有收获,就点个赞吧
0 人点赞
