项目设计
使用 NAS 进行神经网络搜索共分为两大步:
- 搜索出性能最好的 cell(normal cell 和 reduction cell)。
- 使用 cell 进行堆叠得到 network 并训练它。
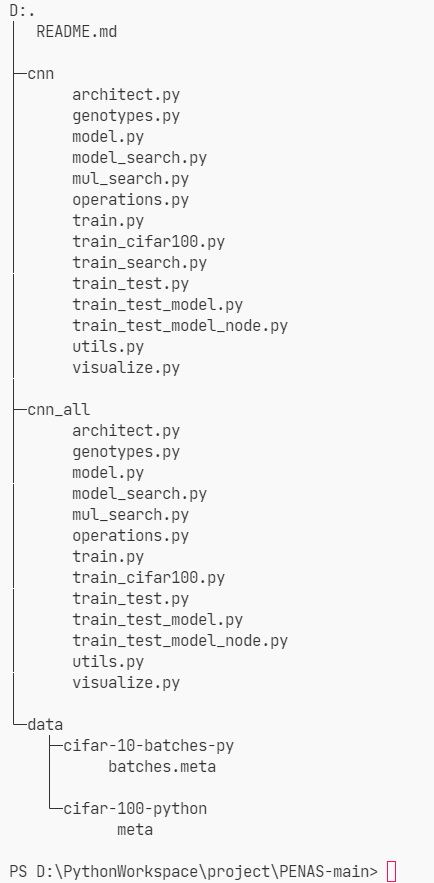
根据上述步骤,设计的项目结构如下:
- cnn 用于搜索单个 cell;
- cnn_all 用于存储搜索好的 cell 并进行堆叠得到 network,然后训练 network;
- data 用于存储数据集,分为训练数据和验证数据。
代码结构设计
本项目的代码是在 DARTS 模型源码的基础上进行改写的,因此重点讲解与 DARTS 模型不同的部分,关于 DARTS 模型源码的解析,源代码里有较多的注释。
cnn 与 cnn_all 内代码结构非常相似,了解其中一个即可。
- architecture.py:网络底层结构,包括正向传播和反向传播。
- genotypes.py:搜索完后,存储搜索好的结构进行训练。
- model.py 和 model_search.py:DARTS 模型 Cell 单元计算与拼接。
- mul_search.py:核心部分,搜索算法的调整与实现。
- operations.py:搜索空间的各项操作。
- train.py:核心部分,main 函数所在,实现网络搜索和评估过程。
- train_cifar100:同上,用 cifar-100 数据集。
- train_test.py:同上,用于测试,无作用。
- train_test_model.py 和 train_test_model_node.py:改写后的 Cell 单元计算与拼接。
- util.py:全局公用函数。
- visualize.py:网络层图片生成,用于观察最终训练得到的 normal_cell 和 reduction_cell。
Cell 的定义
在 train_test_model_node.py 中定义 Cell 类:
DARTS 模型通过给每个操作赋予权重,然后加权加和得到混合操作,再对权重进行梯度下降,最后选择其中最好的操作,而这里改成了根据入参直接选择其中一个(其实是根据概率的选择)。
# Cell 定义class Cell(nn.Module):def __init__(self, steps, multiplier, C_prev_prev, C_prev, C, reduction, reduction_prev, genotype):super(Cell, self).__init__()self.reduction = reduction# input nodes的结构固定不变,不参与搜索# 决定第一个input nodes的结构,取决于前一个cell是否是reductionif reduction_prev:self.preprocess0 = FactorizedReduce(C_prev_prev, C, affine=False)else:#第一个input_nodes是cell k-2的输出,cell k-2的输出通道数为C_prev_prev,所以这里操作的输入通道数为C_prev_prevself.preprocess0 = ReLUConvBN(C_prev_prev, C, 1, 1, 0, affine=False)self.preprocess1 = ReLUConvBN(C_prev, C, 1, 1, 0, affine=False)self._steps = steps # 每个cell中有4个节点的连接状态待确定self._multiplier = multiplierself._ops = nn.ModuleList() # 构建operation的modulelistself._bns = nn.ModuleList()# for i in range(self._steps):# for j in range(2+i):# stride = 2 if reduction and j < 2 else 1# op = MixedOp(C, stride)# self._ops.append(op)# 不再加权求和计算混合操作# 而是直接选if reduction:op_names, self.indices = zip(*genotype.reduce)self._concat = genotype.reduce_concatelse:op_names, self.indices = zip(*genotype.normal)self._concat = genotype.normal_concatfor i in range(14):stride = 2 if reduction and self.indices[i] < 2 else 1op = MixedOp(C, stride, op_names[i])self._ops.append(op)#def forward(self, s0, s1, weights):# cell中的计算过程,前向传播时自动调用# 可以看到与原来相比少了 weights 参数def forward(self, s0, s1):s0 = self.preprocess0(s0)s1 = self.preprocess1(s1)states = [s0, s1] # 当前节点的前驱节点offset = 0#遍历每个intermediate nodes,得到每个节点的outputfor i in range(self._steps):s = sum(self._ops[offset+j](h) for j, h in enumerate(states))offset += len(states)# 把当前节点i的output作为下一个节点的输入# states中为[s0,s1,b1,b2,b3,b4] b1,b2,b3,b4分别是四个intermediate output的输出# 对intermediate的output进行concat作为当前cell的输出states.append(s)# for i in range(self._steps):# s = self._ops[2*i](states[self.indices[2*i]])# s = s + self._ops[2*i+1](states[self.indices[2*i+1]])# states.append(s)#return torch.cat([states[i] for i in self._concat], dim=1)# dim=1是指对通道这个维度concat,所以输出的通道数变成原来的4倍return torch.cat(states[-self._multiplier:], dim=1)
混合操作
在 train_test_model_node.py 中定义 MixedOp 类,前面提到的 DARTS 模型的混合操作被改为根据概率选择,但仍沿用了类名 MixedOp:
# 混合操作class MixedOp(nn.Module):def __init__(self, C, stride, primitive):super(MixedOp, self).__init__()self._ops = nn.ModuleList()# 不再采用 DARTS 模型里通过给每个操作赋予权重# 然后加权求和得到混合操作的方式# 而是直接选择其中一个op = OPS[primitive](C, stride, False)if 'pool' in primitive:op = nn.Sequential(op, nn.BatchNorm2d(C, affine=False)) # 给池化操作后面加一个batchnormalizationself._ops.append(op)# def forward(self, x, weights):# return sum(w * op(x) for w, op in zip(weights, self._ops))def forward(self, x):op = self._ops[0]return op(x)
Cell 的搜索
DARTS 模型通过梯度下降搜索 Cell 结构,需要面对一个双层优化问题,经过一系列近似操作,也给出了近似算法,但本项目是基于概率进行搜索的,在 mul_search.py 中实现了搜索策略的调整,代码较长,这里仅理一下逻辑。
# 导入相关库import ...# 定义 MUL 类class MUL(nn.Module):# 初始化def __init__(self, steps=4, multiplier=4):super(MUL, self).__init__()self._steps = stepsself._multiplier = multiplierself.base = 0.02self._initialize_alphas()# 初始化 alphadef _initialize_alphas(self):......# normal_cell 的 alpha 初始化self.alphas_normal = {"opt":np.zeros((k, num_ops)),"epoch":np.zeros((k, num_ops)),"accurcy":np.zeros((k, num_ops))}for x in range(k):for j in range(num_ops):self.alphas_normal["opt"][x][j]=1/7.0 # 等概率 1/7self.alphas_normal["opt"][x][0]=0.0# reduction_cell 的 alpha 初始化self.alphas_reduce# normal_cell 的 edge 初始化self.edge_normal = {"edge":np.array([0.5,0.5,1/3.0,1/3.0,1/3.0,0.25,0.25,0.25,0.25,0.2,0.2,0.2,0.2,0.2]),"epoch":np.zeros((k,1)),"accurcy":np.zeros((k,1))}# reduction_cell 的 edge 初始化self.edge_reduce = ......# 单次搜索两个节点def genotype(self):#def _parse(weights,pros):......return gene.......return genotype# 搜索边def genotype_edge(self):def _parse(weights,pros):# 更新概率,需要依靠 accurcy 和 epoch 表def update_probability(self,accurcy,genotype):# 更新 accurcy 和 epoch 表def updating(a1, a2, b1, b2):def update(accurcy,weightN,weightR):# 更新选择每条边的概率def update_probability_edge(self,accurcy,genotype):def renew():def update(accurcy,weightN,weightR):# 保存参数def save(self):# 加载参数def load(self):# 搜索全部节点def genotype_all(self):#def _parse(weights,pros):
Cell 的训练
在 train.py 中的 main 函数,损失函数和优化器定义如下:
# 交叉熵损失函数criterion = nn.CrossEntropyLoss()criterion = criterion.cuda()# 用于优化权重w的带动量的SGD优化器optimizer = torch.optim.SGD(model.parameters(),args.learning_rate,momentum=args.momentum,weight_decay=args.weight_decay)
训练集与验证集的拆分:
# 原来训练集的前半部分作为现在的训练集train_queue = torch.utils.data.DataLoader(train_data, batch_size=args.batch_size, shuffle=True, pin_memory=True, num_workers=2)# 原来训练集的后半部分作为现在的验证集valid_queue = torch.utils.data.DataLoader(valid_data, batch_size=args.batch_size, shuffle=False, pin_memory=True, num_workers=2)# 优化权重w时,学习率调整用的是余弦退火(SGDR),但只训练50个epoch,其实就相当于cos学习率衰减,没有周期变化scheduler = torch.optim.lr_scheduler.CosineAnnealingLR(optimizer, float(args.epochs))
迭代训练:
for epoch in range(args.epochs):#scheduler.step()logging.info('epoch %d lr %e', epoch, scheduler.get_lr()[0])model.drop_path_prob = args.drop_path_prob * epoch / args.epochs# 进行训练train_acc, train_obj = train(train_queue, model, criterion, optimizer)logging.info('train_acc %f', train_acc)# 进行验证with torch.no_grad():valid_acc, valid_obj = infer(valid_queue, model, criterion)logging.info('valid_acc %f', valid_acc)# 保存一下模型scheduler.step()utils.save(model, os.path.join(args.save, 'weights.pt'))
验证函数和验证函数:
def train(train_queue, model, criterion, optimizer):def infer(valid_queue, model, criterion):
使用训练集进行训练,包括前向传播和反向传播;验证使用验证集,相同的损失函数。
Cell 堆叠构建 Network
在 train_test_model_node.py 中定义 Network 类:
# 神经网络定义class Network(nn.Module):def __init__(self, C, num_classes, layers, genotype, steps=4, multiplier=4, stem_multiplier=3):super(Network, self).__init__()self._C = C #初始通道数self._num_classes = num_classesself._layers = layers#self._criterion = criterionself._steps = steps # 一个基本单元cell内有4个节点需要进行operation操作的搜索self._multiplier = multiplierC_curr = stem_multiplier*C # 当前Sequential模块的输出通道数self.stem = nn.Sequential(nn.Conv2d(3, C_curr, 3, padding=1, bias=False), #前三个参数分别是输入图片的通道数,卷积核的数量,卷积核的大小nn.BatchNorm2d(C_curr) # BatchNorm2d对minibatch 3d数据组成的4d输入进行batchnormalization操作,num_features为(N,C,H,W)的C)C_prev_prev, C_prev, C_curr = C_curr, C_curr, Cself.cells = nn.ModuleList() # 创建一个空modulelist类型数据reduction_prev = False # 连接的前一个cell是否是reduction cellfor i in range(layers): # 网络是8层,在1/3和2/3位置是reduction cell 其他是normal cell,reduction cell的stride是2if i in [layers//3, 2*layers//3]: # 对应论文的Cells located at the 1/3 and 2/3 of the total depth of the network are reduction cellsC_curr *= 2reduction = Trueelse:reduction = False# 构建cell# 每个cell的input nodes是前前cell和前一个cell的输出cell = Cell(steps, multiplier, C_prev_prev, C_prev, C_curr, reduction, reduction_prev, genotype)reduction_prev = reductionself.cells += [cell]# C_prev=multiplier*C_curr是因为每个cell的输出是4个中间节点concat的,这个concat是在通道这个维度,所以输出的通道数变为原来的4倍C_prev_prev, C_prev = C_prev, multiplier*C_currself.global_pooling = nn.AdaptiveAvgPool2d(1) #构建一个平均池化层,output size是1x1self.classifier = nn.Linear(C_prev, num_classes) #构建一个线性分类器def forward(self, input):s0 = s1 = self.stem(input)for i, cell in enumerate(self.cells):s0, s1 = s1, cell(s0, s1)out = self.global_pooling(s1)logits = self.classifier(out.view(out.size(0),-1))return logits
Network 训练
与 Cell 的训练差不多,不再赘述。
工具类解析
在 util.py 中定义了许多全局公用函数,仅说明作用:
import osimport numpy as npimport torchimport shutilimport torchvision.transforms as transforms# 用于计算平均值class AvgrageMeter(object):def __init__(self):def reset(self):def update(self, val, n=1):# 求top-k精度def accuracy(output, target, topk=(1,)):# 数据增强:Cutout,生成一个边长为length的正方形遮掩(越过边界的话就变成矩形了)class Cutout(object):# 用于CIFAR的数据增强操作def _data_transforms_cifar10(args):# 统计参数量(MB)def count_parameters_in_MB(model):# 保存checkpoint,同时如果是最好模型的话也会copy一下def save_checkpoint(state, is_best, save):# 保存模型def save(model, model_path):# 载入模型def load(model, model_path):# 随机丢弃路径,来自FractalNetdef drop_path(x, drop_prob):# 创建文件夹,copy文件的一些操作def create_exp_dir(path, scripts_to_save=None):

