1.前言
我们知道,在Netty中使用了一套管道模式来处理网络传输上的数据,虽然Netty分为了ChannelInboundHandler和ChannelOutboundHandler两个实现,但是都是在存在同一个管道中,只是调用的时候分开了,接下来我们看看在Netty中具体是如何实现的。
2.结构
我们知道管道模式中,首先得有一个容器让链路在容器之中,所以ChannelPipeline就刚好充当这容器的角色。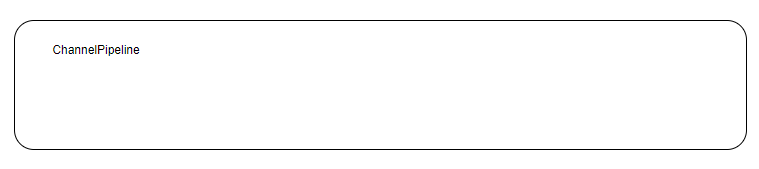
有了容器之后,我们就要开始准备组成我们的链路了,对于链路的方式,第一时间想到的数据结构就是链表了,所以链路的组成是一个链表的类,在Netty中实现链路的类是ChannelHandlerContext接口的实现类。链表如下。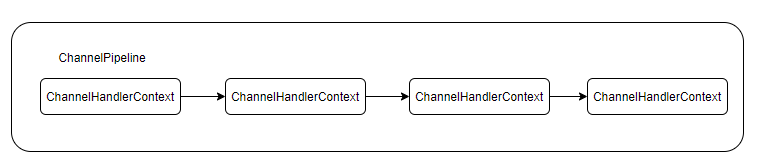
我们知道数据出入栈的逻辑具体在ChannelHandler中实现的,所以这里的ChannelHandlerContext的作用就是类似于一个阀门,可以控制管道的流通以及通过同步还是异步调用等逻辑进行封装。其中也是关联这HandlerContext来执行具体的出入栈逻辑.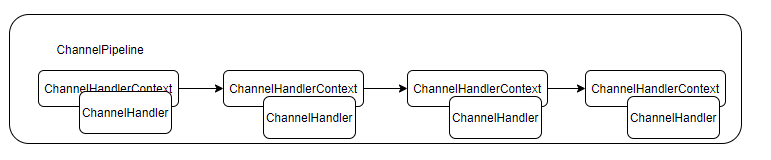
现在我们pipeline的具体细节有了,还差最后一个就是对pipeline生命周期的管理了,只需在pipeline外面在包一层,即可对pipeline进行管理,也就是我们的Channel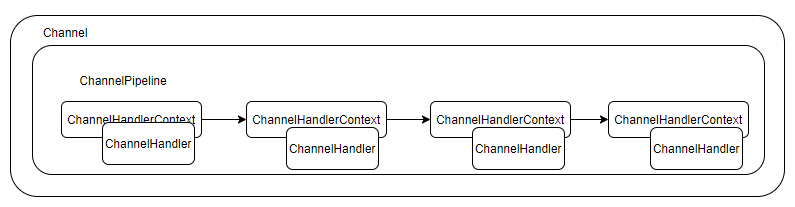
以上就是我们netty中关于管道的完整视图了。
3.源码分析
通过上面的图我们已经知道这些接口的具体职责,那么接下来我们就具体分析源码中的实现,首先看看一个正常的netty配置是怎样样的。
EventLoopGroup bossGroup = new NioEventLoopGroup(1);// 工作线程组,老板线程组会把任务丢给他,让手下线程组去做任务,服务客户EventLoopGroup workerGroup = new NioEventLoopGroup();final EchoServerHandler serverHandler = new EchoServerHandler();try {// 用于配置Server相关参数,并启动ServerServerBootstrap b = new ServerBootstrap();// 配置parentGroup和ChildGroupb.group(bossGroup, workerGroup)// 配置通道.channel(NioServerSocketChannel.class)// 配置通道的ChannelPipeline.option(ChannelOption.SO_BACKLOG, 100).handler(new LoggingHandler(LogLevel.INFO)).childHandler(new ChannelInitializer<SocketChannel>() {@Overridepublic void initChannel(SocketChannel ch) throws Exception {ChannelPipeline p = ch.pipeline();if (sslCtx != null) {p.addLast(sslCtx.newHandler(ch.alloc()));}//p.addLast(new LoggingHandler(LogLevel.INFO));// p.addLast(serverHandler);p.addLast(new EchoClientHandler());}});// 绑定端口,并启动server,同时设置启动方式为同步// Start the server.ChannelFuture f = b.bind(PORT).sync();// 等待服务端监听端口关闭// Wait until the server socket is closed.f.channel().closeFuture().sync();
3.1 Channel
在启动netty时,我们指定了netty的channel为NioServerSocketChannel,netty会默认使用一个channel的工厂类
// channelClass:NioServerSocketChannelpublic B channel(Class<? extends C> channelClass) {return channelFactory(new ReflectiveChannelFactory<C>(ObjectUtil.checkNotNull(channelClass, "channelClass")));}
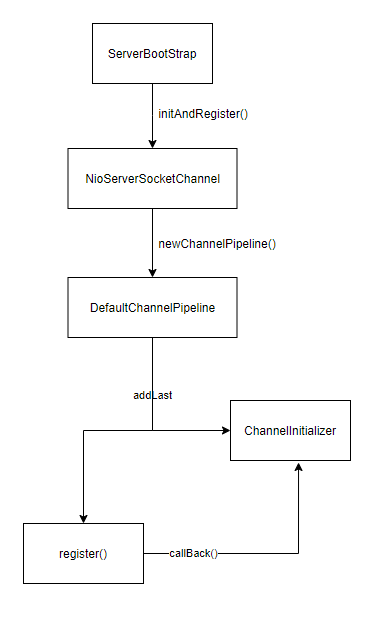
在BootStrap进行端口绑定时b.bind(PORT),就开始通过构造器的newInstance生成NioServerSocketChannel的实例对象
final ChannelFuture initAndRegister() {Channel channel = null;try {// 调用工厂的实例化方法channel = channelFactory.newChannel();init(channel);}}
现在我们知道netty默认提供的Channel类就是NioServerSocketChannel,看下其中的继承结构图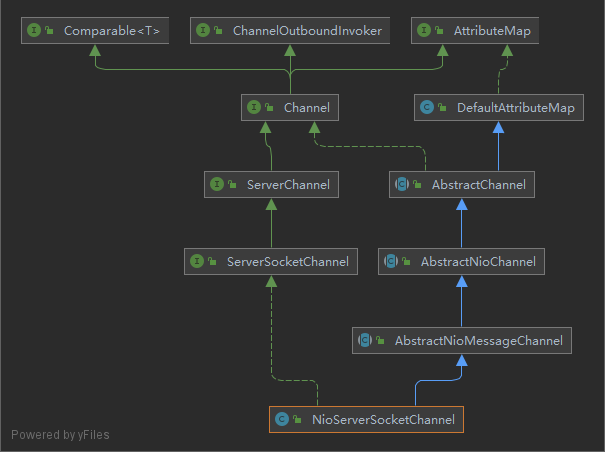
在NIO中Channel可以用来对我们的网络数据进行读写等操作,这里不做过多讨论,只关注pipeline的部分。接下来对Channel的元数据进行分析,既然channel能对pipeline进行管理,那么channel中肯定存在着对pipeline对象的引用。在AbstractChannel中
private final DefaultChannelPipeline pipeline;
通过代码发现,pipeline的生成是在AbstractChannel的构造函数中,也就是生成NioServerSocketChannel对象时,就会默认为我们生成一个DefaultChannelPipeline对象
protected AbstractChannel(Channel parent) {this.parent = parent;id = newId();unsafe = newUnsafe();// 默认生成pipelinepipeline = newChannelPipeline();}
在Channel类生成后,netty会添加一个默认的ChannelHandler加入到链表中,后面在调用channel的注册方式时,会执行里面的回调逻辑,讲我们配置的handler(new LoggingHandler(LogLevel.INFO))加入到链表中
p.addLast(new ChannelInitializer<Channel>() {@Overridepublic void initChannel(final Channel ch) {final ChannelPipeline pipeline = ch.pipeline();ChannelHandler handler = config.handler();if (handler != null) {pipeline.addLast(handler);}ch.eventLoop().execute(new Runnable() {@Overridepublic void run() {pipeline.addLast(new ServerBootstrapAcceptor(ch, currentChildGroup, currentChildHandler, currentChildOptions, currentChildAttrs));}});}});
3.2 ChannelPipeline
在Netty创建的默认的Channel实现类中,在其构造函数里会默认帮我们生成一个ChannelPipeline类,其默认实现类是DefaultChannelPipeline。如下图所示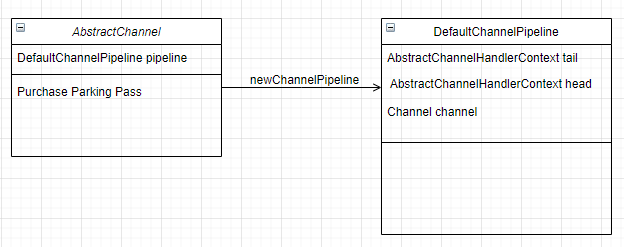
我们先想想pipeline相当于一个容器,管理着里面的链路,那么肯定得保存着链路的引用,所以有如下两个元数据
// 头节点final AbstractChannelHandlerContext head;// 尾节点final AbstractChannelHandlerContext tail;
pipeline是存在于Channel中,所以也需要一个Channel的引用
private final Channel channel;
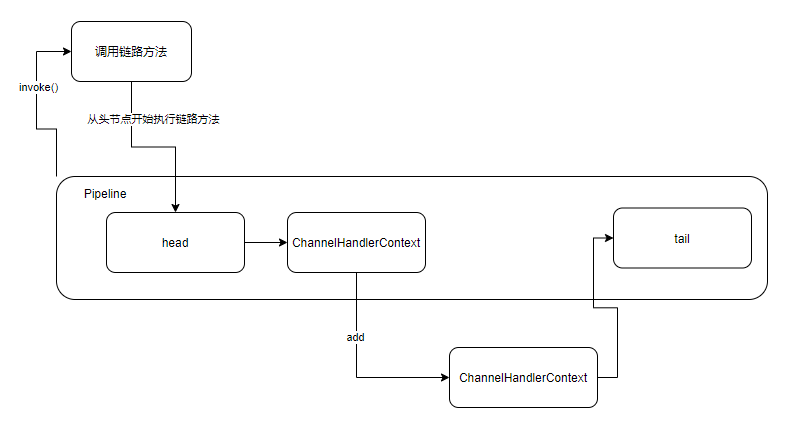
接下来我们看看在该类的构造函数,可以看到在创建管道时,会默认为管道生成头尾两个ChannelHandlerContext,也就是说我们的链路执行一定是最开始执行HeadContext,最后执行TailContext
protected DefaultChannelPipeline(Channel channel) {this.channel = ObjectUtil.checkNotNull(channel, "channel");succeededFuture = new SucceededChannelFuture(channel, null);voidPromise = new VoidChannelPromise(channel, true);tail = new TailContext(this);head = new HeadContext(this);head.next = tail;tail.prev = head;}
pipeline主要作用就是对链表的节点进行管理和调度,我们这里讨论,pipeline对链表的调度分析,通过源码的接口分析,pipeline对链表的调度有如下方法
// ChannelHandlerContext注册事件@OverrideChannelPipeline fireChannelRegistered();// ChannelHandlerContext取消注册事件@OverrideChannelPipeline fireChannelUnregistered();// 活动事件@OverrideChannelPipeline fireChannelActive();// 生命周期结束事件@OverrideChannelPipeline fireChannelInactive();// 异常捕获@OverrideChannelPipeline fireExceptionCaught(Throwable cause);// 如果触发了用户事件,则被调用。@OverrideChannelPipeline fireUserEventTriggered(Object event);// 数据读取事件@OverrideChannelPipeline fireChannelRead(Object msg);// 数据读取完成事件@OverrideChannelPipeline fireChannelReadComplete();// channel读写状态变更事件@OverrideChannelPipeline fireChannelWritabilityChanged();
pipeline提供了对出入站数据处理的调用逻辑,默认都会从head头节点开始调用
@Overridepublic final ChannelPipeline fireChannelActive() {AbstractChannelHandlerContext.invokeChannelActive(head);return this;}
3.3 ChannelHandlerContext
我们知道管道中的链路是由一个个ChannelHandlerContext实现类组成,其中netty为我们提供的抽象父类为AbstractChannelHandlerContext类,每个pipeline中的节点都继承了该父类,那么我们就对该类的元数据进行分析。
pipeline的链路是由一个双向链表组成的,那么我们需要一个上下节点的引用关系,如下
volatile AbstractChannelHandlerContext next;volatile AbstractChannelHandlerContext prev;
再然后我们的链表要依托在哪个管道中执行,所以还存着管道的对象
private final DefaultChannelPipeline pipeline;
我们知道ChannelHandlerContext充当着管道阀的作用,那么阀自然就有状态去控制去开启还是关闭,在ChannelHandlerContext有如下几个状态
// 添加中private static final int ADD_PENDING = 1;// 添加完成private static final int ADD_COMPLETE = 2;// 移除private static final int REMOVE_COMPLETE = 3;// 初始化private static final int INIT = 0;
然后在我们执行的时候,首先就会判断当前ChannelHandlerContext所处的状态,以读取数据方法为例
- 首先判断所处的状态是否为ADD_COMPLETE或者状态处于ADD_PENDING且ordered是无序的
- 如果为true,则执行
ChannelHandler的事件
通过这样,即便当前节点被加入到了链表中,但是状态值不对的话,那这个处理器是不会执行的
private void invokeChannelRead(Object msg) {// 如果返回false,则不会调用channelHandlerif (invokeHandler()) {try {// 执行handler事件((ChannelInboundHandler) handler()).channelRead(this, msg);} catch (Throwable t) {invokeExceptionCaught(t);}} else {// 选取下个节点fireChannelRead(msg);}}private boolean invokeHandler() {// Store in local variable to reduce volatile reads.int handlerState = this.handlerState;// 判断状态return handlerState == ADD_COMPLETE || (!ordered && handlerState == ADD_PENDING);}
接下来我们就对这几个状态进行分析
在AbstractChannelHandlerContext类中,有个handlerState字段标注当前阀所处的状态,其源码如下
private volatile int handlerState = INIT;
可以发现所有ChannelHandlerContext的初始状态都是init,即0。那么阀的状态在什么时候会进行变更呢?我们设想一下如果想改变当前阀的状态一般有两种方法
- 一个是在当前类
ChannelHandlerContext主动调用进行状态变更 - 调用该类的类中进行变更,即我们的pipeline中对链表节点的状态进行变更。
在pipeline中进行状态的变更好处就是可以让ChannelHandlerContext只需关注自己的逻辑而无需控制状态,在netty中采用的是第二种方式,pipeline的主要作用就是对其中的链表进行管理,所以关于状态变更的逻辑也在添加、删除节点中进行了调用,下面看下pipeline中addLast方法的实现
@Overridepublic final ChannelPipeline addLast(EventExecutorGroup group, String name, ChannelHandler handler) {final AbstractChannelHandlerContext newCtx;synchronized (this) {checkMultiplicity(handler);newCtx = newContext(group, filterName(name, handler), handler);// 添加到tail节点前addLast0(newCtx);// 如果该值为false时,表示当前channel还没有注册到eventloop上// 此时会将context的状态设置为if (!registered) {// 修改context状态为ADD_PENDINGnewCtx.setAddPending();callHandlerCallbackLater(newCtx, true);return this;}EventExecutor executor = newCtx.executor();if (!executor.inEventLoop()) {callHandlerAddedInEventLoop(newCtx, executor);return this;}}// 后面进来的context会将状态直接设置为ADD_COMPLETEcallHandlerAdded0(newCtx);return this;}
具体只关系状态变更的逻辑,流程如下
- 首先会判断当前channel是否注册到eventloop上
- 如果没有,那么设置当前context的状态为pending
- 同时将当前context添加到PendingHandlerCallback类的链表中
- 如果当前pipeline的registered属性为true的话,那么下面就直接将context的状态为complete
PendingHandlerCallback类实际上是一个线程,我们初始的数据加入到该链表中后,后面netty会执行该线程,并执行callHandlerAdded()方法,将context的状态设置为complete,并且执行handlerAdd回调方法
这时我们已经有个大概的了解了,在pipeline对链表节点进行添加删除时,还会对context的状态进行变更,其中变更的方法如下
final void callHandlerAdded() throws Exception {if (setAddComplete()) {handler().handlerAdded(this);}}
可以看到,在设置了context的状态后,同时还触发了context的一个添加事件。那么这里就明确了在context状态变更的时候会伴随着回调事件的发生,查看源码发现,context只有两个事件,一个是添加事件,一个是删除事件。
- 当状态变为complete时,执行handlerAdded回调事件
当状态变为REMOVE_COMPLETE时,执行handlerRemoved回调事件
public interface ChannelHandler {/*** Gets called after the {@link ChannelHandler} was added to the actual context and it's ready to handle events.*/void handlerAdded(ChannelHandlerContext ctx) throws Exception;/*** Gets called after the {@link ChannelHandler} was removed from the actual context and it doesn't handle events* anymore.*/void handlerRemoved(ChannelHandlerContext ctx) throws Exception;}
当然这些事件只会执行一次。
最后我们在对context进行一个总结和回顾
首先context使我们pipeline中比较重要的一个环节,他是我们链路的主要载体,所有的节点之间构成一个双向链表组成一个pipeline,其中netty默认指定了头节点和尾节点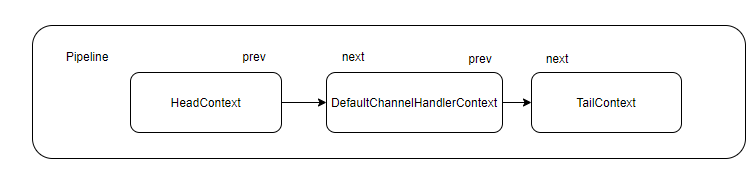
通过之前对context的元数据分析,我们知道context有4个状态,状态的流转如下,其中complete和remove状态还对应着两个回调事件供我们处理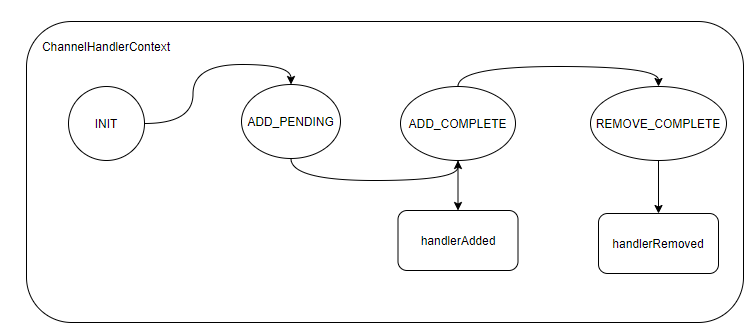
当然ChannelHandlerContext的方法还远不止这些,剩下的通过ChannelHandler一起探寻。3.4 ChannelHandler
ChannelHandler中分为ChannelInboundHandler和ChannelOutboundHandler,这两个接口只是分别用于入站和出站的处理,这里我们只讨论Inbound的逻辑。在我们平时开发时,一般要实现ChannelHandler只需要继承SimpleChannelInboundHandler类实现其中的方法即可,那我们就从这个地方开始,首先看下类图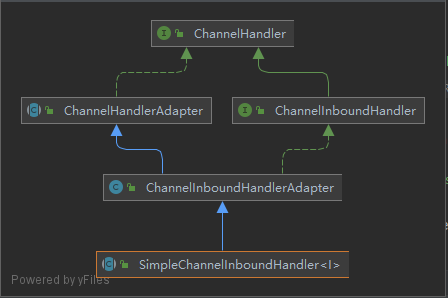
对于我们使用者来说,一般不出意外继承SimpleChannelInboundHandler就行了,在Adapter中封装了一些公共的逻辑,比如Context的注册等。
这里我们看下ChannelHandler和ChannelInBoundHandler中的方法有哪些public interface ChannelHandler {/*** 添加到链路中时执行*/void handlerAdded(ChannelHandlerContext ctx) throws Exception;/*** 移除到链路中时执行*/void handlerRemoved(ChannelHandlerContext ctx) throws Exception;}
```java public interface ChannelInboundHandler extends ChannelHandler {
void channelRegistered(ChannelHandlerContext ctx) throws Exception;
void channelUnregistered(ChannelHandlerContext ctx) throws Exception;
void channelActive(ChannelHandlerContext ctx) throws Exception;
void channelInactive(ChannelHandlerContext ctx) throws Exception;
void channelRead(ChannelHandlerContext ctx, Object msg) throws Exception;
void channelReadComplete(ChannelHandlerContext ctx) throws Exception;
void userEventTriggered(ChannelHandlerContext ctx, Object evt) throws Exception;
void channelWritabilityChanged(ChannelHandlerContext ctx) throws Exception;
void exceptionCaught(ChannelHandlerContext ctx, Throwable cause) throws Exception; }
通过方法名可以发现,都是一些生命周期的回调方法,下面直接给ChannelHandler的生命周期调用顺序<br />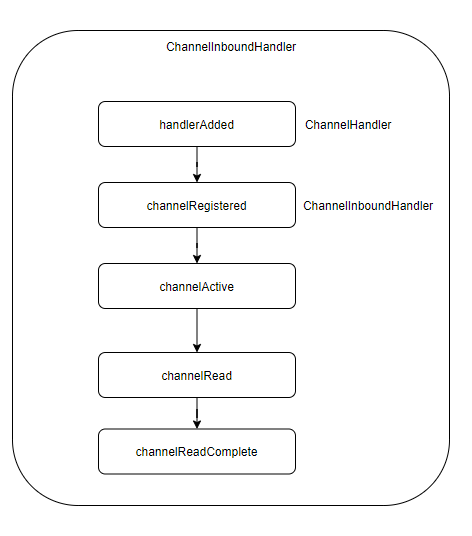<br />对于前两个事件,添加和注册则是在启动netty时注册Channel的时候进行调用,其逻辑如下```javaprivate void register0(ChannelPromise promise) {try {// 执行addpipeline.invokeHandlerAddedIfNeeded();safeSetSuccess(promise);// 执行registerpipeline.fireChannelRegistered();// Only fire a channelActive if the channel has never been registered. This prevents firing// multiple channel actives if the channel is deregistered and re-registered.if (isActive()) {if (firstRegistration) {// 执行activepipeline.fireChannelActive();} else if (config().isAutoRead()) {beginRead();}}} catch (Throwable t) {// Close the channel directly to avoid FD leak.closeForcibly();closeFuture.setClosed();safeSetFailure(promise, t);}}
上面简化了部分代码,不过关于handler的声明周期调用还是很明显的。其中active方法只有netty进行读写时首先会经过ServerBootStrap在启动时默认添加进链表的一个节点ServerBootstrapAcceptor,在节点在读取数据是,会调用一次AbstractChannel的register方法,这时会调用链路的fireChannelActive方法。
对上面的逻辑捋一捋其实就是,在进行ChannelRead方法时,还伴随着ChannelHandler整个生命周期的调用。

若有收获,就点个赞吧
0 人点赞
