创建IOKit驱动工程
Info.plist中添加OSBundleLibraries 查看内核扩展依赖:
http://mirror.informatimago.com/next/developer.apple.com/documentation/Darwin/Conceptual/KEXTConcept/KEXTConceptDependencies/kext_dependencies.html#//apple_ref/doc/uid/20002370-BABFGHCJ
怎么列举kernel depend?确定kernel depend的版本?
编辑IOKitPersonalities定义了驱动支持的硬件设备信息。没有设置个信息的话,IOKit就不知道什么时候,如何加载这个驱动。
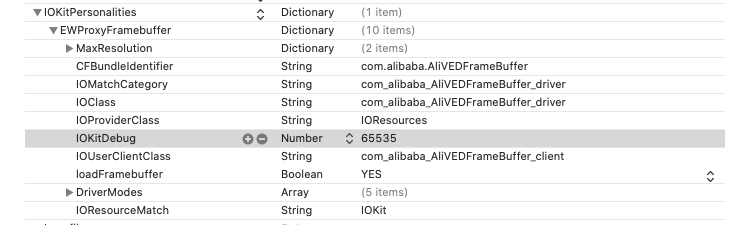
IOResources 是特殊的nub,可以作为没有硬件的驱动(既是虚拟驱动)的provider
这个字典包含一下基本Key
- IOClass – Names the C++ class that will be instantiated by I/O Kit if a driver matches a nub.
- IOProviderClass – Defines a driver’s provider class type. Usually, it’s the nub controlling the port that the device connects to.
- IOMatchCategory – Allows multiple drivers to match the same provider class. A driver should include this property if it matches IOResources or is on a port with multiple devices attached to it.
- IOResourceMatch – Specifies a dependency to a specific resource. If the specified resource is unavailable, a driver won’t be loaded into the kernel.
- IOProbeScore – Specifies the initial match score for a particular driver. The purpose of the probe score will be covered in the following sections.
- IOKitDebug – Indicates specific I/O Kit events that should be logged in the kernel log (/var/log/kernel.log).
- IOUserClient – Defines the class type of the driver’s user interface.
IOKitTest.hpp
#include <IOKit/IOService.h>#ifndef IOKitTest_hpp#define IOKitTest_hppclass com_apple_driver_IOKitTest : public IOService {//一个宏定义,会自动生成该类的构造方法、析构方法和运行时OSDeclareDefaultStructors(com_apple_driver_IOKitTest);public:// 该方法与cocoa中init方法和C++中构造函数类似virtual bool init(OSDictionary *dict = 0) APPLE_KEXT_OVERRIDE;// 该方法与cocoa中dealloc方法和c++中析构函数类似virtual void free(void) APPLE_KEXT_OVERRIDE;// 进行驱动匹配时调用virtual IOService *probe(IOService *provider, SInt32 *score) APPLE_KEXT_OVERRIDE;// 进行加载时调用virtual bool start(IOService *provider) APPLE_KEXT_OVERRIDE;// 进行卸载时调用virtual void stop(IOService *provider) APPLE_KEXT_OVERRIDE;};#endif /* IOKitTest_hpp */
IOTestKit.cpp
bool com_apple_driver_IOKitTest::init(OSDictionary *dict){bool result = super::init(dict);IOLog("IOKitTest : did init !! \n"); // IOlog() 生成log日志, 存在在system.log里/** 遍历OSDictionary */OSCollectionIterator *iter = OSCollectionIterator::withCollection(dict);if (iter){OSObject *object = NULL;while ((object = iter->getNextObject())){OSSymbol *key = OSDynamicCast(OSSymbol, object);IOLog("iRedTest : key:%s ",key->getCStringNoCopy());OSString *value = OSDynamicCast(OSString, dict->getObject(key));if (value != NULL){IOLog("iRedTest : value:%s\n",value->getCStringNoCopy());}}}return result;}
搭建调试环境
目标:远程调试机器内核和内核扩展代码,跟踪内核崩溃问题。
步骤一,需要找到一个可以被调试的内核,内核可以被调试需要满足两个条件。
苹果虽然提供了旧版macOS系统的下载链接(10.15, 10.14, 10.13, 10.12,10.11),很可惜我运气不太好,下载后发现并不能满足调试要求。同事推荐了Mac Downloader这个工具就比较好用了,下载列表里,每个系统版本号后面都带有build号,再去苹果开发者下载中心看看有没有对应build的的KDK,如果有的话,把KDK下载下来后安装好,你就可以在/Library/Developer/KDKs/目录下找到它了。KDK中包含了kernel和各种kext,接下来要试试看能否找到这个KDK说对应的源代码了。挑一个你准备调试的kext模块的.dSYM,用命令查看对应的代码版本信息,这里我关系IOGraphicsFamily这个kext,输入命令xcrun dwarfdump --all /Library/Developer/KDKs/path/to/IOGraphicsFamily.kext.dSYM
可以发现使用的代码版本是IOGraphics-569.3,运气不错,苹果开源网站能找到开源代码,那么目标系统锁定了
10.15.2(19C39d),开始下载系统吧。
步骤二,你需要设置目标机器,也就是被调试的机器。我选择使用vmware Fusion安装虚拟机的方式来。
- 启动虚拟机按Cmd+R进入recovery模式。
- 关闭SIP
csrutil disalbe - 更改boot-args,
sudo nvram boot-args=”debug=0x145 kext-dev-mode=1 kcsuffix=development pmuflags=1 -v”
debug选项解释
0x01- Stop at boot time and wait for the debugger to attach0x02- Send kernel debugging output to the console0x04- Drop into debugger on a nonmaskable interrupt0x08- Send kernel debugging information to a serial port0x10- Make ddb the default debugger0x20- Output diagnostics information to the system log0x40- Allow the debugger to ARP and route0x80- Support old versions of gdb on newer systems0x100- Disable the graphical panic dialog screen
pmuflags=1, 关闭电源芯片的看门狗定时器
- 将文件系统设置为可写,
sudo mount -uw / - 利用KDK中的kernel.development代替kernel,
sudo cp /Library/Developer/path/to/kernel.development /System/Library/Kernel - 清理kext缓存,貌似不是必须的,
sudo kextcache -invalidate - 重启机器。
步骤三:实现源码级别调试
- 重启机器后,电脑会卡住等待调试器远程连接,输入
kdp-remote 172.16.248.136连接调试器。 利用命令source info查看当前代码位置,然后将代码位置重新映射到你本机代码位置。
settings set target.source-map /BuildRoot/Library/Caches/com.apple.xbs
c继续运行,进入系统,随时可以运行sudo dtrace -w -n "BEGIN { breakpoint(); }"进入调试。- 加载你的内核扩展或者你关心的任何系统内核模块 ```shell showallkexts -s Ali #找到你关心的内核模块加载地址
添加模块所在主机的实际位置
addkext -F /Users/zhaorui/AWS/AliProxyFramebuffer/build/Debug/AliVEDFrameBuffer.kext/Contents/MacOS/AliVEDFrameBuffer 0xffffff7f9591d000
添加dSYM
add-dsym /Users/zhaorui/AWS/AliProxyFramebuffer/build/Debug/AliVEDFrameBuffer.kext.dSYM
添加断点
b EWProxyFrameBufferClient.cpp:258
执行操作触发断点进入调试器, gui 进入图形调试器
gui
调试过程中往往还需要关注实时日志,可以使用下面命令```shelllog stream --predicate "process == 'kernel'" | grep AliVEDFrameBufferlog show --predicate 'process == "kernel"' --last 1h | grep AliVEDFrameBuffer
内核崩溃排查(日志符号化)
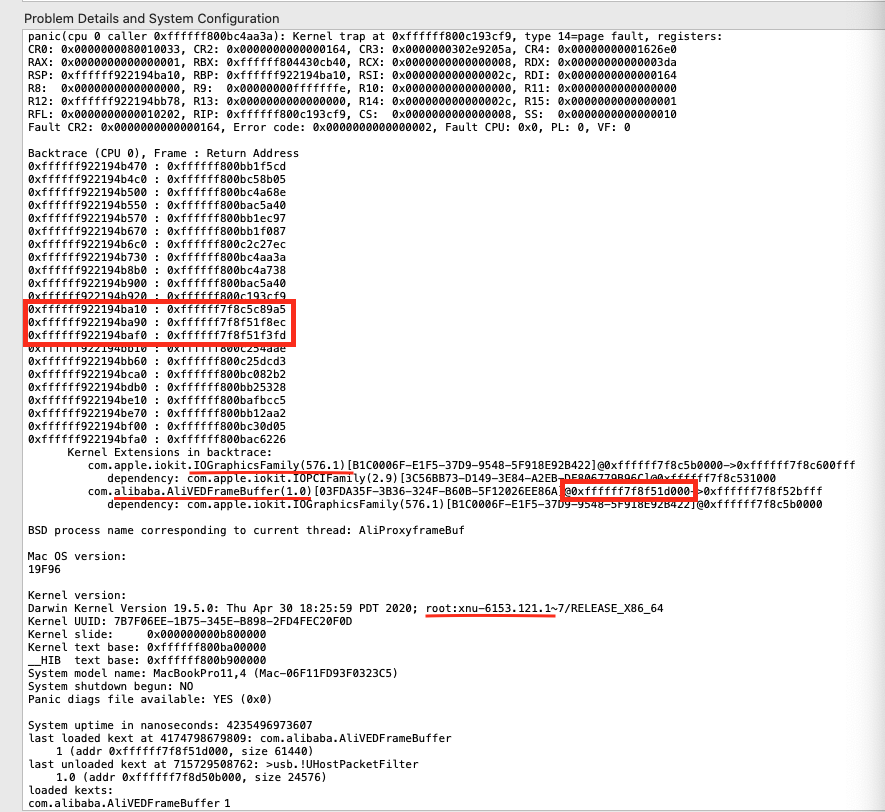
这里只介绍分析我们自己的驱动AliVEDFrameBuffer的崩溃堆栈,内核崩溃堆栈分析方法一样,只要能找到对应版本号的KDK,利用其中的dSYM就能符号化。
xcrun atos -o /Users/zhaorui/Downloads/virtualDisplayDriver+Demo/AliVEDFrameBuffer.kext/Contents/MacOS/AliVEDFrameBuffer -l 0xffffff7f8f51d000 0xffffff7f8f51f8ec
正常结果返回:
com_alibaba_AliVEDFrameBuffer_client::CheckFramebufferState() (in AliVEDFrameBuffer) (EWProxyFrameBufferClient.cpp:279)
查看驱动是否被授权
sudo /usr/bin/sqlite3 /var/db/SystemPolicyConfiguration/KextPolicysqlite> SELECT team_id, bundle_id, allowed, developer_name, flags FROM kext_policy;
参考

若有收获,就点个赞吧
0 人点赞
