前言
在《Eclipse Theia 框架技术架构揭秘》一文中简单介绍了 Theia 框架整体的技术架构,接下来将通过系列文章从源码角度入手看一下 Theia 核心设计思路,本文从启动流程入手开始介绍 Theia 的运行原理。
基础
示例代码结构
根据 Build your own IDE 的文档创建示例工程,工程结构如下:
├── lib # 构建生成的 Bundle 包├── plugins # package.json 中 theiaPlugins 字段配置的插件├── src-gen # 自动生成的工程文件| ├── backend| └── frontend├── gen-webpack.config.js # 自动生成的 Webpack 配置├── package.json # 应用配置包└── webpack.config.js # 引用 gen-webpack.config.js 配置文件
这个工程除了 package.json 和 webpack.config.js 文件外,其他文件都是通过 @theia/cli 包自动生成的,使用 theia build 命令会默认覆盖工程中的文件,为了后续的升级维护,原则上不能直接修改 lib、plugins、src-gen、gen-webpack.config.js,那么我们如果想构建自定义 IDE,显然这种基础的工程结构是不能满足要求的,如果想进一步定制开发脚手架,需要先了解官方默认的运行原理。
package.json 配置
基于 Theia 框架的应用可以在 package.json 中增加 theia、theiaPluginsDir、theiaPlugins 字段的配置,主要分为以下几类:
Application Properties
应用属性配置,例如应用名称:
"theia": {
    "frontend": {
        "config": {
        "applicationName": "Custom Application Name"
        }
    }
},
Default Theme
默认主题配置,例如:
"theia": {
    "frontend": {
        "config": {
        "defaultTheme": "light",
      "defaultIconTheme": "vs-seti"
        }
    }
},
Default Preferences
默认首选项提供了应用运行的默认配置。
"theia": {
    "frontend": {
        "config": {
            "preferences": {
                "files.enableTrash": false
            }
        }
    }
},
Default Generator
配置启动模板:
"theia": {
  "generator": {
    "config": {
      "preloadTemplate": "<div class='theia-preload' style='background-color: rgb(237, 241, 242);'></div>"
    }
  }
}
Build Target & Target Config
Theia 支持 browser 和 electron 两种构建目标,默认目标是 browser。
{
    "theia": {
    "target": "electron",
    "frontend": {
      "config": {
        "electron": {
          "windowOptions": {
            "titleBarStyle": "hidden",
            "webPreferences": {
              "webSecurity": false,
              "nodeIntegration": true,
              "allowRunningInsecureContent": true,
              "webviewTag": true
            }
          }
        }
      }
    }
  },
    "dependencies": {
        "@theia/electron": "latest"
    }
}
Using Latest Builds
使用最新版本
{
    "theia": {
        "next": "true"
    }
}
Theia Plugins
Theia 插件相关的配置,theiaPluginsDir 定义插件下载后存放的位置,theiaPlugins 定义应用依赖的插件。
"theiaPluginsDir": "plugins",
"theiaPlugins": {
    "vscode-builtin-bat": "https://github.com/theia-ide/vscode-builtin-extensions/releases/download/v1.39.1-prel/bat-1.39.1-prel.vsix",
    "vscode-builtin-clojure": "https://github.com/theia-ide/vscode-builtin-extensions/releases/download/v1.39.1-prel/clojure-1.39.1-prel.vsix",
}
Theia CLI 基本命令
| 命令 | 含义及备注 |
|---|---|
| theia build —mode development | 开发模式构建 |
| theia build | 生成模式构建 |
| theia build —watch —mode development | 监听构建 |
| theia clean | 清理构建产物 |
| theia rebuild | electron 目标模式下开发,回滚 Native 模块,切换到 browser 目标模式下等需要执行该命令 |
| theia start | 启动后端服务 |
| theia start —inspect | 调试后端服务 |
| theia download:plugins | 下载插件 |
Theia 源码目录结构
以下目录结构是基于 v1.1.0 版本整理。
├── .github                   # GitHub 配置
├── .theia                    # Theia 配置
├── .vscode                   # VS Code 配置
├── configs                   # 工程 eslint、tsconfig 等配置
├── dev-packages
|   ├── application-manager   # 应用工程管理类,提供 Frontend、Backend、Webpack 代码生成
|   ├── application-package   # 应用 package.json 配置解析,管理 Application、Extensions
|   ├── cli                   # CLI 工具,提供 start、build 等命令
|   ├── electron              # Electron Target 运行环境依赖
|   └── ext-scripts           # Theia package 之间共享 npm scripts
├── doc                                                # 文档
├── examples                  # 示例
├── logo                      # Logo 物料
├── packages                  # 框架模块
|   ├── callhierarchy
|   ├── console
|   ├── core
|   ├── ...
|   └── workspace
├── scripts                   # 工程运行相关的脚本
├── .editorconfig
├── .eslintrc.js
├── .gitignore
├── .gitpod.dockerfile
├── .gitpod.yml
├── .npmignore
├── .travis.yml
├── .yarnrc
├── devfile.yaml
├── lerna.json
├── package.json
├── tsconfig.json
└── tsfmt.json
packages 目录下的子模块,包含如下子目录层级,按不同的平台进行区分:
- common:仅使用基本的 JavaScript API,可以在所有的目标环境中运行的源代码;
- browser:需要使用例如 DOM 等 Browser APIs 等源代码,可能会使用 common 中的代码;
- node:需要使用 Node.js APIs 的源代码,可能会使用 common 中的代码;
- electron-node:需要使用 Node.js APIs 的 Electron 相关的源代码,可能会使用 common 中的代码;
- electron-browser:需要使用 Electron renderer-process APIs 的源代码,可能会使用 common、browser、node 中的代码;
electron-main:需要使用 Electron main-process APIs 的源代码,可能会使用 common、node 中的代码。
Inversify 框架
IoC (Inversion of Control) 容器有依赖注入(Dependency Injection)和依赖查询(Dependency Lookup)两种实现模式。InversifyJS 是一个强大的轻量级 IoC 容器框架,Inversify 中通过依赖注入的模式实现 IoC 容器。
@injectable & @inject
通过
@injectable()装饰器标记可注入的服务;如果目标对象中的构造函数里有@inject()装饰器,则将相应的实例当作构造函数的参数注入,@inject装饰器在运行时可用。/** * The main entry point for Theia applications. */ @injectable() export class BackendApplication { protected readonly app: express.Application = express(); @inject(ApplicationPackage) protected readonly applicationPackage: ApplicationPackage; private readonly _performanceObserver: PerformanceObserver; constructor( @inject(ContributionProvider) @named(BackendApplicationContribution) protected readonly contributionsProvider: ContributionProvider<BackendApplicationContribution>, @inject(BackendApplicationCliContribution) protected readonly cliParams: BackendApplicationCliContribution ) { ... } ... }对于外部库我们无法通过装饰器标识可注入的类,我们可以通过 API 的方法注入:
import { decorate, injectable } from 'inversify';
decorate(injectable(), CLASS_NAME); // CLASS_NAME 是类名
Service
通过 Container 的 bind 方法手动将依赖与容器实现绑定:
bind<T>(serviceIdentifier: ServiceIdentifier<T>): BindingToSyntax<T>;通过服务标志
serviceIdentifier生成绑定对象BindingToSyntax<T>,该对象定义了丰富的绑定函数,诸如to()、toSelf()、toConstantValue()、toFactory()等。可以将多个服务使用相同到serviceIdentifier进行绑定,具体可以参考:Multi-injection。
可以通过 Container 的 get 方法解析依赖:
get<T>(serviceIdentifier: interfaces.ServiceIdentifier<T>): T;
完整实例如下:
let container = new Container({ autoBindInjectable: true });
container.bind(Ninja).to(Samurai);
container.get(Ninja);              // returns a Samurai
可以使用 autoBindInjectable 激活 @injectable() 装饰类的自动绑定:
let container = new Container({ autoBindInjectable: true });
container.isBound(Ninja);          // returns false
container.get(Ninja);              // returns a Ninja
container.isBound(Ninja);          // returns true
ContainerModule
Container modules 可以用来组织复杂应用的模块依赖关系,通过 ContainerModule 初始化容器模块,通过 load 加载模块。
load(...modules: interfaces.ContainerModule[]): void;
同步容器模块:
let warriors = new ContainerModule((bind: interfaces.Bind, unbind: interfaces.Unbind) => {
    bind<Ninja>("Ninja").to(Ninja);
});

let weapons = new ContainerModule(
    (
        bind: interfaces.Bind,
        unbind: interfaces.Unbind,
        isBound: interfaces.IsBound,
        rebind: interfaces.Rebind
    ) => {
        bind<Katana>("Katana").to(Katana);
        bind<Shuriken>("Shuriken").to(Shuriken);
    }
);

let container = new Container();
// 加载模块
container.load(warriors, weapons);
// 卸载模块
container.unload(warriors);
异步容器模块:
let warriors = new AsyncContainerModule(async (bind: interfaces.Bind, unbind: interfaces.Unbind) => {
    const ninja = await getNinja();
    bind<Ninja>("Ninja").toConstantValue(ninja);
});

let weapons = new AsyncContainerModule(
    (
        bind: interfaces.Bind,
        unbind: interfaces.Unbind,
        isBound: interfaces.IsBound,
        rebind: interfaces.Rebind
    ) => {
        bind<Katana>("Katana").to(Katana);
        bind<Shuriken>("Shuriken").to(Shuriken);
    }
);

let container = new Container();
// 加载模块
await container.loadAsync(warriors, weapons);
// 卸载模块
container.unload(warriors);
PhosphorJS 框架
Theia 框架前端 UI 布局和 Services 一样,具备灵活可拓展的特点。VS Code 是内置了一套基本的组件系统,而 Theia 框架的 UI 布局基于 PhosphorJS 框架。 PhosphorJS 提供了一组丰富的小部件,布局,事件和数据结构。
@phosphor/widgets
PhosphorJS Widge 提供了一套组件机制,通过 JS 代码的方式构建 UI 组件,同时可以和其他组件配合使用。
import { Widget } from '@phosphor/widgets';
let widget = new Widget();
let div = document.createElement('div');
widget.node.appendChild(div);
操作 CSS 类名:
let widget = new Widget();
widget.id = 'main';
widget.addClass('foo');
widget.addClass('bar');
widget.removeClass('foo');
widget.toggleClass('bar', false);
将 Widget 附加到 DOM 元素上:
let widget = new Widget();
widget.attach(document.body);
将 Widget 从 DOM 上分离:
let widget = new Widget();
widget.attach(document.body);

// 方法1
widget.detach();
// 方法2
widget.dispose();
@phosphor/messaging
MessageLoop 提供了 sendMessage 发送同步消息 和 postMessage 发送异步消息。
import { IMessageHandler, Message, MessageLoop } from '@phosphor/messaging';

class Handler implements IMessageHandler {
  processMessage(msg: Message): void {
    console.log(msg.type);
  }
}

let handler = new Handler();
MessageLoop.sendMessage(handler, new Message('one'));    // logs 'one'
MessageLoop.postMessage(handler, new Message('two'));    // sometime later: logs 'two'
可以通过 MessageLoop.installMessageHook 设置一个 message hook,在消息被发送到 handler 处理之前执行 hook,对 message 进行处理,如果 hook 返回 false,则不会调用其他 hooks,并且消息不会被发送到 handler 进行处理。
import { IMessageHandler, Message, MessageLoop } from '@phosphor/messaging';

class LogHook implements IMessageHook {
  messages: string[] = [];
  messageHook(target: IMessageHandler, msg: Message): boolean {
    this.messages.push(msg.type);
    return true;
  }
}

let panel = new Widget();
let layout = new LogPanelLayout();
let widget = new Widget();
let hook = new LogHook();
panel.layout = layout;
MessageLoop.installMessageHook(widget, hook);
Widget.attach(panel, document.body);
layout.insertWidget(0, widget);
应用启动流程
执行 npm run start 实际上是执行 theia start 命令。
@theia/cli
theia 命令注册
Theia Cli 是一个基于 Node.js 的 Cli 工具,package.json 中通过 bin 字段注册 theia 命令。
"bin": {
    "theia": "./bin/theia"
 },
./bin/theia 文件如下:
#!/usr/bin/env node
require('../lib/theia')
#!/usr/bin/env node 语句是指定脚本的解释器,通过全局的环境变量找到 node,从而执行脚本里面的代码。
theia 命令实现
CLI 工具的具体实现在 src/theia.ts 中:
const projectPath = process.cwd();
const appTarget: ApplicationProps.Target = yargs.argv['app-target'];
const manager = new ApplicationPackageManager({ projectPath, appTarget });
const target = manager.pck.target;

function commandArgs(arg: string): string[] {
    const restIndex = process.argv.indexOf(arg);
    return restIndex !== -1 ? process.argv.slice(restIndex + 1) : [];
}

yargs
  .command({
  command: 'start',
  describe: 'start the ' + manager.pck.target + ' backend',
  handler: async () => {
    try {
      manager.start(commandArgs('start'));
    } catch (err) {
      console.error(err);
      process.exit(1);
    }
  }
})
// 省略...

// see https://github.com/yargs/yargs/issues/287#issuecomment-314463783
// eslint-disable-next-line @typescript-eslint/no-explicit-any
const commands = (yargs as any).getCommandInstance().getCommands();
const argv = yargs.demandCommand(1).argv;
const command = argv._[0];
if (!command || commands.indexOf(command) === -1) {
  console.log('non-existing or no command specified');
  yargs.showHelp();
  process.exit(1);
} else {
  yargs.help(false);
}
可以看到 cli 中主要是利用 yargs 处理命令行的参数,然后传到 ApplicationPackageManager 类中的方法中进行处理。
@theia/application-manager
ApplicationPackageManager 类是在 @theia/application-manager npm 包中定义的。
ApplicationPackageManager 实现
export class ApplicationPackageManager {

    readonly pck: ApplicationPackage;
    /** application process */
    readonly process: ApplicationProcess;
    /** manager process */
    protected readonly __process: ApplicationProcess;
    protected readonly webpack: WebpackGenerator;
    protected readonly backend: BackendGenerator;
    protected readonly frontend: FrontendGenerator;

    constructor(options: ApplicationPackageOptions) {
        this.pck = new ApplicationPackage(options);
        this.process = new ApplicationProcess(this.pck, options.projectPath);
        this.__process = new ApplicationProcess(this.pck, path.join(__dirname, '..'));
        this.webpack = new WebpackGenerator(this.pck);
        this.backend = new BackendGenerator(this.pck);
        this.frontend = new FrontendGenerator(this.pck);
    }

    protected async remove(fsPath: string): Promise<void> {
        if (await fs.pathExists(fsPath)) {
            await fs.remove(fsPath);
        }
    }

    async clean(): Promise<void> {
        await this.remove(this.pck.lib());
        await this.remove(this.pck.srcGen());
        await this.remove(this.webpack.genConfigPath);
    }

    async generate(): Promise<void> {
        await this.webpack.generate();
        await this.backend.generate();
        await this.frontend.generate();
    }

    async copy(): Promise<void> {
        await fs.ensureDir(this.pck.lib());
        await fs.copy(this.pck.frontend('index.html'), this.pck.lib('index.html'));
    }

    async build(args: string[] = []): Promise<void> {
        await this.generate();
        await this.copy();
        return this.__process.run('webpack', args);
    }

    start(args: string[] = []): cp.ChildProcess {
        if (this.pck.isElectron()) {
            return this.startElectron(args);
        }
        return this.startBrowser(args);
    }

    startElectron(args: string[]): cp.ChildProcess {
        // If possible, pass the project root directory to electron rather than the script file so that Electron
        // can determine the app name. This requires that the package.json has a main field.
        let appPath = this.pck.projectPath;

        if (!this.pck.pck.main) {
            appPath = this.pck.frontend('electron-main.js');

            console.warn(
                `WARNING: ${this.pck.packagePath} does not have a "main" entry.\n` +
                'Please add the following line:\n' +
                '    "main": "src-gen/frontend/electron-main.js"'
            );
        }

        const { mainArgs, options } = this.adjustArgs([ appPath, ...args ]);
        const electronCli = require.resolve('electron/cli.js', { paths: [this.pck.projectPath] });
        return this.__process.fork(electronCli, mainArgs, options);
    }

    startBrowser(args: string[]): cp.ChildProcess {
        const { mainArgs, options } = this.adjustArgs(args);
        return this.__process.fork(this.pck.backend('main.js'), mainArgs, options);
    }

    private adjustArgs(args: string[], forkOptions: cp.ForkOptions = {}): Readonly<{ mainArgs: string[]; options: cp.ForkOptions }> {
        const options = {
            ...this.forkOptions,
            forkOptions
        };
        const mainArgs = [...args];
        const inspectIndex = mainArgs.findIndex(v => v.startsWith('--inspect'));
        if (inspectIndex !== -1) {
            const inspectArg = mainArgs.splice(inspectIndex, 1)[0];
            options.execArgv = ['--nolazy', inspectArg];
        }
        return {
            mainArgs,
            options
        };
    }

    private get forkOptions(): cp.ForkOptions {
        return {
            stdio: [0, 1, 2, 'ipc'],
            env: {
                ...process.env,
                THEIA_PARENT_PID: String(process.pid)
            }
        };
    }

}
ApplicationPackage 负责解析 package.json 配置生成应用包相关的信息;ApplicationProcess 将 Node.js child_process 模块的方法包装了一层,ApplicationPackageManager 构造函数中初始化了两个子进程: process 进程用于应用运行, __process 进程用于应用构建。WebpackGenerator、BackendGenerator、FrontendGenerator 负责管理代码生成。
当我们执行 theia start 命令的时候实际上会调用 ApplicationPackageManager 的 start 方法,根据 target 从而调用 startElectron 或者 startBrowser 方法,我们可以发现最终都会调用 this.__process.fork 方法。
如果要理解这句代码的作用我们需要了解 child_process.fork 。
child_process fork 函数
在 Node 中,child_process 模块提供了衍生子进程的能力,提供了 4 种方式创建子进程:child_process.spawn(),child_process.fork(),child_process.exec(),child_process.execFile()。spawn() 方法在一个新的进程里启动一个命令,可以给这个命令传递任何的参数;fork() 方法是 spawn() 的一个特例,专门用于衍生新的 Node.js 进程。
child_process.fork(modulePath[, args][, options])
modulePath<string>在子进程中运行的模块;args<string[]>字符串参数的列表;options<Object>cwd<string>子进程的当前工作目录。detached<boolean>准备子进程独立于其父进程运行。具体行为取决于平台,参见options.detached。env<Object>环境变量的键值对,默认值:process.env。execPath<string>用于创建子进程的可执行文件。execArgv<string[]>传给可执行文件的字符串参数的列表,默认值:process.execArgv。serialization<string>指定用于在进程之间发送消息的序列化类型。可能的值为'json'和'advanced'。有关更多详细信息,请参见 高级序列化,默认值:'json'。silent<boolean>如果为true,则子进程的 stdin、stdout 和 stderr 将会被输送到父进程,否则它们将会继承自父进程,详见child_process.spawn()的stdio中的'pipe'和'inherit'选项,默认值:false。stdio<Array>|<string>参见child_process.spawn()的stdio。当提供此选项时,则它覆盖silent选项。如果使用了数组变量,则它必须包含一个值为'ipc'的元素,否则将会抛出错误。例如[0, 1, 2, 'ipc']。windowsVerbatimArguments<boolean>在 Windows 上不为参数加上引号或转义,在 Unix 上则忽略,默认值:false。uid<number>设置进程的用户标识,参见setuid(2)。gid<number>设置进程的群组标识,参见setgid(2)。
- 返回:
<ChildProcess>
返回的 ChildProcess 将会内置一个额外的通信通道,允许消息在父进程和子进程之间来回传递。衍生的 Node.js 子进程独立于父进程,但两者之间建立的 IPC 通信通道除外。 每个进程都有自己的内存,带有自己的 V8 实例。 由于需要额外的资源分配,因此不建议衍生大量的 Node.js 子进程。默认情况下, fork() 将会使用父进程的 process.execPath 来衍生新的 Node.js 实例。
Backend 启动流程
当 target 是 browser 时,通过 fork 方法衍生一个新进程,加载 backend 的 main.js。
startBrowser(args: string[]): cp.ChildProcess {
  const { mainArgs, options } = this.adjustArgs(args);
  return this.__process.fork(this.pck.backend('main.js'), mainArgs, options);
}
这里的 main.js 的完整路径为 src-gen/backend/main.js,由 @theia/application-manager 模块中的backend-generator.ts 生成。这是 Backend 启动的入口文件。
VS Code 断点调试
我们可以从 main.js 逐行的跟踪实现,但是这样对中间过程的逻辑理解不太直观,我们可以借助进行断点调试。
新建调试配置文件( .vscode/launch.json):
// Fork from https://github.com/eclipse-theia/theia/blob/master/.vscode/launch.json
{
    // 使用 IntelliSense 了解相关属性。
    // 悬停以查看现有属性的描述。
    // 欲了解更多信息,请访问: https://go.microsoft.com/fwlink/?linkid=830387
    "version": "0.2.0",
    "configurations": [
        {
            "type": "node",
            "request": "launch",
            "name": "Start Browser Backend",
            "program": "${workspaceRoot}/src-gen/backend/main.js",
            "args": [
                "--loglevel=debug",
                "--port=3000",
                "--no-cluster"
            ],
            "env": {
                "NODE_ENV": "development"
            },
            "sourceMaps": true,
            "outFiles": [
                "${workspaceRoot}/node_modules/@theia/*/lib/**/*.js",
                "${workspaceRoot}/lib/**/*.js",
                "${workspaceRoot}/src-gen/**/*.js"
            ],
            "smartStep": true,
            "internalConsoleOptions": "openOnSessionStart",
            "outputCapture": "std"
        },
    ]
}
然后使用 VS Code 调试器运行: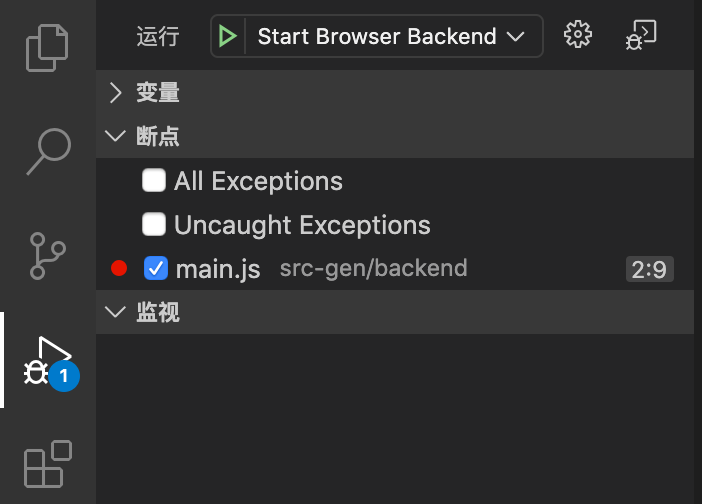
本质上是通过使用 node 命令启动 ${workspaceRoot}/src-gen/backend/main.js 文件,启动过程配置参数。
src-gen/backend/main.js
main.js 的执行逻辑为:
const { BackendApplicationConfigProvider } = require('@theia/core/lib/node/backend-application-config-provider');
const main = require('@theia/core/lib/node/main');
BackendApplicationConfigProvider.set({});

const serverModule = require('./server');
const serverAddress = main.start(serverModule());
serverAddress.then(function ({ port, address }) {
    if (process && process.send) {
        process.send({ port, address });
    }
});
module.exports = serverAddress;
@theia/core 中的 BackendApplicationConfigProvider 模块设置 Application 的配置, src/node/main.ts 模块启动 src-gen/backend/server.js 中的 serverModule,并获取服务 address 和 port 通过 process.send 发送到父进程。@theia/core 的 src/node/main.ts 实现非常简洁。
import * as http from 'http';
import * as https from 'https';
import { AddressInfo } from 'net';
import { checkParentAlive } from './messaging/ipc-protocol';
import { MaybePromise } from '../common/types';

checkParentAlive();

process.on('unhandledRejection', (reason, promise) => {
    throw reason;
});

export interface Address {
    readonly port: number;
    readonly address: string;
}

export async function start(serverModule: MaybePromise<http.Server | https.Server>): Promise<Address> {
    const server = await serverModule;
    return server.address() as AddressInfo;
}
export default start;
src-gen/backend/server.js
整体逻辑是启动 Backend Server,具体实现为:
// @ts-check
require('reflect-metadata');

// Patch electron version if missing, see https://github.com/eclipse-theia/theia/pull/7361#pullrequestreview-377065146
if (typeof process.versions.electron === 'undefined' && typeof process.env.THEIA_ELECTRON_VERSION === 'string') {
    process.versions.electron = process.env.THEIA_ELECTRON_VERSION;
}

const path = require('path');
const express = require('express');
const { Container } = require('inversify');
const { BackendApplication, CliManager } = require('@theia/core/lib/node');
const { backendApplicationModule } = require('@theia/core/lib/node/backend-application-module');
const { messagingBackendModule } = require('@theia/core/lib/node/messaging/messaging-backend-module');
const { loggerBackendModule } = require('@theia/core/lib/node/logger-backend-module');

const container = new Container();
container.load(backendApplicationModule);
container.load(messagingBackendModule);
container.load(loggerBackendModule);

function load(raw) {
    return Promise.resolve(raw.default).then(module =>
        container.load(module)
    )
}

function start(port, host, argv) {
    if (argv === undefined) {
        argv = process.argv;
    }

    const cliManager = container.get(CliManager);
    return cliManager.initializeCli(argv).then(function () {
        const application = container.get(BackendApplication);
        application.use(express.static(path.join(__dirname, '../../lib')));
        application.use(express.static(path.join(__dirname, '../../lib/index.html')));
        return application.start(port, host);
    });
}

module.exports = (port, host, argv) => Promise.resolve()
    .then(function () { return Promise.resolve(require('@theia/process/lib/common/process-common-module')).then(load) })
    .then(function () { return Promise.resolve(require('@theia/process/lib/node/process-backend-module')).then(load) })
    .then(function () { return Promise.resolve(require('@theia/filesystem/lib/node/filesystem-backend-module')).then(load) })
    .then(function () { return Promise.resolve(require('@theia/filesystem/lib/node/download/file-download-backend-module')).then(load) })
    .then(function () { return Promise.resolve(require('@theia/workspace/lib/node/workspace-backend-module')).then(load) })
    .then(function () { return Promise.resolve(require('@theia/languages/lib/node/languages-backend-module')).then(load) })
    .then(function () { return Promise.resolve(require('@theia/file-search/lib/node/file-search-backend-module')).then(load) })
    .then(function () { return Promise.resolve(require('@theia/git/lib/node/git-backend-module')).then(load) })
    .then(function () { return Promise.resolve(require('@theia/git/lib/node/env/git-env-module')).then(load) })
    .then(function () { return Promise.resolve(require('@theia/json/lib/node/json-backend-module')).then(load) })
    .then(function () { return Promise.resolve(require('@theia/mini-browser/lib/node/mini-browser-backend-module')).then(load) })
    .then(function () { return Promise.resolve(require('@theia/terminal/lib/node/terminal-backend-module')).then(load) })
    .then(function () { return Promise.resolve(require('@theia/task/lib/node/task-backend-module')).then(load) })
    .then(function () { return Promise.resolve(require('@theia/debug/lib/node/debug-backend-module')).then(load) })
    .then(function () { return Promise.resolve(require('@theia/search-in-workspace/lib/node/search-in-workspace-backend-module')).then(load) })
    .then(function () { return Promise.resolve(require('@theia/plugin-ext/lib/plugin-ext-backend-module')).then(load) })
    .then(function () { return Promise.resolve(require('@theia/plugin-ext-vscode/lib/node/plugin-vscode-backend-module')).then(load) })
    .then(() => start(port, host, argv)).catch(reason => {
        console.error('Failed to start the backend application.');
        if (reason) {
            console.error(reason);
        }
        throw reason;
    });
通过 inversify 模块初始化一个 IoC 容器,依次加载 @theia/core 的基本模块:
- backendApplicationModule:Backend 应用模块
- messagingBackendModule:消息模块
- loggerBackendModule:日志模块
以及通过解析 package.json 依赖动态加载的模块,例如 @theia/process 的 process-common-module 和 process-backend-module 模块等。@theia/process 是通过应用的 package.json 中 dependencies 字段申明的 NPM 依赖,@theia/process 的 package.json 文件中申明了 Extension 的模块:
"theiaExtensions": [
  {
    "backend": "lib/common/process-common-module",
    "frontend": "lib/common/process-common-module"
  },
  {
    "backend": "lib/node/process-backend-module"
  }
 ],
@theia/process 在 Theia 中的定位是 Extension,Theia 自定义拓展也是通过 package.json 的 dependencies 字段进行申明,自定义拓展开发可以参考:Authoring Theia Extensions,后面我会另外写一篇拓展开发及运行原理的文章。
LoC 容器模块加载完成后,通过 container.get 方法获取 CliManager 和 BackendApplication 依赖,然后调用 cliManager.initializeCli(argv) 方法初始化参数, application.start(port, host) 中通过 http.createServer / https.createServer 创建服务实例,通过 Express 框架创建 Web 服务托管 lib 文件夹下的前端资源。
cliManager.initializeCli
调用initializeCli 方法的时候会通过 this.contributionsProvider.getContributions() 获取实现了
CliContribution 接口的拓展点,例如 BackendApplicationCliContribution、LogLevelCliContribution、WorkspaceCliContribution、PluginCliContribution、HostedPluginCliContribution、PluginVsCodeCliContribution。如果我们想在应用启动的时候带上一些启动参数,可以自定义拓展点实现 CliContribution。
initializeCli 方法如下:
export const CliContribution = Symbol('CliContribution');

/**
 * Call back for extension to contribute options to the cli.
 */
export interface CliContribution {
    configure(conf: yargs.Argv): void;
    setArguments(args: yargs.Arguments): MaybePromise<void>;
}

@injectable()
export class CliManager {

    constructor(@inject(ContributionProvider) @named(CliContribution)
    protected readonly contributionsProvider: ContributionProvider<CliContribution>) { }

    async initializeCli(argv: string[]): Promise<void> {
        const pack = require('../../package.json');
        const version = pack.version;
        const command = yargs.version(version);
        command.exitProcess(this.isExit());
        for (const contrib of this.contributionsProvider.getContributions()) {
            contrib.configure(command);
        }
        const args = command
            .detectLocale(false)
            .showHelpOnFail(false, 'Specify --help for available options')
            .help('help')
            .parse(argv);
        for (const contrib of this.contributionsProvider.getContributions()) {
            await contrib.setArguments(args);
        }
    }

    protected isExit(): boolean {
        return true;
    }
}
backendApplicationModule
Backend Server 启动过程中出现了 backendApplicationModule 和 BackendApplication,那么区别是什么呢?
backendApplicationModule 主要是实现 CLI、IPC、Application Server、Application Package 相关依赖的绑定。BackendApplication 是 Theia backend applications 的入口,BackendApplication 在 backendApplicationModule 中完成绑定,然后在 Backend Server 中被调用启动。
// 绑定 ApplicationPackage 类
decorate(injectable(), ApplicationPackage);

// 连接 Frontend Service: CommandService、MessageClient、QuickPickService
const commandConnectionModule = ConnectionContainerModule.create(({ bindFrontendService }) => {
    bindFrontendService(commandServicePath, CommandService);
});

const messageConnectionModule = ConnectionContainerModule.create(({ bind, bindFrontendService }) => {
    bindFrontendService(messageServicePath, MessageClient);
    bind(MessageService).toSelf().inSingletonScope();
});

const quickPickConnectionModule = ConnectionContainerModule.create(({ bindFrontendService }) => {
    bindFrontendService(quickPickServicePath, QuickPickService);
});

export const backendApplicationModule = new ContainerModule(bind => {
        // 绑定 ConnectionContainerModule
    bind(ConnectionContainerModule).toConstantValue(commandConnectionModule);
    bind(ConnectionContainerModule).toConstantValue(messageConnectionModule);
    bind(ConnectionContainerModule).toConstantValue(quickPickConnectionModule);

      // 绑定 CliManager Service
    bind(CliManager).toSelf().inSingletonScope();
      // 绑定 CliContribution
    bindContributionProvider(bind, CliContribution);

      // 绑定 BackendApplicationCliContribution Service
    bind(BackendApplicationCliContribution).toSelf().inSingletonScope();
    bind(CliContribution).toService(BackendApplicationCliContribution);

      // 绑定 BackendApplication Service
    bind(BackendApplication).toSelf().inSingletonScope();
      // 绑定 BackendApplicationContribution
    bindContributionProvider(bind, BackendApplicationContribution);

      // 绑定 IPCConnectionProvider Service(基于 vscode-jsonrpc 的 IPC 通信模块)
    bind(IPCConnectionProvider).toSelf().inSingletonScope();

      // 绑定 ApplicationServerImpl Service
    bind(ApplicationServerImpl).toSelf().inSingletonScope();
    bind(ApplicationServer).toService(ApplicationServerImpl);
    bind(ConnectionHandler).toDynamicValue(ctx =>
        new JsonRpcConnectionHandler(applicationPath, () =>
            ctx.container.get(ApplicationServer)
        )
    ).inSingletonScope();

      // 绑定 EnvVariablesServer Service(处理环境变量和配置)
    bind(EnvVariablesServer).to(EnvVariablesServerImpl).inSingletonScope();
    bind(ConnectionHandler).toDynamicValue(ctx =>
        new JsonRpcConnectionHandler(envVariablesPath, () => {
            const envVariablesServer = ctx.container.get<EnvVariablesServer>(EnvVariablesServer);
            return envVariablesServer;
        })
    ).inSingletonScope();

      // 绑定 ApplicationPackage(将 projectPath 参数传入到 ApplicationPackage)
    bind(ApplicationPackage).toDynamicValue(({ container }) => {
        const { projectPath } = container.get(BackendApplicationCliContribution);
        return new ApplicationPackage({ projectPath });
    }).inSingletonScope();
});
backendApplicationModule 是 ContainerModule 的实例,构造函数中传入回调函数进行
Services 和 Contribution-Points 的绑定。通过 bind 函数实现 Service 的绑定,通过 bindContributionProvider 方法绑定 ContributionProvider。
export function bindContributionProvider(bindable: Bindable, id: symbol): void {
    const bindingToSyntax = (Bindable.isContainer(bindable) ? bindable.bind(ContributionProvider) : bindable(ContributionProvider));
    bindingToSyntax
        .toDynamicValue(ctx => new ContainerBasedContributionProvider(id, ctx.container))
        .inSingletonScope().whenTargetNamed(id);
}
我们可以看到 CommandService 通过 ConnectionContainerModule 包装了一层,变成了 commandConnectionModule,这是为了允许后端服务在同一连接中访问前端服务。
这里我暂时不分析其中的实现原理,等后面写前后端服务通信机制部分展开分析。
Fontend 启动流程
从上面后端的启动流程中我们可以初步了解 Theia Application 是怎么运行起来的,本质上 Theia Application 是一个简单的 Node.js 项目。在 Theia Backend 启动流程中我们发现前端资源是通过 Express 框架托管 lib 目录的,入口地址是 lib/index.html,而 lib 是在 build 过程中生成的。
我们依然可以借助 VS Code 进行断点调试。
{
    "version": "0.2.0",
    "configurations": [
        {
            "name": "Launch Browser Frontend",
            "type": "chrome",
            "request": "launch",
            "url": "http://localhost:3000/",
            "webRoot": "${workspaceRoot}"
        }
    ]
}
src-gen/frontend/index.js
前端入口 src-gen/frontend/index.js 逻辑如下:
require('es6-promise/auto');
require('reflect-metadata');
const { Container } = require('inversify');
const { FrontendApplication } = require('@theia/core/lib/browser');
const { frontendApplicationModule } = require('@theia/core/lib/browser/frontend-application-module');
const { messagingFrontendModule } = require('@theia/core/lib/browser/messaging/messaging-frontend-module');
const { loggerFrontendModule } = require('@theia/core/lib/browser/logger-frontend-module');
const { ThemeService } = require('@theia/core/lib/browser/theming');
const { FrontendApplicationConfigProvider } = require('@theia/core/lib/browser/frontend-application-config-provider');

FrontendApplicationConfigProvider.set({
    "applicationName": "Theia App"
});

const container = new Container();
container.load(frontendApplicationModule);
container.load(messagingFrontendModule);
container.load(loggerFrontendModule);

function load(raw) {
    return Promise.resolve(raw.default).then(module =>
        container.load(module)
    )
}

function start() {
    (window['theia'] = window['theia'] || {}).container = container;

    const themeService = ThemeService.get();
    themeService.loadUserTheme();

    const application = container.get(FrontendApplication);
    return application.start();
}

module.exports = Promise.resolve()
    .then(function () { return import('@theia/core/lib/browser/menu/browser-menu-module').then(load) })
    .then(function () { return import('@theia/core/lib/browser/window/browser-window-module').then(load) })
    .then(function () { return import('@theia/core/lib/browser/keyboard/browser-keyboard-module').then(load) })
    ...
    .then(function () { return import('@theia/plugin-ext/lib/plugin-ext-frontend-module').then(load) })
    .then(function () { return import('@theia/plugin-ext-vscode/lib/browser/plugin-vscode-frontend-module').then(load) })
    .then(function () { return import('@theia/preview/lib/browser/preview-frontend-module').then(load) })
    .then(start).catch(reason => {
        console.error('Failed to start the frontend application.');
        if (reason) {
            console.error(reason);
        }
    });
和 Backend 逻辑类似,前端也创建了一个 LoC 容器,然后加载 @theia/core 模块内部的 DI 容器模块,并加载 package.json 中声明的依赖的模块,最后通过 FrontendApplication 模块的 start 方法启动应用。
FrontendApplication
启动 FrontendApplication 主要包含以下四个步骤:
- start frontend contributions
- attach the application shell to the host element
- initialize the application shell layout
reveal the application shell if it was hidden by a startup indicator
async start(): Promise<void> {
await this.startContributions();
  this.stateService.state = 'started_contributions';

const host = await this.getHost();
this.attachShell(host);
await animationFrame();
this.stateService.state = 'attached_shell';

await this.initializeLayout();
this.stateService.state = 'initialized_layout';
await this.fireOnDidInitializeLayout();

await this.revealShell(host);
this.registerEventListeners();
this.stateService.state = 'ready';
}
attachShell 方法用于将 ApplicationShell 与 Host Element (宿主元素) 建立联系。FrontendApplication 主要有以下几种状态:
export type FrontendApplicationState =
  'init'
  | 'started_contributions'
  | 'attached_shell'
  | 'initialized_layout'
  | 'ready'
  | 'closing_window';
ApplicationShell
ApplicationShell 类继承自 @phosphor/widgets 的 Widget 类,负责管理应用的顶层 Widget,可以添加、移除、激活 Widget。从 applicationShellLayoutVersion 的取值我们可以看到为 4.0 版本,后续官方如果修改了布局,我们可以通过布局的版本号适配我们的插件。
Application shell Widget 由 @phosphor/widgets 的组件组成,主要分为以下几部分:
- topPanel:类似 VS Code 的标题栏(Title Bar)视图
- mainPanel:类似于 VS Code 编辑器(Editor)视图
- leftPanel:类似 VS Code 的 活动栏(Activity Bar)视图+ Side Bar(侧边栏)视图
- rightPanel:和 leftPanel 类型,VS Code 没有这部分的视图
- bottomPanel:类似于 VS Code 的面板(Panal)视图
- statusBar:类似于 VS Code 的 状态栏(Status Bar)视图
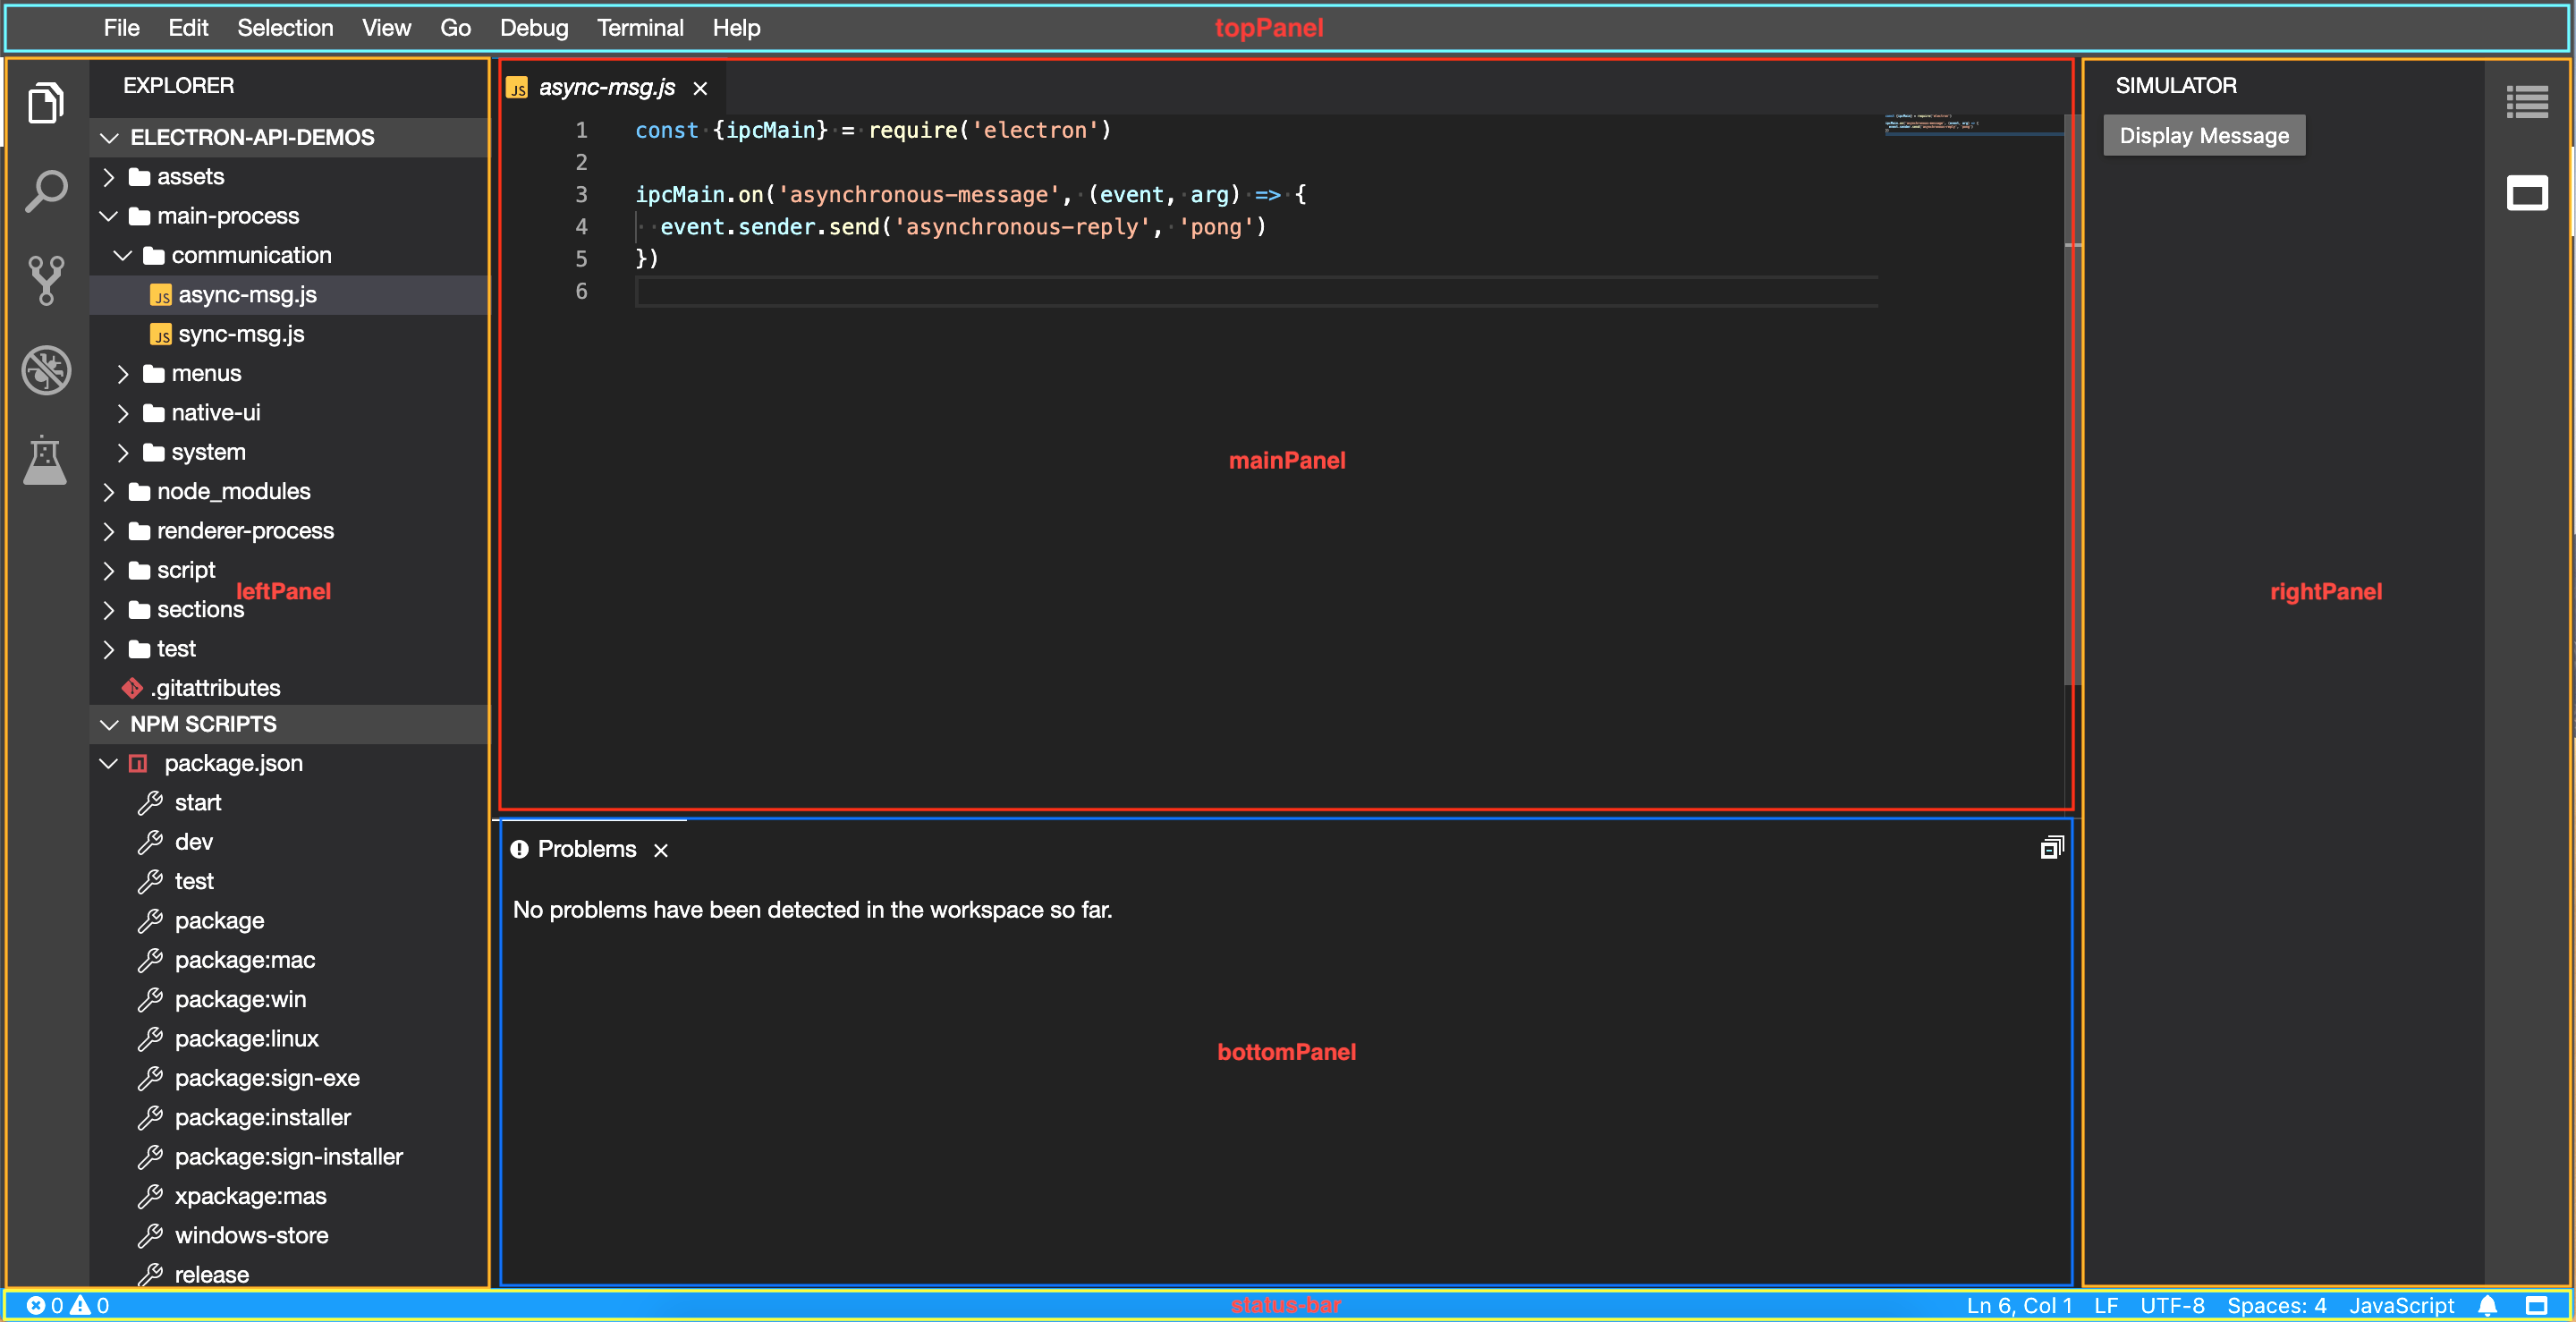
上述的视图都可以通过 Extension 或 Plug-ins 的方式进行拓展,由此可见 Theia 在视图层支持上比 VS Code 更加灵活。
Application Shell 中的视图都是基于 @phosphor/widgets 的内置组件构建生成,支持面板的动态添加移除、手势拖动、面板交互联动、视图恢复等机制,这也是通过 JS 布局相对基于 HTML + CSS 布局的优势所在。
至此 Frontend 启动流程部分流程基本分析完了,我们可以对 Theia 视图部分的流程有一个初步认知,对于其中的一些细节可以根据具体的场景再去单独阅读部分代码从而更加完整的理解 Theia 中的一些设计思路。
后记
本文通过对 Theia Browser Target 的启动流程分析,对 Theia 框架是怎么运行起来的有了一定的认知,从而为后续具体功能模块细致深入分析打下基础,后续会从通信机制、拓展机制、调试机制、LSP机制等多个重要模块的使用及设计原理展开详细分析,希望本文对有大家理解 Theia 有一些帮忙。“纸上得来终觉浅,绝知此事要躬行”,源码分析最重要的还是动手去 Debug,去思考代码背后的设计思想。
参考
写文章不容易,也许写这些代码就几分钟的事,写一篇大家好接受的文章或许需要几天的酝酿,如果文章对您有帮助请我喝杯咖啡吧!

若有收获,就点个赞吧
0 人点赞
