Nginx 适用于哪些场景
- 静态资源服务
- 通过本地文件系统提供服务
- 反向代理服务
- Nginx的强大性能
- 缓存
- 负载均衡
- API服务
- OpenResty
- nginx 直接访问数据库,redis

Nginx 为什么会出现
- 互联网的数据量快速增长
- 摩尔定律:新能提升
- 低效的Apache (一个进程对应一个链接 => 进程间切换 => 性能消耗)
Nginx 的优点
高并发,高性能
32C 64G 服务器 轻松达到数千万的并发链接,若简单的静态资源请求 100万rps
可扩展性好
模块化设计很好,生态丰富
高可靠性
可以持续不间断的运行数年
热部署
不停止服务的情况下升级Nginx, 因为 killed Nginx 意味着操作系统对所有已经建立链接的客户端发送一个 tcp reset 复位包,而很多客户端时没有办法很好的处理复位请求的
BSD许可证
开源
Nginx 的组成

编译Nginx
官方模块并不是每个默认都开启的,如果想添加第三方Nginx模块,需要自己编译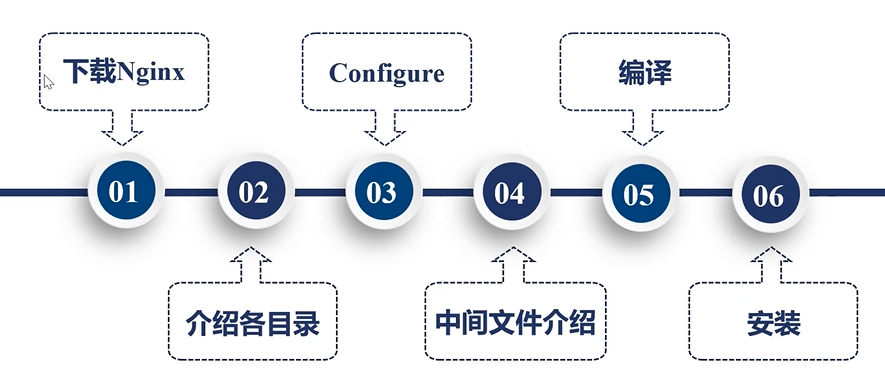
wget http://nginx.org/download/nginx-1.20.1.tar.gztar -xvf nginx-1.20.1.tar.gz
auto -- 辅助configure脚本执行时,判定nginx执行哪些模块,当前的操作有什么特性可供nginx使用CHANGES -- 特性和bugfix描述文档CHANGES.ru -- 俄语版conf -- 配置示例文件,会将其拷贝到安装目录configure -- 生成中间文件,执行编译前的必备动作contrib -- vim 高亮配置, pl 脚本html -- 实例 htmlLICENSE -- LICENSEman -- 帮助文档src -- 源码
# 查看 configure 支持哪些参数~./configure --help# --with 表示模块默认不会编译进 nginx, 需要手动加入# --without 表示模块默认不会编译进 nginx,需要手动移除./configure --prefix=/home/geek/nginx# E: Couldn't find any package by regex 'gcc-c+'sudo apt-get install build-essential# ./configure: error: the HTTP rewrite module requires the PCRE library.sudo apt-get install libpcre3 libpcre3-dev# ./configure: error: the HTTP gzip module requires the zlib library.sudo apt-get install zlib1g-dev# congfigure 执行完后会生成中间文件 objs, ngx_modules.cmake# 安装make installcd pbjs/cat ngx_modules.c

Nginx 配置语法
nginx 每个配置模块都有自己的配置语法,遵循同样的语法规则
配置参数:时间单位

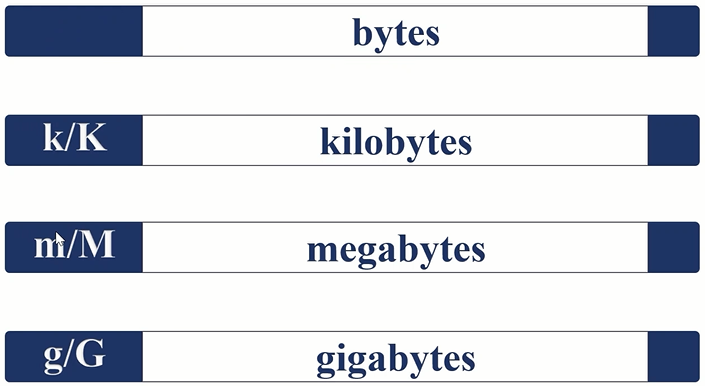
配置参数:空间的单位
http 配置的指令块

- http 块中的配置,都由http模块去解析
- upstream 表示上游服务,当nginx 需要与tomcat, django,等其他服务交互时定义
- server 对应一个域名/一组域名
- location url 表达式
Nginx 命令行及演示:重载,热备份,日志切割
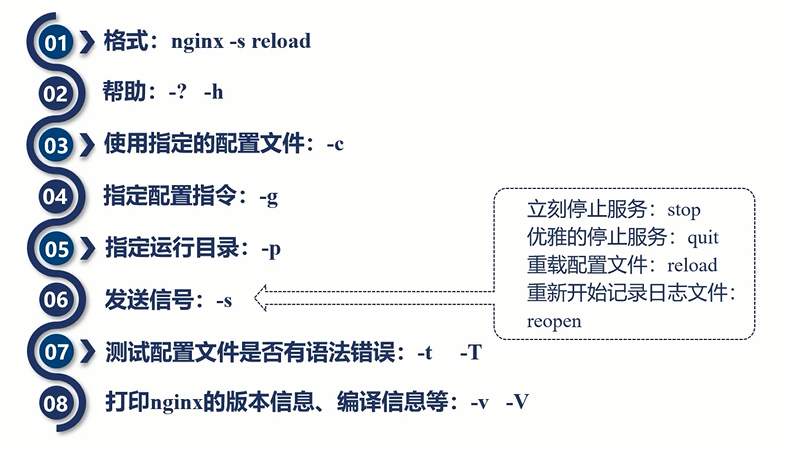
- nginx 操作运行时进程的方法是通过发送信号 -s
重载(配置文件)
nginx -s reload
热部署 (nginx 正在运行,更换最新版本的nginx)
# 查看正在运行的nginxps -ef | grep nginxroot 1168 8 0 21:53 ? 00:00:00 nginx: master process nginxwww-data 1169 1168 0 21:53 ? 00:00:00 nginx: worker processwww-data 1170 1168 0 21:53 ? 00:00:00 nginx: worker processzhanyeye 1182 9 0 21:53 pts/0 00:00:00 grep --color=auto nginx# 先备份现有nginx二进制文件cp nginx nginx.old# cp 替换正在运行的二进制文件cp -r nginx /usr/local/.../nginx/sbin/ -f# 向nginx的master进程发送信号:USR2kill -USR2 1168# 新老nginx进程 平滑过渡n'gin'x# 告诉老进程kill -WINCH 1168
切割日志文件
cd /var/log/nginxmv access.log backup.lognginx -s reopen
我们可以卸载bash脚本,做一个定时任务
rotate.sh (ubuntu 20.04)
#!/bin/bash# Rotate the Nginx logs to prevent a single logfile from consuming too much disk space.OLD_LOGS_PATH=/var/log/nginx/historyCUR_LOGS_PATH=/var/log/nginxYESTERDAY=${date -d "yesterday" +%Y-%m-%d}mv ${CUR_LOGS_PATH}/access.log ${OLD_LOGS_PATH}/access.logmv ${CUR_LOGS_PATH}/error.log ${OLD_LOGS_PATH}/error.log# 向 nginx 主进程发送 usr1 信号, usr1 信号是重新打开日志文件kill -USR1 $(cat /run/nginx.pid)
nginx conf
user www-data;worker_processes auto;pid /run/nginx.pid;include /etc/nginx/modules-enabled/*.conf;events {worker_connections 768;# multi_accept on;}http {### Basic Settings##sendfile on;tcp_nopush on;tcp_nodelay on;keepalive_timeout 65;types_hash_max_size 2048;# server_tokens off;# server_names_hash_bucket_size 64;# server_name_in_redirect off;include /etc/nginx/mime.types;default_type application/octet-stream;### SSL Settings##ssl_protocols TLSv1 TLSv1.1 TLSv1.2 TLSv1.3; # Dropping SSLv3, ref: POODLEssl_prefer_server_ciphers on;### Logging Settings##access_log /var/log/nginx/access.log;error_log /var/log/nginx/error.log;### Gzip Settings##gzip on;# gzip_vary on;# gzip_proxied any;# gzip_comp_level 6;# gzip_buffers 16 8k;# gzip_http_version 1.1;# gzip_types text/plain text/css application/json application/javascript text/xml application/xml application/xml+rss text/javascript;### Virtual Host Configs##include /etc/nginx/conf.d/*.conf;include /etc/nginx/sites-enabled/*;}#mail {# # See sample authentication script at:# # http://wiki.nginx.org/ImapAuthenticateWithApachePhpScript## # auth_http localhost/auth.php;# # pop3_capabilities "TOP" "USER";# # imap_capabilities "IMAP4rev1" "UIDPLUS";## server {# listen localhost:110;# protocol pop3;# proxy on;# }## server {# listen localhost:143;# protocol imap;# proxy on;# }#}
### You should look at the following URL's in order to grasp a solid understanding# of Nginx configuration files in order to fully unleash the power of Nginx.# https://www.nginx.com/resources/wiki/start/# https://www.nginx.com/resources/wiki/start/topics/tutorials/config_pitfalls/# https://wiki.debian.org/Nginx/DirectoryStructure## In most cases, administrators will remove this file from sites-enabled/ and# leave it as reference inside of sites-available where it will continue to be# updated by the nginx packaging team.## This file will automatically load configuration files provided by other# applications, such as Drupal or Wordpress. These applications will be made# available underneath a path with that package name, such as /drupal8.## Please see /usr/share/doc/nginx-doc/examples/ for more detailed examples.### Default server configuration#server {listen 80 default_server;listen [::]:80 default_server;# SSL configuration## listen 443 ssl default_server;# listen [::]:443 ssl default_server;## Note: You should disable gzip for SSL traffic.# See: https://bugs.debian.org/773332## Read up on ssl_ciphers to ensure a secure configuration.# See: https://bugs.debian.org/765782## Self signed certs generated by the ssl-cert package# Don't use them in a production server!## include snippets/snakeoil.conf;root /var/www/html;# Add index.php to the list if you are using PHPindex index.html index.htm index.nginx-debian.html;server_name _;location / {# First attempt to serve request as file, then# as directory, then fall back to displaying a 404.try_files $uri $uri/ =404;}# pass PHP scripts to FastCGI server##location ~ \.php$ {# include snippets/fastcgi-php.conf;## # With php-fpm (or other unix sockets):# fastcgi_pass unix:/var/run/php/php7.4-fpm.sock;# # With php-cgi (or other tcp sockets):# fastcgi_pass 127.0.0.1:9000;#}# deny access to .htaccess files, if Apache's document root# concurs with nginx's one##location ~ /\.ht {# deny all;#}}# Virtual Host configuration for example.com## You can move that to a different file under sites-available/ and symlink that# to sites-enabled/ to enable it.##server {# listen 80;# listen [::]:80;## server_name example.com;## root /var/www/example.com;# index index.html;## location / {# try_files $uri $uri/ =404;# }#}
用 nginx 搭建一个静态资源web 服务器
server {listen 8080; # 监听8080 端口# '/' 表示所有的请求location / {# 下面的dir/ 带表的是 /etc/nginx/nginx.conf/dir/# 也可以用root, root会将url中的路径带到目录中来alias dir/}}

若有收获,就点个赞吧
0 人点赞
