1,服务器环境信息和部署架构图
主机名 主机IP 部署服务 端口wxqyh1 192.168.1.168 glusterfs 49152/24007wxqyh2 192.168.1.169 glusterfs 49152/24007
2,两台节点配置主机名
# wxqyh1节点1hostnamectl set-hostname wxqyh1# wxqyh2节点2hostnamectl set-hostname wxqyh2
3,两台节点配置hosts表解析
cat << EOF >> /etc/hosts192.168.1.168 wxqyh1192.168.1.169 wxqyh2EOF
4,两台节点安装glusterfs仓库和glusterfs软件包(如服务器无互联网,可以去能上网的服务器yum下载下来或者到文章末尾有提供安装包,拷贝到服务器本地安装)
# 在线安装yum -y install centos-release-glusteryum -y install glusterfs glusterfs-fuse glusterfs-server# 离线安装(上传附件glusterfs软件包)tar xf glusterfs.tar.gzrpm -ivh *.rpm
5,两台节点启动glusterd服务
systemctl start glusterd && systemctl enable glusterd
6,两台节点创建数据存放目录
mkdir -p /wxqyh/glusterfs/data
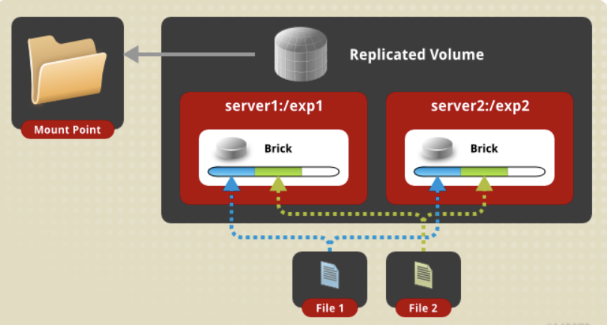
7,在wxqyh1节点操作创建复制卷
# 在节点1上将节点2加入到信任池[root@wxqyh1 /]# gluster peer probe wxqyh2# 创建复制卷[root@wxqyh1 /]# gluster volume create vol_replica replica 2 transport tcp wxqyh1:/wxqyh/glusterfs/data wxqyh2:/wxqyh/glusterfs/data# vol_replica 卷组名称# replica 2 双节点复制卷# transport tcp 同时支持rdma和tcp两种协议# 启动卷[root@wxqyh1 /]# gluster volume start vol_replica# 查看卷详细信息[root@wxqyh1 /]# gluster volume infoVolume Name: vol_replicaType: ReplicateVolume ID: 2bc5ca25-eef7-4994-8baf-a6db4ab92a93Status: StartedSnapshot Count: 0Number of Bricks: 1 x 2 = 2Transport-type: tcpBricks:Brick1: wxqyh1:/wxqyh/glusterfs/dataBrick2: wxqyh2:/wxqyh/glusterfs/dataOptions Reconfigured:transport.address-family: inetstorage.fips-mode-rchecksum: onnfs.disable: onperformance.client-io-threads: off
8,客户端挂载测试
# 在线安装[root@wxqyh2 /]# yum -y install glusterfs-fuse# 离线安装[root@wxqyh2 /]# rpm -ivh glusterfs-fuse-7.6-1.el7.x86_64.rpm# 创建挂载点目录[root@wxqyh2 /]# mkdir -p /data/replica# 挂载glusterfs节点[root@wxqyh2 /]# mount -t glusterfs wxqyh1:vol_replica /data/replica/[root@wxqyh2 /]# df -h | grep volwxqyh1:vol_replica 45G 1.6G 43G 4% /data/replica

若有收获,就点个赞吧
0 人点赞
