
组件选择
注册中心:SpringCloud Alibaba Nacos
配置中心:SpringCloud Alibaba Nacos
负载均衡:SpringCloud Ribbon
声明式HTTP客户端:SpringCloud Feign ——调用远程服务
负载均衡:SpringCloud Ribbon —— feign中已经整合,无需显示引用
服务容错:SpringCloud Alibaba Sentinel ——限流、降级、熔断
API网关:SpringCloud Gateway ——webflux 编程模式
调用链路监控:SpringCloud Sleuth
分布式事务:SpringCloud Alibaba Seata ——原Fescar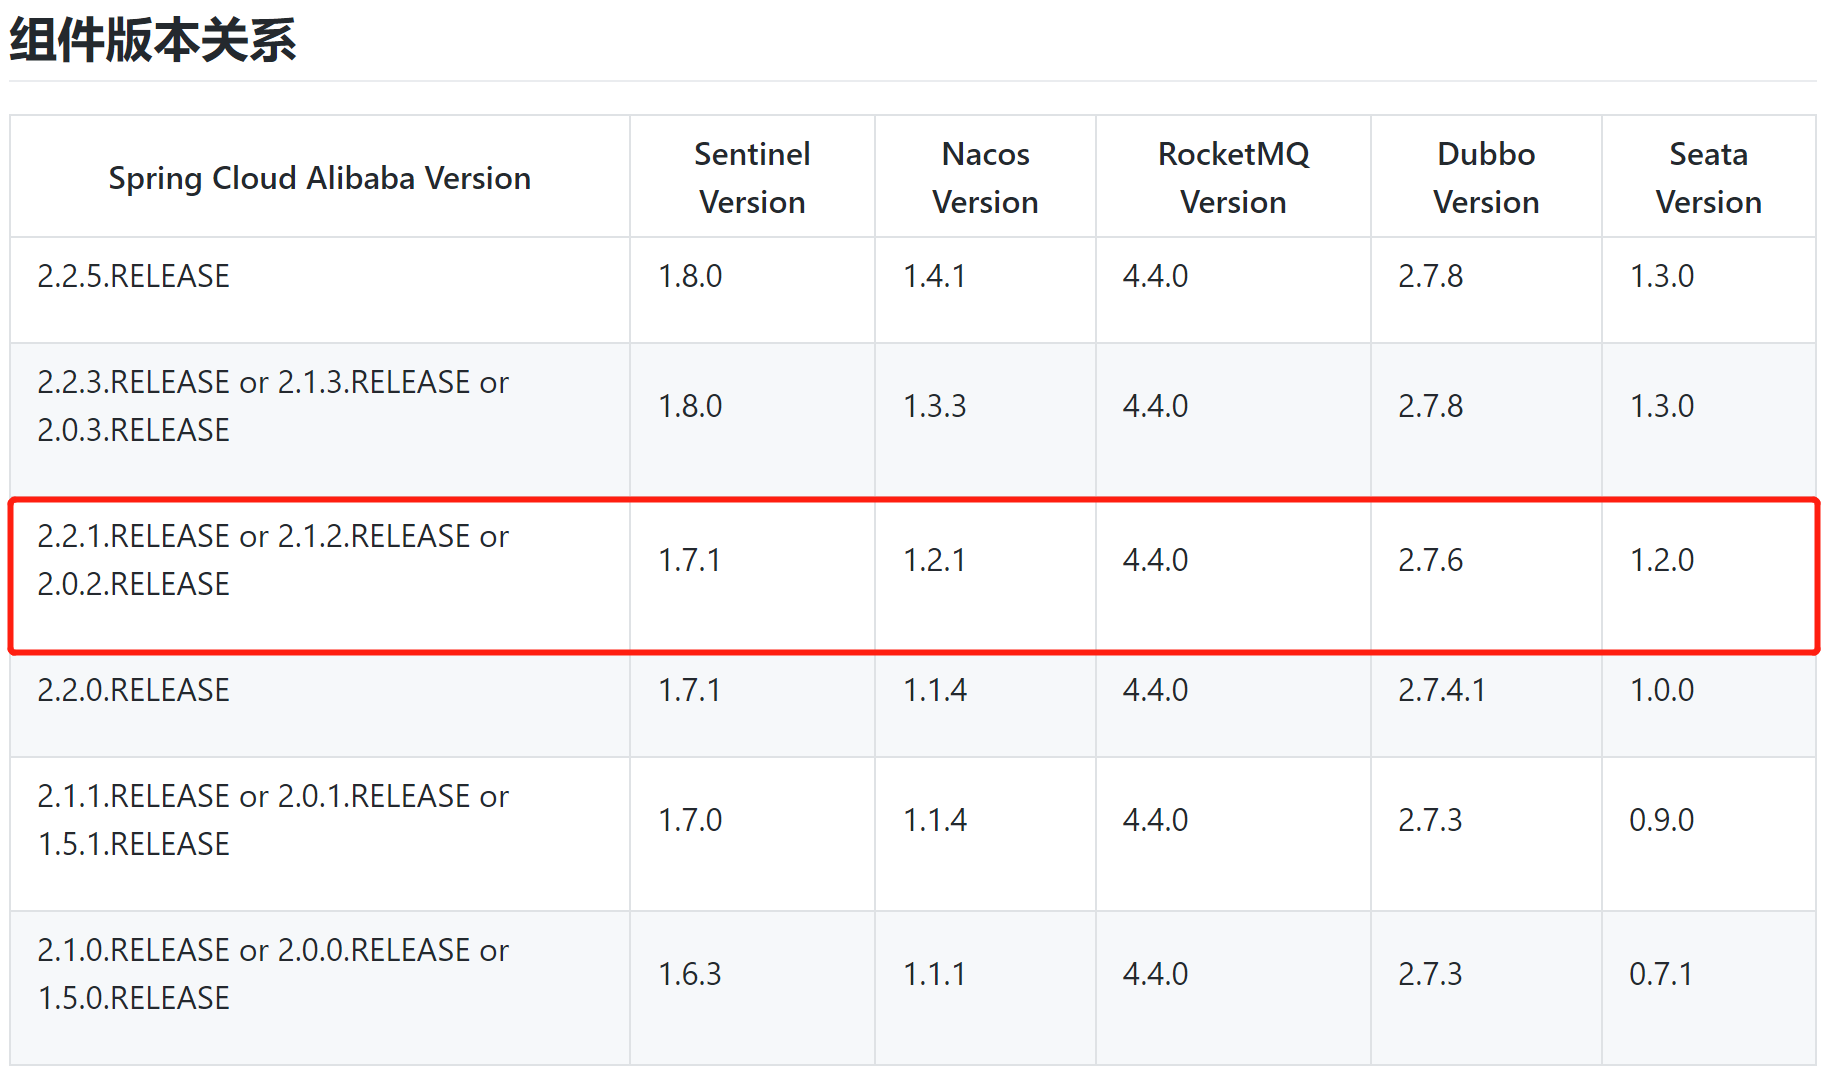
版本选择
参考:官方
下载 Nacos Server
下载地址:Github Release 由上面版本选择可知:当前对应 Nacos 版本为1.2.1
下载对应系统的tar包(Linux)或者zip包(Windows),解压后运行bin目录下的可执行文件即可运行Nacos
Docker启动nacos
docker run --name nacos -d -p 8848:8848 --privileged=true \--restart=always \-e JVM_XMS=512m \-e JVM_XMX=2048m \-e MODE=standalone \-e PREFER_HOST_MODE=hostname \-v /home/nacos/logs:/home/nacos/logs \nacos/nacos-server:1.2.1
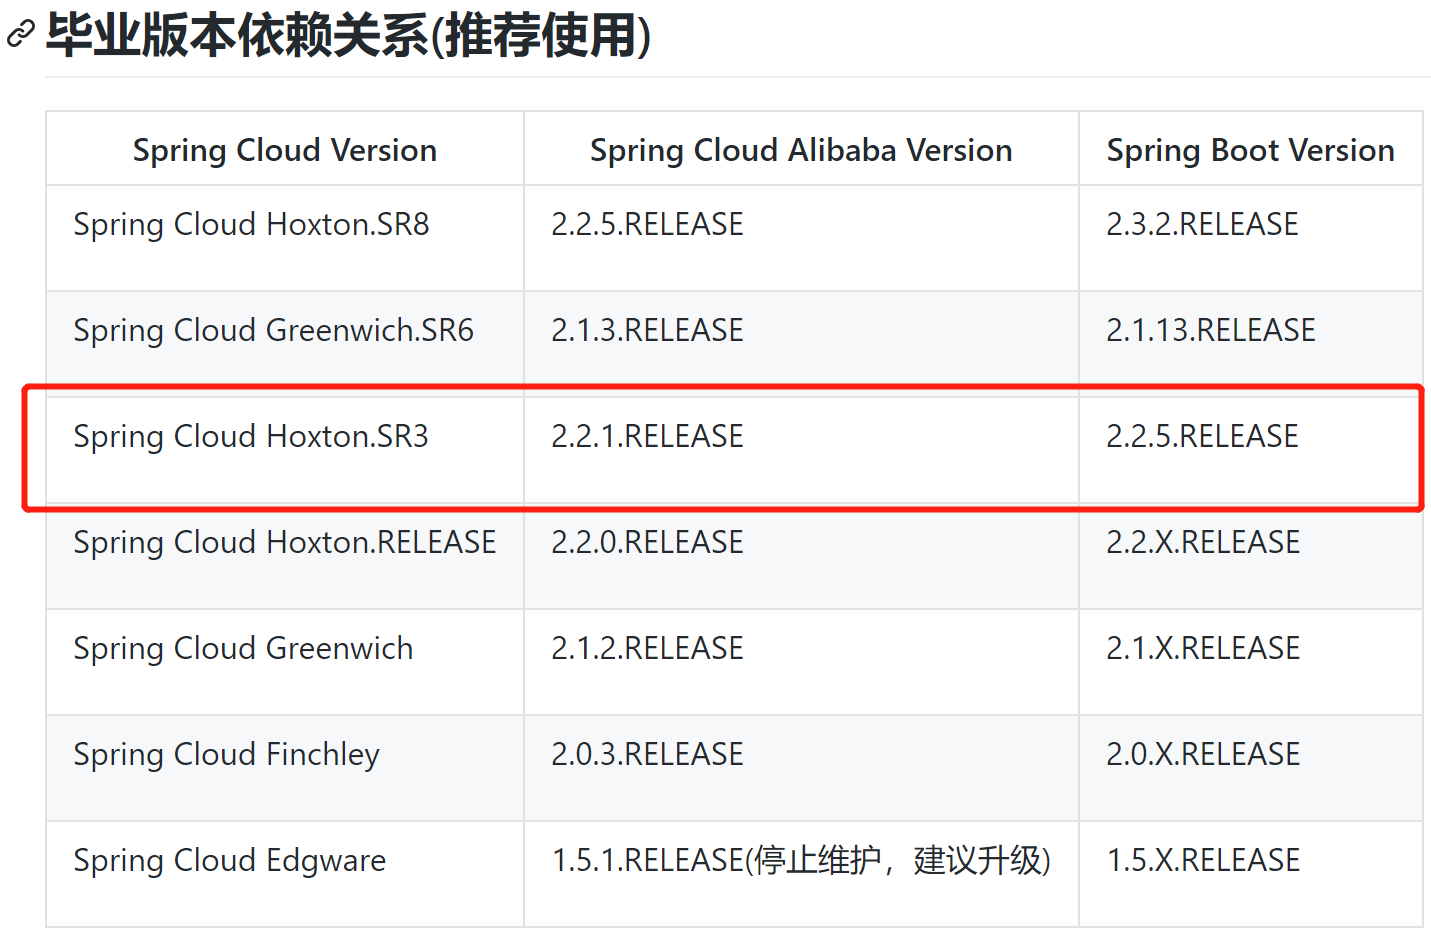
项目中进行微服务版本管理
父pom引入上面对应版本的依赖:
<properties><spring.boot.version>2.2.5.RELEASE</spring.boot.version><spring.cloud.version>Hoxton.SR3</spring.cloud.version><cloud.alibaba.version>2.2.1.RELEASE</cloud.alibaba.version></properties><dependencyManagement><dependencies><dependency><groupId>org.springframework.boot</groupId><artifactId>spring-boot-dependencies</artifactId><version>${spring.boot.version}</version><type>pom</type><scope>import</scope></dependency><dependency><groupId>org.springframework.cloud</groupId><artifactId>spring-cloud-dependencies</artifactId><version>${spring.cloud.version}</version><type>pom</type><scope>import</scope></dependency><dependency><groupId>com.alibaba.cloud</groupId><artifactId>spring-cloud-alibaba-dependencies</artifactId><version>${cloud.alibaba.version}</version><type>pom</type><scope>import</scope></dependency></dependencies></dependencyManagement>
引入Nacos作为注册中心
1. common模块引入nacos-discovery依赖
<dependency><groupId>com.alibaba.cloud</groupId><artifactId>spring-cloud-starter-alibaba-nacos-discovery</artifactId></dependency>
2. yaml文件增加配置
spring:application:name: mall-productcloud:nacos:discovery:server-addr: 192.168.163.131:8848
3. 主启动类增加注解
@MapperScan("com.zsy.product.dao")@SpringBootApplication@EnableDiscoveryClientpublic class MallProductApplication {public static void main(String[] args) {SpringApplication.run(MallProductApplication.class, args);}}
此时,启动Nacos,运行主启动类启动服务后,在浏览器打开配置文件中的地址:127.0.0.1:8848/nacos (账号密码:nacos/nacos)中就可以看到当前服务已经注册到 Nacos 服务列表中
引入Feign远程服务调用
1. common引入Feign依赖
<dependency><groupId>org.springframework.cloud</groupId><artifactId>spring-cloud-starter-openfeign</artifactId></dependency>
2. 主启动类开启远程调用功能
@EnableFeignClients(basePackages = "com.zsy.member.feign")@EnableDiscoveryClient@SpringBootApplicationpublic class MallMemberApplication {public static void main(String[] args) {SpringApplication.run(MallMemberApplication.class, args);}}
3. 远程调用过程测试
以优惠券模块coupon为例:当前测试member模块远程调用coupon模块
1. coupon模块接口定义
@RestController@RequestMapping("coupon/coupon")public class CouponController {@RequestMapping("/member/list")public R membercoupons() {CouponEntity couponEntity = new CouponEntity();couponEntity.setCouponName("满100减10");return R.ok().put("coupons", Arrays.asList(couponEntity));}}
2. member定义远程调用接口
- 首先在接口上加上@FeignClient注解声明要调用哪个服务
- 定义接口方法,并声明要调用服务接口的地址 @RequestMapping(“/coupon/coupon/member/list”)
当前接口方法的的含义:当前服务调用该方法,会到服务注册中心找到 mall-coupon 服务,去调用该服务的/coupon/coupon/member/list 请求对应的方法。
@FeignClient("mall-coupon")public interface CouponFeignService {@RequestMapping("/coupon/coupon/member/list")R memberCoupons();}
3. member 定义请求调用第2步的接口方法
@RestController@RequestMapping("member/member")public class MemberController {@AutowiredCouponFeignService couponFeignService;@RequestMapping("/coupons")public R test() {MemberEntity memberEntity = new MemberEntity();memberEntity.setNickname("张三");R membercoupons = couponFeignService.memberCoupons();return R.ok().put("member", memberEntity).put("coupons", membercoupons.get("coupons"));}}
4. 启动member和coupon服务完成调用
解析:
- 当前请求member服务的
/member/member/coupons请求; - 会调用
couponFeignService.memberCoupons(); - 此时会到服务注册中心找到
mall-coupon服务; - 调用该服务的
/coupon/coupon/member/list请求对应的方法。引入Nacos作为配置中心
参考:官方介绍
1. common模块引入nacos-config依赖
<dependency><groupId>com.alibaba.cloud</groupId><artifactId>spring-cloud-starter-alibaba-nacos-config</artifactId></dependency>
2. 在服务模块新建bootstrap.yaml配置 Nacos Config 元数据
此处以coupon服务为例:
spring:application:name: mall-couponcloud:nacos:config:server-addr: 192.168.163.131:8848file-extension: yaml
3. 测试读取配置中心配置
给配置中心新增一个配置

新建接口读取配置
CouponController.java
@RefreseScope:动态刷新,修改配置中心配置不需要重新启动项目
@RefreshScope@RestController@RequestMapping("coupon/coupon")public class CouponController {@Autowiredprivate CouponService couponService;@Value("${coupon.user.name}")private String name;@Value("${coupon.user.age}")private Integer age;@RequestMapping("/test")public R test() {return R.ok().put("name", name).put("age", age);}}
请求 /coupon/coupon/test 可以看到配置中心的数据,修改配置中心的配置,刷新可自动更新
Nacos 命名空间
为了对不同服务之间进行配置隔离,这里为每个微服务创建自己的命名空间。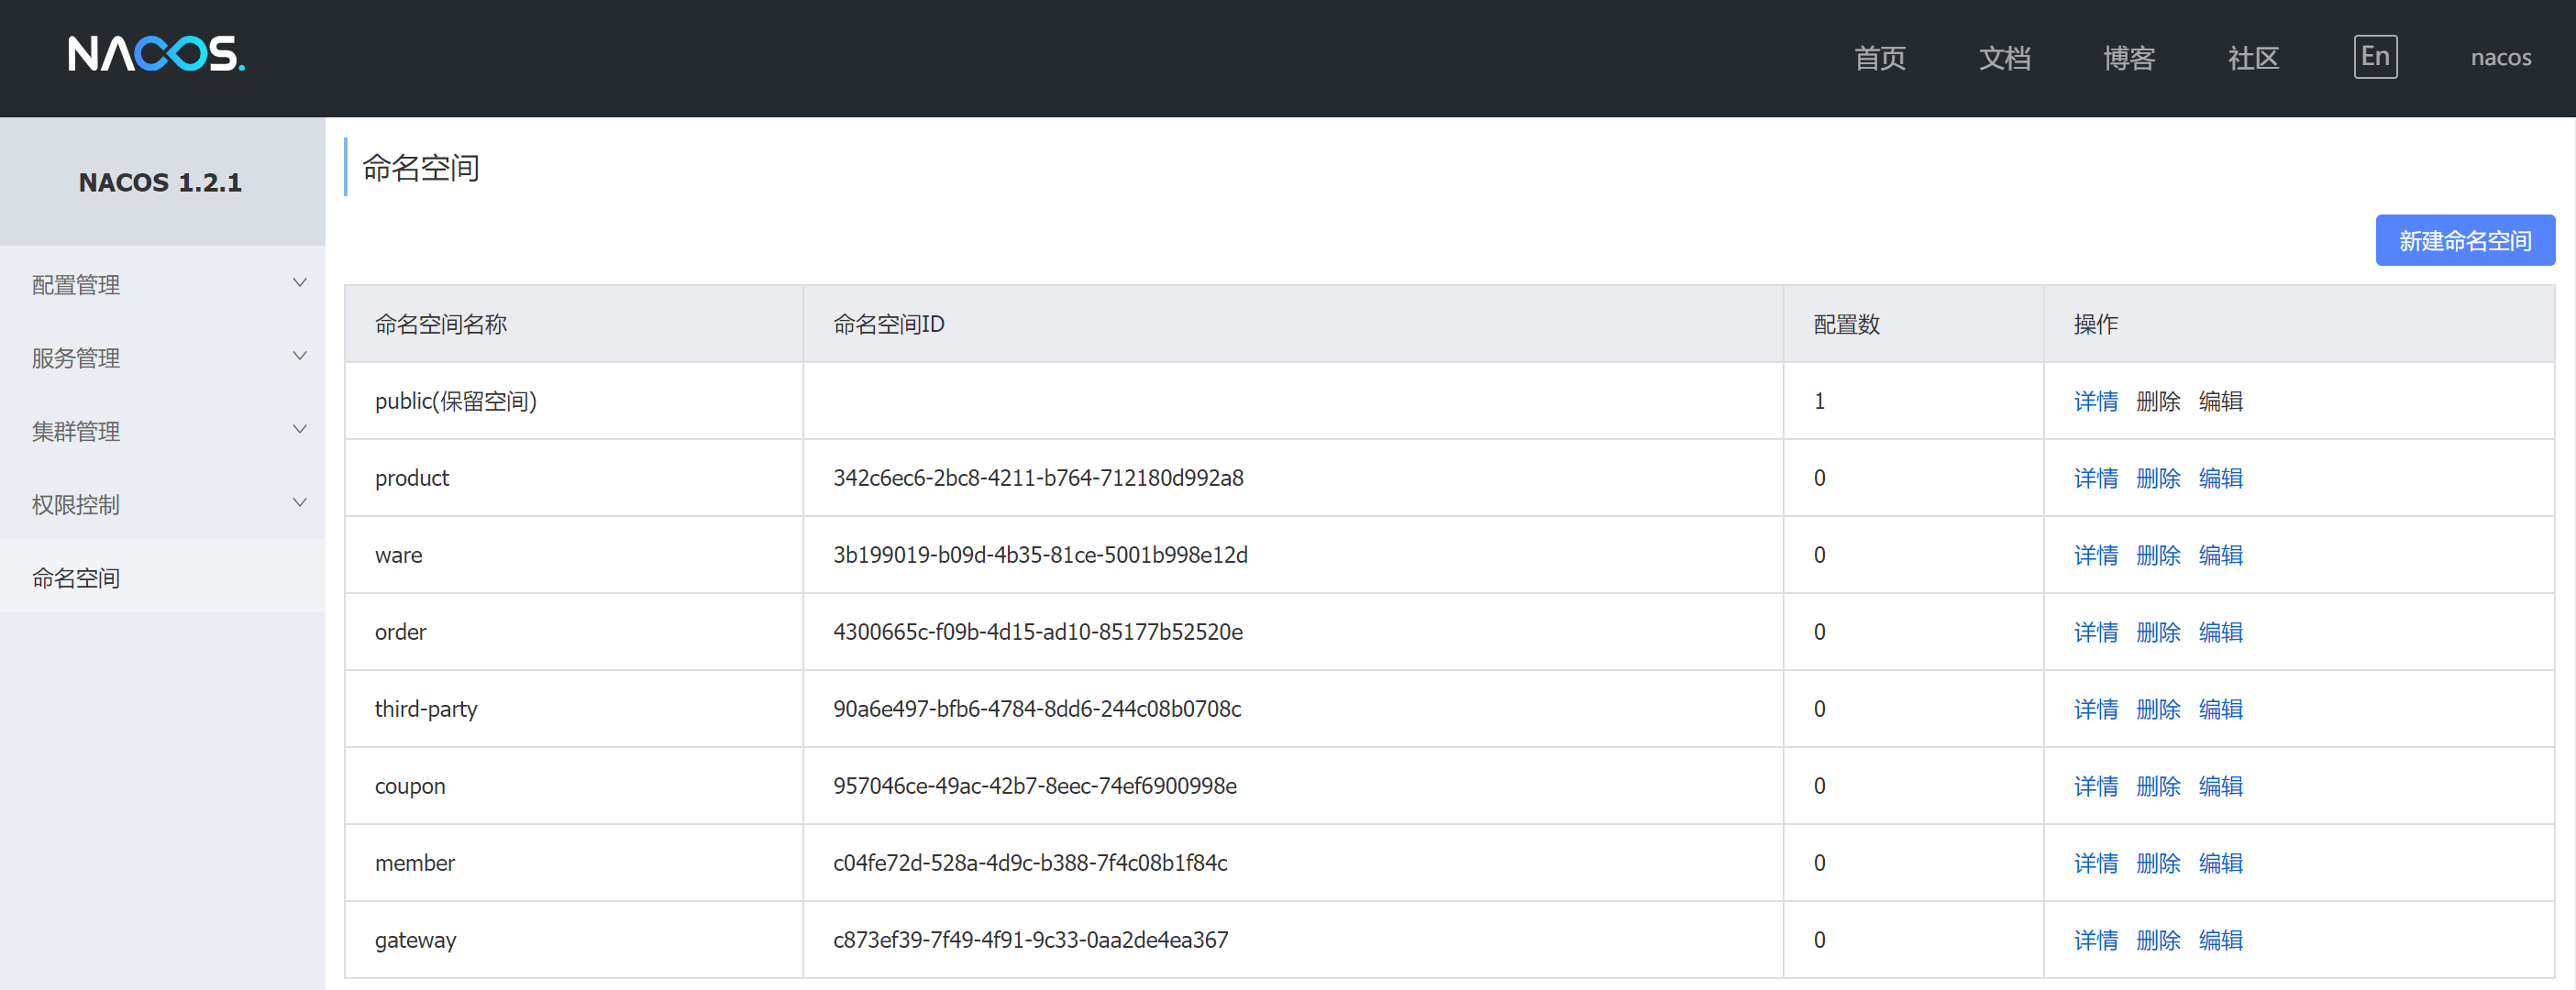
后端代码中在bootstrap.yaml 配置属于自己服务的命名空间
spring:application:name: mall-productcloud:nacos:config:server-addr: 192.168.163.131:8848file-extension: yamlnamespace: 342c6ec6-2bc8-4211-b764-712180d992a8
引入Gateway作为API网关
参考:官网
创建网关子模块mall-gateway
pom.xml
<?xml version="1.0" encoding="UTF-8"?><project xmlns="http://maven.apache.org/POM/4.0.0" xmlns:xsi="http://www.w3.org/2001/XMLSchema-instance"xsi:schemaLocation="http://maven.apache.org/POM/4.0.0 https://maven.apache.org/xsd/maven-4.0.0.xsd"><parent><artifactId>guli-mall</artifactId><groupId>com.zsy</groupId><version>0.0.1-SNAPSHOT</version></parent><modelVersion>4.0.0</modelVersion><artifactId>mall-gateway</artifactId><version>0.0.1-SNAPSHOT</version><description>API网关</description><name>mall-gateway</name><dependencies><dependency><groupId>com.zsy</groupId><artifactId>mall-common</artifactId><exclusions><exclusion><groupId>org.springframework.boot</groupId><artifactId>spring-boot-starter-web</artifactId></exclusion></exclusions></dependency><dependency><groupId>org.springframework.cloud</groupId><artifactId>spring-cloud-starter-gateway</artifactId></dependency></dependencies><build><plugins><plugin><groupId>org.springframework.boot</groupId><artifactId>spring-boot-maven-plugin</artifactId></plugin></plugins></build></project>
主启动类
@EnableDiscoveryClient@SpringBootApplication(exclude = {DataSourceAutoConfiguration.class})public class MallGatewayApplication {public static void main(String[] args) {SpringApplication.run(MallGatewayApplication.class, args);}}
配置文件
application.yaml
spring:application:name: mall-gatewaycloud:nacos:discovery:server-addr: 192.168.163.131:8848server:port: 88
bootstrap.yaml
读取配置中心的配置,在配置中心为每个分组创建各自的命名空间。
spring:application:name: mall-gatewaycloud:nacos:config:server-addr: 127.0.0.1:8848file-extension: yamlnamespace: 07abe11f-3ead-4ae4-add6-71e8f129bfb9
测试:
配置gateway路由规则
spring:application:name: mall-gatewaycloud:nacos:discovery:server-addr: 192.168.163.131:8848gateway:routes:#Query A 参数有A就行,Query B,C 参数B的值为C即可#实现针对于“http://localhost:88/hello?url=baidu”,转发到“https://www.baidu.com/hello”,#针对于“http://localhost:88/hello?url=qq”的请求,转发到“https://www.qq.com/hello”- id: baidu_routeuri: https://www.baidu.compredicates:- Query=url,baidu- id: github_routeuri: https://www.github.compredicates:- Query=url,githubserver:port: 88
启动项目分别请求:
http://localhost:88/s?wd=Ep%E6%B5%81%E8%8B%8F&url=baidu
https://github.com/zsy0216?url=github
会分别跳转到百度和github 表示成功。

若有收获,就点个赞吧
0 人点赞
