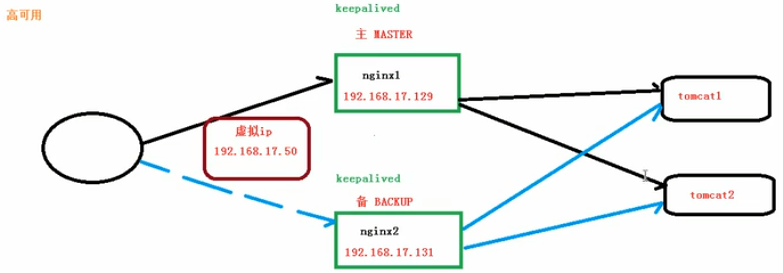
1,什么是Nginx高可用
- 需要两台nginx服务器
- 需在keepalived
- 需要虚拟 ip
2,准备工用
1,需要2台服务器 192.168.17.129 和 192.168.17.131
2,在2台服务安装 nginx
3,在2台服务器上安装 keepalived
yum install keepalived -y
安装成功后会在/etc目录中生成 keepalived 目录,有文件keepalived.conf
3,配置一
1,完成高可用配置(主从配置)
1,修改/etc/keepalived/keepalivec.conf 配置文
global_defs {notification_email {acassen@firewall.locfailover@firewall.locsysadmin@firewall.loc}notification_email_from Alexandre.Cassen@firewall.locsmtp_server 192.168.17.129smtp_connect_timeout 30router_id LVS_DEVEL}vrrp_script chk_http_port {script "/usr/local/src/nginx_check.sh"interval 2 #(检测脚本执行的间隔)weight 2}vrrp_instance VI_1 {state BACKUP # 备份服务器上将 MASTER 改为 BACKUPinterface ens33 //网卡virtual_router_id 51 # 主、备机的 virtual_router_id 必须相同priority 90 # 主、备机取不同的优先级,主机值较大,备份机值较小advert_int 1authentication {auth_type PASSauth_pass 1111}virtual_ipaddress {192.168.17.50 // VRRP H 虚拟地址}}
2,在/usr/local/src 添加检测脚本
#!/bin/bashA=`ps -C nginx –no-header |wc -l`if [ $A -eq 0 ];then/usr/local/nginx/sbin/nginxsleep 2if [ `ps -C nginx --no-header |wc -l` -eq 0 ];thenkillall keepalivedfifi
3,把两台服务器上 nginx 和 和 keepalived 启动
启动 nginx :./nginx
启动 keepalived :systemctl start keepalived.service
2,最终测试
在浏览器地址栏输入 虚拟 ip 地址 192.168.17.50<br /><br />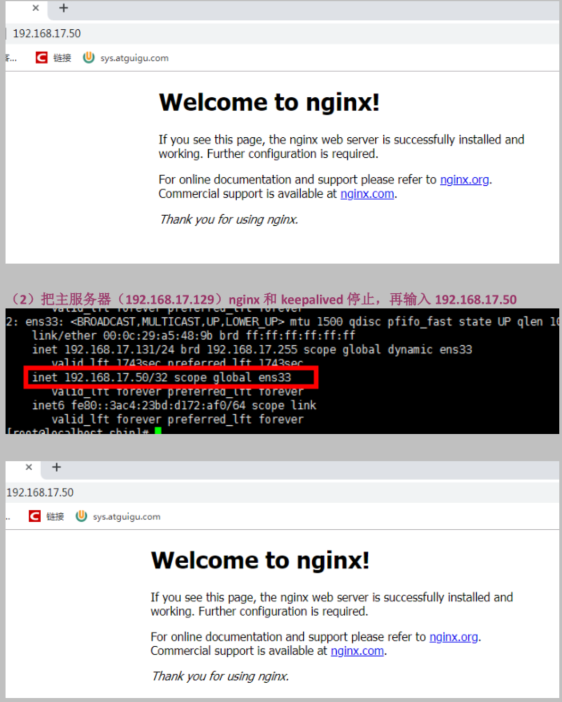
4,配置二
1,测试环境介绍
系统centos7.4 64位
centos6.9 64位
前端node1服务器:DIP:192.168.92.136
VIP1:192.168.92.23
VIP2:192.168.92.24
前端node2服务器:DIP:192.168.92.133
VIP1:192.168.92.24
VIP2:192.168.92.23
后端服务器:web node3:192.168.92.123
web node4:192.168.92.124
web node5:192.168.92.125
我们开始之前先把防火墙和selinux关掉,很多时候我们服务器之间不通都是这些原因造成的。
2、软件安装
Nginx和keepalive的安装非常简单,我们可以直接使用yun来安装。
yum install keepalived nginx -y
后端服务器我们同样用yum来装上Nginx
后端node3
[root@node3 ~]# yum -y install nginx[root@node3 ~]# echo "this is 192.168.92.123" > /usr/share/nginx/html/index.html[root@node3 ~]# service nginx start[root@node3 ~]# curl 192.168.92.123this is 192.168.92.123
后端node4
[root@node4 ~]# yum -y install nginx[root@node4 ~]# echo "this is 192.168.92.124" > /usr/share/nginx/html/index.html[root@node4 ~]# service nginx start[root@node4 ~]# curl 192.168.92.124this is 192.168.92.124
后端node5
[root@node5 ~]# yum -y install nginx[root@node5 ~]# echo "this is 192.168.92.125" > /usr/share/nginx/html/index.html[root@node5 ~]# service nginx start[root@node5 ~]# curl 192.168.92.125this is 192.168.92.125
3、在node1、node2上配置Nginx
[root@node2 ~]# vim /etc/nginx/conf.d/node2.conf #在扩展配置目录中配置需要注释掉主配置文件中的server部分upstream web1 {#ip_hash; #hash绑定ipserver 192.168.92.123:80;server 192.168.92.124:80;server 192.168.92.125:80;}server {listen 80;server_name www.node.com;index index.html index.htm;location / {proxy_set_header Host $host;proxy_set_header X-Forwarded-For $remote_addr;proxy_pass http://web1;}}
4、在node1上配置keepalive
[root@node1 ~]# cat /etc/keepalived/keepalived.conf! Configuration File for keepalivedglobal_defs {notification_email {root@localhost}notification_email_from Alexandre.Cassen@firewall.locsmtp_server 127.0.0.1smtp_connect_timeout 30router_id node1vrrp_mcast_gruop4 224.0.100.23}vrrp_script chk_haproxy {script "/etc/keepalived/chk_nginx.sh"interval 2weight 2}vrrp_instance VI_1 {state MASTERinterface ens37virtual_router_id 51priority 100advert_int 1authentication {auth_type PASSauth_pass 111123}track_script {chk_nginx}virtual_ipaddress {192.168.92.23}}vrrp_instance VI_2 {state BACKUPinterface ens37virtual_router_id 151priority 98advert_int 1authentication {auth_type PASSauth_pass 123123}track_script {chk_nginx}virtual_ipaddress {192.168.92.24}}
5、在node2上配置keepalive
[root@node2 ~]# cat /etc/keepalived/keepalived.conf! Configuration File for keepalivedglobal_defs {notification_email {root@localhost}notification_email_from Alexandre.Cassen@firewall.locsmtp_server 127.0.0.1smtp_connect_timeout 30router_id node1vrrp_mcast_gruop4 224.0.100.23}vrrp_script chk_haproxy {script "/etc/keepalived/chk_nginx.sh"interval 2weight 2}vrrp_instance VI_1 {state BACKUPinterface ens34virtual_router_id 51priority 98advert_int 1authentication {auth_type PASSauth_pass 111123}track_script {chk_nginx}virtual_ipaddress {192.168.92.23}}vrrp_instance VI_2 {state MASTERinterface ens34virtual_router_id 151priority 100advert_int 1authentication {auth_type PASSauth_pass 123123}track_script {chk_nginx}virtual_ipaddress {192.168.92.24}}
6、在双主服务器上添加检测脚本
此脚本作用是检测Nginx是否运行,如果没有运行就启动Nginx
如果启动失败则停止keepalive,保证备用服务器正常运行。
[root@node2 ~]# cat /etc/keepalived/chk_nginx.sh#!/bin/bashstatus=$(ps -C nginx --no-heading|wc -l)if [ "${status}" = "0" ]; thensystemctl start nginxstatus2=$(ps -C nginx --no-heading|wc -l)if [ "${status2}" = "0" ]; thensystemctl stop keepalivedfifi
7、启动Nginx、keepalive服务
[root@node2 ~]# service nginx start[root@node2 ~]# service keepalived start[root@node3 ~]# service nginx start[root@node3 ~]# service keepalived start
8、查看VIP并测试访问
[root@node2 ~]# ip a..........ens34: <BROADCAST,MULTICAST,UP,LOWER_UP> mtu 1500 qdisc pfifo_fast state UP qlen 1000link/ether 00:0c:29:ca:0b:2b brd ff:ff:ff:ff:ff:ffinet 192.168.92.133/24 brd 192.168.92.255 scope global dynamic ens34valid_lft 1293sec preferred_lft 1293secinet 192.168.92.24/32 scope global ens34valid_lft forever preferred_lft foreverinet6 fe80::9bff:2e2b:aebb:e35/64 scope linkvalid_lft forever preferred_lft forever.........[root@node1 ~]# ip a..........ens37: <BROADCAST,MULTICAST,UP,LOWER_UP> mtu 1500 qdisc pfifo_fast state UP qlen 1000link/ether 00:0c:29:04:b6:17 brd ff:ff:ff:ff:ff:ffinet 192.168.92.136/24 brd 192.168.92.255 scope global dynamic ens37valid_lft 1567sec preferred_lft 1567secinet 192.168.92.23/32 scope global ens37valid_lft forever preferred_lft foreverinet6 fe80::7ff4:9608:5903:1a4b/64 scope linkvalid_lft forever preferred_lft forever..........
[root@node1 ~]# curl http://192.168.92.23this is 192.168.92.123[root@node1 ~]# curl http://192.168.92.23this is 192.168.92.124[root@node1 ~]# curl http://192.168.92.23this is 192.168.92.125[root@node1 ~]# curl http://192.168.92.24this is 192.168.92.124
9、测试脚本是否能正常运行
手动停止Nginx后自动恢复启动
[root@node1 ~]# systemctl stop nginx[root@node1 ~]# ss -tnlpState Recv-Q Send-Q Local Address:Port Peer Address:PortLISTEN 0 128 *:80 *:* users:(("nginx",pid=20257,fd=6),("nginx",pid=20256,fd=6))LISTEN 0 128 *:22 *:* users:(("sshd",pid=913,fd=3))LISTEN 0 100 127.0.0.1:25 *:* users:(("master",pid=991,fd=13))LISTEN 0 128 :::22 :::* users:(("sshd",pid=913,fd=4))LISTEN 0 100 ::1:25 :::*

若有收获,就点个赞吧
0 人点赞
