ansible是什么?
ansible是一个开源的自动化运维工具,实现了批量系统配置、批量程序部署、批量运行命令等功能。
ansible安装
- 免密登录
- 安装epel-release
- 安装ansible
yum install -y epel-releaseyum install -y ansible
命令
```shell ansible all -m command -a “chdir=/bin pwd”
mkdir /backup ansible all -m command -a “chdir=/backup pwd”
ansible Server -m copy -a “src=/etc/hosts dest=/tmp/oldboly123.txt”
ansible Server -m copy -a “content=’Hello Ansible’ dest=/tmp/oldboly123.txt” cat /tmp/oldboly123.txt Hello Ansible ansible Server -m copy -a “src=/tmp/oldboy123.txt dest=/tmp/remote_src.test” ansible Server -m copy -a “src=/etc/hosts dest=/tmp/remote_src.test backup=yes”
级联创建(目录后不加文件) ansible Server -m copy -a “src=/etc/hosts dest=/tmp/1/2/3/ backup=yes”
ansible Server -m yum -a ‘name=httpd state=installed’ ansible Server -m yum -a ‘name=httpd state=latest’ 最新版本 ansible Server -m yum -a ‘name=httpd state=removed’
ansible Server -m setup -a “filter=ansible_default_ipv4” ansible Server -m setup -a “filter=ansible_memory_mb”
<a name="vzkH9"></a>### ansible的常用模块有哪些?1. ping(测试连通性)1. command(在远程主机上执行命令)1. shell(支持bash的特性如管道)1. script(在远程主机上执行控制端的脚本文件)1. copy(从管理端到被管理端)1. fetch(从被管理端到管理端)1. file(用于配置文件属性)1. user(配置用户)1. group(配置用户组)1. yum(用于安装软件包)1. cron(配置计划任务)1. service(用于管理服务)1. setup(查看远程主机的基本信息)1. synchronize(使用rsync同步文件)1. package(使用os包管理器安装、升级和删除包)1. systemd1. get_url(该模块主要用于从http、ftp、https服务器上下载文件,类似于wget)<a name="LE7eY"></a>### 命令行参数- -i : 指定主机清单文件- -k : 使用密码远程- -f : 启动的并发线程数(默认5)- -m : 要使用的模块- -a : 模块特有的参数运维自动化场景1. 操作系统的预备自动化(镜像)- PXE- kickstart- cobber2. 配置自动化2. 监控自动化- 系统及应用监控- 日志监控4. 代码的持续集成和发布自动化git github jenkins docker<a name="snaIO"></a>## 一、配置自动化场景配置自动化可以帮助企业在大量服务器存在的情况下,快速实现应用部署,软件配置等一大利器。通过配置自动化可以在如下方面有优异表现:- 提高配置效率- 提高配置的准确性- 降低人工参与度<a name="bY2OJ"></a>## 二、配置自动化产品| 序号 | 工具 | 描述 || --- | --- | --- || 1 | ansible | 开箱即用,使用ssh协议 || 2 | saltstack | 需要anget端配合,配置部署速度快 || 3 | puppet | 老牌配置自动化工具,需要agent端配合 |<a name="CxUCc"></a>## 三、ansible介绍无主无从 开箱即用 用完即走<a name="XiNmM"></a>### 1. 工作原理图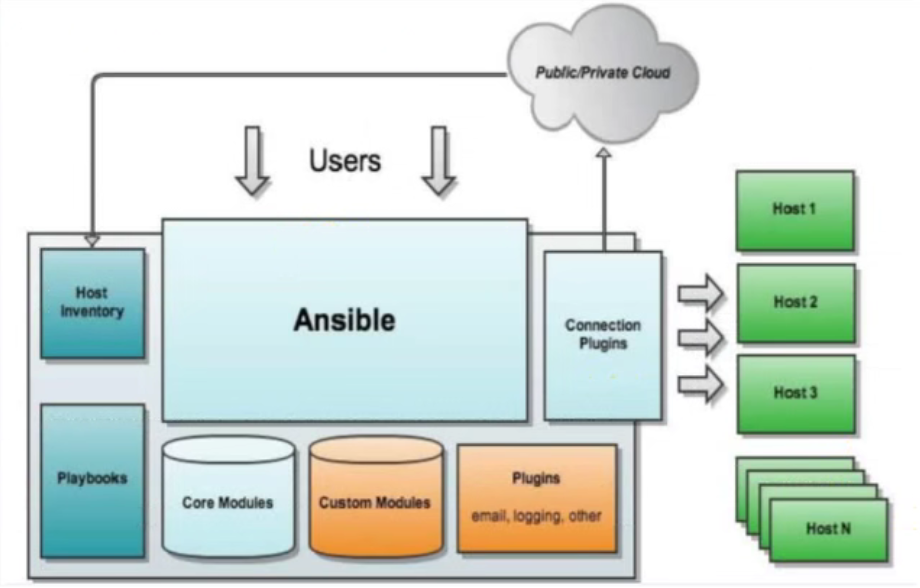- 可以对大量主机进行操作(主机)- 本身包含大量的模块 hostname copy 用户自定义模块(ansible)- 主机清单(ansible必须认识你,不会胡乱更改。ansible)- 借助ssh,不用部署客户端(ansible)- playbook(剧本)可以完成复杂的批量部署工作(ansible)<a name="U5PwX"></a>## 2. 安装ansible1. 安装epel源(epel源安装的ansible会更新)1. 安装ansible```shellrpm -qa|grep ansible #验证
3. ansible主机清单
存储位置在:/etc/ansible/hosts
主机清单的作用
- 读取主机列表
- 实现主机分组
两种方法定义主机清单
- 直接写入ip地址或主机名
- 在主机清单中添加分组,再到主机清单中添加ip或主机名(要熟练使用第二种) ```shell [webgroup] 11.22.33.44
[webgroup2] web1 web2
ansible的工作原理<br />ansible主机清单定义<a name="adyeo"></a>### 4. ping模块如何使用ansible来实现主机间联通性测试?- 多主机间免密登陆```shellssh-keygen -t rsa -f ~/root/.ssh/id_rsa -N ''ssh-copy-id xx.xx.xx.xx
- 定义主机清单
- 使用ping模块测试联通性
问题:ansible xx.xx.xx.xx -m ping
- 这里的ping是真ping还是假ping?
ansible是通过ssh协议来通信的,这里ansible的ping是假象的ping。
4. cron模块实现配置多主机时间同步
- 时钟源服务器
- 国内选择阿里时钟源 time1.aliyun.com
- 国际选择微软时钟源 time.windows.com
ntpdate time1.aliyun.com
cron模块应用配置
ansible xx.xx.xx.xx -m cron -a 'name="test cron" job="ntpdate time1.aliyun.com" minute=0 hour=*/1'ansible xx.xx.xx.xx -m cron -a 'name="global cron" job="ntpdate time.windows.com" minute=*/3'
验证远程主机结果
crontab -l
5. copy模块
准备本地解析文件:/etc/hosts
192.168.1.10 ansiblecontroller192.168.1.20 web1192.168.1.30 web2192.168.1.40 web3
copy模块应用
ansible xx.xx.xx.xx -m copy -a "src=/etc/hosts dest=/etc/hosts"
远程主机验证
cat /etc/hosts
达内ansible
ansible也是cobbler的作者,Michael DeHaan
批量修改密码、批量安装软件、批量执行基于SSH架构
可以管理Linux和Windows
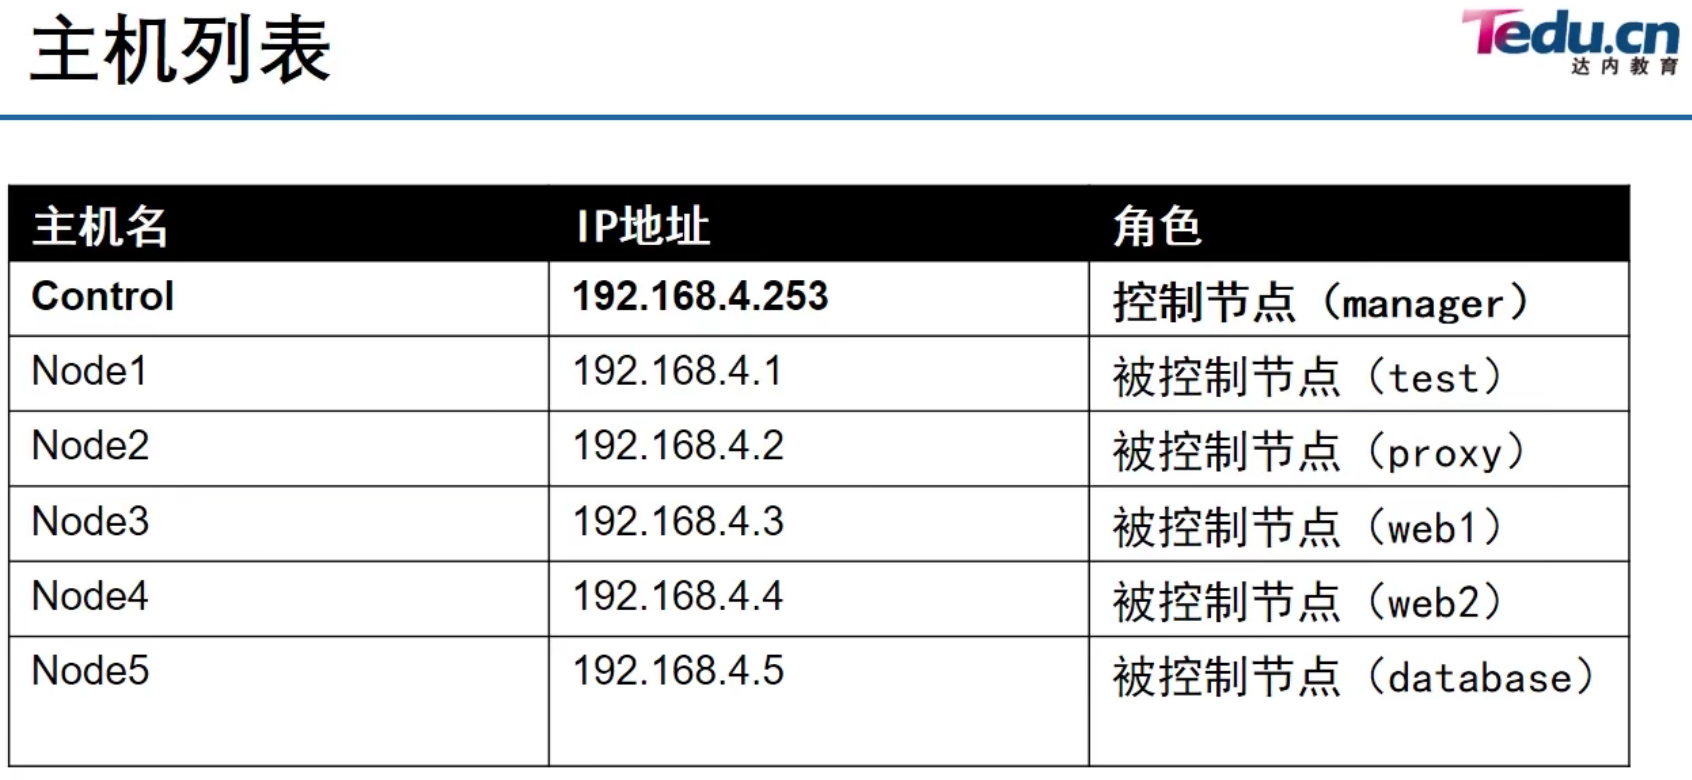
主机列表
配置文件
- 主配置文件:/etc/ansible/ansible.cfg(习惯性命名)
ansible配置文件检查顺序:
- 环境变量ANSIBLE_CONFIG变量定义的配置文件
- 当前目录下的./ansible.cfg
- 用户家目录下的~/ansible.cfg
- 最后检查/etc/ansible/ansible.cfg
ansible.cfg内容
mkdir ~/ansiblevim ~/ansible/ansible.cfg[defaults]inventory = ~/ansible/inventory#fork = 5 # ssh并发数#ask_pass = True # 使用密钥还是密码#host_key_ckecking = False # 是否校验密钥这些都是默认参数
主机清单文件:参考/etc/ansible/hosts
vim ~/ansible/hosts[test]node1[proxy]node2[webserver]node[3:4][database]node5[cluster:children] # 嵌套组,children为关键词webserverdatabase
测试ansible配置和环境是否正常
cd ~/ansibleansible all --list-hostsansible node1 -m pingansible node1,node2 -m pingansible webserver -m ping
Ansible ad-hoc命令
ansible ad-hoc是一种通过命令行批量管理的方式
格式:
ansible 主机 -m 模块名 -a “参数”
- 其他参数
- -k 使用密码远程
- -i 指定其他主机列表文件
什么是模块?
模块就是写好的py脚本,拷贝到被管理端主机,然后执行!
默认模块是command
ansible node1 -m command -a 'uptime'ansible node1 -a 'ip a s' # 默认使用command模块ansible test -a 'date'ansible all -a 'date' # all是一个特殊的组
获取帮助
ansible-doc -l # 获取所有已安装的模块ansible-doc -l|grep yumansible-doc yum # 查看yum模块的帮助
总结:
- 掌握ansible ad-hoc命令行方式
-
shell模块
command模块不启动shell,直接通过ssh执行命令
- command模块不支持bash特性,如管道和重定向等功能
所有需要调用shell的功能都无法使用
ansible test -m command -a "ps -ef|wc -l"ansible test -m command -a "ps > a.txt"ansible test -m command -a "ps &"# 以上都需要开启bash解释器,所以都会报错
使用shell模块注意事项
ansible test -m shell -a "cd /tmp"ansible test -m shell -a "touch my.txt"# 前后是两个shell,这可能不是我们想要的结果
空格分割,传递多个参数(chdir)
ansible test -m shell -a "chdir=/tmp touch my.txt"ansible test -m shell -a "chdir=/tmp touch touch a.txt b.txt c.txt"ansible-doc shell
shell模块还支持判断(creates、removes)
creates 文件名:文件存在、不执行shell命令
- removes 文件名:文件不存在、不执行shell命令
ansible test -m shell -a "ssh-keygen -f ~/.ssh/id_rsa -N '' creates=~/.ssh/id_rsa"ansible node1,node2 -m shell -a "unzip xxx.zip removes=/bin/unzip"
script模块
如果命令很复杂,script允许在本地写脚本,拷贝到被管理端并执行。脚本可以是python、shell、perl等 ```shell cat test.sh yum install httpd systemctl start httpd
ansible node1,node2 -m script -a “./test.sh”
<a name="v62J9"></a>### file模块(幂等性)为什么要存在这么多单独的模块?<br />幂等性<br />创建文件、目录、链接;修改全新和属性```shellansible test -m file -a "path=/tmp/file.txt state=touch"ansible test -m file -a "path=/tmp/mydir state=directory"# 删除ansible test -m file -a "path=/tmp/file.txt state-absent"ansible test -m file -a "path=/tmp/mydir state-absent"# 软链接ansible test -m file -a "src=/etc/hosts path=/tmp/hosts state=link"
copy模块
backup=yes 如果目标主机有同名文件,则先备份
ansible test -m copy -a "src=~/a3.txt dest=/root/a3.txt"# 没有源文件直接定义内容ansible test -m copy -a "content='hello world\ntest' dest=/root/test.txt"
fetch模块(收集远程主机上的文件)
ansible node1,node2 -m fetch -a "src=/etc/hostname dest=~"# 自动创建了node1和node2的目录 拷贝的文件放在对应的目录下
lineinfile模块|replace模块
ansible test -m lineinfile -a "path=/etc/issue line='hello world'"# 在文件末尾添加一行ansible test -m lineinfile -a "path=/etc/issue line='insert' insertafter='Kernel'"将内容插入到Kernel行的后面
替换
ansible test -m lineinfile -a "path=/etc/issue regexp='hello' line='ni hao'"# 如果在/etc/issue文件中匹配到包含hello的行,把整行内容替换为ni hao# 如果无法匹配到hello,则在文件最后添加一行nihao# 如果有多行内容包含hello, 仅替换最后一行
lineinfile替换的是一整行,replace可以替换一个词
ansible test -m replace -a "path=/etc/issue.net regexp=Kernel replace=Ocean"
user模块
user模块可以管理Linux系统账户
ansible test -m user -a "name=user1"ansible test -m user -a "name=user2 uid=1010 group=adm groups=daemon,root home=/home/user2"ansible test -m test -a "name=user3 password={{'abc'|password_hash('sha512')}}"# 不管什么密码都需要hash,这是Linux的标准算法,不可改变ansible test -m test -a "name=user1 groups=daemon,root"# 修改user1的附加组ansible test -m test -m user -a "name=user2 state=absent remove=true"# 删除用户的时候同时删除加目录、邮箱
yum_repository模块
创建或修改yum配置文件
ansible test -m yum_repository -a "name=myyum description=hello baseurl=ftp://192.168.4.254/centos gpgcheck=no"ansible test -m yum_repository -a "name=myyum state=absent"
yum模块
ansible node2 -m yum -a "name=unzip state=persent" # 安装ansible node2 -m yum -a "name=unzip state=latest" # 升级ansible node2 -m yum -a "name=unzip state=absent" # 卸载
service模块
管理服务,是否开机自启动等
ansible test -m service -a "name=httpd state=started"ansible test -m service -a "name=httpd state=stopped"ansible test -m service -a "name=httpd state=started enabled=yes" # 启动服务并开机自启动
逻辑卷相关模块
lvg模块 创建、删除卷组(VG),修改卷组大小
ansible test -m yum -a "name=lvm2"ansible test -m lvg -a "vg=myvg pvs=/dev/sdb1"ansible test -m lvg -a "vg=myvg pvs=dev/sdb1,/dev/sdb2"
lvol模块 创建、删除逻辑卷(LV),修改逻辑卷的大小
ansible test -m lvol -a "lv=mylv vg=myvg size=2G"ansible test -m lvol -a "lv-mylv vg-myvg size=4G" # 修改逻辑卷的大小ansible test -m lvol -a "lv-mylv vg-myvg state=ansent force=yes"ansible test -m lvg -a "vg=myvg state=absent"
Ansible进阶
sudo提权
- 管理员先授权(/etc/sudoers)
- 普通用户以sudo的方式执行命令 ```shell jerry ALL=(root) /usr/bin/systemctl # 任何主机上以root的身份 jerry ALL=(ALL) /usr/bin/systemctl # 任何主机上以任何人的身份 jerry ALL=(ALL) NOPASSWD:/usr/bin/systemctl # 不需要输入密码
sudo systemctl restart httpd
ansible test -m lineinfile -a “path=/etc/sudoers line=’alice ALL=(ALL) NOPASSWD:ALL’”
<a name="CP0Aa"></a>### Ansible配置进阶/etc/ansible/ansible.cfg<br />[default]<br />remote_user = alice # 以什么用户管理远程主机<br />```shellansible all -m shell -a "who"ansible all -m shell -a "ls /root"
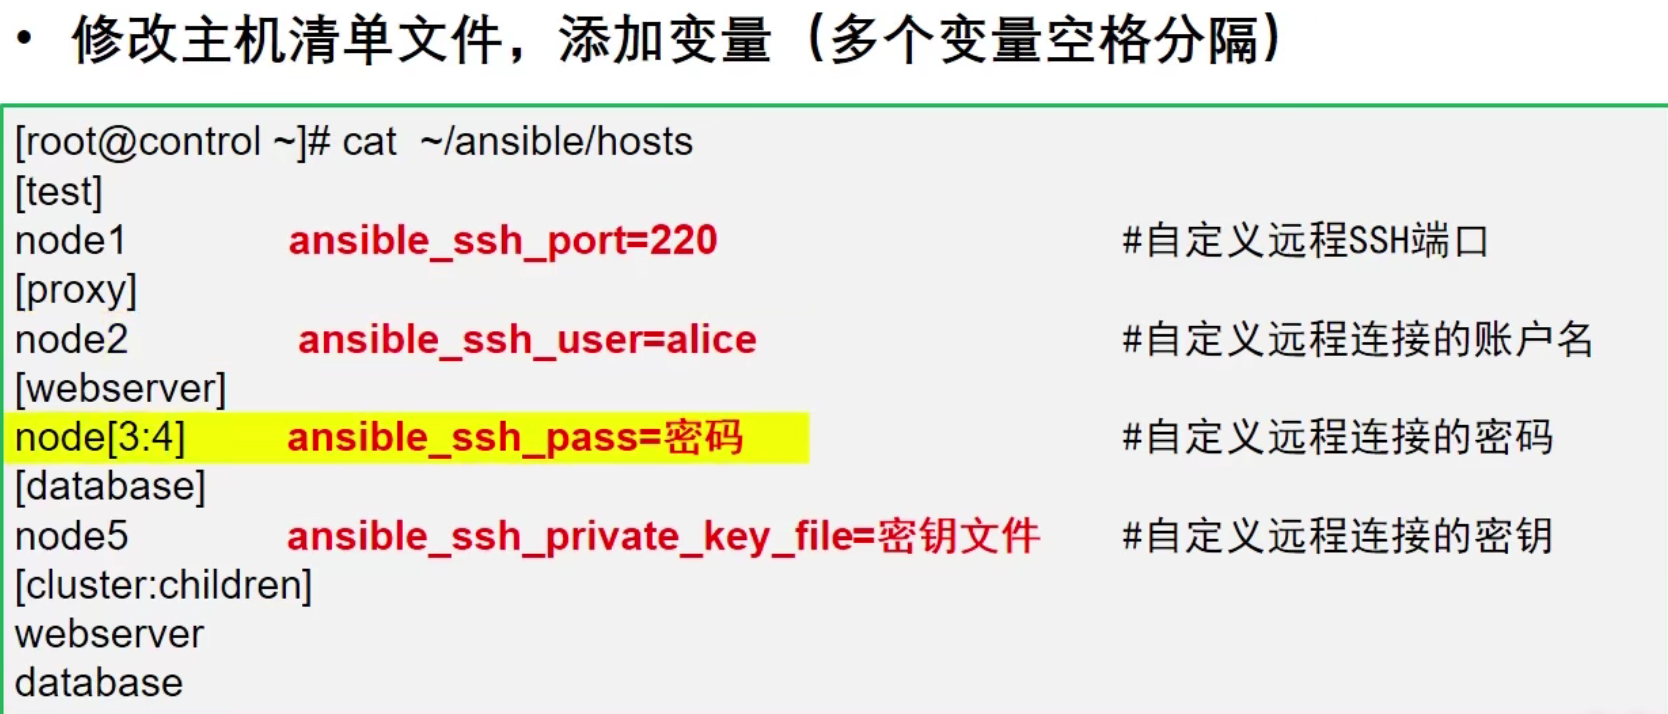
主机清单单独变量
Ansible playbook
命令行:需要反复编写
剧本:重复执行的,复杂的命令写到一个文件中
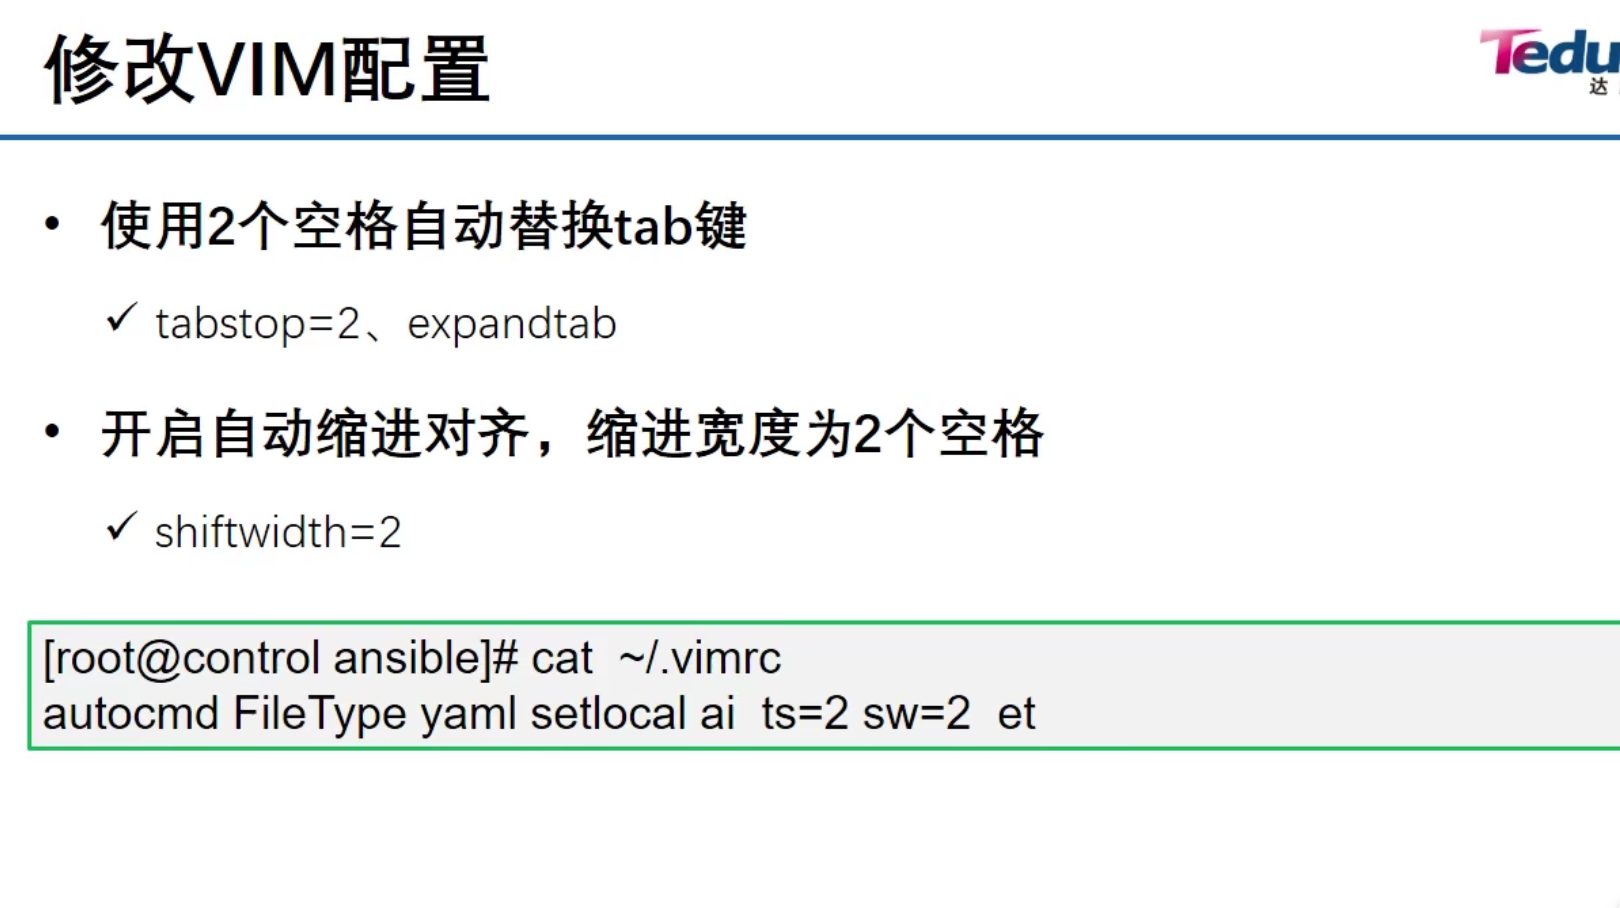
YAML
一种可读性高,用来表达数据序列的语言格式
YAML以数据为中心,重点描述数据的关系和结构
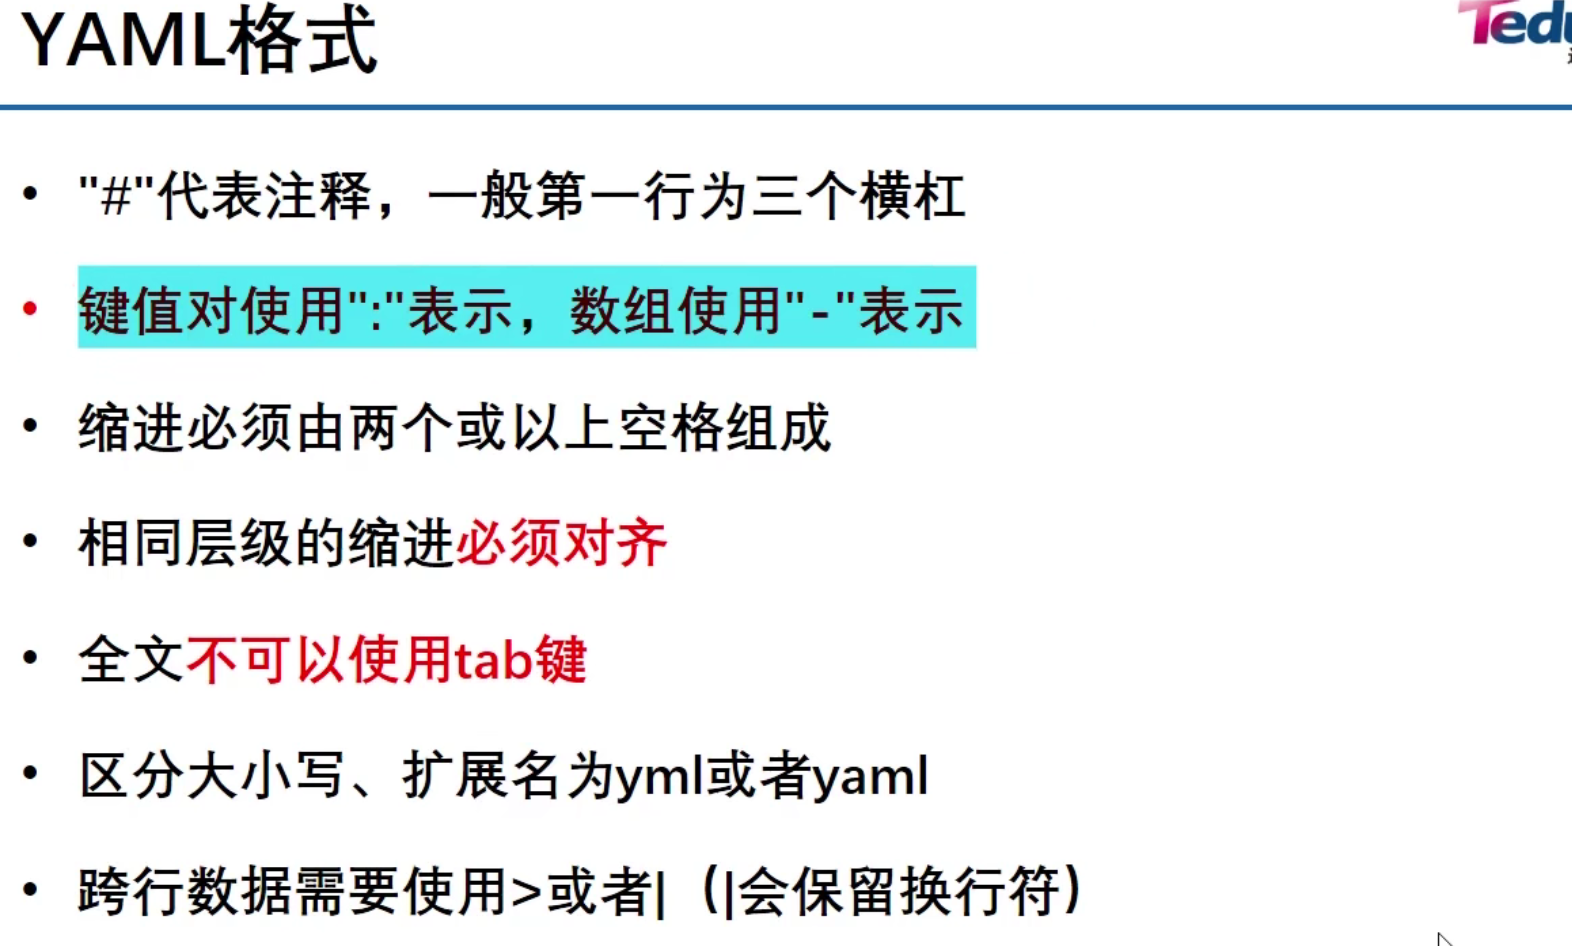
YAML格式
跨行文本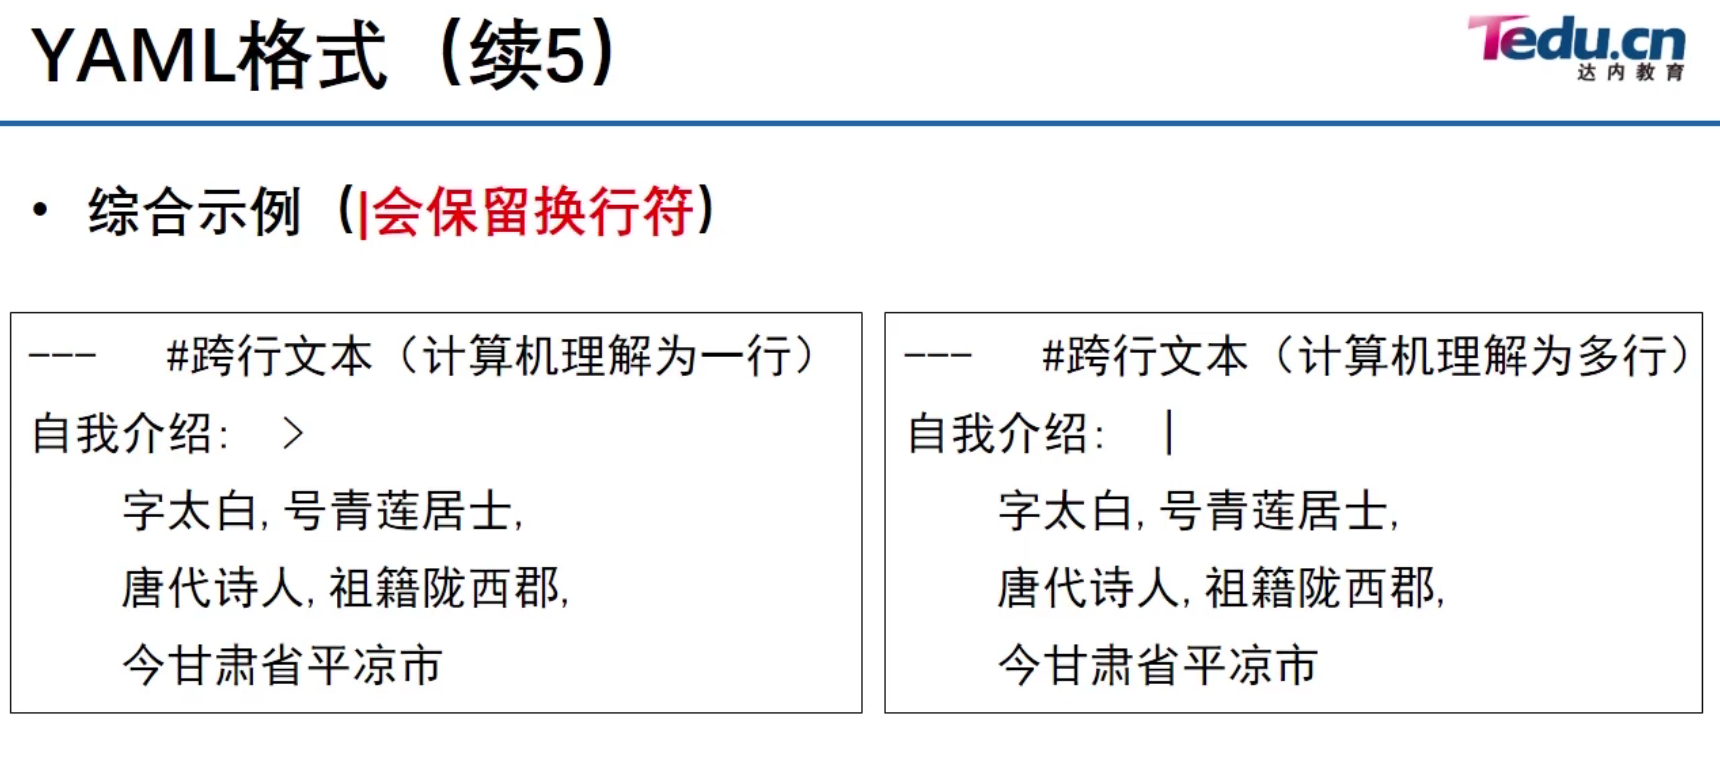
Playbook语法格式
- playbook采用YAML格式编写
- playbook文件中由一个或多个play组成
- 每个play中包含:
- hosts(主机)、tasks(任务)
- variables(变量)、roles(角色)、handers等元素
- 使用ansible-playbook命令运行playbook剧本
测试第一个playbook
---- hosts: alltasks:- name: This is my first playbookping:
ansible-playbook ~/ansible/test.yml
多个组或多个任务的playbook
---- hosts: test, webserver # 多个组用逗号分隔tasks:- name: This is my first playbookping:- name: Run a shell commandshell: touch ~/shell.txt
ansible-playbook ~/ansible/test.yml -f 5 # 并发连接数
创建用户
---- hosts: webservertasks:- name: Add the user johnuser:name: johnuid: 1040group: daemonpassword: "{{'123' | password_hash('sha512')}}"
---- hosts: webservertasks:- name: Add the user johnuser:name: johnshell: /bin/bashgroups: bin, admpassword: "{{'123' | password_hash('sha512')}}"
---- hosts: webservertasks:- name: Add the user johnuser:name: johnstate: absent
使用playbook分区的例子
---- hosts: testtasks:- name: Create a new primary partition with a size of 1GiBparted:device: /dev/sdbnumber: 1state: presentpart_end: 1GB- name: Create a new primary partition with a size of 2GiBparted:device: /dev/sdbnumber: 2state: presentpart_start: 1GBpart_end: 3GB- name: Create a volume group on top of /dev/sdb1lvg:vg: my_vgpvs: /dev/sdb1- name: Create a logic volume of 512mlvol:vg: my_vglv: my_lvsize: 512m
安装软件
---- hosts: webservertasks:- name: Install a list of packagesyum:name:- httpd- mariadb- mariadb-server- name: Install the 'Development tools' package groupyum:name: "@Development tools" # @表示主包- name: update softwareyum:name: '*'state: latest
setup模块
- ansible_facts用于采集被管理设备的系统信息
在剧本中是可以直接调用变量的,使用debug模块去显示 ```yamlansible test -m setup # 查看收集的信息,保存在变量中ansible test -m setup -a "filter=ansible_mem*"
- hosts: test
tasks:
- debug: var: ansible_all_ipv4.addresses
- debug: msg: “主机名称是:{{ansible_hostname}}”
- debug: var: ansible_devices.sda.partitions.sda1.size
- debug:
msg: “总内存大小:{{ ansible_memtotal_mb }}”
```
利用setup模块获取主机信息
通过debug模块显示变量信息
Ansible定义变量
根据优先级排序
- Inventory变量
- Host Facts变量(可以直接调用ansible收集的系统信息)
- Register变量
- Playbook变量
- Playbook提示变量
- 变量文件
- 命令行变量
定义主机清单的变量文件
cat ~/ansible/hosts[test]node1 myvar1="hello the world" myvar2="content"[webserver:vars]yourname="jacob"
cat ~/ansible/inventory_var.yml---- hosts: testtasks:- name: create a file with var.shell: echo {{myvar1}} > /tmp/{{myvar2}}- hosts: webservertasks:- name: create a user with var.user:name: "{{yourname}}"
Host Facts变量
cat ~/ansible/facts_var.yml---- hosts: testtasks:- name: Use facts info.copy:content: "{{ansible_hostname}}:{{ansible_bios_version}}"dest: /tmp/facts.txt
register定义变量
cat ~/ansible/register.yml---- hosts: testtasks:- name: save shell result to a variableshell: hostnameregister: myvar- name: print the variabledebug:msg: "{{ myvar }}"msg: "{{ myvar.stdout }}" # 仅显示一部分信息
playbook变量(vars定义变量)
cat ~/ansible/playbook_var.yml---- hosts: testvars:iname: healipass: '123456'tasks:- name: Use variables create user.user:name: "{{iname}}"password: "{{ipass | password_hash('sha512')}}"
playbook变量(vars_prompt变量)
cat ~/ansible/prompt_var.yml---- hosts: testvars_prompt:- name: inameprompt: "请输入用户名"private: no- name: ipassprompt: "请输入密码"private: yestasks:- name: Use variables create user.user:name: "{{iname}}"password: "{{ipass | password_hash('sha512')}}"
vars_files变量
-e参数定义
cat ~/ansible/prompt_var.yml---- hosts: testtasks:- name: create useruser:name: "{{iname}}"password: "{{ipass | password_hash('sha512')}}"
执行的时候:
ansible-playbook command_var.yml -e iname=tiechui -e ipass=123456
Ansible模块应用
hosts: test tasks:
- name: install firewalld yum: name: firewalld state: present
- name: run firewalld service: name: firewalld state: started enabled: yes
- name: set firewalld rule
firewalld:
port: 80/tcp
permanent: yes # 永久生效的
state: enable # 打开
```
firewall-cmd —list-all permanent
80/tcp
firewall-cmd —list-ports permanentAnsible高级语法
错误处理机制: 第一个任务出错,后面的任务中断;ignore_errors: true 也可以全局忽略错误
- 熟悉handers任务
- 熟悉when条件判断
- 熟悉block任务块
- 熟悉loop循环的使用方法
Ansible Vault
数据的加密和解密

若有收获,就点个赞吧
0 人点赞
