keywords: 双向数据绑定、Object.defineProperty、 Dep、 Watcher、 Compiler、 keep-alive …
Frankly Speaking, 我并专攻vue技术栈,但是简单了学习了vue的核心原理和源码之后,感觉很有可借鉴的地方,那么很功夫一定不会白费。
vue2的代码结构:
- /compiler ⽬录是编译模版;vue这套静态模版分析是运行在浏览器端的还是打包的时候执行的?答案是都行,离线模式 和 在线模式;
- /core ⽬录是 Vue.js 的核⼼(是重点);
- /entries ⽬录是⽣产打包的⼊⼝;
- /platforms ⽬录是针对核⼼模块的 ‘平台’ 模块,platforms ⽬录下暂时只有 web ⽬录(在最新的开发⽬录⾥⾯已经有 weex ⽬录了)。web ⽬录下有对应的 /compiler、/runtime、/server、/util⽬录;
- /server ⽬录是处理服务端渲染;
- /sfc ⽬录处理单⽂件 .vue;
- /shared ⽬录提供全局⽤到的⼯具函数。
Vue.js 的组成是由 core + 对应的 ‘平台’ 补充代码构成 。
core中文件:
- compents 模板编译的代码
- global-api 最上层的⽂件接⼝
- instance ⽣命周期->init.js
- observer 数据收集与订阅
- util 常⽤⼯具⽅法类
- vdom 虚拟dom
vue的流程模型
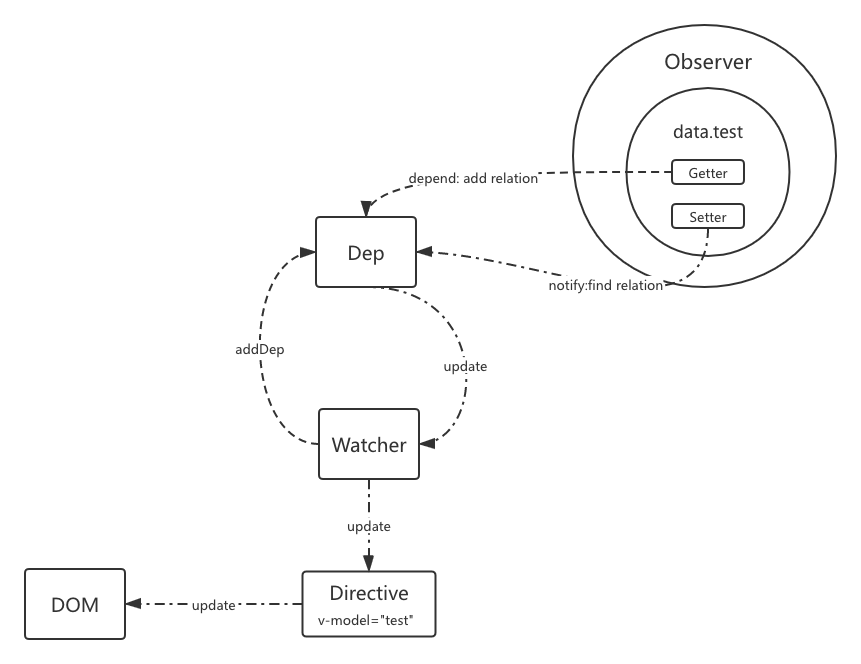
vue的动态数据和静态模版之间是通过指令关联的。
静态模版,结合关联的动态数据,生成真实DOM的映射对象,VDOM,VDOM当然是由Vnode构成的。每一个Vnode都是经由render方法生成的。
那么它的核心流程就是,扫描模版中的动态数据,将这些数据的依赖关系收集起来,当数据被修改,查找这些依赖,根据依赖关系通知这些view层来触发render。
DEP —- 维护数据和view依赖的模块;
Watcher —- Watcher就是View层的关联对象,由此对象来调用更新方法;
下面我们就逐一审视下这些重要的模型角色,首先看看双向数据绑定。
vue2的双向数据绑定
核心API:Object.defineProperty()
let person = {}let temp = nullObject.defineProperty(person, 'name', {get: function () {console.log('getting Name:>>', temp)return temp},set: function (val) {console.log('setting Name:>>', val)temp = val}})
这样我们每次对o对象设置b属性的值,或者访问b比如o.b的时候,都会调用上述demo的get和set方法。
基于这个特性,我们就可以在这些属性的访问器中实现所谓‘双向数据绑定’了:当get方法触发的时候,就说明view层中有对这个数据的依赖,那么在此时收集这些依赖关系;当set方法触发的时候,需要通知所有我们此前收集的依赖关系,通知他们需要更新view了。
这个过程对应上面看到的流程模型中就是:
- Dep:get方法中维护的数据和依赖的关系,就像一个电话本一样;当某个数据的set方法被触发,需要在Dep中找到这数据的依赖关系,然后需要根据这些关系通知对应的view(指令)该更新了;
- Watcher:Watcher就是,当dep的更新的时候,调用每一个watcher的update的方法,其实就是再调用render。早期的vue大致是每一个指令对应一个watcher。具体的话大致是:vue1以指令为单位建立一一对应关系;vue2中 以component为维度对应一个watcher,watcher对应多个dep;
这不就是发布订阅,或者观察者模式么:一个目标对象管理所有相依于它的观察者对象,并且在它本身的状态改变时主动发出通知。这通常透过呼叫各观察者所提供的方法来实现。
Object.defineProperty存在问题
大家都知道,vue3中已经废弃了在Object.defineProperty的做法,而是采用了Proxy来拦截对象。
那么为什么要废弃呢,那肯定是Object.defineProperty存在问题了呗:
- 对象
最基本的Object.defineProperty只能监听一层数据,比如上述person demo,如果name的值是一个对象:
// 属性是数组的时候person.name = { familyName: 'zhou', nickName : 'enen' };// 当设置person.name.familyName = 'Zhou';
这种情况下设置person.name.familyName = ‘Zhou’就不能触发set方法了,只能触发访问name的get方法:
// in consolegetting Name:>> {familyName: "zhou", nickName: "enen"}
不过这个问题当然不是无解的,可以在定义的时候,遍历数据对象,如果对象的key不是基本类型,就再遍历这个key的数据,如此递归下去,就能对所有定义阶段的数据进行监听…
不过这里还有一个问题,就是无法对新数据监听:
person.age = 27;
- 数组
js中的数组,本质上其实也是有key和value的。只不过其key就是index。数组并不是不能监听啊,很多人说不能被监听,是不对的
那么从这个角度来看,数组也涉及上述问题,那么针对这个问题,在解法上来说也是一样的—递归遍历。但是数组当然还涉及其它的问题:
function defineObserverPerperty(data, key, value){Object.defineProperty(data, key, {get: function () {console.log('getting Name:>>', value)return value},set: function (new_val) {console.log('setting Name:>>', new_val)value = new_val}})}// 遍历对象function mapObj(o) {Object.keys(o).forEach( k => {defineObserverPerperty(o, k, o[k]);})}
比如上面这段代码,我们去访问list[3]或者设置list[3]显然是不能触发监听,这是老问题:
const list = ['a', 'b', 'c'];list[3] = 'x';
不过这个问题不至于导致重写数组,真正的问题在于多次触发,比如我们向首位塞入数据:
list.unshift('zero')
这种情况下,unshift本来数组的一个正常操作,我们期望是只涉及一个元素的读写,但是,控制台的打印明显是不符合预期的:
getting Name:>> cgetting Name:>> bsetting Name:>> bgetting Name:>> asetting Name:>> asetting Name:>> zero
因为对数组的操作,可能涉及到数组内部其它元素,其index对应的key的值发生变化。
这就要导致vue2对数组重写了。
Observer 处理成响应式数据
- class Observer
简单看下src/core/observer/index.js
这是这个模块的主入口。在index中导出了Observer类,重点关注下构造函数中的流程:构造函数中分别对数组和非数组进行了判断,非数组的话直接走walk方法,数组的话,最终统一走了observeArray方法。
export class Observer {value: any;dep: Dep;vmCount: number; // number of vms that have this object as root $dataconstructor(value: any) {this.value = valuethis.dep = new Dep(); // 依赖关系(电话本)this.vmCount = 0def(value, '__ob__', this); // 表示是响应式数据if (Array.isArray(value)) {if (hasProto) {protoAugment(value, arrayMethods)} else {copyAugment(value, arrayMethods, arrayKeys)}this.observeArray(value)} else {this.walk(value)}}/*** Walk through all properties and convert them into* getter/setters. This method should only be called when* value type is Object.*/walk(obj: Object) {const keys = Object.keys(obj);for (let i = 0; i < keys.length; i++) {defineReactive(obj, keys[i])}}/*** Observe a list of Array items.*/observeArray(items: Array<any>) {for (let i = 0, l = items.length; i < l; i++) {observe(items[i])}}}
非数组处理
非数组处理被分发到oberver.walk中,我们看到walk中遍历非数组对象的key,把每一个key都调用了defineReactive:/*** Define a reactive property on an Object.*/export function defineReactive(obj: Object,key: string,val: any,customSetter?: ?Function,shallow?: boolean) {const dep = new Dep()const property = Object.getOwnPropertyDescriptor(obj, key)if (property && property.configurable === false) {return}// cater for pre-defined getter/settersconst getter = property && property.getconst setter = property && property.setif ((!getter || setter) && arguments.length === 2) {val = obj[key]}let childOb = !shallow && observe(val)Object.defineProperty(obj, key, {enumerable: true,configurable: true,get: function reactiveGetter() {//使用数据的东西添加到depconst value = getter ? getter.call(obj) : valif (Dep.target) {dep.depend()if (childOb) {childOb.dep.depend()if (Array.isArray(value)) {dependArray(value)}}}return value},set: function reactiveSetter(newVal) {const value = getter ? getter.call(obj) : val/* eslint-disable no-self-compare */if (newVal === value || (newVal !== newVal && value !== value)) {return}/* eslint-enable no-self-compare */if (process.env.NODE_ENV !== 'production' && customSetter) {customSetter()}// #7981: for accessor properties without setterif (getter && !setter) returnif (setter) {setter.call(obj, newVal)} else {val = newVal}childOb = !shallow && observe(newVal)// 打电话通知,数据被修改dep.notify();}})}
数组处理
数组的在observer中其实是被重写了:
刚才在Observer的构造函数中存在这样的逻辑:if (Array.isArray(value)) {// 这里判断的是浏览器支持不支持__proto__if (hasProto) {protoAugment(value, arrayMethods)} else {copyAugment(value, arrayMethods, arrayKeys)}this.observeArray(value)}
hasProto是import的进来的一个工具方法,其目的就是在判断的是浏览器支持不支持proto。protoAugment、copyAugment这两个方法是重写原型方法, protoAugment的代码也没啥,protoAugment的代码就是把value的proto赋值为arrayMethods。
function protoAugment(target, src: Object) {target.__proto__ = src}
现在看下arrayMethods是什么东西:
/** not type checking this file because flow doesn't play well with* dynamically accessing methods on Array prototype*/import {/**def其实就是definePropertyObject.defineProperty(obj, key, {value: val,enumerable: !!enumerable,writable: true,configurable: true})*/def} from '../util/index'const arrayProto = Array.prototype // Array构造函数的原型对象export const arrayMethods = Object.create(arrayProto) // 新对象继承了数组构造方法的原型对象// 对数组需要重写的方法const methodsToPatch = ['push','pop','shift','unshift','splice','sort','reverse']//遍历上述方法并重写methodsToPatch.forEach(function (method) {const original = arrayProto[method] // 获取原来最初始的方法def(arrayMethods, method, function mutator(...args) {const result = original.apply(this, args) // 拿到结果 1213const ob = this.__ob__ // 当前observerlet inserted // 新增项switch (method) {case 'push':case 'unshift':inserted = argsbreakcase 'splice':inserted = args.slice(2)break}// 新增索引,才会重新处理响应数据if (inserted) ob.observeArray(inserted)// 触发视图更新,打电话ob.dep.notify();return result})})
上面的代码中清晰可见vue重写了那些数组方法——methodsToPatch里面的值:’push’、’pop’、’shift’、’unshift’、’splice’, 、’sort’、’reverse’这些。
重写的方法其实逻辑是统一的:先调用原始方法完成操作后,再做处理,最后调用dep去通知。
先调用原始方法, 这里拿到result就是结果:
const result = original.apply(this, args)
判断这个方法是不是对数组产生了新增项,若有新增项赋值给inserted
if (inserted) ob.observeArray(inserted)
调用 ob.observeArray(inserted) ,是因为新增项可能也是数组或者对象这种非基本类型,如果是非基本类型,最终会newOb = new Observer(inserted),即对非基本类型设置监听。
- 由通知dep
ob.dep.notify();
可以看到,重写的这些数组的方法,其实是在原属的数组方法上做了一层拦截。
Dep
Dep就是维护依赖关系的‘电话本’。代码是在:src/core/observer/dep.js
这个方法是在响应式的过程中调用的,用户修改数据触发 setter 函数,函数的最后一行就是调用 dep.notify 去通知订阅者更新视图。
源码倒是很简单:
/*** A dep is an observable that can have multiple* directives subscribing to it.*/export default class Dep {static target: ?Watcher;id: number;// 依赖关系集合,订阅者subs: Array<Watcher>;constructor() {this.id = uid++this.subs = [];}addSub(sub: Watcher) {this.subs.push(sub)}removeSub(sub: Watcher) {remove(this.subs, sub)}depend() {if (Dep.target) {//wathcer.appDep(dep)Dep.target.addDep(this)}}notify() {// stabilize the subscriber list firstconst subs = this.subs.slice()if (process.env.NODE_ENV !== 'production' && !config.async) {// subs aren't sorted in scheduler if not running async// we need to sort them now to make sure they fire in correct// ordersubs.sort((a, b) => a.id - b.id)}for (let i = 0, l = subs.length; i < l; i++) {subs[i].update()//Watcher}}}// The current target watcher being evaluated.// This is globally unique because only one watcher// can be evaluated at a time.Dep.target = nullconst targetStack = []export function pushTarget(target: ?Watcher) {targetStack.push(target)Dep.target = target}export function popTarget() {targetStack.pop()Dep.target = targetStack[targetStack.length - 1]}
看下notify方法,其实就是遍历subs,分别调用subs的update方法。subs是 Array,这和我们之前说的,借助Watcher去更新数据的。另外,在更新之前还调用了subs.sort()做优先级的保证?但是这里只是更具id sort( (a, b) => a.id - b.id) ??
Watcher
上面简单的讨论中涉及了watcher的角色,现在可以更加仔细的审视下这个模型对象:
src/core/observer/watcher.js
Watcher是将模板和 Observer 对象结合在一起的纽带。
Watcher是订阅者模式中的订阅者。
Watcher是什么时候被构建的?
这个问题需要再从流程的角度先阐述下。As we know,在vue1时代,一个模版指令对应一个watcher,试想现在是程序初始化阶段,所有的模版要先经过编译(当然是要编译,否则v-model这种东西不编译,浏览器也不认识),编译的过程中,遇到需要建立数据绑定的变量,这时候就会new Watcher()。
new Watcher的话那就先看下 Watcher constructor:
// Watcher constructorconstructor(vm: Component,expOrFn: string | Function,cb: Function,options?: ?Object,isRenderWatcher?: boolean) {this.vm = vmif (isRenderWatcher) {vm._watcher = this}vm.push(this)// optionsif (options) {// ...一通赋值的} else {// ...}// ...一通赋值的this.cb = cbthis.id = ++uid // uid for batchingthis.active = truethis.dirty = this.lazy // for lazy watchersthis.deps = []this.newDeps = []this.depIds = new Set()this.newDepIds = new Set()this.expression = process.env.NODE_ENV !== 'production'? expOrFn.toString(): ''if (typeof expOrFn === 'function') {this.getter = expOrFn} else {this.getter = parsePath(expOrFn)if (!this.getter) {this.getter = noopprocess.env.NODE_ENV !== 'production' && warn(`Failed watching path: "${expOrFn}" ` +'Watcher only accepts simple dot-delimited paths. ' +'For full control, use a function instead.',vm)}}// 这里是重点this.value = this.lazy? undefined: this.get()}
这一堆代码,真正核心的地方是最后一句,走到了:this.get():
/*** Evaluate the getter, and re-collect dependencies.*/get() {// 1pushTarget(this)let valueconst vm = this.vmtry {// 2// this.getter 可以理解为去vm对象上拿值value = this.getter.call(vm, vm)} catch (e) {if (this.user) {handleError(e, vm, `getter for watcher "${this.expression}"`)} else {throw e}} finally {// "touch" every property so they are all tracked as// dependencies for deep watchingif (this.deep) {traverse(value)}// 3popTarget()this.cleanupDeps()}return value}
上面的代码实际上干了三件事:
- pushTarget: Dep的方法,实际上是向targetStack.push(target),同时设置标志位Dep.target = target;
- value = this.getter.call(vm, vm);可以理解为去vm对象上拿值,这个过程就要触发双向数据绑定中的的get方法了;这个时候再看下Observer中的get:
get: function reactiveGetter() {//使用数据的东西添加到电话本const value = getter ? getter.call(obj) : valif (Dep.target) {dep.depend()if (childOb) {childOb.dep.depend()if (Array.isArray(value)) {dependArray(value)}}}return value}
可以看到,这里检查了我们刚才设置的标志位置:Dep.target,这个静态属性其实是用来表征第一次时候vm中数据的;因为下一步就可能要改变这个标志了;
3. popTarget:改变这个标志Dep.target
watcher是怎样更新?待后文分解…
更新调度
watcher是view层到数据层的纽带,是view层沟通数据的信使,是数据层更新view的代理。前文说了,view层和watcher是一一对应的,或指令对应watcher,或组件对应watcher,而且分析了watcher是如何在响应式数据的建立中发挥作用的。
那么,当vm的数据要更新了,wathcer是怎样更新view层呢?
看下watcher.update
update() {/* istanbul ignore else */if (this.lazy) {// 懒this.dirty = true} else if (this.sync) {// 同步this.run()} else {// 批量跟新queueWatcher(this)}}
忽略代码中lazy和sync,直接看queueWatcher这边, 代码来到了core / oberver / scheduler:
export function queueWatcher(watcher: Watcher) {const id = watcher.id// has 是这个东西:let has: { [key: number]: ?true } = {}if (has[id] == null) {has[id] = trueif (!flushing) {queue.push(watcher)} else {// if already flushing, splice the watcher based on its id// if already past its id, it will be run next immediately.let i = queue.length - 1while (i > index && queue[i].id > watcher.id) {i--}queue.splice(i + 1, 0, watcher)}// queue the flushif (!waiting) {waiting = true// 环境相关 不看if (process.env.NODE_ENV !== 'production' && !config.async) {flushSchedulerQueue()return}// 异步任务nextTick(flushSchedulerQueue)}}}
这里其实涉及一个比较重要的更新机制。
我们知道,每一个watcher都和view层的指令或者component关联,会有一个id,假设现在出现了这样的情况:
for(let i = 0; i < 100; i+= 1 ) {// 更新vm数据app.data.name = `name: ${i}`}
向上面一样:连续触发100次同一个数据更新,按照道理来说,watcher应该也会触发100次更新。但这样显然是没有必要的,这样会导致大量的不必要的DOM更新操作。
那么代码中这里的逻辑是怎样的呢?
简单先用文字描述下:watcher会调用scheduler的queueWatcher,在scheduler中会维护一个queue,里面放的都是即将被触发更新的watcher,另外,还有一个has,let has: { [key: number]: ?true } = {},其作用了set类似,用来标示当前的queue有没有某一个id的watcher。
如果没有,就把这个watcher加到queue中。
这个queue中的东西,就是每一次需要执行的更新。当具体执行的时候,watcher再去vm中得到那一时刻最新的值。
在这个简单原理描述中,还有一个点很重要,就是所谓“每一次需要执行的更新”,这个每一次?是怎么来的,答案很简单,就是异步任务机制,源码中这里还有一段降级处理,拉胯兜底的自然是setTimeout。
结合上面for(let i = 0; i < 100; i+= 1 ) 的这个例子,再看下整个过程,我们要更新的name,ok,和name关联的watcher假设其id是99,第一次,queue中没有id是99的watcher,ok,把watcher增加进queue来,for循环还在继续,但是真正需要执行watcher.update的时候,name已经是最终值了name: 99。
根据上面分析,结合代码,我们先看下:nextTick(flushSchedulerQueue):
export function nextTick(cb?: Function, ctx?: Object) {let _resolve// 核心就是callbacks中加了一个函数callbacks.push(() => {if (cb) {try {cb.call(ctx)} catch (e) {handleError(e, ctx, 'nextTick')}} else if (_resolve) {_resolve(ctx)}})if (!pending) {pending = truetimerFunc()}// $flow-disable-lineif (!cb && typeof Promise !== 'undefined') {return new Promise(resolve => {_resolve = resolve})}}
上面代码没啥好看,核心就是callbacks中加了一个函数,不过这个cb是啥?自然是nextTick(flushSchedulerQueue)传进去flushSchedulerQueue,flushSchedulerQueue就有必要看看:
function flushSchedulerQueue() {currentFlushTimestamp = getNow()flushing = truelet watcher, id// Sort queue before flush.// This ensures that:// 1. Components are updated from parent to child. (because parent is always// created before the child)// 2. A component's user watchers are run before its render watcher (because// user watchers are created before the render watcher)// 3. If a component is destroyed during a parent component's watcher run,// its watchers can be skipped.queue.sort((a, b) => a.id - b.id)// do not cache length because more watchers might be pushed// as we run existing watchersfor (index = 0; index < queue.length; index++) {watcher = queue[index]if (watcher.before) {watcher.before()}id = watcher.idhas[id] = nullwatcher.run()// in dev build, check and stop circular updates.if (process.env.NODE_ENV !== 'production' && has[id] != null) {// ....环境 警告, 不看}}// keep copies of post queues before resetting stateconst activatedQueue = activatedChildren.slice()const updatedQueue = queue.slice()resetSchedulerState()// call component updated and activated hookscallActivatedHooks(activatedQueue)callUpdatedHooks(updatedQueue)// devtool hook/* istanbul ignore if */if (devtools && config.devtools) {devtools.emit('flush')}}
上面这个函数,先上了搞了一堆自己的queue的排序,其实就是优先更新的策略,具体什么策略见注释中英文源代码吧😭~
后面部分的逻辑我也不懂,不过核心逻辑是,遍历queue中的watcher,而且调用了watcher.run():
理应当看看watcher.run的内容了:
run() {if (this.active) {const value = this.get()if (value !== this.value ||// Deep watchers and watchers on Object/Arrays should fire even// when the value is the same, because the value may// have mutated.isObject(value) ||this.deep) {// set new valueconst oldValue = this.valuethis.value = valueif (this.user) {try {this.cb.call(this.vm, value, oldValue)} catch (e) {handleError(e, this.vm, `callback for watcher "${this.expression}"`)}} else {this.cb.call(this.vm, value, oldValue)}}}}
其核心,发现是调用了this.cb:this.cb.call(this.vm, value, oldValue)。
这是干嘛呢?
猜也知道,要更新view,触发render呗~
留着这个问题,我们看下view的编译和render过程。
view的编译和render
vue的编译可以分为离线编译和在线编译,编译的目的都是把.vue变成js,那么所谓离线编译就是在发布之前就编译好了(webpack + vue loader),而所谓的在线编译就是用户在前端执行代码,编译模版。
编译的过程一般是:1. 分析模版; 2. 生成树(AST); 3. 产生js;
编译的代码在compiler中,我们看下index.js:
export const createCompiler = createCompilerCreator(function baseCompile(template: string,options: CompilerOptions): CompiledResult {// 1. 转义html==>ASTconst ast = parse(template.trim(), options);// 不等于false,默认都优化if (options.optimize !== false) {// 2. 优化, 优化AST,标记静态节点optimize(ast, options);}// 3. 把AST,转换为可以执行的代码const code = generate(ast, options)/*** 生成with 方法,内部方法==>core/instance/render-helpers*/return {ast,// 返回的ASTrender: code.render,// 返回的render,执行生成VNodestaticRenderFns: code.staticRenderFns}})
- const ast = parse(template.trim(), options); 这一句话template就是我们的vue模版,比如
<button @click="show">show </button>
通过parse函数,生成AST。这里注意:
- AST的节点可不是VNode哈~AST是解析语法用的~
- 整个解析的过程vue2是用正则做的;
- parse的时候标记出静态节点(static),static就是没有那些vm数据的节点,这样标记出来以后,做diff的时候可以节省算力;
optimize(ast, options);
如何分辨出此节点是一个静态节点?
这里是一个分治(递归):自己和子节点都是静态节点,那就是静态节点。
- 把AST, 转换为可以执行的代码。这样生成了render函数的代码, 转化成的代码大致是这样的:
// renderwith(this){return _c('div', {attrs: { 'id': 'app' },}, [(name)?_c('h2', [ _v(_s(name))]) : _e(),// ....])}
with是什么作用,在代码块中强行引入对象追加到当前作用域链中。不过,通常认为with有比较严重的性能问题,浅谈 js 下 with 对性能的影响。
上面代码中的,with(this)就是vm中的data。
这些_c、_v之类的方法,就是创建Vnode的方法。
这个render,其实就是watch的cb,也就是说,watcher在遇到更新数据的时候,最终会调用render,生成Vnode。
vue2特点
优点:
- vue有静态编译优化,那些生成静态节点的过程,打标static的后面就不做diff了;
- 批处理机制,避免过多更新;
- 双向数据绑定,本身就是架构层面的一种优点,可以实现view层的靶向更新;
缺点:
keep-alive 是保存失活组件状态的东西,外头包裹下keep-alive,内部组件的状态就得以保存。
keep-alive 保存的是Vnode,所以,可能影响内存空间导致性能问题。
keep-alive 的代码在:components / keep-alive.js
所以这里牵扯LRU算法:移除最久没有用到的。LRU算法

若有收获,就点个赞吧
0 人点赞
