1.项目的创建一个flutter项目
进入Android Studio直接创建new flutter Project(如若创建时过慢也可以直接在项目目录打开命令指示符输入flutter create 项目名即可快速创建)
2.Android Studio与夜神模拟器连接
https://blog.csdn.net/weixin_42433094/article/details/113399762
3.flutter简单了解
引入import ‘package:flutter/material.dart’; flutter标准UI包
启动项目可用控制台输入flutter run启动 p显示网格(可看对齐线) o切换模式(ios和安卓切换) q关闭
4.flutter基础讲解
基础界面设置的了解
import 'package:flutter/material.dart';void main() => runApp(MyApp());class MyApp extends StatelessWidget{@overrideWidget build(BuildContext context){return MaterialApp(title: "后台标题",home: Scaffold(appBar: AppBar(title: Text("内部标题")),body: Center(child: Text("这是一个内部的文本,主要是内部的东西,",textAlign: TextAlign.left,//对齐方式maxLines: 1, //最多显示行 比下面那个优先级高overflow: TextOverflow.ellipsis,//超出一行省略号代替style: TextStyle( //文本字体设置fontSize: 25.0,//字体大小color: Color.fromARGB(255, 5, 125, 125),//颜色配置decoration: TextDecoration.underline,//下划线decorationStyle: TextDecorationStyle.solid,//线的属性(实线,虚线等等)),),),),);}}
Container容器的基础(类似于div)
import 'package:flutter/material.dart';void main() => runApp(MyApp());class MyApp extends StatelessWidget{@overrideWidget build(BuildContext context){return MaterialApp(title: "后台标题",home: Scaffold(body: Center(child: Container( //类似于css的divchild: new Text("Hello wwt",style: TextStyle(fontSize: 40.0)),alignment: Alignment.topLeft ,//Container下的子内容对齐方式width: 500.0, //Container块的宽height: 400.0,//Container块的高//color: Colors.lightBlue,//Container背景颜色padding: const EdgeInsets.fromLTRB(10.0,30.0,0,0),//Container容器对里面的内边距margin: const EdgeInsets.all(20.0),//Container容器对里面的外边距decoration: new BoxDecoration( //Container容器装饰gradient: const LinearGradient(//背景渐变色colors: [Colors.lightBlue,Colors.lightGreenAccent,Colors.pinkAccent,Colors.white12]//可以一直叠加),border: Border.all(width: 5.0,color: Colors.red)//Container容器的边框),),),),);}}
图片的插入Image
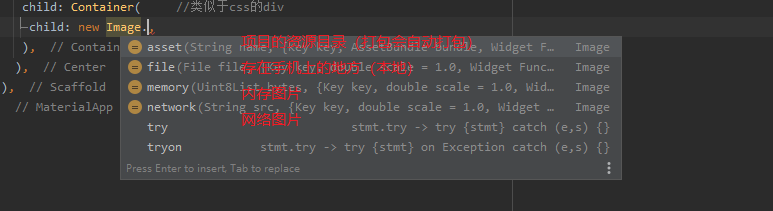
import 'package:flutter/material.dart';void main() => runApp(MyApp());class MyApp extends StatelessWidget{@overrideWidget build(BuildContext context){return MaterialApp(title: "后台标题",home: Scaffold(body: Center(child: Container( //类似于css的divchild: new Image.network(//网上图片"https://i1.hdslb.com/bfs/face/5e78623de1267feccac3bf0e20303e00e91694ca.jpg@140w_140h_1c.webp",//图片的设置;contain拉伸但不影响图片比例,fill铺满Container容器影响比例,fitWidth横向填充拉伸不影响比例但不够会被裁切,fitHeight与前面相反//fit: BoxFit.fitHeight,//color: Colors.lightBlueAccent,//图片颜色//colorBlendMode: BlendMode.modulate,//颜色模式repeat: ImageRepeat.repeat,//相对于Container容器铺满方式,),width: 300.0,height: 200.0,color: Colors.pinkAccent,),),),);}}
加载项目源文件的资源图片
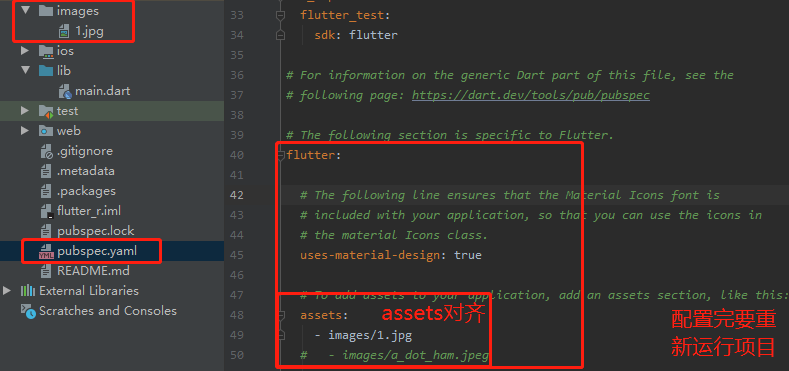
child: new Image.asset('images/1.jpg'),
ListView列表视图
import 'package:flutter/material.dart';void main() => runApp(MyApp());class MyApp extends StatelessWidget{@overrideWidget build(BuildContext context){return MaterialApp(title: "后台标题",home: Scaffold(appBar: new AppBar(title: new Text("ListView图标组件"),),body: new ListView( //列表视图/* children: <Widget>[ //列表元素,文本new ListTile(leading: new Icon(Icons.perm_camera_mic), //小标签title: new Text("画虎刻鹄"), //文本),new ListTile(leading: new Icon(Icons.repeat),title: new Text("有勇有谋"),),],*/children: <Widget>[ //列表插入图片new Image.asset("images/1.jpg"),new Image.network("https://i1.hdslb.com/bfs/face/5e78623de1267feccac3bf0e20303e00e91694ca.jpg@140w_140h_1c.webp"),new Image.asset("images/1.jpg"),new Image.network("https://i1.hdslb.com/bfs/face/5e78623de1267feccac3bf0e20303e00e91694ca.jpg@140w_140h_1c.webp"),],),),);}}
ListView横向列表+分组件减少单体嵌套过多
import 'package:flutter/material.dart';void main() => runApp(MyApp());class MyApp extends StatelessWidget{@overrideWidget build(BuildContext context){return MaterialApp(title: "后台标题",home: Scaffold(appBar: new AppBar(title: new Text("ListView图标组件"),),body:Center(child: Container(height: 200.0,child: MyList(), //分模块写),),),);}}class MyList extends StatelessWidget{@overrideWidget build(BuildContext context){return ListView(scrollDirection: Axis.horizontal,//列表横向设置children: <Widget>[new Container(width: 180.0,color: Colors.indigoAccent,),new Container(width: 180.0,color: Colors.pinkAccent,),new Container(width: 180.0,color: Colors.deepOrangeAccent,),],);}}
ListView纵向动态列表+List数组+动态列表构建(写完后需要重新运行加载数据缓存)
import 'package:flutter/material.dart';void main() => runApp(MyApp(items:new List<String>.generate(1000,(i)=>"列表第 $i")//自己编辑一个list));class MyApp extends StatelessWidget{final List<String> items; //声明一个常量//固定写法 传递的参数 无名无参的父类MyApp({Key key,@required this.items}):super(key: key);@overrideWidget build(BuildContext context){return MaterialApp(title: "后台标题",home: Scaffold(appBar: new AppBar(title: new Text("ListView图标组件"),),body:new ListView.builder( //构建动态列表itemCount: items.length, //生成条数itemBuilder: (context,index){ //遍历listreturn new ListTile(title: new Text("${items[index]}"),);},),),);}}
GridView网格列表(图片列表)
写法一
import 'package:flutter/material.dart';void main() => runApp(MyApp());class MyApp extends StatelessWidget {@overrideWidget build(BuildContext context) {return MaterialApp(title: "后台标题",home: Scaffold(appBar: new AppBar(title: new Text("ListView图标组件"),),body: GridView.count( //网格padding: const EdgeInsets.all(20.0),//距离外部容器的边距crossAxisCount: 3,//设置三行crossAxisSpacing: 10.0,//每个网格的边距children: <Widget>[const Text("我是a"),const Text("我是b"),const Text("我是c"),const Text("我是d"),const Text("我是e"),const Text("我是f"),],),),);}}
写法二
fit: BoxFit.cover填满容器裁切,图片的属性,fit可以完美配合容器进行裁切
import 'package:flutter/material.dart';void main() => runApp(MyApp());class MyApp extends StatelessWidget {@overrideWidget build(BuildContext context) {return MaterialApp(title: "后台标题",home: Scaffold(appBar: new AppBar(title: new Text("ListView图标组件"),),body: GridView(gridDelegate: SliverGridDelegateWithFixedCrossAxisCount(crossAxisCount: 3,//一行三个mainAxisSpacing: 2.0,//上下两行的边距crossAxisSpacing: 2.0,//左右边距childAspectRatio: 0.7,//图片比例 宽高比),children: <Widget>[new Image.network("http://img5.mtime.cn/mt/2021/03/04/101410.25280244_1280X720X2.jpg",fit: BoxFit.cover),//fit: BoxFit.cover填满容器裁切new Image.network("http://img5.mtime.cn/mt/2021/01/06/094232.18209247_1280X720X2.jpg",fit: BoxFit.cover),new Image.network("http://img5.mtime.cn/mt/2021/03/04/103317.70446282_1280X720X2.jpg",fit: BoxFit.cover),new Image.network("http://img5.mtime.cn/mt/2021/03/11/094158.30870791_1280X720X2.jpg",fit: BoxFit.cover),new Image.network("http://img5.mtime.cn/mt/2021/02/04/143001.40483517_1280X720X2.jpg",fit: BoxFit.cover),new Image.network("http://img5.mtime.cn/mt/2021/03/09/200645.34627873_1280X720X2.jpg",fit: BoxFit.cover),],),),);}}

若有收获,就点个赞吧
0 人点赞
