安装
rpm安装
https://www.cnblogs.com/daikainan/p/14282962.html
下载:https://mirrors.tuna.tsinghua.edu.cn/jenkins/redhat/
wget https://mirrors.tuna.tsinghua.edu.cn/jenkins/redhat/jenkins-2.275-1.1.noarch.rpm
安装:rpm -ivh jenkins-2.275-1.1.noarch.rpm
daemonize 被 jenkins-2.328-1.1.noarch 需要
yum  -y install epel-release
yum -y install daemonize
目录说明:
  /usr/lib/jenkins/jenkins.war    WAR包
  /etc/sysconfig/jenkins       配置文件
  /var/lib/jenkins/       默认的JENKINS_HOME目录
  /var/log/jenkins/jenkins.log    Jenkins日志文件
配置:vi /etc/sysconfig/jenkins,修改如下内容
修改工作目录
JENKINS_HOME="/var/lib/jenkins"
修改用户名,切记要么修改为root,要么使用默认的,其他的需要修改权限后才能使用,否则报错
JENKINS_USER="root"
修改端口号
JENKINS_PORT="8080"
修改时区
JENKINS_JAVA_OPTIONS="-Djava.awt.headless=true -Dorg.apache.commons.jelly.tags.fmt.timeZone=Asia/Shanghai"
授权
chown -R root:root /var/log/jenkins
chown -R root:root /var/cache/jenkins
chown -R root:root /var/lib/jenkins
jdk路径查询:whereis java
vi /etc/init.d/jenkins
在candidates 之后追加上面查询的java路径
/usr/local/bin/jdk1.8.0_162/bin/java
配置生效
#修改以后必须使用此命令才能生效
systemctl daemon-reload
启动
systemctl start jenkins
/sbin/chkconfig jenkins on
卸载
#卸载
rpm -e jenkins
#检查是否卸载成功
rpm -ql jenkins
#彻底删除残留文件
find / -iname jenkins | xargs -n 1000 rm -rf
docker安装
https://www.jenkins.io/zh/doc/book/installing/
下载,使用jenkins/jenkins,jenkins已经没有维护
docker pull jenkins/jenkins:jdk11
运行
docker run --name jenkins \
 -e JAVA_OPTS='-Dhudson.model.DownloadService.noSignatureCheck=true -Duser.timezone=Asia/Shanghai' \
 -p 8080:8080 -p 50000:50000 \
 -v /home/jenkins:/var/jenkins_home \
 -v /var/run/docker.sock:/var/run/docker.sock \
 -v $(which docker):/usr/bin/docker \
 -v /usr/lib64/libltdl.so.7:/usr/lib/x86_64-linux-gnu/libltdl.so.7 \
 -v /home/mavenRepo:/home/mavenRepo \
 -d -it jenkins/jenkins:jdk11

docker start jenkins
也可以使用docker-compose.yml
version: "3"
services:
  jenkinsServer:
    image: jenkins/jenkins:jdk11
    container_name: jenkins
    volumes:
      - /home/jenkins/:/var/jenkins_home
      - /etc/localtime:/etc/localtime:ro
      - /var/run/docker.sock:/var/run/docker.sock
      - /usr/bin/docker:/usr/bin/docker
      - /usr/lib64/libltdl.so.7:/usr/lib/x86_64-linux-gnu/libltdl.so.7
      - /home/soft:/home/soft
    ports:
      - 8080:8080
      - 50000:50000
    environment:
        JAVA_OPTS: -Dhudson.model.DownloadService.noSignatureCheck=true -Duser.timezone=Asia/Shanghai
    deploy:
      replicas: 1
      restart_policy:
        condition: on-failure
    networks:
      - default
执行命令:docker-compose up -d
进入jenkins容器
docker exec -it jenkins bash
复制容器
如果使用已经安装的jenkins容器复制,只需要对应的jenkins_home文件目录映射即可
假设挂载原目录为/home/old/jenkins,新挂载目录为/home/jenkins,复制/home/old/jenkins到/home/jenkins
打包镜像:
docker save -o jenkins.tar jenkins/jenkins:jdk11
docker load -i jenkins.tar
运行
docker run --name jenkins \
 -p 8080:8080 -p 50000:50000 \
 -v /home/jenkins:/var/jenkins_home \
 -v /var/run/docker.sock:/var/run/docker.sock \
 -v $(which docker):/usr/bin/docker \
 -v /usr/lib64/libltdl.so.7:/usr/lib/x86_64-linux-gnu/libltdl.so.7 \
 -v /home/soft:/home/soft \
 -d -it jenkins/jenkins:jdk11
安装插件
推荐入门安装,失败就重试
Maven Integration插件
gitlab相关插件
git parameter
Extended Choice Parameter
Discard Old Build
Configuration Slicing
下载源
https://www.cnblogs.com/jack-jin/articles/12268484.html
直接访问http://
上面的docker run -e的JAVA_OPTS参数必须带上,
之后进入页面Manage Jenkins—Manage plugin—Advanced底部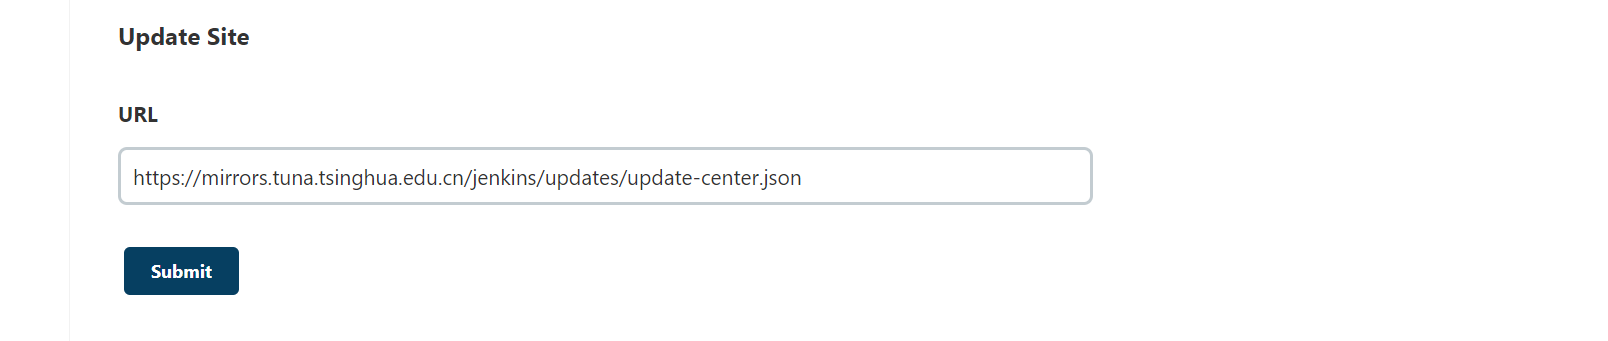
https://mirrors.tuna.tsinghua.edu.cn/jenkins/updates/update-center.json
点击提交
上面的提交成功之后才能有update文件夹,进入/var/jenkins_home/updates文件夹
sed -i 's/http:\/\/updates.jenkins-ci.org\/download/https:\/\/mirrors.tuna.tsinghua.edu.cn\/jenkins/g' default.json && sed -i 's/http:\/\/www.google.com/https:\/\/www.baidu.com/g' default.json
重启
http://localhost:8080/restart
配置
gitlab
docker中的jenkins已经有需要的环境,不要再自己安装git(全局工具也不用配置,自己会有),装了也不能用。
Manage Jenkins—Config System,找到下面的gitlab
点击添加
apiToken填写生成的access-token
点击生成后access-token在当前页面顶部
mvn clean install -Dmaven.test.skip=true
docker stop xxxe
cd target/

cd xxx
p ./target/xxx.jar ./
docker build -t xxx:latest .
docker run --name=xxx -d -it xxx
docker start xxx
构建
基础构建
新建任务—maven
配置构建参数,防止内存占满
配置git分支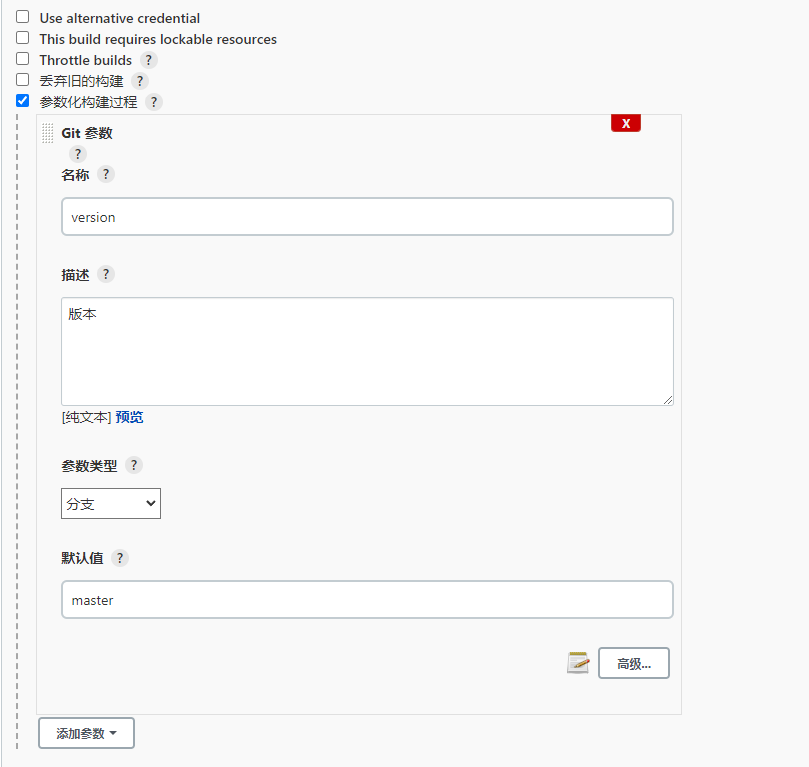
git仓库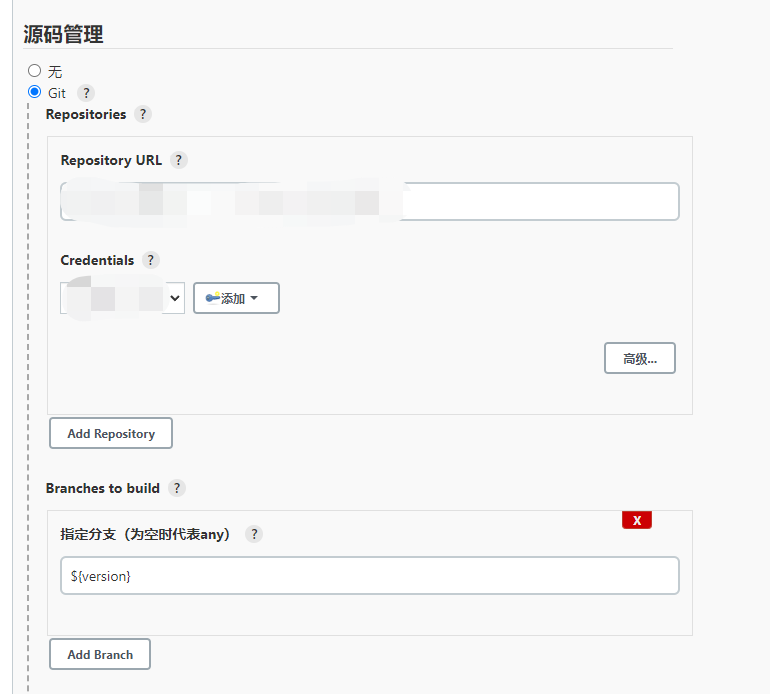
添加构建脚本
build.sh
docker stop container
docker rm container
docker rmi container

cd project
cp ./target/xxx.jar ./
docker build -t container:latest .
docker run --name=name -p 8200:8200 -d -it container
docker start container
参数化
除了git parameter,一般使用到的还有choice parameter和string parameter

问题
permissions
touch: cannot touch ‘/var/jenkins_home/copy_reference_file.log’: Permission denied
Can not write to /var/jenkins_home/copy_reference_file.log. Wrong volume permissions?
https://blog.csdn.net/babys/article/details/71170254
// 查看容器中用户
docker run -ti --rm --entrypoint="/bin/bash" jenkins/jenkins:jdk11 -c "whoami && id"
// 授权,注意这里的1000是容器中的jenkins用户的id
// /home/jenkins对应目录/var/jenkins_home
sudo chown -R 1000:1000 /home/jenkins
如果容器中执行docker命令提示没有权限,这里最好不用授权,而是将jenkins添加到docker用户组
chmod 7 /var/run/docker.sock
no such file or dictory
没有权限
修改默认用户
vi /etc/sysconfig/jenkins

JENKINS_USER="jenkins"改为root
授权
chown -R root:root /var/log/jenkins
chown -R root:root /var/cache/jenkins
chown -R root:root /var/lib/jenkins
重启
service jenkins restart
如果还是不行,注意使用sh xx.sh,不要使用./sh的方式
docker指定用户:docker run -u root
active(exited)
https://www.cnblogs.com/mua9102/p/13402514.html
授权
chown -R root:root /var/log/jenkins
chown -R root:root /var/cache/jenkins
chown -R root:root /var/lib/jenkins
还是不行,查看/var/log/jenkins.log,这里是端口占用
命令未找到
命令首行添加 #!/bin/bash
jenkins是从/usr/bin查找命令,因此需要生成软连接
ln -s /home/maven/bin/mvn /usr/bin/mvn
Syntax error: “(“ unexpected

引用
https://blog.csdn.net/Day_Day_No_Bug/article/details/97924627
https://www.jianshu.com/p/640caaa239f8
https://www.cnblogs.com/daikainan/p/14282962.html
https://blog.csdn.net/lose123_/article/details/106996732

若有收获,就点个赞吧
0 人点赞
