注册组件的方式
- 通过包扫描注册
@Controller, @Service, @Repository, @Component - 通过@Bean, 使用方法注册, id默认为方法名
@Import快速注册组件@Import{Xxx.class}注册组件@Import{ImportSelector.class}ImportSelectorfan返回需要注册的组件全类名数组.通过观察源码发现数组不能会null, 否则会导致异常.@Import{ImportBeanDefinitionRegister.class}ImportBeanDefinitionRegister手动通过BeanDefinitionRegistry.registerBeanDefinition()注册组件registerBeanDefinition()方法原形void registerBeanDefinition(String var1, BeanDefinition var2) throws BeanDefinitionStoreException;
使用Spring提供的FactoryBean接口
public class ColorFactoryBean implements FactoryBean<Color> {@Overridepublic Color getObject() throws Exception {return new Color();}@Overridepublic Class<?> getObjectType() {return Color.class;}@Overridepublic boolean isSingleton() {return true;}}
默认获取到的是工厂bean调用getObject()创建的对象
@Testpublic void test03() {Object colorFactoryBean = ioc.getBean("colorFactoryBean");System.out.println(colorFactoryBean.getClass());// 实际输出的是class com.yguilai.bean.ColorObject colorFactoryBean = ioc.getBean("&colorFactoryBean");System.out.println(colorFactoryBean.getClass());// 实际输出的是class com.yguilai.condition.ColorFactoryBean}
要获取工厂bean本身, 给id前面加上&前缀.
在Spring的BeanFactory接口中声明了&前缀是用来获取FactoryBean原型
public interface BeanFactory {String FACTORY_BEAN_PREFIX = "&";//....}
生命周期
bean创建—>初始化—>销毁的过程 单实例bean在容器启动时就会调用构造方法和初始化方法, 在容器 关闭时调用销毁方法 多实例bean在通过
ioc.getBean()获取时, 容器会调用构造方法和初始化方法, 容器关闭时不会调用销毁方法
自定义初始化和销毁方法
基于配置时
在spring配置文件中, 指定bean的init-method=""和destroy-method=""
基于注解时
- 在
@Bean中指定初始化和销毁方法:@Bean(initMethod = "初始化方法名", destroyMethod = "销毁方法名") - 通过让bean实现
InitializingBean和DisposableBean接口来自定义初始化和销毁方法 - 使用
@PostConstrutor和@PreDestroy注解(标注在方法上) - 实现
BeanPostProcessor(bean的后置处理器)接口public interface BeanPostProcessor {// 在构造方法之前 初始化方法之后调用Object postProcessBeforeInitialization(Object var1, String var2) throws BeansException;// 在初始化方法之后被调用Object postProcessAfterInitialization(Object var1, String var2) throws BeansException;}
BeanPostProcessor原理
protected Object initializeBean(final String beanName, final Object bean, RootBeanDefinition mbd) {if (System.getSecurityManager() != null) {AccessController.doPrivileged(new PrivilegedAction<Object>() {public Object run() {AbstractAutowireCapableBeanFactory.this.invokeAwareMethods(beanName, bean);return null;}}, this.getAccessControlContext());} else {this.invokeAwareMethods(beanName, bean);}Object wrappedBean = bean;if (mbd == null || !mbd.isSynthetic()) {/////////应用PostProcessorsBeforeInitializationwrappedBean = this.applyBeanPostProcessorsBeforeInitialization(bean, beanName);/////////应用PostProcessorsBeforeInitialization}try {// 执行初始化this.invokeInitMethods(beanName, wrappedBean, mbd);} catch (Throwable var6) {throw new BeanCreationException(mbd != null ? mbd.getResourceDescription() : null, beanName, "Invocation of init method failed", var6);}if (mbd == null || !mbd.isSynthetic()) {/////////应用PostProcessorsAfterInitializationwrappedBean = this.applyBeanPostProcessorsAfterInitialization(wrappedBean, beanName);/////////应用PostProcessorsBeforeInitialization}return wrappedBean;}
applyBeanPostProcessorsAfterInitialization方法
public Object applyBeanPostProcessorsAfterInitialization(Object existingBean, String beanName) throws BeansException {Object result = existingBean;Iterator var4 = this.getBeanPostProcessors().iterator();// 迭代遍历所有beanProcessor, 一旦为null直接跳出循环do {if (!var4.hasNext()) {return result;}BeanPostProcessor beanProcessor = (BeanPostProcessor)var4.next();result = beanProcessor.postProcessAfterInitialization(result, beanName);} while(result != null);return result;}
initializeBean方法是在populateBean方法后执行的
try {// populateBean 给bean进行赋值this.populateBean(beanName, mbd, instanceWrapper);if (exposedObject != null) {exposedObject = this.initializeBean(beanName, exposedObject, mbd);}} catch (Throwable var18) {if (var18 instanceof BeanCreationException && beanName.equals(((BeanCreationException)var18).getBeanName())) {throw (BeanCreationException)var18;}throw new BeanCreationException(mbd.getResourceDescription(), beanName, "Initialization of bean failed", var18);}
整个流程
- 调用
populateBean给bean赋值 - 执行
postProcessBeforeInitialization - 执行初始化方法
initializeBean - 执行
applyBeanPostProcessorsAfterInitialization
Spring底层对BeanPostProcessor的应用
Spring底层大量使用了BeanPostProcessor
BeanPostProcessor继承树
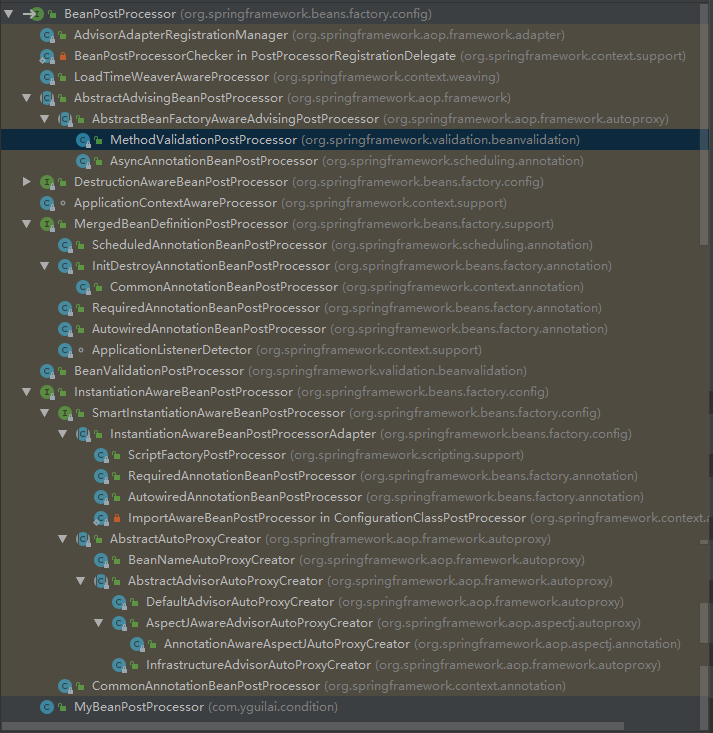
ApplicationContextAwareProcessor
在bean实例中可通过实现ApplicationContextAware接口获取ioc容器, 例如:
public class Blue implements ApplicationContextAware {
    private ApplicationContext applicationContext;
    @Override
    public void setApplicationContext(ApplicationContext applicationContext) throws BeansException {
        this.applicationContext = applicationContext;
    }
}
**Aware接口Spring为自定义组件提供的调用Spring底层组件的接口, 这些接口都都一个父接口Aware
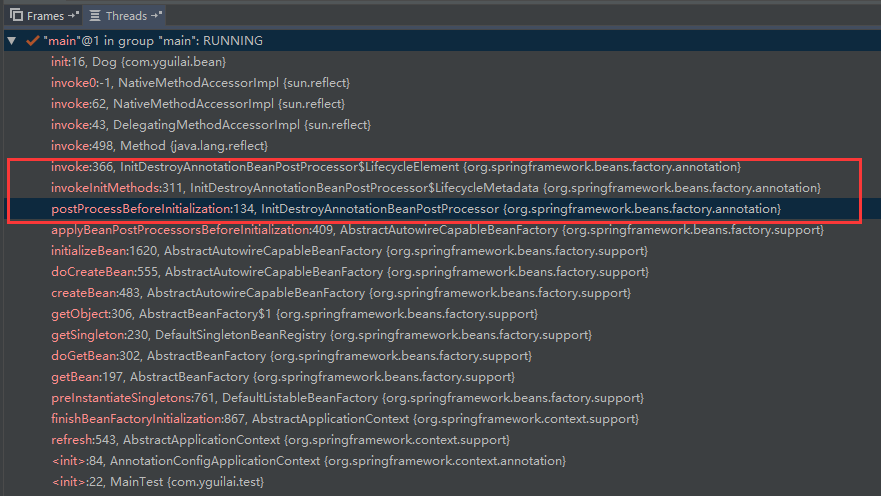
InitDestroyAnnotationBeanPostProcessor
作用于[@PostConstructor](#)和[@PreDestroy](#)
public class Dog {

    @PostConstruct
    public void init(){ //在此加断点
        System.out.println("dog init");
    }

    @PreDestroy
    public void destroy(){
        System.out.println("dog destroy");
    }
}
BeanValidationPostProcessor
主要应用在数据校验, 数据转换. 在web中用的很多
AutowiredAnnotationBeanPostProcessor
作用于[@Autowired](#)注解
属性赋值
使用[@Value](#)注解赋值
- 基本类型
- SpEL表达式#{}
- ${}取出配置文件(运行环境)中的值
public class Person {
 @Value("张三")
 private String name;
 @Value("#{20-2}")
 private Integer age;
}
使用@PropertySource导入外部配置文件
@PropertySource({"classpath:db.properties"})
@Configuration
public class SpringConfigOfPropertyValues {}
自动装配
Spring利用依赖注入(DI), 完成对IOC容器中各个组件的依赖关系赋值
@Autowired@Qualifier("id")使用该注解可让自动注入明确要注入的组件的id@Primary让Spring自动装配的时候, 默认使用首选的Bean@Resource功能与@Autowired类似, 但是该注解默认是按照组件名称进行匹配的, 不支持@Primary和@Autowired里的required=false@Inject需要导入javax.inject包, 功能和@Autowired一样
@Resource和@Inject属于java规范
方法, 构造器位置的自动装配
// Autowired可标注在构造器 方法 参数 属性
@Target({ElementType.CONSTRUCTOR, ElementType.METHOD, ElementType.PARAMETER, ElementType.FIELD, ElementType.ANNOTATION_TYPE})
@Retention(RetentionPolicy.RUNTIME)
@Documented
public @interface Autowired {
    boolean required() default true;
}
- 标注在方法上, 方法的参数会由容器自动装配
- 标注在构造器上, 如果只有一个有参构造器, 即使不加
@Autowired也会自动装配参数
自动装配Spring底层组件
通过实现**Aware接口, 如: ApplicationContextAware
Profile
Spring提供的可以根据当前环境, 动态的激活和切换一系列bean(组件)的功能.
在如下示例代码中, dataSourceDev和dataSourcePro两个在默认环境下都不会被加载, 只有在某个环境被激活后才能注册到容器中.
默认是default环境, 即
@Profile("default")当@Profile标注在类上, 则表示只有当特定环境激活够, 这个配置下的所有组件才会被注册到容器中. 没有标注@Profile的bean在任何环境下都会被加载.
@PropertySource({"classpath:db.properties"})
@Configuration
public class DevDataSourceConfig {
    @Value("${jdbc.username}")
    private String user;
    @Value("${jdbc.password}")
    private String pwd;
    @Value("${jdbc.driver}")
    private String driverClass;
    @Value("${jdbc.dev.url}")
    private String devUrl;
    @Value("${jdbc.pro.url}")
    private String proUrl;

    @Profile("dev")
    @Bean
    public DataSource dataSourceDev() throws Exception {
        ComboPooledDataSource dataSource = new ComboPooledDataSource();
        dataSource.setUser(user);
        dataSource.setPassword(pwd);
        dataSource.setDriverClass(driverClass);
        dataSource.setJdbcUrl(devUrl);
        return dataSource;
    }

    @Profile("pro")
    @Bean
    public DataSource dataSourcePro() throws Exception {
        ComboPooledDataSource dataSource = new ComboPooledDataSource();
        dataSource.setUser(user);
        dataSource.setPassword(pwd);
        dataSource.setDriverClass(driverClass);
        dataSource.setJdbcUrl(proUrl);
        return dataSource;
    }
}
如何激活特定环境
- 在虚拟机option中添加命令行动态参数
-Dspring.profiles.active=环境名称
- 在容器创建前设置激活环境
AnnotationConfigApplicationContext applicationContext = new AnnotationConfigApplicationContext();
// 可激活多个环境setActiveProfiles("dev", "pro")
applicationContext.getEnvironment().setActiveProfiles("dev");
// 注册配置文件类
applicationContext.register(DevDataSourceConfig.class);
// 刷新加载容器
applicationContext.refresh();
声明式事务
@EnableTransactionManagement开启注解驱动的声明式事务@Trascational注明事务方法
mysql数据库下应该将表引擎设为
InnoDB,否则无法成功回滚
@PropertySource({"classpath:db.properties"})
@ComponentScan("com.yguilai.tx")
@Configuration
@EnableTransactionManagement
public class TxConfig {
    @Value("${jdbc.username}")
    private String user;
    @Value("${jdbc.password}")
    private String pwd;
    @Value("${jdbc.driver}")
    private String driverClass;
    @Value("${jdbc.dev.url}")
    private String url;

    //@Profile("dev")
    // 配置数据源
    @Bean
    public DataSource dataSource() throws Exception {
        ComboPooledDataSource dataSource = new ComboPooledDataSource();
        dataSource.setUser(user);
        dataSource.setPassword(pwd);
        dataSource.setDriverClass(driverClass);
        dataSource.setJdbcUrl(url);
        return dataSource;
    }

    @Bean
    public JdbcTemplate jdbcTemplate() throws Exception {
        return new JdbcTemplate(dataSource());
    }

    // 配置事务管理器
    @Bean
    public PlatformTransactionManager transactionManager() throws Exception {
        return new DataSourceTransactionManager(dataSource());
    }
}
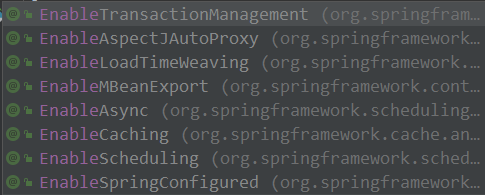
@Enable** 开启注解驱动的某功能
BeanFactoryPostProcessor接口
该后置处理器在BeanFactory标准初始化之后调用, 标准初始化即所有的bean定义已经加载到beanFactory, 但是还未初始化bean. 可用于定制beanFactory的内容.
public void refresh() throws BeansException, IllegalStateException {
        synchronized(this.startupShutdownMonitor) {
            this.prepareRefresh();
            ConfigurableListableBeanFactory beanFactory = this.obtainFreshBeanFactory();
            this.prepareBeanFactory(beanFactory);

            try {
                this.postProcessBeanFactory(beanFactory);
                // 回调所有实现了beanFactoryPostProcessor的类的postProcessBeanFactory方法
                this.invokeBeanFactoryPostProcessors(beanFactory);
                this.registerBeanPostProcessors(beanFactory);
                this.initMessageSource();
                this.initApplicationEventMulticaster();
                this.onRefresh();
                this.registerListeners();
                // 初始化bean
                this.finishBeanFactoryInitialization(beanFactory);
                this.finishRefresh();
            } catch (BeansException var9) {
                if (this.logger.isWarnEnabled()) {
                    this.logger.warn("Exception encountered during context initialization - cancelling refresh attempt: " + var9);
                }

                this.destroyBeans();
                this.cancelRefresh(var9);
                throw var9;
            } finally {
                this.resetCommonCaches();
            }

        }
    }
BeanDefinitionRegistryPostProcessor接口
BeanFactoryPostProcessor的子接口
在所有bean定义信息将要被加载, 但是bean实例还未初始化, 可用于给容器额外添加一些组件
ApplicationListener
实现ApplicationListener接口来监听ApplicationEvent及其子事件
public interface ApplicationListener<E extends ApplicationEvent> extends EventListener {
    void onApplicationEvent(E var1);
}

使用publishEvent发布事件
@Test
public void test01() {
    ApplicationContext ioc = new AnnotationConfigApplicationContext(ExtConfig.class);

    ioc.publishEvent(new ApplicationEvent(new String("发布事件")) {
    });
}
使用@EventListener注解
@EventListener(classes = ApplicationEvent.class)
public void listener(ApplicationEvent event) {

}
ApplicationListener原理
事件发布流程
- 获取事件多播器(派发器)
getApplicationEventMulticaster() - multicastEvent派发事件
- 如果有Executor, 可以支持使用Executor进行异步派发
- 否则, 执行
this.invokeListener(listener, event)拿到listener回调onApplicationEvent方法
public void multicastEvent(final ApplicationEvent event, ResolvableType eventType) {
    ResolvableType type = eventType != null ? eventType : this.resolveDefaultEventType(event);
    Iterator var4 = this.getApplicationListeners(event, type).iterator();

    while(var4.hasNext()) {
        final ApplicationListener<?> listener = (ApplicationListener)var4.next();
        Executor executor = this.getTaskExecutor();
        if (executor != null) {
            // 异步派发
            executor.execute(new Runnable() {
                public void run() {
                    SimpleApplicationEventMulticaster.this.invokeListener(listener, event);
                }
            });
        } else {
            this.invokeListener(listener, event);
        }
    }
}
ContextRefreshedEvent事件
org.springframework.context.support.AbstractApplicationContext#finishRefresh
protected void finishRefresh() {
    this.initLifecycleProcessor();
    this.getLifecycleProcessor().onRefresh();
    // 发布容器刷新完成事件
    this.publishEvent((ApplicationEvent)(new ContextRefreshedEvent(this)));
    LiveBeansView.registerApplicationContext(this);
}

若有收获,就点个赞吧
0 人点赞
