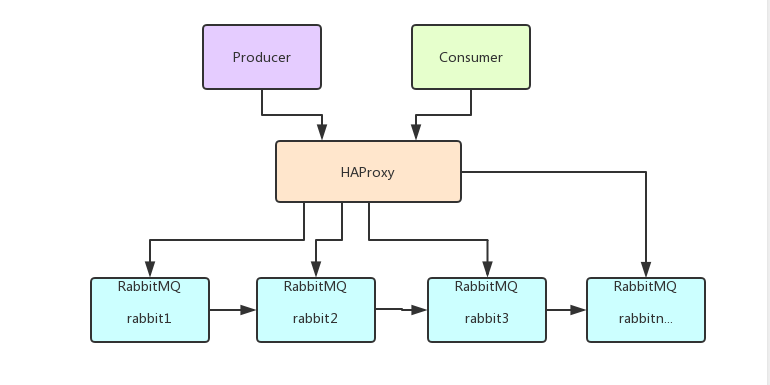
1.RabbitMQ集群搭建
一般来说,如果只是为了学习RabbitMQ或者验证业务工程的正确性那么在本地环境或者测试环境上使用其单实例部署就可以了,但是出于MQ中间件本身的可靠性、并发性、吞吐量和消息堆积能力等问题的考虑,在生产环境上一般都会考虑使用RabbitMQ的集群方案。
1.1 集群方案的原理
RabbitMQ这款消息队列中间件产品本身是基于Erlang编写,Erlang语言天生具备分布式特性(通过同步Erlang集群各节点的cookie来实现)。RabbitMQ本身不需要像ActiveMQ、Kafka那样通过ZooKeeper分别来实现HA方案和保存集群的元数据。
1.2 如下案例中使用多台云服务器进行集群搭建
主要参考官方文档:https://www.rabbitmq.com/clustering.html
#1、环境准备hostnamectl set-hostname m1hostnamectl set-hostname m2#2、统一 erlang.cookie 文件中 cookie 值 将m1中的 .erlang.cookie 同步到 m2中scp /var/lib/rabbitmq/.erlang.cookie m2:/var/lib/rabbitmq/.erlang.cookie#3、Rabbitmq 集群添加节点#重启 m2机器中 rabbitmq 的服务 在 m2执行[root@rabbitmq2 ~]# rabbitmqctl stop_app[root@rabbitmq2 ~]# rabbitmqctl join_cluster --ram rabbit@m2[root@rabbitmq2 ~]# rabbitmqctl start_app[root@rabbitmq2 ~]# rabbitmq-plugins enable rabbitmq_management[root@rabbitmq2 ~]# systemctl restart rabbitmq-server.service#4、查看集群信息rabbitmqctl cluster_status
1.5 负载均衡-HAProxy
HAProxy提供高可用性、负载均衡以及基于TCP和HTTP应用的代理,支持虚拟主机,它是免费、快速并且可靠的一种解决方案,包括Twitter,Reddit,StackOverflow,GitHub在内的多家知名互联网公司在使用。HAProxy实现了一种事件驱动、单一进程模型,此模型支持非常大的并发连接数。
1.5.1 安装HAProxy
#1、安装yum install haproxy#2、配置haproxy.cfg文件 具体参照 如下 1.5.2 配置HAProxyvim /etc/haproxy/haproxy.cfg#3、启动haproxysystemctl start haproxy#4、查看haproxy进程状态systemctl status haproxy.service#状态如下说明 已经启动成功 Active: active (running)#访问如下地址对mq节点进行监控http://服务器IP:1080/haproxy_stats#代码中访问mq集群地址,则变为访问haproxy地址:5672
1.5.2 配置HAProxy
配置文件路径:/etc/haproxy/haproxy.cfg
#---------------------------------------------------------------------# Example configuration for a possible web application. See the# full configuration options online.## http://haproxy.1wt.eu/download/1.4/doc/configuration.txt##---------------------------------------------------------------------#---------------------------------------------------------------------# Global settings#---------------------------------------------------------------------global# to have these messages end up in /var/log/haproxy.log you will# need to:## 1) configure syslog to accept network log events. This is done# by adding the '-r' option to the SYSLOGD_OPTIONS in# /etc/sysconfig/syslog## 2) configure local2 events to go to the /var/log/haproxy.log# file. A line like the following can be added to# /etc/sysconfig/syslog## local2.* /var/log/haproxy.log#log 127.0.0.1 local2chroot /var/lib/haproxypidfile /var/run/haproxy.pidmaxconn 4000user haproxygroup haproxydaemon# turn on stats unix socketstats socket /var/lib/haproxy/stats#---------------------------------------------------------------------# common defaults that all the 'listen' and 'backend' sections will# use if not designated in their block#---------------------------------------------------------------------defaultsmode httplog globaloption httplogoption dontlognulloption http-server-closeoption forwardfor except 127.0.0.0/8option redispatchretries 3timeout http-request 10stimeout queue 1mtimeout connect 10stimeout client 1mtimeout server 1mtimeout http-keep-alive 10stimeout check 10smaxconn 3000#对MQ集群进行监听listen rabbitmq_clusterbind 0.0.0.0:5672option tcplogmode tcpoption clitcpkatimeout connect 1stimeout client 10stimeout server 10sbalance roundrobinserver node1 节点1 ip地址:5672 check inter 5s rise 2 fall 3server node2 节点2 ip地址:5672 check inter 5s rise 2 fall 3#开启haproxy监控服务listen http_frontbind 0.0.0.0:1080stats refresh 30sstats uri /haproxy_statsstats auth admin:admin
haproxy.cfg配置详解
listen rabbitmg clusterbind 0.0.0.0:5672#通过5672对M1, M2进行映射option tcplog #记录tcp连接的状态和时间mode tcp#四层协议代理,即对TCP协议转发option clitcpka #开启TCP的Keep Alive. (长连接模式)timeout connect 1s #haproxy与mq建立连接的超时时间timeout client 10s#客户端与haproxy最大空闲时间。timeout server 10s #服务器与haproxy最大空闲时间balance roundrobin #采用轮询转发消息#每5秒发送一次心跳包,如连续两次有响应则代表状态良好。#如连续三次没有响应,则视为服务故障,该节点将被剔除。server node1 192.168.132.137:5672 check inter 5s rise 2 fall 3server node2192.168.132.139:5672 check inter 5s rise 2 fall 3listen http front#监听端口bind 0.0.0.0:1080#统计页面自动刷新时间stats refresh 30s#统计页面urlstats uri /haproxy?stats#指定HAproxy访问用户名和密码设置stats auth admin:admin

