- 安装python
- 查看是否安装成功
- anaconda
- 知识
- 2. 定义变量
- Numbers(数字)
- String(字符串)
- List(列表)
- Tuple(元组)
- Dictionary(字典)
- 循环语句
- While 循环语句
- for 循环语句
- 循环嵌套
- break 语句
- continue 语句
- pass 语句
- Python 字符串
- Python 访问字符串中的值
- Python 字符串连接
- Python三引号
- Unicode 字符串
- 把字符串的第一个字符大写
- 返回一个原字符串居中,并使用空格填充至长度 width 的新字符串
- 返回 str 在 string 里面出现的次数,如果 beg 或者 end 指定则返回指定范围内 str 出现的次数
- 以 encoding 指定的编码格式解码 string,如果出错默认报一个 ValueError 的 异 常 , 除非 errors 指 定 的 是 ‘ignore’ 或 者’replace’
- 检查字符串是否以 obj 结束,如果beg 或者 end 指定则检查指定的范围内是否以 obj 结束,如果是,返回 True,否则返回 False.
- 把字符串 string 中的 tab 符号转为空格,tab 符号默认的空格数是 8。
- 检测 str 是否包含在 string 中,如果 beg 和 end 指定范围,则检查是否包含在指定范围内,如果是返回开始的索引值,否则返回-1
- 格式化字符串
- index()方法
- isalnum()方法
- isalpha()方法
- isdigit()方法
- islower()方法
- isnumeric()方法
- isspace()方法
- istitle()方法
- isupper()方法
- join()方法
- ljust()方法
- lower()方法
- lstrip()方法
- maketrans()方法
- max()方法
- min()方法
- partition() 方法
- replace()方法
- rfind()方法
- rindex()方法
- rjust()方法
- rpartition() 方法
- rstrip()方法
- split()方法
- swapcase()方法
- title()方法
- translate()方法
- upper()方法
- zfill()方法
- Python 列表(List)
- 访问列表中的值
- 更新列表
- 删除列表元素
- Python列表函数&方法
- Python 元组
- 元组运算符
- 元组索引,截取
- Tuple(元组) tuple()方法
- Python 字典(Dictionary)
- Python 文件I/O
- Python File(文件) 方法
- 函数
- 参数
- 体验一下
- 柱状图
安装python
Windows 安装python
版本目前,Python有两个版本,一个是2.x版,一个是3.x版,这两个版本是不兼容的。由于3.x版越来越普及,我们的教程将以最新的Python 3.7版本为基础。请确保你的电脑上安装的Python版本是最新的3.7.x,这样,你才能无痛学习这个教程。下载:https://www.python.org/下一步-----》下一步-----》安装就行
Mac上安装Python
如果你正在使用Mac,系统是OS X>=10.9,那么系统自带的Python版本是2.7。要安装最新的Python 3.7,有两个方法:

方法一:从Python官网下载Python 3.7的安装程序(网速慢的同学请移步国内镜像),双击运行并安装;

方法二:如果安装了Homebrew,直接通过命令brew install python3安装即可。
Linux上安装Python
liunx自带python
查看是否安装成功
输入:python
显示几行英文那就是安装成功了
anaconda
https://mirrors.tuna.tsinghua.edu.cn/anaconda/archive/?C=M&O=D
知识
注释
# 单行注释 #

多行注释
'''
a
a
a
'''
"""
aa
aa
aa
"""
2. 定义变量
score = 10
# 变量名字 = 数据
a = 10
b = 20

counter = 100 # 赋值整型变量
miles = 1000.0 # 浮点型
name = "John" # 字符串
Numbers(数字)
int(有符号整型)

long(长整型[也可以代表八进制和十六进制])

float(浮点型)

complex(复数)
String(字符串)
str = 'Hello World!'

print(str)           # 输出完整字符串
print(str[0])        # 输出字符串中的第一个字符
print(str[2:5])      # 输出字符串中第三个至第六个之间的字符串
print(str[2:])       # 输出从第三个字符开始的字符串
print(str * 2)       # 输出字符串两次
print(str + "TEST")  # 输出连接的字符串
List(列表)
# -*- coding: UTF-8 -*-

list = [ 'runoob', 786 , 2.23, 'john', 70.2 ]
tinylist = [123, 'john']

print(list)               # 输出完整列表
print(list[0])            # 输出列表的第一个元素
print(list[1:3])          # 输出第二个至第三个元素
print(list[2:])           # 输出从第三个开始至列表末尾的所有元素
print(tinylist * 2)       # 输出列表两次
print(list + tinylist)    # 打印组合的列表
Tuple(元组)
#!/usr/bin/python
# -*- coding: UTF-8 -*-

tuple = ( 'zhangsan', 123 , 2.23, 'xingming', 70.2 )
tinytuple = (123, 'john')

print(tuple)               # 输出完整元组
print(tuple[0])            # 输出元组的第一个元素
print(tuple[1:3])          # 输出第二个至第四个(不包含)的元素
print(tuple[2:])           # 输出从第三个开始至列表末尾的所有元素
print(tinytuple * 2)       # 输出元组两次
print(tuple + tinytuple)   # 打印组合的元组
Dictionary(字典)
#!/usr/bin/python
# -*- coding: UTF-8 -*-

dict = {}
dict['one'] = "This is one"
dict[2] = "This is two"

tinydict = {'name': 'john','code':6734, 'dept': 'sales'}


print(dict['one'])          # 输出键为'one' 的值
print(dict[2])              # 输出键为 2 的值
print(tinydict)             # 输出完整的字典
print(tinydict.keys())      # 输出所有键
print(tinydict.values())    # 输出所有值
数据
整形 int

浮点型 float

字符串

列表

字典

布尔类型
条件语句
计算机之所以能做很多自动化的任务,因为它可以自己做条件判断。
if 判断条件:
    执行语句……
else:
    执行语句……
if 语句的判断条件可以用>(大于)、<(小于)、==(等于)、>=(大于等于)、<=(小于等于)来表示其关系。
当判断条件为多个值时,可以使用以下形式:
if 判断条件1:
    执行语句1……
elif 判断条件2:
    执行语句2……
elif 判断条件3:
    执行语句3……
else:
    执行语句4……
运算符号
| 运算符 | 描述 | 实例 |
|---|---|---|
| + | 加 - 两个对象相加 | a + b 输出结果 30 |
| - | 减 - 得到负数或是一个数减去另一个数 | a - b 输出结果 -10 |
| * | 乘 - 两个数相乘或是返回一个被重复若干次的字符串 | a * b 输出结果 200 |
| / | 除 - x除以y | b / a 输出结果 2 |
| % | 取模 - 返回除法的余数 | b % a 输出结果 0 |
| ** | 幂 - 返回x的y次幂 | a**b 为10的20次方, 输出结果 100000000000000000000 |
| // | 取整除 - 返回商的整数部分(向下取整) | >>> 9//2 4 >>> -9//2 -5 |
比较运算符
| 运算符 | 描述 | 实例 |
|---|---|---|
| == | 等于 - 比较对象是否相等 | (a == b) 返回 False。 |
| != | 不等于 - 比较两个对象是否不相等 | (a != b) 返回 true. |
| <> | 不等于 - 比较两个对象是否不相等 | (a <> b) 返回 true。这个运算符类似 != 。 |
| > | 大于 - 返回x是否大于y | (a > b) 返回 False。 |
| < | 小于 - 返回x是否小于y。所有比较运算符返回1表示真,返回0表示假。这分别与特殊的变量True和False等价。 | (a < b) 返回 true。 |
| >= | 大于等于 - 返回x是否大于等于y。 | (a >= b) 返回 False。 |
| <= | 小于等于 - 返回x是否小于等于y。 | (a <= b) 返回 true。 |
赋值运算符
| 运算符 | 描述 | 实例 |
|---|---|---|
| = | 简单的赋值运算符 | c = a + b 将 a + b 的运算结果赋值为 c |
| += | 加法赋值运算符 | c += a 等效于 c = c + a |
| -= | 减法赋值运算符 | c -= a 等效于 c = c - a |
| *= | 乘法赋值运算符 | c = a 等效于 c = c a |
| /= | 除法赋值运算符 | c /= a 等效于 c = c / a |
| %= | 取模赋值运算符 | c %= a 等效于 c = c % a |
| **= | 幂赋值运算符 | c = a 等效于 c = c a |
| //= | 取整除赋值运算符 | c //= a 等效于 c = c // a |
循环语句
While 循环语句
while 判断条件:
    执行语句……
无限循环
如果条件判断语句永远为 true
循环使用 else 语句
count = 0
while count < 5:
   print(count, " is type true")
   count = count + 1
else:
   print(count, " is not type flase")
for 循环语句
for iterating_var in sequence:
   statements(s)
通过序列索引迭代
fruits = ['a', 'b',  'c']
for index in range(len(fruits)):
   print('当前字母 :', fruits[index])

print("Good bye!")
循环嵌套
for iterating_var in sequence:
   for iterating_var in sequence:
      statements(s)
   statements(s)
while expression:
   while expression:
      statement(s)
   statement(s)
break 语句
break语句用来终止循环语句,即循环条件没有False条件或者序列还没被完全递归完,也会停止执行循环语句。

break语句用在while和for循环中。
continue 语句
continue 语句用来告诉Python跳过当前循环的剩余语句,然后继续进行下一轮循环。

continue语句用在while和for循环中。
pass 语句
pass 不做任何事情,一般用做占位语句。
Python 字符串
字符串是 Python 中最常用的数据类型。我们可以使用引号(‘或”)来创建字符串。
Python 访问字符串中的值
Python 不支持单字符类型,单字符在 Python 中也是作为一个字符串使用。
var1 = 'Hello World!'
var2 = "Python Runoob"

print("var1[0]: ", var1[0])
print("var2[1:5]: ", var2[1:5])
Python 字符串连接
var1 = 'Hello World!'

print("输出 :- ", var1[:6] + 'Runoob!')
Python三引号
 >>> hi = '''hi
there'''
>>> hi   # repr()
'hi\nthere'
>>> print(hi)
hi
there
Unicode 字符串
>>> u'Hello World !'
u'Hello World !'
把字符串的第一个字符大写
capitalize()将字符串的第一个字母变成大写,其他字母变小写(前面不能有空格)
str.capitalize()
返回一个原字符串居中,并使用空格填充至长度 width 的新字符串
Python center() 返回一个原字符串居中,并使用空格填充至长度 width 的新字符串。默认填充字符为空格。
str.center(width[, fillchar])

width -- 字符串的总宽度。
fillchar -- 填充字符。
>>>str = 'runoob'
>>> str.center(20, '*')
'*******runoob*******'
>>> str.center(20)
'       runoob       '
>>>
返回 str 在 string 里面出现的次数,如果 beg 或者 end 指定则返回指定范围内 str 出现的次数
Python count() 方法用于统计字符串里某个字符出现的次数。可选参数为在字符串搜索的开始与结束位置。
str.count(sub, start= 0,end=len(string))

sub -- 搜索的子字符串

start -- 字符串开始搜索的位置。默认为第一个字符,第一个字符索引值为0。

end -- 字符串中结束搜索的位置。字符中第一个字符的索引为 0。默认为字符串的最后一个位置。
以 encoding 指定的编码格式解码 string,如果出错默认报一个 ValueError 的 异 常 , 除非 errors 指 定 的 是 ‘ignore’ 或 者’replace’
Python decode() 方法以 encoding 指定的编码格式解码字符串。默认编码为字符串编码。
str.decode(encoding='UTF-8',errors='strict')

encoding -- 要使用的编码,如"UTF-8"。

errors -- 设置不同错误的处理方案。默认为 'strict',意为编码错误引起一个UnicodeError。 其他可能得值有 'ignore', 'replace', 'xmlcharrefreplace', 'backslashreplace' 以及通过 codecs.register_error() 注册的任何值。
检查字符串是否以 obj 结束,如果beg 或者 end 指定则检查指定的范围内是否以 obj 结束,如果是,返回 True,否则返回 False.
Python endswith() 方法用于判断字符串是否以指定后缀结尾,如果以指定后缀结尾返回True,否则返回False。可选参数”start”与”end”为检索字符串的开始与结束位置。
str.endswith(suffix[, start[, end]])

suffix -- 该参数可以是一个字符串或者是一个元素。
start -- 字符串中的开始位置。
end -- 字符中结束位置。
把字符串 string 中的 tab 符号转为空格,tab 符号默认的空格数是 8。
Python expandtabs() 方法把字符串中的 tab 符号(‘\t’)转为空格,tab 符号(‘\t’)默认的空格数是 8。
str.expandtabs(tabsize=8)

tabsize -- 指定转换字符串中的 tab 符号('\t')转为空格的字符数。
检测 str 是否包含在 string 中,如果 beg 和 end 指定范围,则检查是否包含在指定范围内,如果是返回开始的索引值,否则返回-1
Python find() 方法检测字符串中是否包含子字符串 str ,如果指定 beg(开始) 和 end(结束) 范围,则检查是否包含在指定范围内,如果包含子字符串返回开始的索引值,否则返回-1。
str.find(str, beg=0, end=len(string))

str -- 指定检索的字符串
beg -- 开始索引,默认为0。
end -- 结束索引,默认为字符串的长度。
格式化字符串
format 函数可以接受不限个参数,位置可以不按顺序。
"{} {}".format("hello", "world")    # 不设置指定位置,按默认顺序

"{0} {1}".format("hello", "world")  # 设置指定位置

"{1} {0} {1}".format("hello", "world")  # 设置指定位置

print("网站名:{name}, 地址 {url}".format(name="菜鸟教程", url="www.runoob.com"))


# 通过列表索引设置参数
my_list = ['菜鸟教程', 'www.runoob.com']
print("网站名:{0[0]}, 地址 {0[1]}".format(my_list))  # "0" 是必须的
index()方法
Python index() 方法检测字符串中是否包含子字符串 str ,如果指定 beg(开始) 和 end(结束) 范围,则检查是否包含在指定范围内,该方法与 python find()方法一样,只不过如果str不在 string中会报一个异常。
str.index(str, beg=0, end=len(string))

str -- 指定检索的字符串
beg -- 开始索引,默认为0。
end -- 结束索引,默认为字符串的长度。
isalnum()方法
Python isalnum() 方法检测字符串是否由字母和数字组成。
str.isalnum()
isalpha()方法
Python isalpha() 方法检测字符串是否只由字母组成。
str.isalpha()
isdigit()方法
Python isdigit() 方法检测字符串是否只由数字组成。
str.isdigit()
islower()方法
Python islower() 方法检测字符串是否由小写字母组成。
str.islower()
isnumeric()方法
Python isnumeric() 方法检测字符串是否只由数字组成。这种方法是只针对unicode对象。
str.isnumeric()]
isspace()方法
Python isspace() 方法检测字符串是否只由空格组成。
str.isspace()
istitle()方法
Python istitle() 方法检测字符串中所有的单词拼写首字母是否为大写,且其他字母为小写。
str.istitle()
isupper()方法
Python isupper() 方法检测字符串中所有的字母是否都为大写。
str.isupper()
join()方法
Python join() 方法用于将序列中的元素以指定的字符连接生成一个新的字符串。
str.join(sequence)


sequence -- 要连接的元素序列。
ljust()方法
Python ljust() 方法返回一个原字符串左对齐,并使用空格填充至指定长度的新字符串。如果指定的长度小于原字符串的长度则返回原字符串。
str.ljust(width[, fillchar])


width -- 指定字符串长度。
fillchar -- 填充字符,默认为空格。
lower()方法
Python lower() 方法转换字符串中所有大写字符为小写。
str.lower()
lstrip()方法
Python lstrip() 方法用于截掉字符串左边的空格或指定字符。
str.lstrip([chars])
maketrans()方法
Python maketrans() 方法用于创建字符映射的转换表,对于接受两个参数的最简单的调用方式,第一个参数是字符串,表示需要转换的字符,第二个参数也是字符串表示转换的目标
str.maketrans(intab, outtab)
max()方法
Python max() 方法返回字符串中最大的字母。
max(str)

str -- 字符串。
min()方法
Python min() 方法返回字符串中最小的字母。
min(str)
partition() 方法
partition() 方法用来根据指定的分隔符将字符串进行分割。
如果字符串包含指定的分隔符,则返回一个3元的元组,第一个为分隔符左边的子串,第二个为分隔符本身,第三个为分隔符右边的子串。
partition() 方法是在2.5版中新增的。
str.partition(str)
replace()方法
Python replace() 方法把字符串中的 old(旧字符串) 替换成 new(新字符串),如果指定第三个参数max,则替换不超过 max 次。
str.replace(old, new[, max])
rfind()方法
Python rfind() 返回字符串最后一次出现的位置(从右向左查询),如果没有匹配项则返回-1。
str.rfind(str, beg=0 end=len(string))

str -- 查找的字符串
beg -- 开始查找的位置,默认为 0
end -- 结束查找位置,默认为字符串的长度。
rindex()方法
Python rindex() 返回子字符串 str 在字符串中最后出现的位置,如果没有匹配的字符串会报异常,你可以指定可选参数[beg:end]设置查找的区间。
str.rindex(str, beg=0 end=len(string))

 -- 查找的字符串
beg -- 开始查找的位置,默认为0
end -- 结束查找位置,默认为字符串的长度。
rjust()方法
Python rjust() 返回一个原字符串右对齐,并使用空格填充至长度 width 的新字符串。如果指定的长度小于字符串的长度则返回原字符串。
str.rjust(width[, fillchar])

width -- 指定填充指定字符后中字符串的总长度.
fillchar -- 填充的字符,默认为空格。
rpartition() 方法
rpartition() 方法类似于 partition() 方法,只是该方法是从目标字符串的末尾也就是右边开始搜索分割符。。
str.rpartition(str)

str : 指定的分隔符。
rstrip()方法
Python rstrip() 删除 string 字符串末尾的指定字符(默认为空格).
str.rstrip([chars])
split()方法
Python split() 通过指定分隔符对字符串进行切片,如果参数 num 有指定值,则分隔 num+1 个子字符串
str.split(str="", num=string.count(str)).


str -- 分隔符,默认为所有的空字符,包括空格、换行(\n)、制表符(\t)等。
num -- 分割次数。默认为 -1, 即分隔所有。
swapcase()方法
Python swapcase() 方法用于对字符串的大小写字母进行转换。
str.swapcase();
title()方法
Python title() 方法返回”标题化”的字符串,就是说所有单词都是以大写开始,其余字母均为小写(见 istitle())。
str.title();
translate()方法
Python translate() 方法根据参数table给出的表(包含 256 个字符)转换字符串的字符, 要过滤掉的字符放到 del 参数中。
str.translate(table[, deletechars]);
upper()方法
Python upper() 方法将字符串中的小写字母转为大写字母。
str.upper()
zfill()方法
Python zfill() 方法返回指定长度的字符串,原字符串右对齐,前面填充0。
str.zfill(width)
Python 列表(List)
list1 = ['physics', 'chemistry', 1997, 2000]
list2 = [1, 2, 3, 4, 5 ]
list3 = ["a", "b", "c", "d"]
访问列表中的值
list1 = ['physics', 'chemistry', 1997, 2000]
list2 = [1, 2, 3, 4, 5, 6, 7 ]

print("list1[0]: ", list1[0])
print("list2[1:5]: ", list2[1:5])
更新列表
list = []          ## 空列表
list.append('Google')   ## 使用 append() 添加元素
list.append('Runoob')
print(list)
删除列表元素
list1 = ['physics', 'chemistry', 1997, 2000]

print(list1)
del list1[2]
print("After deleting value at index 2 : ")
print(list1)
Python列表函数&方法
cmp()方法
cmp() 方法用于比较两个列表的元素。
cmp(list1, list2)

list1 -- 比较的列表。
list2 -- 比较的列表。
len()方法
len() 方法返回列表元素个数。
len(list)

list -- 要计算元素个数的列表。
max()方法
max() 方法返回列表元素中的最大值。
max(list)
list()方法
list() 方法用于将元组转换为列表。
list( tup )

tup -- 要转换为列表的元组。
List append()方法
append() 方法用于在列表末尾添加新的对象。
list.append(obj)
List count()方法
count() 方法用于统计某个元素在列表中出现的次数。
list.count(obj)
List extend()方法
extend() 函数用于在列表末尾一次性追加另一个序列中的多个值(用新列表扩展原来的列表)。
list.extend(seq)
List index()方法
index() 函数用于从列表中找出某个值第一个匹配项的索引位置。
list.index(x[, start[, end]])
List insert()方法
insert() 函数用于将指定对象插入列表的指定位置。
list.insert(index, obj)
List pop()方法
pop() 函数用于移除列表中的一个元素(默认最后一个元素),并且返回该元素的值。
list.pop([index=-1])
List remove()方法
remove() 函数用于移除列表中某个值的第一个匹配项。
list.remove(obj)
List reverse()方法
reverse() 函数用于反向列表中元素。
list.reverse()
List sort()方法
sort() 函数用于对原列表进行排序,如果指定参数,则使用比较函数指定的比较函数。
list.sort(cmp=None, key=None, reverse=False)

cmp -- 可选参数, 如果指定了该参数会使用该参数的方法进行排序。
key -- 主要是用来进行比较的元素,只有一个参数,具体的函数的参数就是取自于可迭代对象中,指定可迭代对象中的一个元素来进行排序。
reverse -- 排序规则,reverse = True 降序, reverse = False 升序(默认)。
Python 元组
tup1 = ('physics', 'chemistry', 1997, 2000)
tup2 = (1, 2, 3, 4, 5 )
tup3 = "a", "b", "c", "d"
访问元组
tup1 = ('physics', 'chemistry', 1997, 2000)
tup2 = (1, 2, 3, 4, 5, 6, 7 )

print "tup1[0]: ", tup1[0]
print "tup2[1:5]: ", tup2[1:5]
修改元组
tup1 = (12, 34.56)
tup2 = ('abc', 'xyz')

# 以下修改元组元素操作是非法的。
# tup1[0] = 100

# 创建一个新的元组
tup3 = tup1 + tup2
print tup3
删除元组
tup = ('physics', 'chemistry', 1997, 2000)

print tup
del tup
print "After deleting tup : "
print tup
元组运算符
和数组的一样
元组索引,截取
和数组的一样
Tuple(元组) tuple()方法
Python 元组 tuple() 函数将列表转换为元组。
tuple( seq )
Python 字典(Dictionary)
d = {key1 : value1, key2 : value2 }
问字典里的值
dict = {'Name': 'Zara', 'Age': 7, 'Class': 'First'}

print("dict['Name']: ", dict['Name'])
print("dict['Age']: ", dict['Age'])
修改字典
dict = {'Name': 'Zara', 'Age': 7, 'Class': 'First'}

dict['Age'] = 8 # 更新
dict['School'] = "RUNOOB" # 添加


print("dict['Age']: ", dict['Age'])
print("dict['School']: ", dict['School'])
删除字典元素
dict = {'Name': 'Zara', 'Age': 7, 'Class': 'First'}

del dict['Name']  # 删除键是'Name'的条目
dict.clear()      # 清空字典所有条目
del dict          # 删除字典

print("dict['Age']: ", dict['Age'] )
print("dict['School']: ", dict['School'])
Python 文件I/O
file object = open(file_name [, access_mode][, buffering])

file_name:file_name变量是一个包含了你要访问的文件名称的字符串值。

access_mode:access_mode决定了打开文件的模式:只读,写入,追加等。所有可取值见如下的完全列表。这个参数是非强制的,默认文件访问模式为只读(r)。

buffering:如果buffering的值被设为0,就不会有寄存。如果buffering的值取1,访问文件时会寄存行。如果将buffering的值设为大于1的整数,表明了这就是的寄存区的缓冲大小。如果取负值,寄存区的缓冲大小则为系统默认。
Python File(文件) 方法
open(file, mode='r', buffering=-1, encoding=None, errors=None, newline=None, closefd=True, opener=None)

file: 必需,文件路径(相对或者绝对路径)。
mode: 可选,文件打开模式
buffering: 设置缓冲
encoding: 一般使用utf8
errors: 报错级别
newline: 区分换行符
closefd: 传入的file参数类型
opener:
函数
# 定义函数
def printme( str ):
   "打印任何传入的字符串"
   print(str)
   return str
参数传递
def func(a, b):
    print(a+b)
传不可变对象实例
def ChangeInt( a ):
    a = 10
   b = 2
   ChangeInt(b)
   print( b )
传可变对象实例
def changeme( mylist ):
   mylist.append([1,2,3,4])
   print ("函数内取值: ", mylist)
   return

# 调用changeme函数
mylist = [10,20,30]
changeme( mylist )
print ("函数外取值: ", mylist)
参数
必备参数
def helloWorld(a):
  print('输出:hello')
关键字参数
def about(name,course,site):
 print (name,course,site)

about('jim','100','www.baidu.com') ## 必须按顺序传参
about(site='www.baidu.com',name='green',course=100) ##以关健字方式传入参数(可以不按顺序)
默认参数
def enroll(name, gender, age=6, city='Beijing'):
 print('name:', name)
 print('gender:', gender)
 print('age:', age)
 print('city:', city)
enroll('Bob', 'M', 7)
enroll('Adam', 'M', city='Tianjin')
不定长参数
def person(name, age, **kw):
 print('name:', name, 'age:', age, 'other:', kw)
匿名函数
calc = lambda x,y:x**y
print(calc(2,5))
return 语句
def calc(x,y):
    if x > y:
        return x*y
    else:
        return x / y
变量作用域
x = int(2.9)  # 内建作用域

y = 0  # 全局作用域

def outer():
    c = 1  # 闭包函数外的函数中
    def inner():
        c = 2  # 局部作用域
全局变量和局部变量
total = 0 # 这是一个全局变量

def sum( arg1, arg2 ):
    #返回2个参数的和."
    total = arg1 + arg2 # total在这里是局部变量.
    print ("函数内是局部变量 : ", total)
    return total

#调用sum函数
sum( 10, 20 )
print ("函数外是全局变量 : ", total)
模块 import
当 Python 解释器遇到 import 语句时,会在 Python 的搜索路径中依次去寻找所引入的模块。

搜索路径被存储在 sys 模块中的 path 变量,sys.path 输出是一个列表,其中第一项是空串 '',代表当前目录,亦即我们执行 Python 解释器的目录(对于脚本的话就是运行的脚本所在的目录)。

因此如果在当前目录下存在与要引入模块同名的文件,就会把要引入的模块屏蔽掉,这也就是我们自己的模块名不能和 Python 标准模块名重名的原因。

一个模块只会被导入一次,不管你执行了多少次 import ,这样可以防止导入模块被一遍又一遍地执行。
包
包是一种管理 Python 模块命名空间的形式,采用"点模块名称"。比如一个模块的名称是 A.B, 那么他表示一个包 A 中的子模块 B 。

不妨假设你想设计一套统一处理声音文件和数据的模块(或者称之为一个"包")。

现存很多种不同的音频文件格式(基本上都是通过后缀名区分的,例如: .wav,:file:.aiff,:file:.au,),所以你需要有一组不断增加的模块,用来在不同的格式之间转换。

并且针对这些音频数据,还有很多不同的操作(比如混音,添加回声,增加均衡器功能,创建人造立体声效果),所以你还需要一组怎么也写不完的模块来处理这些操作。
模块
pip install Pillow
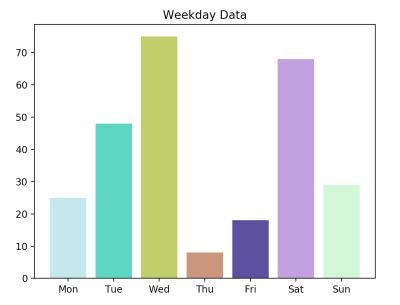
枚举
from enum import Enum

Month = Enum('a', ('b', 'c', 'd', 'e', 'f', 'j', 'h', 'j', 'k', 'l', 'm', 'n'))

@unique
class Weekday(Enum):
    Sun = 0 # Sun的value被设定为0
    Mon = 1
    Tue = 2
    Wed = 3
    Thu = 4
    Fri = 5
    Sat = 6

print(Weekday.Mon)
异常
try:
    print('try...')
    r = 10 / 0
    print('result:', r)
except ZeroDivisionError as e:
    print('ZeroDivisionError:', e)
finally:
    print('finally...')
print('END')
体验一下
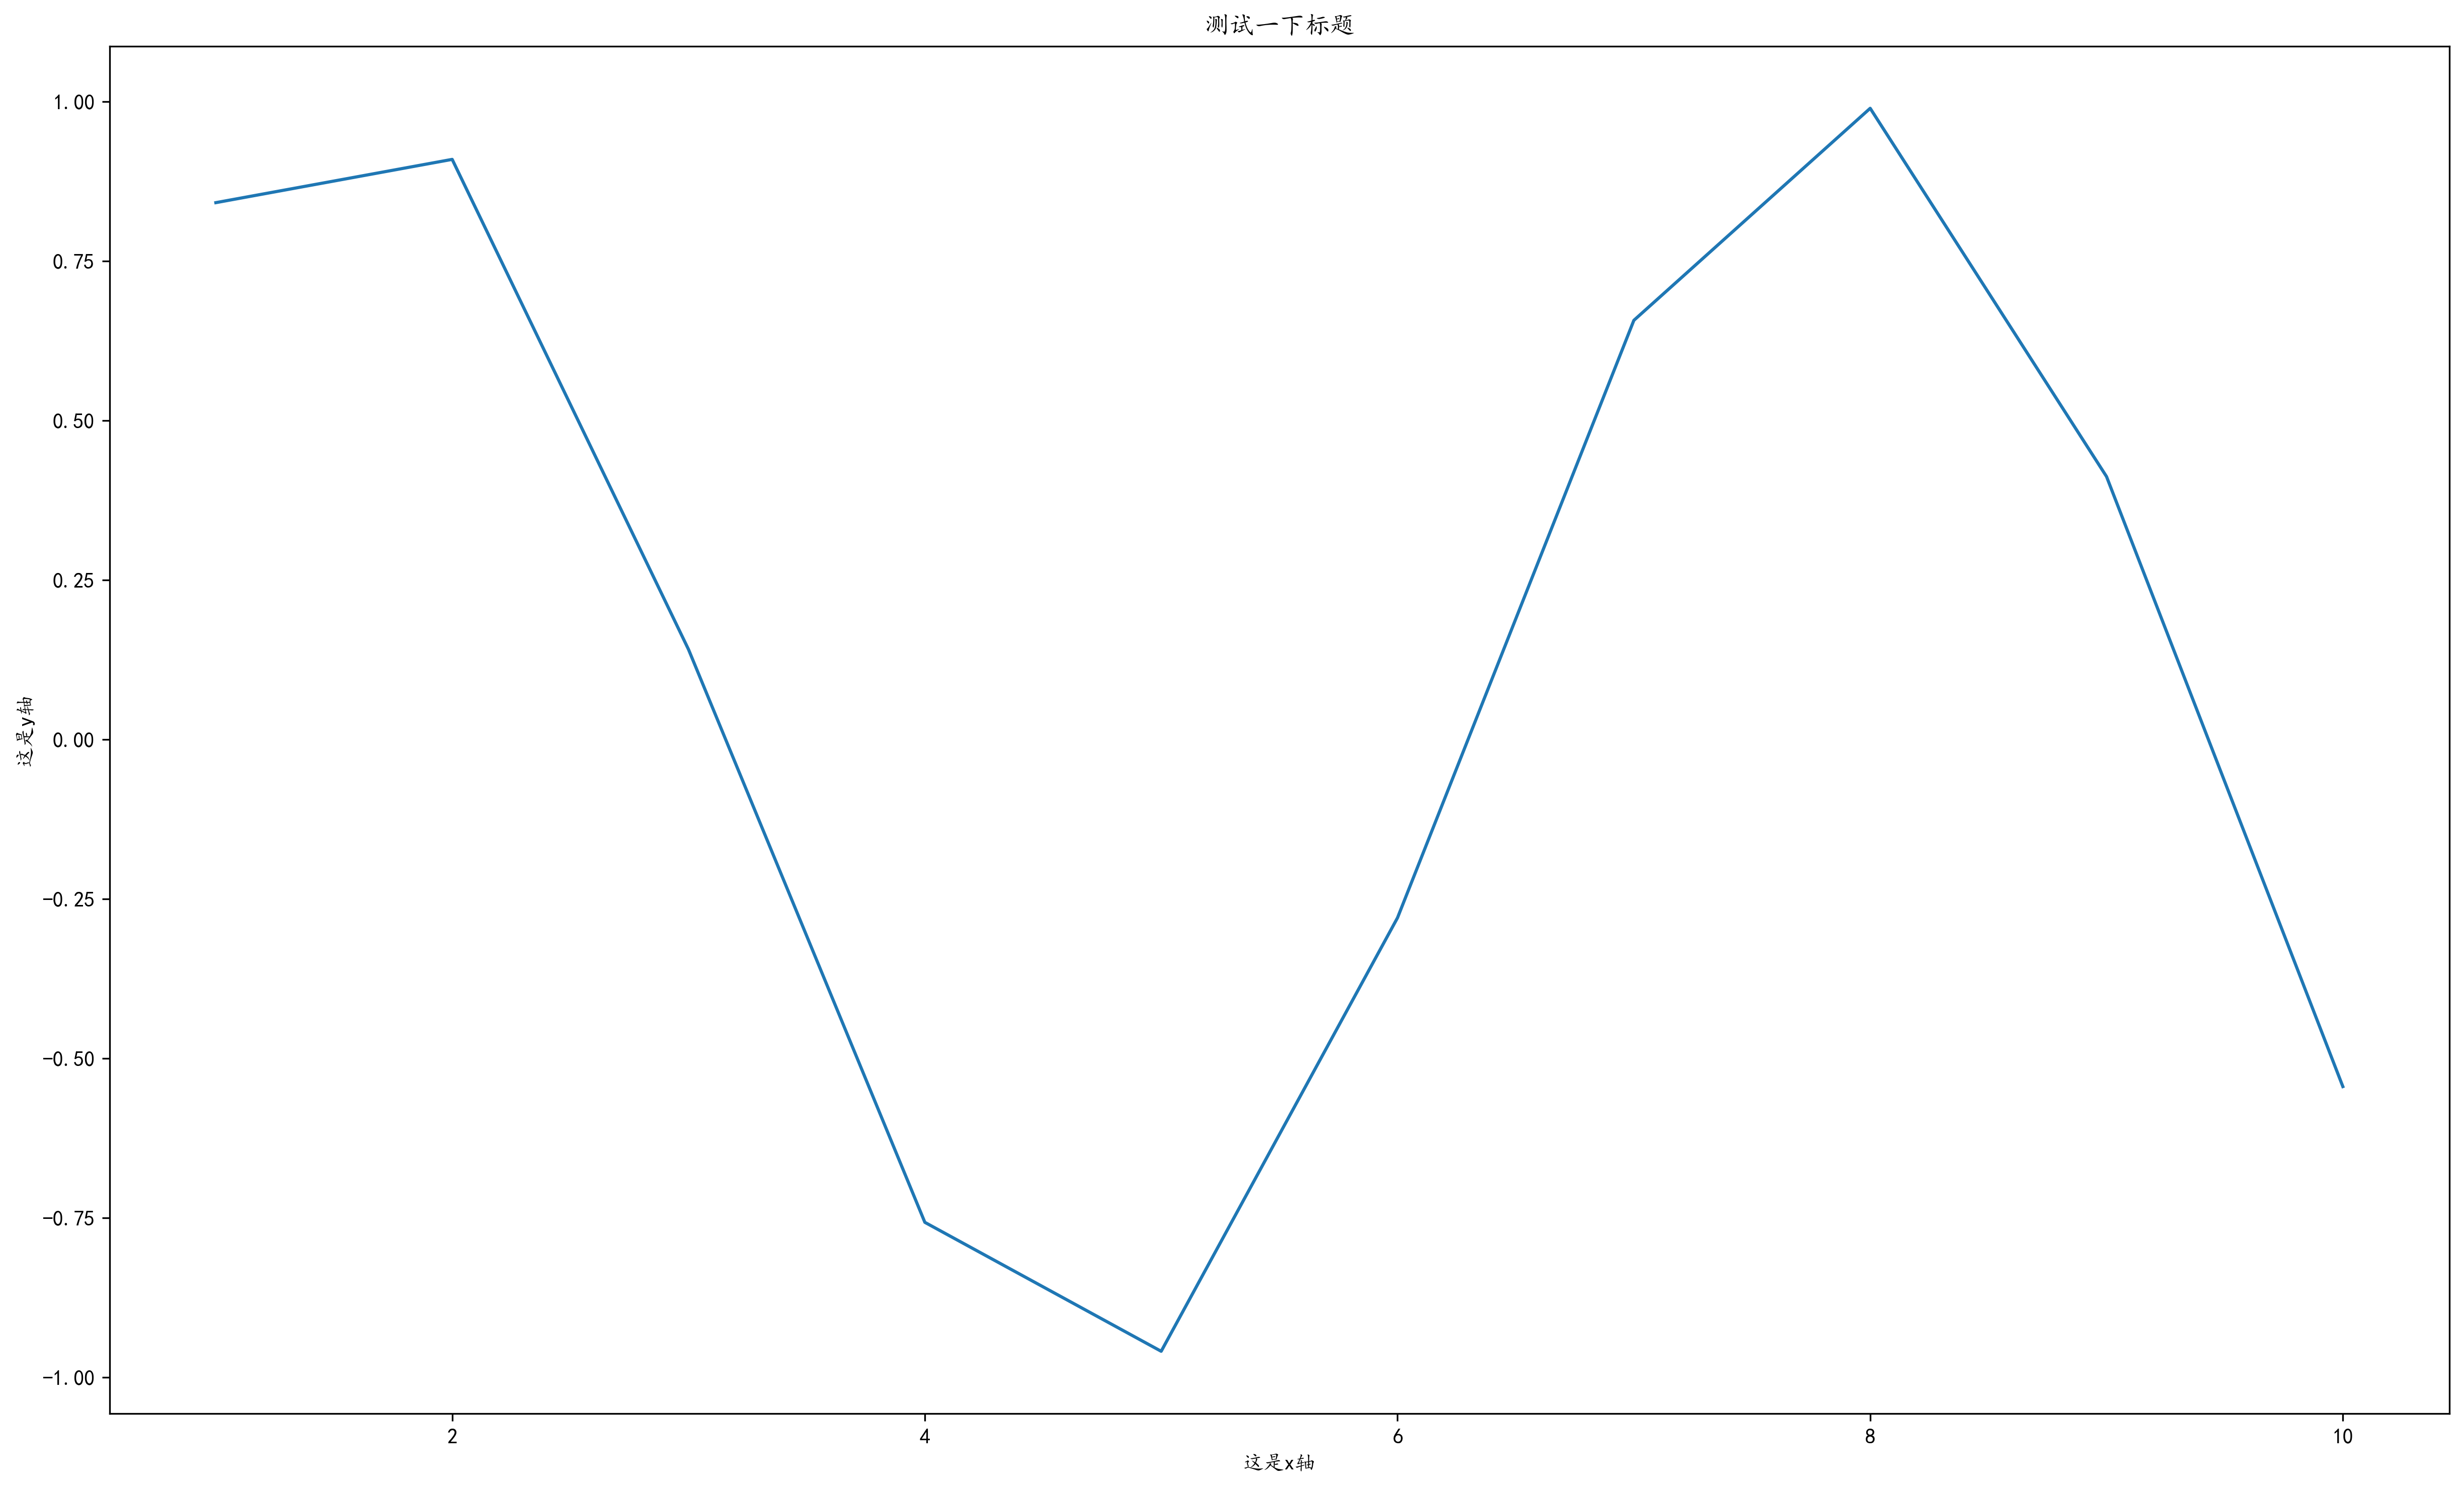
直线图
import numpy as np
from matplotlib import pyplot as plt


#解决中文显示问题
plt.rcParams['font.sans-serif'] = ['KaiTi'] # 指定默认字体
plt.rcParams['axes.unicode_minus'] = False # 解决保存图像是负号'-'显示为方块的问题

x = np.arange(1,11)
y =  2  * x +  5
plt.figure(dpi=300, figsize=(20, 12))
plt.title("测试一下标题")
plt.xlabel("这是x轴")
plt.ylabel("这是y轴")
plt.plot(x,np.sin(x))
plt.show()
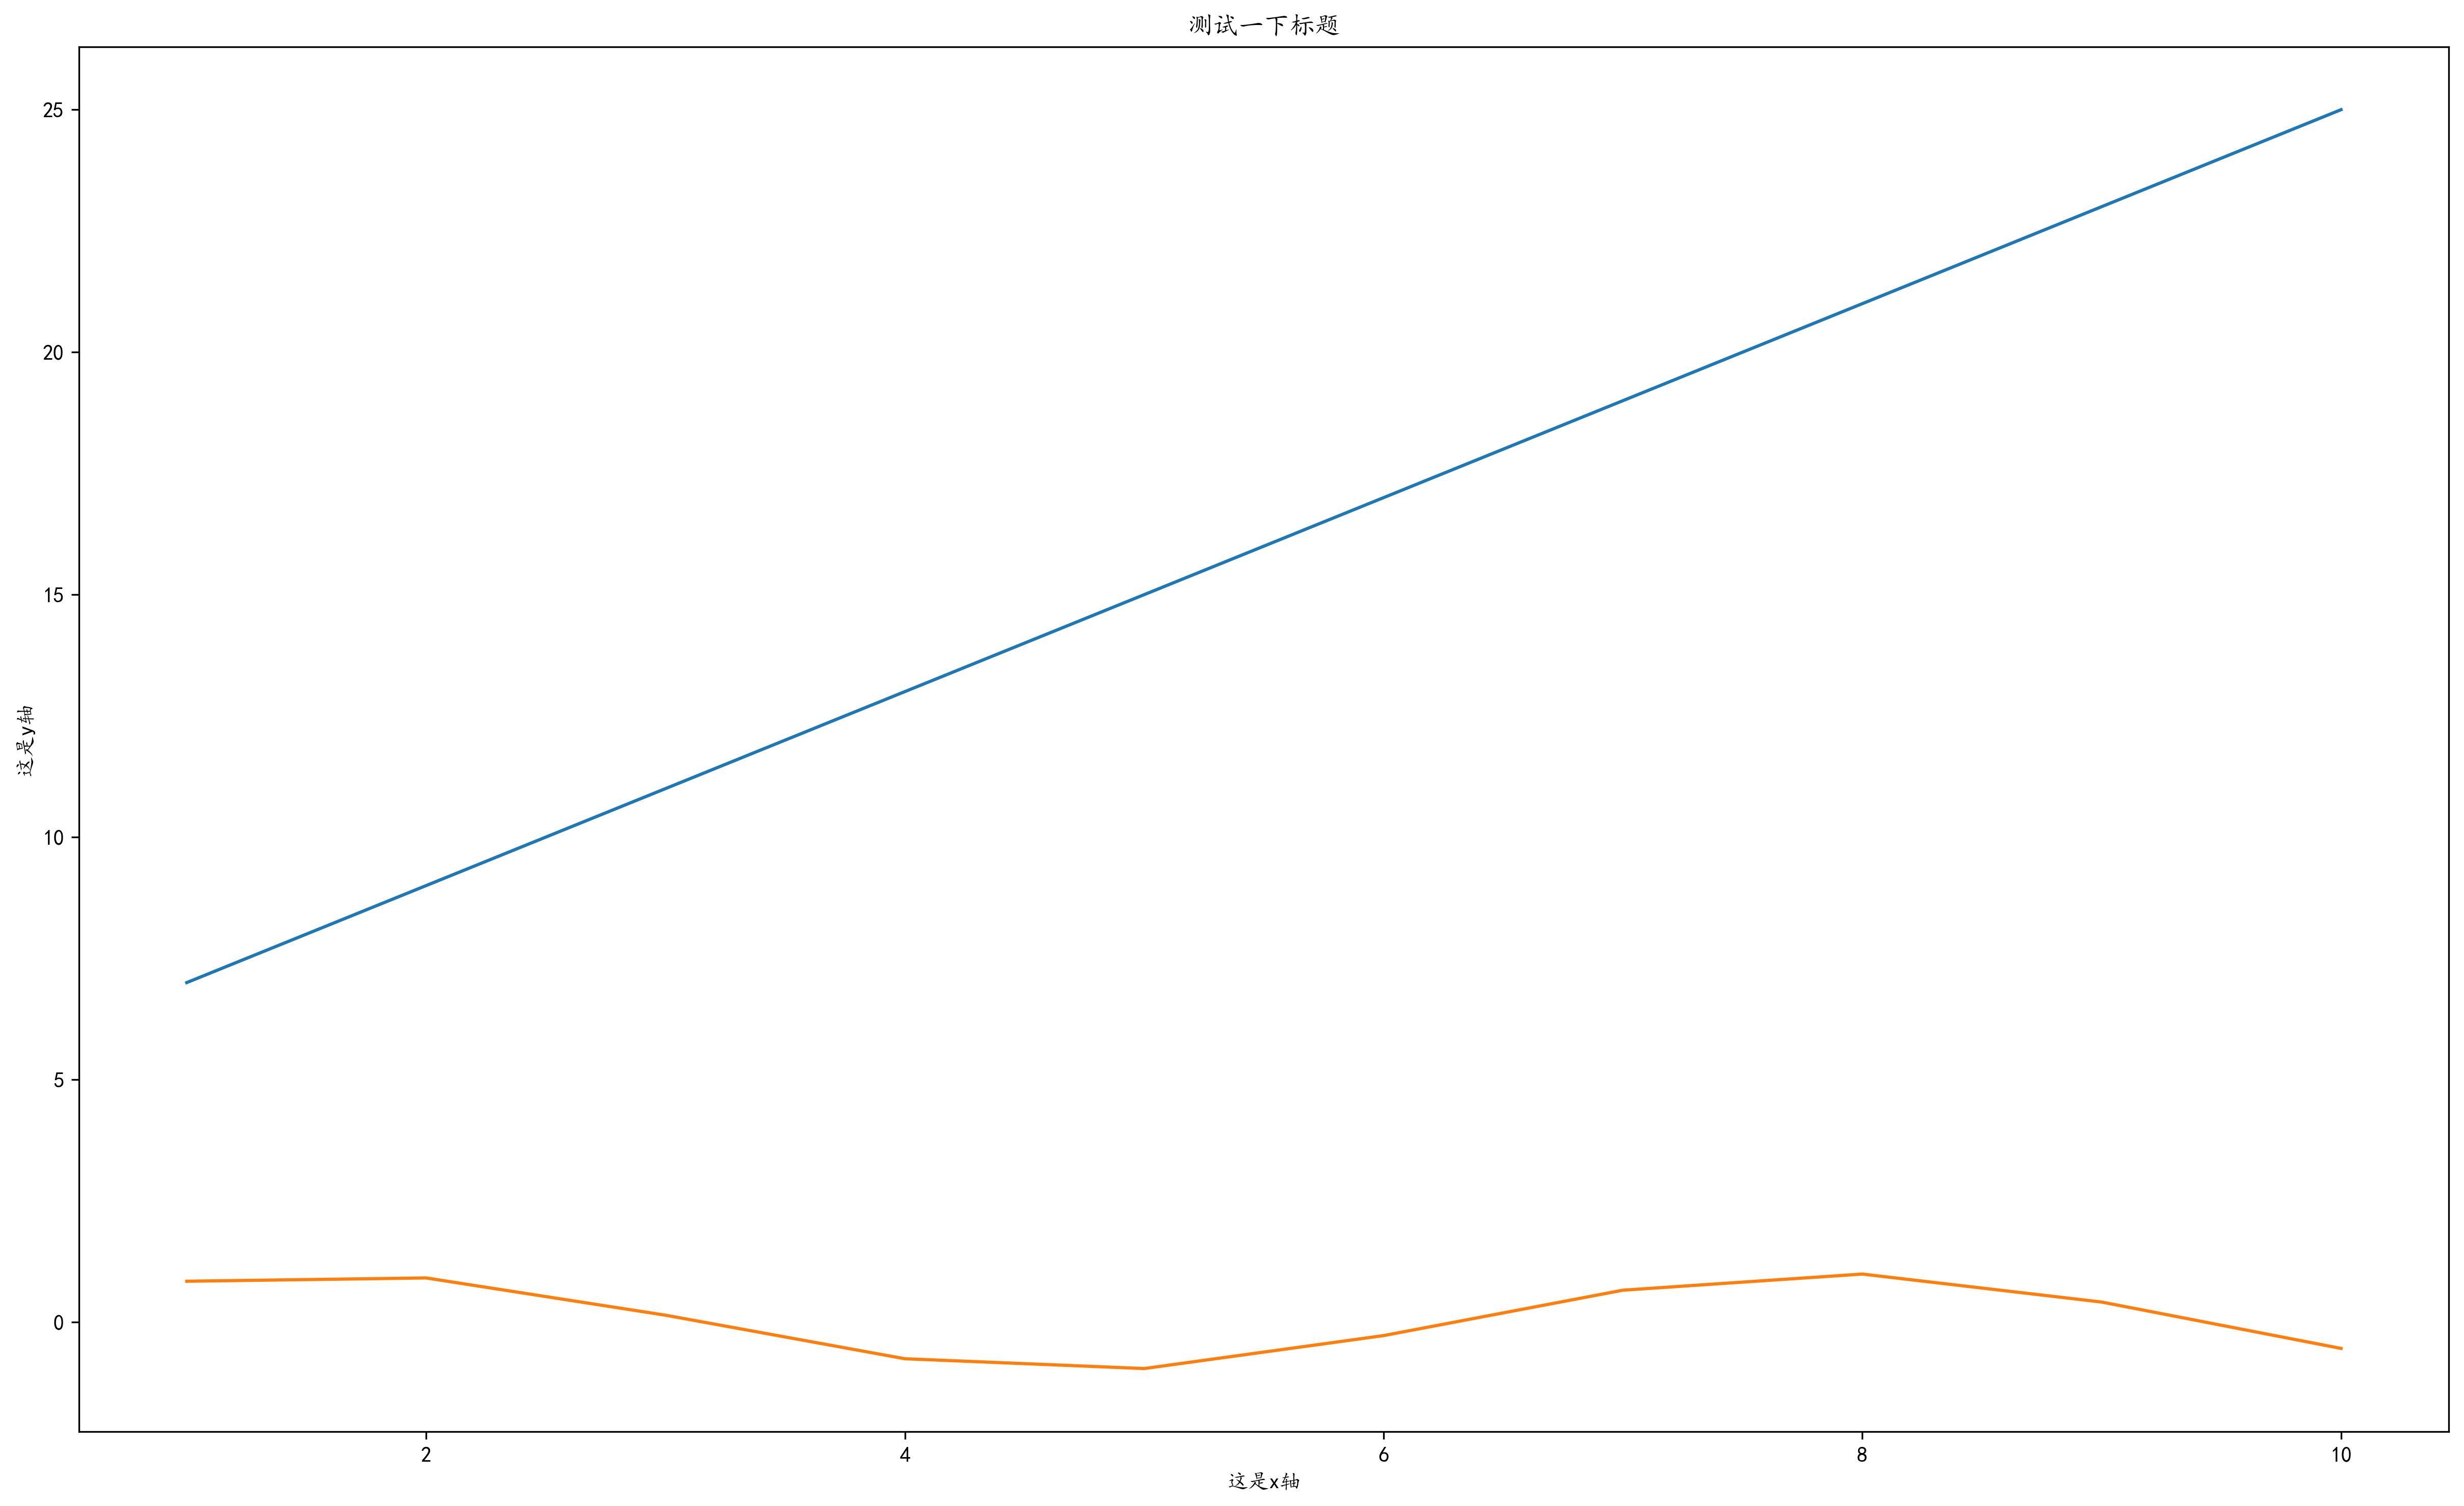
figure图像
import numpy as np
from matplotlib import pyplot as plt

#解决中文显示问题
plt.rcParams['font.sans-serif'] = ['KaiTi'] # 指定默认字体
plt.rcParams['axes.unicode_minus'] = False # 解决保存图像是负号'-'显示为方块的问题

x = np.arange(1,11)
y =  2  * x +  5
plt.figure(dpi=300, figsize=(20, 12))
plt.title("测试一下标题")
plt.xlabel("这是x轴")
plt.ylabel("这是y轴")
plt.plot(x,y)
plt.plot(x,np.sin(x))
plt.show()
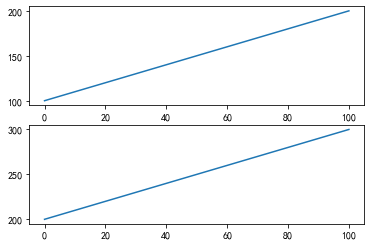
多个subplot
# subplot.py
import matplotlib.pyplot as plt
import numpy as np
data = np.arange(100, 201)
plt.subplot(2, 1, 1)
plt.plot(data)
data2 = np.arange(200, 301)
plt.subplot(2, 1, 2)
plt.plot(data2)
plt.show()
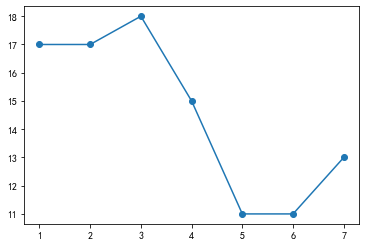
import matplotlib.pyplot as plt
x = range(1 , 8)
y = [17,17,18,15,11,11,13]
plt.plot(x,y,marker = 'o')
plt.show()
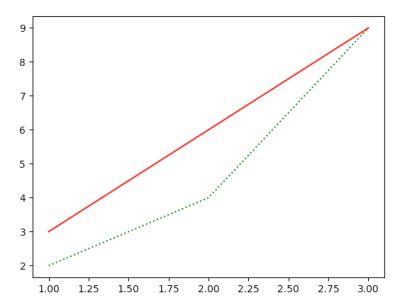
双线折线图
# plot.py
import matplotlib.pyplot as plt
plt.plot([1, 2, 3], [3, 6, 9], '-r')
plt.plot([1, 2, 3], [2, 4, 9], ':g')
plt.show()
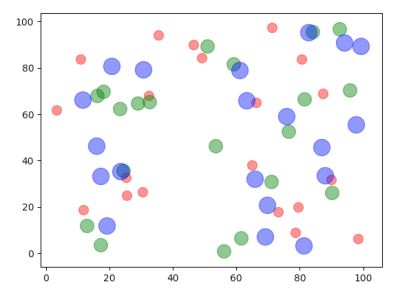
散点图
# scatter.py
import matplotlib.pyplot as plt
import numpy as np
N = 20
plt.scatter(np.random.rand(N) * 100,
   np.random.rand(N) * 100,
   c='r', s=100, alpha=0.5)
plt.scatter(np.random.rand(N) * 100,
   np.random.rand(N) * 100,
   c='g', s=200, alpha=0.5)
plt.scatter(np.random.rand(N) * 100,
   np.random.rand(N) * 100,
   c='b', s=300, alpha=0.5)
plt.show()
饼状图
# pie.py
import matplotlib.pyplot as plt
import numpy as np
labels = ['Mon', 'Tue', 'Wed', 'Thu', 'Fri', 'Sat', 'Sun']
data = np.random.rand(7) * 100
plt.pie(data, labels=labels, autopct='%1.1f%%')
plt.axis('equal')
plt.legend()
plt.show()

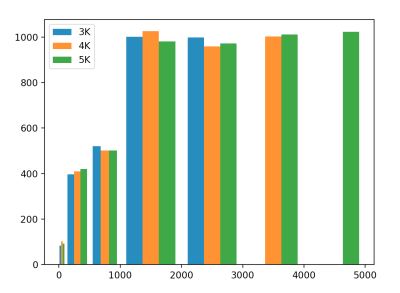
多个柱状图
# hist.py
import matplotlib.pyplot as plt
import numpy as np
data = [np.random.randint(0, n, n) for n in [3000, 4000, 5000]]
labels = ['3K', '4K', '5K']
bins = [0, 100, 500, 1000, 2000, 3000, 4000, 5000]
plt.hist(data, bins=bins, label=labels)
plt.legend()
plt.show()
设置大小和保存图片
import matplotlib.pyplot as plt
import random

x = range(1 , 8)
y = [random.randint(15,30) for i in x]

# 设置图片尺寸
plt.figure(figsize=(20,8),dpi=80)

plt.plot(x,y)
plt.show()
plt.savefig('t1.svg')
设置刻度
import matplotlib.pyplot as plt
import random

x = range(1 , 8, 2)
y = [random.randint(15,30) for i in x]

# 设置图片尺寸
plt.figure(figsize=(20,8),dpi=80)

# 设置刻度
plt.xticks(range(1,25))
plt.yticks(range(min(y),max(y)+1))

# 绘图
plt.plot(x,y)
plt.show()

设置字体旋转
import matplotlib.pyplot as plt
import random

x = range(1 , 8, 2)
y = [random.randint(15,30) for i in x]

# 设置图片尺寸
plt.figure(figsize=(20,8),dpi=80)

# 设置刻度
# plt.xticks(range(1,25))
# rotation=60 设置y轴旋转
plt.yticks(range(min(y),max(y)+1),rotation=60)

#绘图
plt.plot(x,y)
plt.show()
设置图例
import numpy as np
from matplotlib import pyplot as plt


#解决中文显示问题
plt.rcParams['font.sans-serif'] = ['KaiTi'] # 指定默认字体
plt.rcParams['axes.unicode_minus'] = False # 解决保存图像是负号'-'显示为方块的问题

x = np.arange(1,11)

y =  2  * x +  5
#plt.figure(dpi=300, figsize=(20, 12))
fig = plt.figure()
plt.title("测试一下标题")
plt.xlabel("这是x轴")
plt.ylabel("这是y轴")
plt.plot(x,y,label="a")
plt.plot(x,np.sin(x),label="b")
plt.legend()  # 很重要
plt.show()
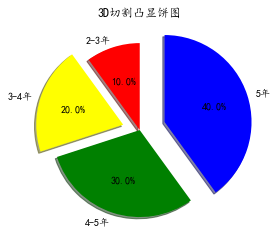
3D饼图
import matplotlib.pyplot as plt
from numpy import *

beijing = [10,20,30,40]
label = ['2-3年','3-4年','4-5年','5年']
color = ['red','yellow','green','blue']
indict = []
for index,item in enumerate(beijing):
    # 判断优先级
    if item == max(beijing):
        indict.append(0.3)
    elif index == 1:
        indict.append(0.2)
    else:
        indict.append(0)
plt.pie(beijing,labels=label,colors=color,startangle=90,shadow=True,explode=tuple(indict),autopct='%1.1f%%')
plt.title('3D切割凸显饼图')
plt.show()
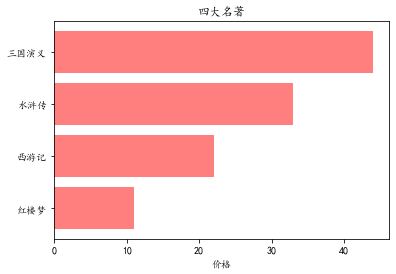
条形图
price = [11,22,33,44]
plt.barh(range(4),price,align='center',color='red',alpha=0.5)
plt.xlabel('价格')
plt.yticks(range(4),['红楼梦','西游记','水浒传','三国演义'])
plt.title('四大名著')
plt.show()
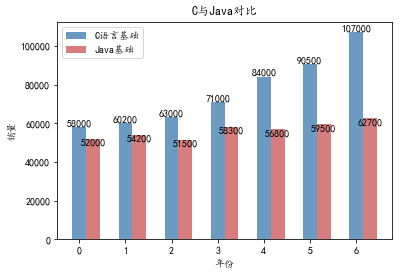
import matplotlib.pyplot as plt
import numpy as np
# 构建数据
x_data = ['2012', '2013', '2014', '2015', '2016', '2017', '2018']
y_data = [58000, 60200, 63000, 71000, 84000, 90500, 107000]
y_data2 = [52000, 54200, 51500,58300, 56800, 59500, 62700]
# 绘图
plt.bar(x=x_data, height=y_data, label='C语言基础', color='steelblue', alpha=0.8)
plt.bar(x=x_data, height=y_data2, label='Java基础', color='indianred', alpha=0.8)
# 在柱状图上显示具体数值, ha参数控制水平对齐方式, va控制垂直对齐方式
for x, y in enumerate(y_data):
    plt.text(x, y + 100, '%s' % y, ha='center', va='bottom')
for x, y in enumerate(y_data2):
    plt.text(x, y + 100, '%s' % y, ha='center', va='top')
# 设置标题
plt.title("Java与Android图书对比")
# 为两条坐标轴设置名称
plt.xlabel("年份")
plt.ylabel("销量")
# 显示图例
plt.legend()
plt.show()
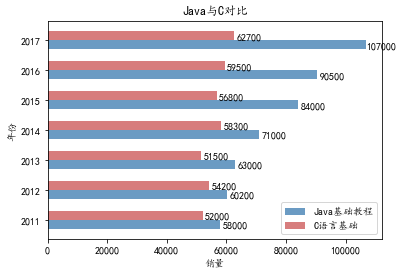
import matplotlib.pyplot as plt
import numpy as np
# 构建数据
x_data = ['2011', '2012', '2013', '2014', '2015', '2016', '2017']
y_data = [58000, 60200, 63000, 71000, 84000, 90500, 107000]
y_data2 = [52000, 54200, 51500,58300, 56800, 59500, 62700]
bar_width=0.3
# Y轴数据使用range(len(x_data), 就是0、1、2...
plt.barh(y=range(len(x_data)), width=y_data, label='Java基础教程',
    color='steelblue', alpha=0.8, height=bar_width)
# Y轴数据使用np.arange(len(x_data))+bar_width,
# 就是bar_width、1+bar_width、2+bar_width...这样就和第一个柱状图并列了
plt.barh(y=np.arange(len(x_data))+bar_width, width=y_data2,
    label='C语言基础', color='indianred', alpha=0.8, height=bar_width)
# 在柱状图上显示具体数值, ha参数控制水平对齐方式, va控制垂直对齐方式
for y, x in enumerate(y_data):
    plt.text(x+5000, y-bar_width/2, '%s' % x, ha='center', va='bottom')
for y, x in enumerate(y_data2):
    plt.text(x+5000, y+bar_width/2, '%s' % x, ha='center', va='bottom')
# 为Y轴设置刻度值
plt.yticks(np.arange(len(x_data))+bar_width/2, x_data)
# 设置标题
plt.title("Java与C对比")
# 为两条坐标轴设置名称
plt.xlabel("销量")
plt.ylabel("年份")
# 显示图例
plt.legend()
plt.show()
import matplotlib.pyplot as plt
x_data = ['2011', '2012', '2013', '2014', '2015', '2016', '2017']
# 定义2个列表分别作为两条折线的Y轴数据
y_data = [58000, 60200, 63000, 71000, 84000, 90500, 107000]
y_data2 = [52000, 54200, 51500,58300, 56800, 59500, 62700]
# 指定折线的颜色、线宽和样式
plt.plot(x_data, y_data, color = 'red', linewidth = 2.0,
    linestyle = '--', label='Java基础')
plt.plot(x_data, y_data2, color = 'blue', linewidth = 3.0,
    linestyle = '-.', label='C基础')
import matplotlib.font_manager as fm
# 使用Matplotlib的字体管理器加载中文字体
my_font=fm.FontProperties(fname="C:\Windows\Fonts\simkai.ttf")
# 调用legend函数设置图例
plt.legend(loc='best')
# 设置两条坐标轴的名字
plt.xlabel("年份")
plt.ylabel("教程销量")
# 设置数据图的标题
plt.title('C语言中文网的历年销量')
# 设置Y轴上的刻度值
# 第一个参数是点的位置,第二个参数是点的文字提示
plt.yticks([50000, 70000, 100000],
    [r'挺好', r'优秀', r'火爆'])
# 调用show()函数显示图形
plt.show()
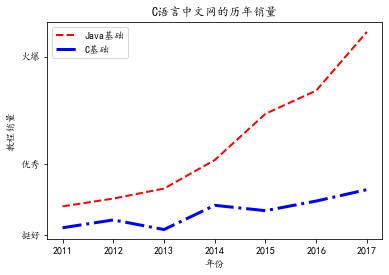
import matplotlib.pyplot as plt
x_data = ['2011', '2012', '2013', '2014', '2015', '2016', '2017']
# 定义2个列表分别作为两条折线的Y轴数据
y_data = [58000, 60200, 63000, 71000, 84000, 90500, 107000]
y_data2 = [52000, 54200, 51500,58300, 56800, 59500, 62700]
# 指定折线的颜色、线宽和样式
plt.plot(x_data, y_data, color = 'red', linewidth = 2.0,
    linestyle = '--', label='Java基础')
plt.plot(x_data, y_data2, color = 'blue', linewidth = 3.0,
    linestyle = '-.', label='C语言基础')
import matplotlib.font_manager as fm
# 使用Matplotlib的字体管理器加载中文字体
my_font=fm.FontProperties(fname="C:\Windows\Fonts\simkai.ttf")
# 调用legend函数设置图例
plt.legend(loc='best')
# 设置两条坐标轴的名字
plt.xlabel("年份")
plt.ylabel("教程销量")
# 设置数据图的标题
plt.title('C语言中文网的历年销量')
# 设置Y轴上的刻度值
# 第一个参数是点的位置,第二个参数是点的文字提示
plt.yticks([50000, 70000, 100000],
    [r'挺好', r'优秀', r'火爆'])
ax = plt.gca()
# 设置将X轴的刻度值放在底部X轴上
ax.xaxis.set_ticks_position('bottom')
# 设置将Y轴的刻度值放在底部X轴上
ax.yaxis.set_ticks_position('left')
# 设置右边坐标轴线的颜色(设置为none表示不显示)
ax.spines['right'].set_color('none')
# 设置顶部坐标轴线的颜色(设置为none表示不显示)
ax.spines['top'].set_color('none')
# 定义底部坐标轴线的位置(放在70000数值处)
ax.spines['bottom'].set_position(('data', 70000))
# 调用show()函数显示图形
plt.show()

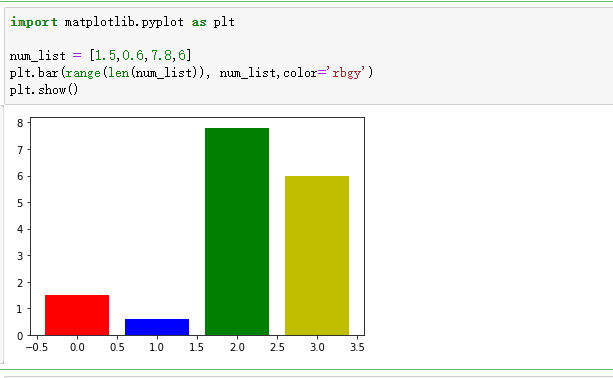
柱状图
import matplotlib.pyplot as plt

num_list = [1.5,0.6,7.8,6]
plt.bar(range(len(num_list)), num_list,color='rbgy')
plt.show()
import  pandas  as pd

df=pd.read_excel('e.xls')#这个会直接默认读取到这个Excel的第一个表单
data=df.head()#默认读取前5行的数据
data
print("获取到所有的值:\n{0}".format(data))#格式化输出
dataNumber = data.loc[1:1]
dataNumber
dataNumberre = dataNumber.drop(columns=['数据库:月度数据']).values
print(dataNumberre[0])
sqldata = data.loc[2:2]
sqldatare = sqldata.drop(columns=['数据库:月度数据']).values
print(sqldatare)
import numpy as np
from matplotlib import pyplot as plt

x = dataNumberre[0]
y =  sqldatare[0]
plt.title("Matplotlib demo")
plt.xlabel("month")
plt.ylabel("numerical value")
plt.plot(x,y)
plt.show()

若有收获,就点个赞吧
0 人点赞
