一、开启node服务器
1-1 配置
yarn init -y 或者npm init -y 这一步生成package.json
npm i koa 安装koa
npm install -g nodemon
//配置package.json
"scripts": {"start":"nodemon index.js" //配置项目启动命令 index.js项目文件}
1-2 开启服务
新建index.js文件,输入以下内容
const Koa = require("koa");
const app = new Koa();
app.use(async ctx=>{
    ctx.body = "hello world"
})
app.listen(8080) //监听http://localhost:8080
打开localhost:8080 页面输出hello world
二、使用koa-router配置路由
npm i koa-router
//1.导入
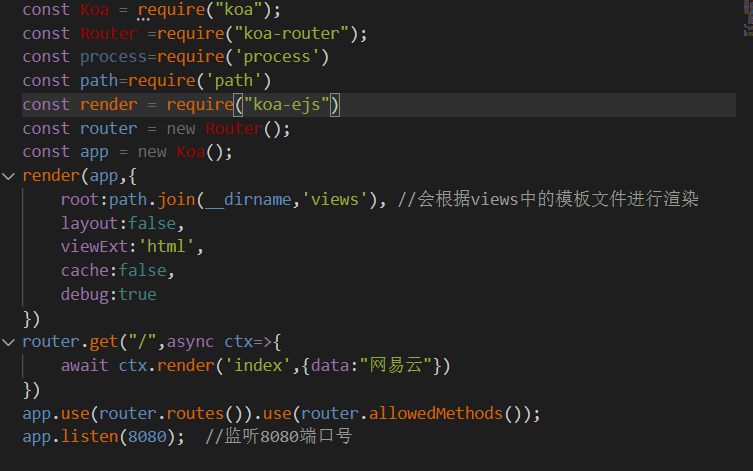
const Router = require("koa-router")
const router = new Router()
//2.配置路由
router.get("/",async ctx=>{
    ctx.body="首页"
})
router.get("/detail",async ctx=>{
    ctx.body = "详情页面"
})
//3.使用路由中间件
app.use(router.routes()).use(router.allowedMethods());
三、配置模板文件
3-1 koa-ejs
yarn add koa-ejs
//1.导入
const path = require('path')
const render = require("koa-ejs");
//2.配置
render(app, {
    root: path.join(__dirname, 'views'),   //这里paht.join可能会报未定义,可以用process.cwd方法来替换
    layout: false,
    viewExt: 'html',
    cache: false,
    debug: true
  });
//3.使用
router.get("/",async ctx=>{
    await ctx.render('index',{data:"网易云"})
})
3-1-2 在根路径下新建views文件夹
- 再新建index.html和”/“路由关联
- 新建detail.html
index.html
<body>
    <h1>首页</h1>
    <%= data %>
</body>
detail.html
<body>
    <h2>fefe</h2>
</body>
渲染效果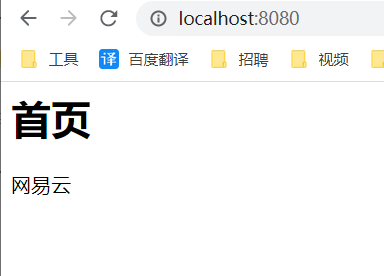
localhost:8080/detail 则可以查看详情页
3-2 art-template
yarn add art-template koa-art-template
3-2-1 配置
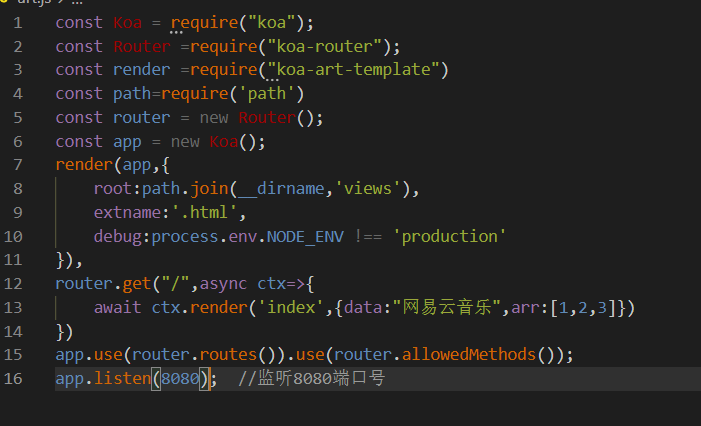
//1.导入
const render = require("koa-art-template");
//2.配置
render(app, {
    root: path.join(__dirname, 'views'),
    extname: '.html', //后缀也可以写成.art
    debug: process.env.NODE_ENV !== 'production'
});
//3.使用
router.get("/",async ctx=>{
    await ctx.render('index',{data:"网易云"})//这里也可以传数组
})

router.get("/",async ctx=>{
    await ctx.render('index',{data:"网易云",arr:[1,2,3]})//这里也可以传数组
})
index.html
<body>
    <h1>首页322222</h1>
   <div>222222{{data}}</div>
        <div> //渲染数组
        {{each arr}}
        <p>{{$value}}</p> <!-- 数组元素 -->
        {{/each}}
    </div>
</body>
四、读取静态资源
安装
yarn add koa-static-S
idnex.js
const static = require('koa-static'); //导入
app.use(static(path.join(__dirname,"assets")) //使用
在根目录下新建assets文件夹,在assets里面新建index.css文件和detail.css文件
在index.css文件
h1{
    color:red;
  }
index.html 中引入
<link rel="stylesheet" href="index.css">
<body>
    <h1>首页</h1>
   <div>{{data}}</div>
   <div>
       {{each arr}}
       <P>{{$value}}</P> <!-- 数组元素 -->
       {{/each}}
   </div>
</body>
五、循环
index.js
router.get("/",async ctx=>{
    var url ="https://www.zhihu.com/hot"
    var res =await axios.get(url)
    var palylists = res.data.hotList
    await ctx.render('index',{data:'网易云',arr:[1,2,3]})
}
index.html
<body>
    <h1>首页</h1>
    {{data}}
    <div>
        {{each arr}}
        <p>{{$value}}</p>
        {{/each}}
    </div>
</body>
六、接口请求资源,渲染数据
1.get传值
tip:node.js不识别中文,url里面有中文时要进行转码
安装axios
npm i axios -S
index.js
//引入
const axios=require('axios');
//使用
router.get("/",async ctx=>{
    await ctx.render('index',{playlists:[{name:"鹿晗",id:420}]})
})
//在detail页面接收
router.get("/detail",async ctx=>{
    var id=ctx.query.id;  //使用ctx.query接收
    await ctx.render('detail',{id:id})
 })
index.html
<link rel="stylesheet" href="index.css">
<body>
    <h1>首页</h1>
   <div>{{data}}</div>
   <div>
    {{each playlists}}
    <a href="/detail?id={{$value.id}}">{{$value.name}}</a>
    {{/each}}
   </div>
</body>

若有收获,就点个赞吧
0 人点赞
