这个系列开始,我们将从「能用的Flutter」到「可用的Flutter」的迁移过程来讲解如何在实际项目中更好的使用Flutter,下面是第一篇。
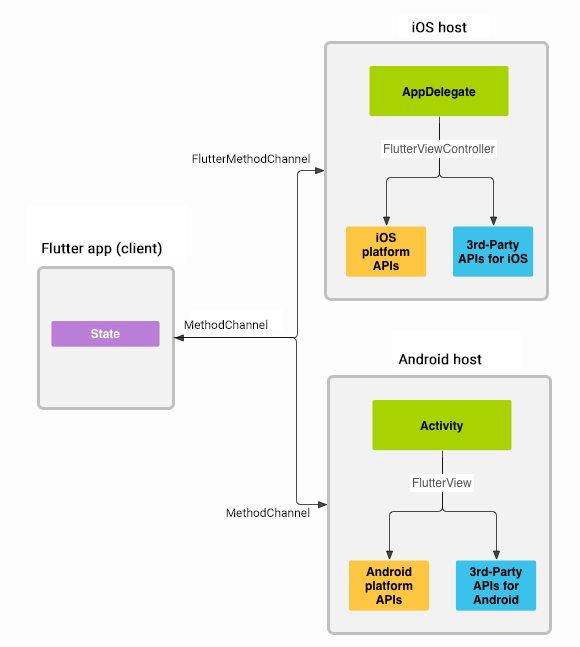
对于混编工程来说,最常用的需求就是双端的数据通信。在Flutter中,SDK提供了platform_channels来进行跨端通信,它的整体架构如下所示。
官方文档中提供了一个比较全的例子,下面我们通过这个例子,来好好分析下,如何使用Flutter和原生的通信管道。
https://github.com/flutter/samples/blob/master/platform_channels/README.md
MethodChannel
MethodChannel提供了Flutter调用原生方法的能力。
MethodChannel的构建需要两个参数,一个是BinaryMessenger,通常从Flutter Engine中获取,可以通过普通的Engine构建,也可以通过EngineCache预热引擎来获取,当然也可以使用EngineGroup来获取,如果在FlutterActivity里面,可以直接在configureFlutterEngine回调中获取。另一个参数是name,用于标识这个Channel。
通常在Flutter中使用时,会将Method封装起来,类似下面的代码。
import 'package:flutter/services.dart';/// This class includes implementation of two platform methods [increment],/// and [decrement] which are used to increment and decrement value/// of count respectively.class Counter {/// Creates a [MethodChannel] with the specified name to invoke platform method./// In order to communicate across platforms, the name of MethodChannel/// should be same on native and dart side.static MethodChannel methodChannel = const MethodChannel('methodChannelDemo');/// This method is responsible to increment and return the value of count.static Future<int> increment({required int counterValue}) async {final result = await methodChannel.invokeMethod<int>('increment', {'count': counterValue});return result!;}/// This method is responsible to decrement and return the value of count.static Future<int> decrement({required int counterValue}) async {final result = await methodChannel.invokeMethod<int>('decrement', {'count': counterValue});return result!;}}
其中——methodChannelDemo就是这个MethodChannel的Name。通过这个标志,我们就可以找到对应的MethodChannel。
在具体的方法调用处,使用MethodChannel的invokeMethod来调用具体的函数,和MethodChannel本身一样,也是通过Name标志符来调用的,参数以Map的形式进行传递。
那么在具体调用的地方,使用代码如下所示。
onPressed: () async {try {final value = await Counter.increment(counterValue: count);setState(() => count = value);} catch (error) {}},
那么在Android中呢?我们需要为前面定义的协议实现具体的逻辑。
首先,在FlutterActivity的configureFlutterEngine回调中,通过指定的MethodChannel Name创建MethodChannel,然后再通过setMethodCallHandler来监听Flutter端的调用,call参数中包含了method和argument,可以用来获取调用的函数标志符和参数。
MethodChannel(flutterEngine.dartExecutor, "methodChannelDemo").setMethodCallHandler { call, result ->val count: Int? = call.argument<Int>("count")if (count == null) {result.error("INVALID ARGUMENT", "Value of count cannot be null", null)} else {when (call.method) {"increment" -> result.success(count + 1)"decrement" -> result.success(count - 1)else -> result.notImplemented()}}}
根据不同的Method Name,我们可以判断使用不同的方法,并通过result来返回结果,result的不同类型,代表了返回值的不同类型。
EventChannel
EventChannel用于在事件流中将消息传递给Flutter端。
EventChannel与MethodChannel一样,在Flutter中通过Name来进行标志。
但与MethodChannel不同的是,EventChannel返回一个Stream,借助下面的模板代码,我们可以了解EventChannel的基本使用。
import 'package:flutter/services.dart';/// This class includes the implementation for [EventChannel] to listen to value/// changes from the Accelerometer sensor from native side. It has a [readings]/// getter to provide a stream of [AccelerometerReadings].class Accelerometer {static const _eventChannel = EventChannel('eventChannelDemo');/// Method responsible for providing a stream of [AccelerometerReadings] to listen/// to value changes from the Accelerometer sensor.static Stream<AccelerometerReadings> get readings {return _eventChannel.receiveBroadcastStream().map((dynamic event) => AccelerometerReadings(event[0] as double,event[1] as double,event[2] as double,),);}}class AccelerometerReadings {/// Acceleration force along the x-axis.final double x;/// Acceleration force along the y-axis.final double y;/// Acceleration force along the z-axis.final double z;AccelerometerReadings(this.x, this.y, this.z);}
在调用的地方,需要通过StreamBuilder来承载EventChannel返回的Stream,并从其中获取到相应的数据并展示。
child: StreamBuilder<AccelerometerReadings>(stream: Accelerometer.readings,builder: (context, snapshot) {if (snapshot.hasError) {return Text((snapshot.error as PlatformException).message!);} else if (snapshot.hasData) {return Column(mainAxisAlignment: MainAxisAlignment.center,children: [Text('x axis: ' + snapshot.data!.x.toStringAsFixed(3),style: textStyle,),Text('y axis: ' + snapshot.data!.y.toStringAsFixed(3),style: textStyle,),Text('z axis: ' + snapshot.data!.z.toStringAsFixed(3),style: textStyle,)],);}
在Android中,我们需要获取一个Stream流,并通过EventChannel传递给Flutter,首先,创建一个SensorManager,用来获取传感器的值,并借助EventChannel.EventSink将数据发出。
class AccelerometerStreamHandler(sManager: SensorManager, s: Sensor) : EventChannel.StreamHandler, SensorEventListener {private val sensorManager: SensorManager = sManagerprivate val accelerometerSensor: Sensor = sprivate lateinit var eventSink: EventChannel.EventSinkoverride fun onListen(arguments: Any?, events: EventChannel.EventSink?) {if (events != null) {eventSink = eventssensorManager.registerListener(this, accelerometerSensor, SensorManager.SENSOR_DELAY_UI)}}override fun onCancel(arguments: Any?) {sensorManager.unregisterListener(this)}override fun onAccuracyChanged(sensor: Sensor?, accuracy: Int) {}override fun onSensorChanged(sensorEvent: SensorEvent?) {if (sensorEvent != null) {val axisValues = listOf(sensorEvent.values[0], sensorEvent.values[1], sensorEvent.values[2])eventSink.success(axisValues)} else {eventSink.error("DATA_UNAVAILABLE", "Cannot get accelerometer data", null)}}}
在调用的地方,同样与MethodChannel类似,先借助Name找到对应的EventChannel,再设置setStreamHandler来创建Stream。
val sensorManger: SensorManager = getSystemService(Context.SENSOR_SERVICE) as SensorManagerval accelerometerSensor: Sensor = sensorManger.getDefaultSensor(Sensor.TYPE_ACCELEROMETER)EventChannel(flutterEngine.dartExecutor, "eventChannelDemo").setStreamHandler(AccelerometerStreamHandler(sensorManger, accelerometerSensor))
BasicMessageChannel
BasicMessageChannel提供了从原生侧获取元数据的一种通信方式。
从原生侧获取图片
在Flutter侧,与前面的操作类似,我们需要一个Name标志来标志BasicMessageChannel,然后再通过调用send方法来发送一个指令,同时异步获取该指令的返回值。
/// This class manages a [BasicMessageChannel] that can return an image loaded/// from a native asset. The [BasicMessageChannel] uses [StandardMessageCodec]/// since it supports [Uint8List], which is used to transport the image data.class PlatformImageFetcher {static const _basicMessageChannel = BasicMessageChannel<dynamic>('platformImageDemo', StandardMessageCodec());/// Method responsible for providing the platform image.static Future<Uint8List> getImage() async {final reply = await _basicMessageChannel.send('getImage') as Uint8List?;if (reply == null) {throw PlatformException(code: 'Error',message: 'Failed to load Platform Image',details: null,);}return reply;}}
在Flutter中,图片数据使用Uint8List来进行传递。展示图片时,我们需要使用FutureBuilder来进行承载,根据Future的返回状态,来确定展示样式,代码如下所示。
child: FutureBuilder<Uint8List>(future: imageData,builder: (context, snapshot) {if (snapshot.connectionState == ConnectionState.none) {return const Placeholder();} else if (snapshot.hasError) {return Center(child: Text((snapshot.error as PlatformException).message!,),);} else if (snapshot.connectionState ==ConnectionState.done) {return Image.memory(snapshot.data!,fit: BoxFit.fill,);}return const CircularProgressIndicator();},
在Android侧,我们需要定义同名的Channel和Handler,并通过Stream返回Uint8List数据,代码如下。
// Registers a MessageHandler for BasicMessageChannel to receive a message from Dart and send// image data in reply.BasicMessageChannel(flutterEngine.dartExecutor, "platformImageDemo", StandardMessageCodec()).setMessageHandler { message, reply ->if (message == "getImage") {val inputStream: InputStream = assets.open("eat_new_orleans.jpg")reply.reply(inputStream.readBytes())}}
双向通信
BasicMessageChannel可以用于双向通信,这是前面的示例中所没有涉及到的。
首先,我们在Flutter中构建这样一个列表,用于展示一个信息List,信息的来源是原生侧,所以,在Flutter界面的initState中,我们创建一个名为stringCodecDemo的BasicMessageChannel,用来接收数据List,Flutter界面依托List来创建相应的界面。
@overridevoid initState() {super.initState();// Receives a string of json object from the platform and converts it to PetModel.const BasicMessageChannel<String?>('stringCodecDemo', StringCodec()).setMessageHandler((message) async {if (message == null) {showSnackBar('An error occurred while adding pet details.', context);} else {setState(() {petListModel = PetListModel.fromJson(message);});}return null;});}
接下来,再创建一个添加数据的Flutter界面,用来添加数据,添加好的数据,通过一个名为_jsonMessageCodecChannel的BasicMessageChannel传递给原生侧。
class PetListMessageChannel {static const _jsonMessageCodecChannel = BasicMessageChannel<dynamic>('jsonMessageCodecDemo', JSONMessageCodec());/// Method to add a new pet to the list.////// Demonstrates how to use [BasicMessageChannel] and [JSONMessageCodec] to/// send more structured data to platform like a [Map] in this case.static void addPetDetails(PetDetails petDetails) {_jsonMessageCodecChannel.send(petDetails.toJson());}
有了新增,自然还有删除,类似的,再创建一个名为binaryCodecDemo的BasicMessageChannel,用来通知原生侧删除数据。
class PetListMessageChannel {static const _binaryCodecChannel = BasicMessageChannel('binaryCodecDemo', BinaryCodec());/// Method to remove a pet from the list.////// Demonstrates how to use [BasicMessageChannel] and [BinaryCodec] to/// send [ByteData] to platform. If the reply received is null, then/// we will throw a [PlatformException].static Future<void> removePet(int index) async {final uInt8List = utf8.encoder.convert(index.toString());final reply = await _binaryCodecChannel.send(uInt8List.buffer.asByteData());if (reply == null) {throw PlatformException(code: 'INVALID INDEX',message: 'Failed to delete pet details',details: null,);}}}
看到这里,大家可能一脸懵逼,其实,这里是Demo中为了演示不同的Message Codec而故意为之的。获取列表数据,新增,删除,这三个功能,分别使用了StringCodec、JSONMessageCodec和BinaryCodec,其实只使用StringCodec也是可以达到同样的效果的。
由此可见,基于BasicMessageChannel的双向通信,是完全基于协议的通信,双端,甚至是任何一个界面,不论是原生还是Flutter,都基于这套协议来进行通信,在实现时,可能略显繁琐,但完全对各端进行了解耦,可以分别独立的进行开发而不受其它端、页面的限制。
下面我们继续在原生界面中完成相应的操作,我们分别需要对信息List、新增、删除,这三种操作进行实现。
首先,我们创建jsonMessageCodecDemo,即新增操作的MessageHandler。
// Registers a MessageHandler for BasicMessageChannel to receive pet details to be// added in petList and send the it back to Dart using stringCodecChannel.BasicMessageChannel(flutterEngine.dartExecutor, "jsonMessageCodecDemo", JSONMessageCodec.INSTANCE).setMessageHandler { message, reply ->petList.add(0, gson.fromJson(message.toString(), object : TypeToken<Map<String, String>>() {}.type))stringCodecChannel.send(gson.toJson(mapOf("petList" to petList)))}
这个BasicMessageChannel用的是JSONMessageCodec,所以我们将新增数据通过Gson进行解析,然后添加到信息List,最后通过列表的BasicMessageChannel,将结果传递出去,信息List的BasicMessageChannel定义如下。
val petList = mutableListOf<Map<String, String>>()val gson = Gson()// A BasicMessageChannel for sending petList to Dart.val stringCodecChannel = BasicMessageChannel(flutterEngine.dartExecutor, "stringCodecDemo", StringCodec.INSTANCE)
最后,再来创建删除的MessageHandler。
// Registers a MessageHandler for BasicMessageChannel to receive the index of pet// details to be removed from the petList and send the petList back to Dart using// stringCodecChannel. If the index is not in the range of petList, we send null// back to Dart.BasicMessageChannel(flutterEngine.dartExecutor, "binaryCodecDemo", BinaryCodec.INSTANCE).setMessageHandler { message, reply ->val index = String(message!!.array()).toInt()if (index >= 0 && index < petList.size) {petList.removeAt(index)val replyMessage = "Removed Successfully"reply.reply(ByteBuffer.allocateDirect(replyMessage.toByteArray().size).put(replyMessage.toByteArray()))stringCodecChannel.send(gson.toJson(mapOf("petList" to petList)))} else {reply.reply(null)}}
这里除了因为使用的是BinaryCodec,导致代码比较复杂以为,其它和前面的MessageHandler是一样的。
其实,从整个工程来说,这个双向通信的Demo本身是没有意义的,从上面这个代码就能看出,实际上在MessageHandler中,可以直接通过Replay来进行回传消息,所以,这里这样写的原因就是告诉开发者BasicMessageChannel的通信能力,开发者需要结合实际的使用场景来具体分析改如何使用这些Channel。
另外,不管是在Flutter中,还是在原生代码中,都是可以通过Channel来向对方通信的,以BasicMessageChannel为例,原生和Flutter侧,都可以调用send函数来发送消息,也都可以设置setMessageHandler来接收消息,其它几种Channel也是如此。
不过EventChannel有点点不一样,首先,它是由Flutter发起,交给原生侧处理后,再回调通知到Flutter进行处理,原生侧不能主动发起通信,所以不能算是完整的双向通信。
综上
在了解了上面的代码后,我们可以简单的总结一下。
- 大部分的开发场景,我们都可以使用MethodChannel来解决通信问题
- 如果需要更加灵活的控制,我们可以使用BasicMessageChannel
- Flutter从原生获取数据流,可以使用EventChannel
Channel是跨平台通信的核心,熟练掌握Channel的通信代码,才能更好的做到跨平台。
向大家推荐下我的网站 https://xuyisheng.top/ 专注 Android-Kotlin-Flutter 欢迎大家访问

若有收获,就点个赞吧
0 人点赞
