Linux软件包管理
一、挂载ios镜像
- 步骤一:确定自己正在使用的镜像
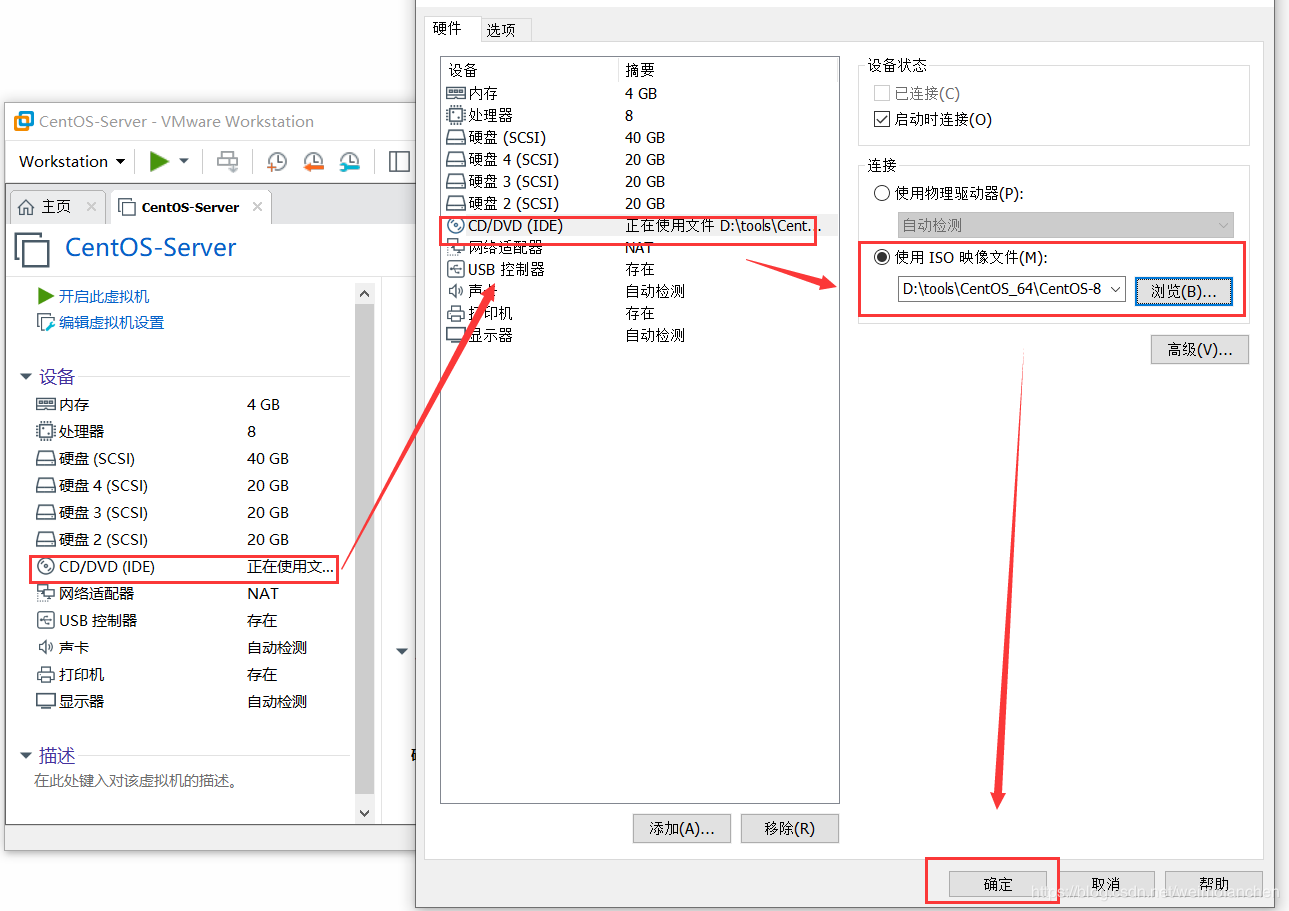
- 步骤二:开机,检查是否配置成功——右下角驱动图标为绿色则为配置成功

- 步骤三:将光驱挂载到系统中
[root@myserver ~]# mount /dev/sr0 /mntmount: /mnt: WARNING: device write-protected, mounted read-only.[root@myserver ~]# df -hFilesystem Size Used Avail Use% Mounted ondevtmpfs 1.9G 0 1.9G 0% /devtmpfs 1.9G 0 1.9G 0% /dev/shmtmpfs 1.9G 10M 1.9G 1% /runtmpfs 1.9G 0 1.9G 0% /sys/fs/cgroup/dev/mapper/cl-root 36G 4.5G 31G 13% //dev/sda1 976M 193M 716M 22% /boot/dev/sdb1 5.0G 68M 5.0G 2% /data/sdb1tmpfs 376M 1.2M 375M 1% /run/user/42tmpfs 376M 4.6M 371M 2% /run/user/0/dev/sr0 7.7G 7.7G 0 100% /mnt-------------------------------------------------------------------------· /dev/sr0 在/dev目录下,cdrom和sr0均为光驱设备,我们选择sr0进行挂载
二、rpm软件包管理
- Windows应用:exe包
- Mac OS应用:dmg包
- Linux应用:rpm包
- 如果我们的应用可以直接安装时可以直接使用rpm;如果我们的应用在安装时还需要依赖其他包,使用rpm进行安装就会很麻烦(需要将所有的包一个一个rpm -ivh进行安装)
- rpm软件包管理工具常用命令
- rpm -qa —> 查看已安装的所有rpm包
- rpm -qa | grep 关键字 —> 查看所有带有关键字的已安装rpm包
- rpm -ivh xxx.rpm —> 安装xxx. rpm
- rpm -e xxx —> 卸载已安装的xxx(不需要.rmp后缀)
- rpm -Uvh xxx.rpm —> 更新xxx.rpm
举例
[root@myserver ~]# cd /mnt[root@myserver mnt]# lsAppStream BaseOS EFI images isolinux media.repo TRANS.TBL[root@myserver mnt]# cd BaseOS/[root@myserver BaseOS]# lsPackages repodata[root@myserver BaseOS]# cd Packages/[root@myserver Packages]# lsaajohan-comfortaa-fonts-3.001-2.el8.noarch.rpmacl-2.2.53-1.el8.x86_64.rpmacpica-tools-20180629-3.el8.x86_64.rpmadcli-0.8.2-5.el8.x86_64.rpmadcli-doc-0.8.2-5.el8.noarch.rpmarpwatch-2.1a15-44.el8.x86_64.rpm.......------------------------------------------------------------------------------------------· 在我们挂载的光驱下,有BaseOS文件夹,其下有Packages文件夹,在Packages文件夹下有光驱提供的所有可直接进行安装的rpm包· 下面我们以xz-devel举例------------------------------------------------------------------------------------------[root@myserver Packages]# ls | grep xzxz-5.2.4-3.el8.x86_64.rpmxz-devel-5.2.4-3.el8.i686.rpmxz-devel-5.2.4-3.el8.x86_64.rpmxz-libs-5.2.4-3.el8.i686.rpmxz-libs-5.2.4-3.el8.x86_64.rpm# 查看安装的xz包[root@myserver Packages]# rpm -qa | grep xzxz-5.2.4-3.el8.x86_64xz-libs-5.2.4-3.el8.x86_64# 安装xz-devel[root@myserver Packages]# rpm -ivh xz-devel-5.2.4-3.el8.x86_64.rpmwarning: xz-devel-5.2.4-3.el8.x86_64.rpm: Header V3 RSA/SHA256 Signature, key ID 8483c65d: NOKEYVerifying... ################################# [100%]Preparing... ################################# [100%]Updating / installing...1:xz-devel-5.2.4-3.el8 ################################# [100%]# 检测是否安装成功[root@myserver Packages]# rpm -qa | grep xzxz-devel-5.2.4-3.el8.x86_64xz-5.2.4-3.el8.x86_64xz-libs-5.2.4-3.el8.x86_64------------------------------------------------------------------------------------------# 查看安装的rpm包[root@myserver Packages]# rpm -qa | grep xzxz-devel-5.2.4-3.el8.x86_64xz-5.2.4-3.el8.x86_64xz-libs-5.2.4-3.el8.x86_64# 卸载xz-devel[root@myserver Packages]# rpm -e xz-devel-5.2.4-3.el8.x86_64# 检测是否卸载成功[root@myserver Packages]# rpm -qa | grep xzxz-5.2.4-3.el8.x86_64xz-libs-5.2.4-3.el8.x86_64
三、yum软件包管理
- yum仓库 —> yum源
- 源的配置需要的是一个xxx.repo文件(在/etc/yum.repos.d文件夹下进行配置)
- yum软件包管理工具常用命令
- yum repolist —> 查看所有可用yum源
- yum repolist all —> 查看所有yum源及其状态
- yum -y install xxx —-> 安装xxx软件(-y参数表示安装过程中不需要用户再进行确认)‘
- yum remove xxx —> 卸载xxx软件
- yum update xxx —> 更新xxx软件
- yum clean all —> 清理yum运行缓存
1. 准备工作
- 备份初始源
[root@myserver Packages]# cd /etc/yum.repos.d/[root@myserver yum.repos.d]# lsCentOS-AppStream.repo CentOS-Devel.repo CentOS-PowerTools.repoCentOS-Base.repo CentOS-Extras.repo CentOS-Sources.repoCentOS-centosplus.repo CentOS-fasttrack.repo CentOS-Vault.repoCentOS-CR.repo CentOS-HA.repoCentOS-Debuginfo.repo CentOS-Media.repo[root@myserver yum.repos.d]# mkdir bak[root@myserver yum.repos.d]# mv *.repo bak/[root@myserver yum.repos.d]# lsbak
- yum源格式
[root@myserver yum.repos.d]# cd bak/[root@myserver bak]# lsCentOS-AppStream.repo CentOS-Devel.repo CentOS-PowerTools.repoCentOS-Base.repo CentOS-Extras.repo CentOS-Sources.repoCentOS-centosplus.repo CentOS-fasttrack.repo CentOS-Vault.repoCentOS-CR.repo CentOS-HA.repoCentOS-Debuginfo.repo CentOS-Media.repo# 查看yum源格式[root@myserver bak]# cat CentOS-Base.repo[BaseOS] # 仓库idname=CentOS-$releasever - Base # 仓库名称baseurl=http://mirror.centos.org/$contentdir/$releasever/BaseOS/$basearch/os/ # 源地址,分为在线源(http://)和本地源(file://)gpgcheck=1 # 是否进行证书验证,1为验证,0为不验证enabled=1 # 是否启动,1为启动,0为不启动gpgkey=file:///etc/pki/rpm-gpg/RPM-GPG-KEY-centosofficial # 进行证书验证的钥匙
2. 配置本地yum源及检测
- 配置本地yum源
[root@myserver bak]# cd ..[root@myserver yum.repos.d]# lsbak# 编辑本地yum源[root@myserver yum.repos.d]# vim myRepo.repo# 本地源配置[myRepo]name=My first repo.baseurl=file:///mnt/BaseOS/gpgcheck=0enabled=1# 查看是否配置成功[root@myserver yum.repos.d]# yum repolistrepo id repo namemyRepo My first repo.
- 安装软件进行检测
# 查看当前已安装的xz包[root@myserver yum.repos.d]# rpm -qa | grep xzxz-5.2.4-3.el8.x86_64xz-libs-5.2.4-3.el8.x86_64# 使用yum命令安装xz-devel[root@myserver yum.repos.d]# yum -y install xz-develLast metadata expiration check: 0:01:08 ago on Mon 27 Jul 2020 01:53:34 PM CST.Dependencies resolved.=======================================================================================Package Architecture Version Repository Size=======================================================================================Installing:xz-devel x86_64 5.2.4-3.el8 myRepo 62 kTransaction Summary=======================================================================================Install 1 PackageTotal size: 62 kInstalled size: 202 kDownloading Packages:Running transaction checkTransaction check succeeded.Running transaction testTransaction test succeeded.Running transactionPreparing : 1/1Installing : xz-devel-5.2.4-3.el8.x86_64 1/1Running scriptlet: xz-devel-5.2.4-3.el8.x86_64 1/1Verifying : xz-devel-5.2.4-3.el8.x86_64 1/1Installed products updated.Installed:xz-devel-5.2.4-3.el8.x86_64Complete!# 检测xz-devel是否安装成功[root@myserver yum.repos.d]# rpm -qa | grep xzxz-devel-5.2.4-3.el8.x86_64xz-5.2.4-3.el8.x86_64xz-libs-5.2.4-3.el8.x86_64# 使用yum命令卸载xz-devel[root@myserver yum.repos.d]# yum -y remove xz-develDependencies resolved.=======================================================================================Package Architecture Version Repository Size=======================================================================================Removing:xz-devel x86_64 5.2.4-3.el8 @myRepo 202 kTransaction Summary=======================================================================================Remove 1 PackageFreed space: 202 kRunning transaction checkTransaction check succeeded.Running transaction testTransaction test succeeded.Running transactionPreparing : 1/1Erasing : xz-devel-5.2.4-3.el8.x86_64 1/1Running scriptlet: xz-devel-5.2.4-3.el8.x86_64 1/1Verifying : xz-devel-5.2.4-3.el8.x86_64 1/1Installed products updated.Removed:xz-devel-5.2.4-3.el8.x86_64Complete!# 检测xz-devel是否卸载成功[root@myserver yum.repos.d]# rpm -qa | grep xzxz-5.2.4-3.el8.x86_64xz-libs-5.2.4-3.el8.x86_64
3. 配置在线yum源及检测
- 配置在线yum源
[root@myserver yum.repos.d]# lsbak myRepo.repo# 备份本地yum[root@myserver yum.repos.d]# mv myRepo.repo myRepo.repo~[root@myserver yum.repos.d]# lsbak myRepo.repo~# 创建在线yum[root@myserver yum.repos.d]# vim myRepo.repo# 在线yum源配置[myRepo2]name=My second repo.baseurl=https://mirrors.tuna.tsinghua.edu.cn/centos/8.2.2004/BaseOS/x86_64/os/gpgcheck=0enabled=1[root@myserver yum.repos.d]# lsbak myRepo.repo myRepo.repo~# 查看是否配置成功[root@myserver yum.repos.d]# yum repolistrepo id repo namemyRepo2 My second repo.
- 安装软件进行检测
# 清理之前的缓存[root@myserver yum.repos.d]# yum clean all32 files removed# 查看当前xz包的安装情况[root@myserver yum.repos.d]# rpm -qa | grep xzxz-5.2.4-3.el8.x86_64xz-libs-5.2.4-3.el8.x86_64# 安装xz-devel[root@myserver yum.repos.d]# yum -y install xz-develMy second repo. 123 kB/s | 2.2 MB 00:18Dependencies resolved.=======================================================================================Package Architecture Version Repository Size=======================================================================================Installing:xz-devel x86_64 5.2.4-3.el8 myRepo2 62 kTransaction Summary=======================================================================================Install 1 PackageTotal download size: 62 kInstalled size: 202 kDownloading Packages:xz-devel-5.2.4-3.el8.x86_64.rpm 39 kB/s | 62 kB 00:01---------------------------------------------------------------------------------------Total 39 kB/s | 62 kB 00:01Running transaction checkTransaction check succeeded.Running transaction testTransaction test succeeded.Running transactionPreparing : 1/1Installing : xz-devel-5.2.4-3.el8.x86_64 1/1Running scriptlet: xz-devel-5.2.4-3.el8.x86_64 1/1Verifying : xz-devel-5.2.4-3.el8.x86_64 1/1Installed products updated.Installed:xz-devel-5.2.4-3.el8.x86_64Complete!# 检测xz-devel是否安装成功[root@myserver yum.repos.d]# rpm -qa | grep xzxz-devel-5.2.4-3.el8.x86_64xz-5.2.4-3.el8.x86_64xz-libs-5.2.4-3.el8.x86_64# 尝试更新xz-devel,不过没有可以更新的地方[root@myserver yum.repos.d]# yum update xz-develLast metadata expiration check: 0:00:18 ago on Mon 27 Jul 2020 02:16:44 PM CST.Dependencies resolved.Nothing to do.Complete!# 卸载xz-devel[root@myserver yum.repos.d]# yum -y remove xz-develDependencies resolved.=======================================================================================Package Architecture Version Repository Size=======================================================================================Removing:xz-devel x86_64 5.2.4-3.el8 @myRepo2 202 kTransaction Summary=======================================================================================Remove 1 PackageFreed space: 202 kRunning transaction checkTransaction check succeeded.Running transaction testTransaction test succeeded.Running transactionPreparing : 1/1Erasing : xz-devel-5.2.4-3.el8.x86_64 1/1Running scriptlet: xz-devel-5.2.4-3.el8.x86_64 1/1Verifying : xz-devel-5.2.4-3.el8.x86_64 1/1Installed products updated.Removed:xz-devel-5.2.4-3.el8.x86_64Complete!# 检测是否卸载成功[root@myserver yum.repos.d]# rpm -qa | grep xzxz-5.2.4-3.el8.x86_64xz-libs-5.2.4-3.el8.x86_64
四、dnf软件包管理
- dnf是Dandified yum的缩写,即修订版的yum;首先出现在Fedora系统中,现已成为Fedora系统默认的包管理工具
- 与yum相比,dnf更简单、消耗内容更少、依赖包解析速度更快
- dnf软件包管理工具常用命令
- dnf —version —> 查看当前dnf版本信息
- dnf check —> 检查yum源配置是否正确
- dnf check-update —> 检查是否有软件包需要升级
- dnf clean all —> 清理dnf运行缓存
- dnf repolist —> 查看所有可用yum源
- dnf repolist all —> 查看所有yum源及其状态
- dnf list installed —> 列出系统所有已安装的包
- dnf search xxx —> 在yum源中查找xxx包
- dnf -y install xxx —> 安装xxx软件
- dnf -y reinstall xxx —> 重新安装xxx软件
- dnf -y remove xxx —> 卸载xxx软件
- dnf download xxx —> 下载xxx软件(.rpm格式)到当前文件夹
- dnf update xxx —> 更新xxx软件
五、源码编译安装软件
1. 归档文件
- tar cfv 归档文件名.tar 文件1 文件2 —> 将文件1和文件2归档
- tar xfv 归档文件名.tar -C 解压路径 —> 将归档中的文件解压到-C指定的路径下
- tar tfv 归档文件名.tar —> 列出当前归档文件中所有文件的详细信息
[root@myserver ~]# lsanaconda-ks.cfg Documents initial-setup-ks.cfg Pictures TemplatesDesktop Downloads Music Public Videos# 创建a.txt、b.txt、c.txt三个文件[root@myserver ~]# touch a.txt b.txt c.txt[root@myserver ~]# lsanaconda-ks.cfg b.txt Desktop Downloads Music Public Videosa.txt c.txt Documents initial-setup-ks.cfg Pictures Templates# 将三个文件归档到myTestFile.tar中[root@myserver ~]# tar cfv myTestFile.tar a.txt b.txt c.txta.txtb.txtc.txt# 检测是否归档成功[root@myserver ~]# lsanaconda-ks.cfg c.txt Downloads myTestFile.tar Templatesa.txt Desktop initial-setup-ks.cfg Pictures Videosb.txt Documents Music Public# 查看myTestFile.tar类型--->一个tar存档[root@myserver ~]# file myTestFile.tarmyTestFile.tar: POSIX tar archive (GNU)# 将myTestFile.tar归档的内容解压到/usr/local/src目录下[root@myserver ~]# tar xfv myTestFile.tar -C /usr/local/src/a.txtb.txtc.txt# 查看是否解压成功[root@myserver ~]# cd /usr/local/src/[root@myserver src]# lsa.txt b.txt c.txt[root@myserver home]# cd -/root# 列出myTestFile.tar中所有文件的详细信息[root@myserver ~]# tar tfv myTestFile.tar-rw-r--r-- root/root 0 2020-07-27 16:22 a.txt-rw-r--r-- root/root 0 2020-07-27 16:22 b.txt-rw-r--r-- root/root 0 2020-07-27 16:22 c.txt# 清除测试用的归档文件[root@myserver ~]# cd /usr/local/src/[root@myserver src]# lsa.txt b.txt c.txt[root@myserver src]# rm -f a.txt b.txt c.txt[root@myserver src]# ls[root@myserver src]# cd -/root[root@myserver ~]# lsanaconda-ks.cfg c.txt Downloads myTest.tar Templatesa.txt Desktop initial-setup-ks.cfg Pictures vb.txt Documents Music Public Videos[root@myserver ~]# rm -f myTest.tar[root@myserver ~]# lsanaconda-ks.cfg b.txt Desktop Downloads Music Public va.txt c.txt Documents initial-setup-ks.cfg Pictures Templates Videos
2. tar.gz格式压缩包
- tar zcfv 压缩包名.tar.gz 文件1 文件2 —> 创建一个tar.gz格式的压缩包
- tar zxfv 压缩包名.tar.gz -C 解压目录 —> 将tar.gz压缩包解压到-C所指定目录下
- tar ztfv 压缩包名.tar.gz —> 列出当前tar.gz压缩包中所有文件的详细信息(参数中没有z也可以)
[root@myserver ~]# lsanaconda-ks.cfg b.txt Desktop Downloads Music Public va.txt c.txt Documents initial-setup-ks.cfg Pictures Templates Videos# 将a.txt、b.txt、c.txt三个文件压缩到myTest.tar.gz中[root@myserver ~]# tar zcfv myTest.tar.gz a.txt b.txt c.txta.txtb.txtc.txt# 检查是否压缩成功[root@myserver ~]# lsanaconda-ks.cfg c.txt Downloads myTest.tar.gz Templatesa.txt Desktop initial-setup-ks.cfg Pictures vb.txt Documents Music Public Videos# 查看myTest.tar.gz的类型--->gzip压缩数据[root@myserver ~]# file myTest.tar.gzmyTest.tar.gz: gzip compressed data, last modified: Mon Jul 27 08:39:38 2020, from Unix, original size 10240# 将myTest.tar.gz解压到/usr/local/src文件夹下[root@myserver ~]# tar zxfv myTest.tar.gz -C /usr/local/src/a.txtb.txtc.txt# 查看是否解压成功[root@myserver ~]# ls /usr/local/src/a.txt b.txt c.txt[root@myserver ~]# tar ztfv myTest.tar.gz-rw-r--r-- root/root 0 2020-07-27 16:33 a.txt-rw-r--r-- root/root 0 2020-07-27 16:34 b.txt-rw-r--r-- root/root 0 2020-07-27 16:34 c.txt# 清除测试用的压缩文件[root@myserver ~]# cd /usr/local/src/[root@myserver src]# lsa.txt b.txt c.txt[root@myserver src]# rm -f a.txt b.txt c.txt[root@myserver src]# ls[root@myserver src]# cd -/root[root@myserver ~]# lsanaconda-ks.cfg c.txt Downloads myTest.tar.gz Templatesa.txt Desktop initial-setup-ks.cfg Pictures vb.txt Documents Music Public Videos[root@myserver ~]# rm -f a.txt b.txt c.txt myTest.tar.gz[root@myserver ~]# lsanaconda-ks.cfg Documents initial-setup-ks.cfg Pictures Templates VideosDesktop Downloads Music Public v
3. 源码编译安装软件过程
- wget下载软件源码包(要联网)
- tar zxfv命令解压源码包(默认会解压到当前文件夹下,建议用-C参数指定解压路径为/usr/local/src,或者直接在/usr/local/src目录下进行操作)
- ./configure —> 执行配置文件
- make —> 执行编译
- make install -> 执行编译安装
[root@myserver ~]# cd /usr/local/src/# 下载PCRE源码的压缩包[root@myserver src]# wget https://ftp.pcre.org/pub/pcre/pcre-8.44.tar.gz--2020-07-27 17:07:03-- https://ftp.pcre.org/pub/pcre/pcre-8.44.tar.gzResolving ftp.pcre.org (ftp.pcre.org)... 131.111.8.88Connecting to ftp.pcre.org (ftp.pcre.org)|131.111.8.88|:443... connected.HTTP request sent, awaiting response... 200 OKLength: 2090750 (2.0M) [application/x-gunzip]Saving to: ‘pcre-8.44.tar.gz’pcre-8.44.tar.gz 100%[========================>] 1.99M 16.7KB/s in 2m 4s2020-07-27 17:09:09 (16.4 KB/s) - ‘pcre-8.44.tar.gz’ saved [2090750/2090750][root@myserver src]# lspcre-8.44.tar.gz# 解压获得PCRE的源码包[root@myserver src]# tar zxfv pcre-8.44.tar.gzpcre-8.44/pcre-8.44/pcre_scanner.h......pcre-8.44/pcre32_ucd.cpcre-8.44/makevp_l.txt[root@myserver src]# lspcre-8.44 pcre-8.44.tar.gz[root@myserver src]# cd pcre-8.44/[root@myserver pcre-8.44]# ls132html pcre16_fullinfo.c pcrecpp_internal.haclocal.m4 pcre16_get.c pcrecpp_unittest.cc......configure pcre16_version.c pcre_maketables.c......pcre16_exec.c pcrecpp.h# 执行配置文件,由于系统没有装c和c++编译器,所以没有办法解析执行[root@myserver pcre-8.44]# ./configurechecking for a BSD-compatible install... /usr/bin/install -cchecking whether build environment is sane... yeschecking for a thread-safe mkdir -p... /usr/bin/mkdir -pchecking for gawk... gawkchecking whether make sets $(MAKE)... nochecking whether make supports nested variables... nochecking whether make supports nested variables... (cached) nochecking whether make supports the include directive... nochecking for gcc... nochecking for cc... nochecking for cl.exe... noconfigure: error: in `/usr/local/src/pcre-8.44':configure: error: no acceptable C compiler found in $PATHSee `config.log' for more details# 安装c和c++编译器[root@myserver pcre-8.44]# yum install gcc gcc-c++......# 重新执行配置文件[root@myserver pcre-8.44]# ./configurechecking for a BSD-compatible install... /usr/bin/install -cchecking whether build environment is sane... yes......Code coverage ................... : no# 安装make工具[root@myserver pcre-8.44]# yum -y install gcc automake autoconf libtool make......# 执行编译[root@myserver pcre-8.44]# makerm -f pcre_chartables.cln -s ./pcre_chartables.c.dist pcre_chartables.cmake all-ammake[1]: Entering directory '/usr/local/src/pcre-8.44'CC pcretest-pcretest.oCC pcretest-pcre_printint.oCC libpcre_la-pcre_byte_order.lo......CXX pcre_stringpiece_unittest-pcre_stringpiece_unittest.oCXXLD pcre_stringpiece_unittestmake[1]: Leaving directory '/usr/local/src/pcre-8.44'# 执行编译安装[root@myserver pcre-8.44]# make installmake install-ammake[1]: Entering directory '/usr/local/src/pcre-8.44'make[2]: Entering directory '/usr/local/src/pcre-8.44'/usr/bin/mkdir -p '/usr/local/lib'......ln -sf pcre_version.3 /usr/local/share/man/man3/pcre32_version.3make[3]: Leaving directory '/usr/local/src/pcre-8.44'make[2]: Leaving directory '/usr/local/src/pcre-8.44'make[1]: Leaving directory '/usr/local/src/pcre-8.44'# 完成源码编译安装PCRE[root@myserver pcre-8.44]#

若有收获,就点个赞吧
0 人点赞
