Redisson GitHub:https://github.com/redisson/redisson
1. SpringBoot 整合 Redissson
1.1 引入 Maven 依赖
<parent><groupId>org.springframework.boot</groupId><artifactId>spring-boot-starter-parent</artifactId><version>2.3.3.RELEASE</version></parent><dependencies><dependency><groupId>org.springframework.boot</groupId><artifactId>spring-boot-starter-web</artifactId></dependency><dependency><groupId>org.redisson</groupId><artifactId>redisson-spring-boot-starter</artifactId><version>3.15.6</version><exclusions><exclusion><groupId>org.redisson</groupId><artifactId>redisson-spring-data-24</artifactId></exclusion></exclusions></dependency><dependency><groupId>org.redisson</groupId><artifactId>redisson-spring-data-23</artifactId><version>3.15.6</version></dependency></dependencies>
其中redisson-spring-boot-starter 的子依赖 redisson-spring-data 需要根据 springboot version 来进行调整:
| redisson-spring-data module name |
Spring Boot version |
|---|---|
| redisson-spring-data-16 | 1.3.x |
| redisson-spring-data-17 | 1.4.x |
| redisson-spring-data-18 | 1.5.x |
| redisson-spring-data-20 | 2.0.x |
| redisson-spring-data-21 | 2.1.x |
| redisson-spring-data-22 | 2.2.x |
| redisson-spring-data-23 | 2.3.x |
| redisson-spring-data-24 | 2.4.x |
1.2 定义配置文件
- application.yaml ```yaml server: port: 8080
spring: redis: redisson: file: classpath:redisson.yaml
- redisson.yaml```yaml# redis 单机模式singleServerConfig:address: "redis://127.0.0.1:6379"
1.3 分布式可重入锁
(1) 可重入锁测试
基于 Redis 的 Redisson 分布式可重入锁 RLockJava 对象实现了 java.util.concurrent.locks.Lock 接口。同时还提供了异步(Async)、反射式(Reactive)和 RxJava2 标准的接口。
RLock lock = redisson.getLock("anyLock");// 最常见的使用方法lock.lock();
测试主要关注下面两个点:
- 多个线程抢占锁,后面锁需要等待吗?
- 如果抢占到锁的线程所在的服务停了。锁会不会被释放?
为了验证以上两点,代码的流程如下:设置锁,然后加锁,打印线程 ID,等待10秒后释放锁。
@RestController@Slf4jpublic class LockController {@Autowiredprivate RedissonClient redissonClient;@GetMapping("/lock")public void lock(){RLock lock = redissonClient.getLock("shawn-lock");lock.lock();try {log.info("加锁成功,执行后续代码。线程 ID:"+ Thread.currentThread().getId());Thread.sleep(10000);} catch (InterruptedException e) {e.printStackTrace();}finally {lock.unlock();log.info("Finally,释放锁成功。线程 ID:" + Thread.currentThread().getId());}}}
a. 验证一:可重入锁是阻塞的吗?
打开两个浏览器窗口,发送两个 http 请求来测试抢占锁,请求的 URL:http://localhost:8080/lock。
由此可以得出结论,Redisson 的可重入锁(RLock)是阻塞其他线程的,需要等待其他线程释放的。
b. 验证二:服务停了,锁会释放吗?
如果线程 A 在等待的过程中,服务突然停了,那么锁会释放吗?如果不释放的话,就会成为死锁,阻塞了其他线程获取锁。
锁是自带过期时间的,默认 30 秒后过期,经过30秒后,锁过期消失。说明 Redisson 在停机后,占用的锁会自动释放。
那这又是什么原理呢?这里就要提一个概念了,看门狗。
(2) 看门狗原理
如果负责储存这个分布式锁的 Redisson 节点宕机以后,而且这个锁正好处于锁住的状态时,这个锁会出现锁死的状态。为了避免这种情况的发生,Redisson 内部提供了一个监控锁的看门狗,它的作用是在 Redisson 实例被关闭前,不断的延长锁的有效期。
默认情况下,看门狗的检查锁的超时时间是30秒钟,也可以通过修改 Config.lockWatchdogTimeout 来另行指定。
如果我们未制定 lock 的超时时间,就使用 30 秒作为看门狗的默认时间。只要占锁成功,就会启动一个定时任务:每隔 10 秒重新给锁设置过期的时间,过期时间为 30 秒。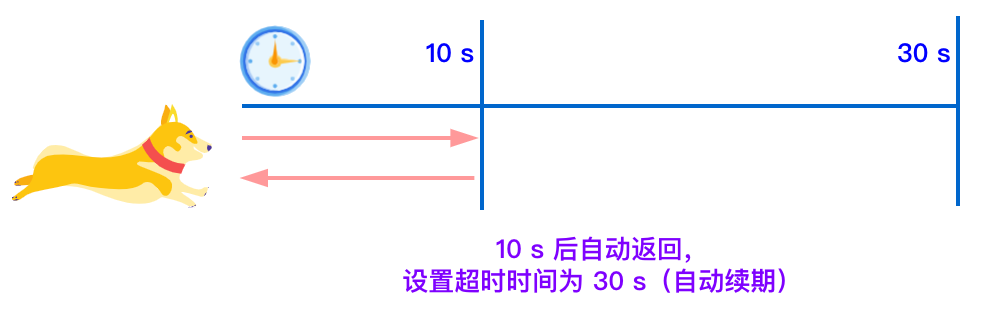
示例分析:
- 假设业务执行时间需要 15 s,A 线程抢占锁后会设置默认超时时间30s,同时启动定时任务;
- 业务执行10秒后还没有完成,仍然持有锁,此时定时任务 WatchDog 重新给锁设置超时时间,将剩余的20s倒计时重置为30s;
- 业务执行15秒后,此时锁的有效期还有25s;
- 业务逻辑执行完毕后,删除持有的锁。
(3) 设置锁过期时间
我们也可以通过给锁设置过期时间,让其自动解锁。
如下所示,设置锁 8 秒后自动过期。
lock.lock(8, TimeUnit.SECONDS);
如果业务执行时间超过 8 秒,手动释放锁将会报错; :::info 所以我们如果设置了锁的自动过期时间,则执行业务的时间一定要小于锁的自动过期时间,否则就会报错。 :::
1.4 Redisson 其他分布式锁
Redisson 还有其他的分布式锁,可以参考官网进行学习: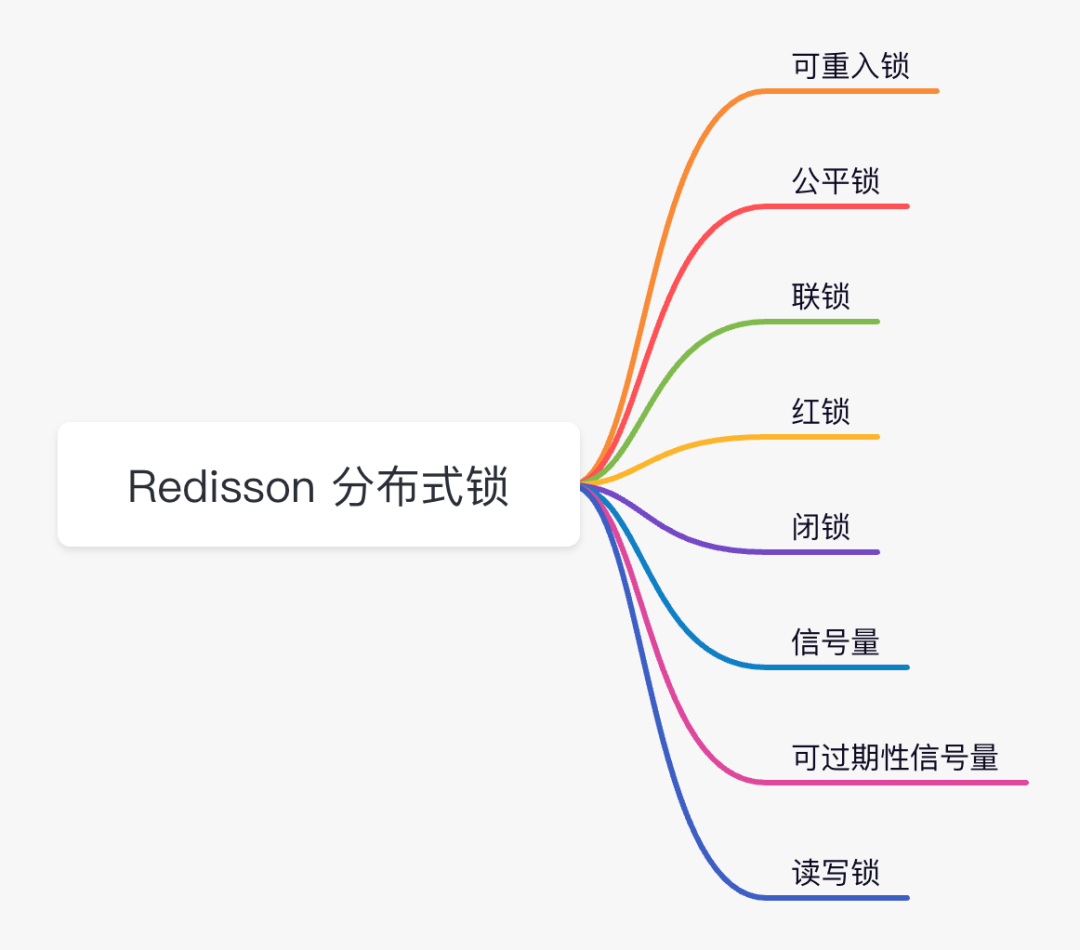
以上内容来源:《分布式锁中的王者方案 - Redisson》
2. 追溯 Redisson 源码,分析工作原理
根据示例代码中调用方法,查看 Redisson 源码,进一步验证 Redisson 的分布式锁是如何实现的。
RLock lock = redissonClient.getLock("shawn-lock");boolean lockSuccess = lock.tryLock(20, TimeUnit.SECONDS);if (lockSuccess) {System.out.println("get lock success");} else {System.out.println("get lock fail");}// 业务逻辑执行15sTimeUnit.SECONDS.sleep(15);//释放锁lock.unlock();
2.1 RedissonClient 与 redis 通信
- 同 Redis 通信的组件;
- Redisson 类是 RedissonClient 接口的实现,封装了一些配置、同 Redis 的连接管理、一些定时任务、发布订阅组件等;
- 提供一些获取 Redisson 基于 Redis 实现的分布式锁、分布式集合、分布式信号等接口方法:
RLock getLock(String name):可重入锁RReadWriteLock getReadWriteLock(String name):读写锁RLock getFairLock(String name):公平锁RLock getRedLock(RLock... locks):红锁
我们获得锁只是 Redisson 对分布式锁的抽象的接口,并不真正的负责执行加锁等操作。加锁、释放锁等操作是在其具体的实现类中,例如,可重入锁就是 RedissonLock 基于 RLock 接口的一种实现: ```java public class Redisson implements RedissonClient { // 加载配置 protected Redisson(Config config) {
this.config = config;Config configCopy = new Config(config);this.connectionManager = ConfigSupport.createConnectionManager(configCopy);RedissonObjectBuilder objectBuilder = null;if (config.isReferenceEnabled()) {objectBuilder = new RedissonObjectBuilder(this);}this.commandExecutor = new CommandSyncService(this.connectionManager, objectBuilder);this.evictionScheduler = new EvictionScheduler(this.commandExecutor);this.writeBehindService = new WriteBehindService(this.commandExecutor);
} // 创建 Redisson 客户端 public static RedissonClient create(Config config) {
return new Redisson(config);}
// 获取可重入锁 public RLock getLock(String name) {
return new RedissonLock(connectionManager.getCommandExecutor(), name);}
… }
<a name="qIO2N"></a>
### 2.2 RedissonLock如何加锁

- 负责具体执行加锁、释放锁等操作
- 查看 `tryLock(xxx, TimeUnit)` 中的加锁逻辑,其实第一次尝试加锁的逻辑是在类中 `tryAcquire(xxx)` 方法,将持有锁时间和线程 ID 作为参数;
```java
public class RedissonLock extends RedissonBaseLock {
    public boolean tryLock(long waitTime, TimeUnit unit) throws InterruptedException {
        return this.tryLock(waitTime, -1L, unit);
    }

    public boolean tryLock(long waitTime, long leaseTime, TimeUnit unit) throws InterruptedException {
        long time = unit.toMillis(waitTime);
        long current = System.currentTimeMillis();
        long threadId = Thread.currentThread().getId();

        // 真正加锁的操作,tryAcquire,传入超时时间、线程Id作为redis锁的value
        Long ttl = this.tryAcquire(waitTime, leaseTime, unit, threadId);

        // 加锁成功 返回null 否则返回的是该锁将要过期的剩余时间
        if (ttl == null) {
            return true;
        } else {
            time -= System.currentTimeMillis() - current;

            // 未获取到锁,且第一次尝试获取锁花费时间超过了预设等待时间,则获取锁失败,不再等待
            if (time <= 0L) {
                this.acquireFailed(waitTime, unit, threadId);
                return false;
            } else {
                current = System.currentTimeMillis();
                RFuture<RedissonLockEntry> subscribeFuture = this.subscribe(threadId);
                if (!subscribeFuture.await(time, TimeUnit.MILLISECONDS)) {
                    if (!subscribeFuture.cancel(false)) {
                        subscribeFuture.onComplete((res, e) -> {
                            if (e == null) {
                                this.unsubscribe(subscribeFuture, threadId);
                            }

                        });
                    }

                    this.acquireFailed(waitTime, unit, threadId);
                    return false;
                } else {
                    boolean var16;
                    try {
                        time -= System.currentTimeMillis() - current;
                        if (time <= 0L) {
                            this.acquireFailed(waitTime, unit, threadId);
                            boolean var20 = false;
                            return var20;
                        }

                        do {
                            long currentTime = System.currentTimeMillis();
                            ttl = this.tryAcquire(waitTime, leaseTime, unit, threadId);
                            if (ttl == null) {
                                var16 = true;
                                return var16;
                            }

                            time -= System.currentTimeMillis() - currentTime;
                            if (time <= 0L) {
                                this.acquireFailed(waitTime, unit, threadId);
                                var16 = false;
                                return var16;
                            }

                            currentTime = System.currentTimeMillis();
                            if (ttl >= 0L && ttl < time) {
                                ((RedissonLockEntry)subscribeFuture.getNow()).getLatch().tryAcquire(ttl, TimeUnit.MILLISECONDS);
                            } else {
                                ((RedissonLockEntry)subscribeFuture.getNow()).getLatch().tryAcquire(time, TimeUnit.MILLISECONDS);
                            }

                            time -= System.currentTimeMillis() - currentTime;
                        } while(time > 0L);

                        this.acquireFailed(waitTime, unit, threadId);
                        var16 = false;
                    } finally {
                        this.unsubscribe(subscribeFuture, threadId);
                    }

                    return var16;
                }
            }
        }
    }

}
- 重点看 tryAcquire(…) 中的逻辑
- 当不指定 leaseTime(锁的持有时间)时,默认的锁持有时间是 30s (这个时间就是叫做看门狗,
Congfig.lockWatchdogTimeout=30000L),并且每 10s (30/3) 去确认一下锁的状态;如果锁仍未被释放,则重新设置锁的过期时间为 30s。 - 当指定 leaseTime 时,成功获取到锁后,在 leaseTime (自定义的失效时间)后,如果锁仍没有被服务主动释放,锁将自动过期,而不会管持有锁的线程有没有完成对应的操作,相当于在持有锁的服务执行了比较耗时的任务且未完成时,这时锁已经释放,这时候是不安全的。 ```java private Long tryAcquire(long waitTime, long leaseTime, TimeUnit unit, long threadId) { return (Long)this.get(this.tryAcquireAsync(waitTime, leaseTime, unit, threadId)); }
- 当不指定 leaseTime(锁的持有时间)时,默认的锁持有时间是 30s (这个时间就是叫做看门狗,
private
// 如果自己设置了锁释放时间,则获取锁后直接返回,且不会设置定时刷新的逻辑(上层方法没有设置定时任务),则获取到锁后超过设定的事件后自动释放
// 或者在设定时间内手动调用释放锁
if (leaseTime != -1L) {
    //设定了自定义的失效时间
    ttlRemainingFuture = this.tryLockInnerAsync(waitTime, leaseTime, unit, threadId, RedisCommands.EVAL_LONG);
} else {
    //未指定失效时间,internalLockLeaseTime = getLockWatchdogTimeout(),使用默认看门狗时间30秒为有效期
    ttlRemainingFuture = this.tryLockInnerAsync(waitTime, this.internalLockLeaseTime, TimeUnit.MILLISECONDS, threadId, RedisCommands.EVAL_LONG);
}

ttlRemainingFuture.onComplete((ttlRemaining, e) -> {
    if (e == null) {
        if (ttlRemaining == null) {
            if (leaseTime != -1L) {
                this.internalLockLeaseTime = unit.toMillis(leaseTime);
            } else {
                //自定义了锁持有时间,如果加锁成功,会开启一个自动延期锁的定时任务
                this.scheduleExpirationRenewal(threadId);
            }
        }

    }
});
return ttlRemainingFuture;
}
上面代码逻辑的主要流程图,如下:<br />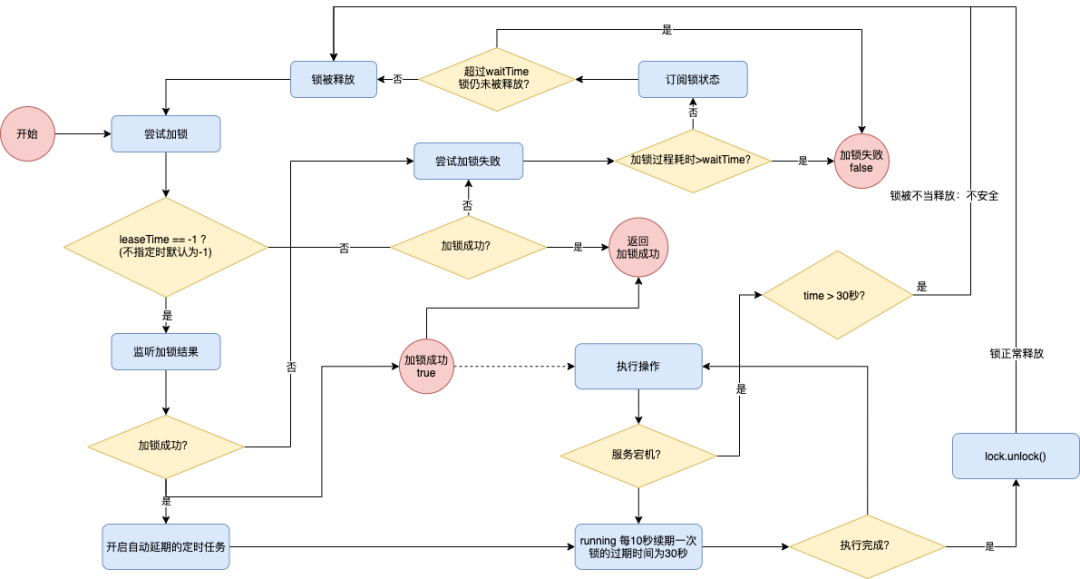
<a name="QuFaf"></a>
### 2.3 RedissonLock 分布式锁的数据结构与加锁原理
上面的代码逻辑实现了加锁的流程逻辑,那么分布式锁在 Redis 中具体是如何实现的呢?怎么判断加锁失败及锁的剩余时间呢?
从上面的代码中,了解到真正执行加锁的逻辑是 `RedissonLock.tryAcquireAsync(...)` 中的以下逻辑:
```java
if (leaseTime != -1L) {
ttlRemainingFuture = this.tryLockInnerAsync(waitTime, leaseTime, unit, threadId, RedisCommands.EVAL_LONG);
} else {
ttlRemainingFuture = this.tryLockInnerAsync(waitTime, this.internalLockLeaseTime, TimeUnit.MILLISECONDS, threadId, RedisCommands.EVAL_LONG);
}
<T> RFuture<T> tryLockInnerAsync(long waitTime, long leaseTime, TimeUnit unit, long threadId, RedisStrictCommand<T> command) {

    // 锁不存在,加锁成功,设置hash数据结构锁: 锁名 -> 加锁线程:id -> 加锁次数(1)
    // 锁存在且是本线程的锁 加锁次数增加:锁名 -> 加锁线程:id -> 加锁次数+1
    // 锁存在且不是本线程的锁 加锁失败 返回锁剩余过期时间
    return this.evalWriteAsync(this.getRawName(), LongCodec.INSTANCE, command,
            "if (redis.call('exists', KEYS[1]) == 0) then "
                + "redis.call('hincrby', KEYS[1], ARGV[2], 1); "
                + "redis.call('pexpire', KEYS[1], ARGV[1]); "
                + "return nil; "
                + "end; "
                + "if (redis.call('hexists', KEYS[1], ARGV[2]) == 1) then "
                + "redis.call('hincrby', KEYS[1], ARGV[2], 1); "
                + "redis.call('pexpire', KEYS[1], ARGV[1]); "
                + "return nil; "
                + "end; return redis.call('pttl', KEYS[1]);",
            Collections.singletonList(this.getRawName()), new Object[]{unit.toMillis(leaseTime), this.getLockName(threadId)});
}
上面是执行了一段 lua 脚本,这段 lua 脚 本是会涉及到多个判断以及数据修改的,这个时候就可以回到我们说的关于加锁的原子性问题了。先不看这段加锁的逻辑,只考虑加锁过程涉及到多个判断以及操作时,那么那些动作必须是原子的,要么同时成功要么同时失败,而 RedissonLock 实现加锁过程的原子性就是借助了 lua 脚本(锁延期等也会使用 lua 脚本)。
下面图解这段 lua 脚本的含义:
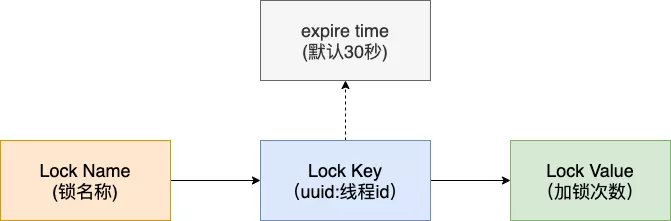
- Redisson 实现的可重入锁的数据结构使用了 Redis 中的 hash 对象数据类型
{锁名}:{uuid:threadId}:{count}来实现; - 另外对于已经存在的健值对初始化过期时间为 30 秒。
- 某一个节点下的线程加锁首先判断该线程对于的 hash 键是否存在
- 若不存在(锁未被持有),则将锁的键设置为线程 id 对应的唯一标识,值为 1 (第一次加锁),返回空表示加锁成功
- 锁存在且对应的是本线程,说明之前加锁的线程为同一个,则将 hash 值 1 (加锁次数,可重入),另外将该锁对应的存活时间重新设置,返回空表示加锁成功
- 锁存在但键对应的不是当前线程,说明持有锁的是其他线程,返回锁剩余的过期时间表示加锁失败
2.4 锁的自动续期
前面我们从 Redisson 加锁为入口,分析了加锁的整体流程并详细看了加锁时的细节以及数据结构,现在我们看一下 Redisson 分布式锁是如何自动续期的。前面我们已经提到了当第一次加锁成功时会开启自动续期的定时任务,对于的代码入口即为:
ttlRemainingFuture.onComplete((ttlRemaining, e) -> {
    if (e == null) {
        if (ttlRemaining == null) {
            if (leaseTime != -1L) {
                this.internalLockLeaseTime = unit.toMillis(leaseTime);
            } else {
                //未自定义有效期,定时任务自动给锁续期
                this.scheduleExpirationRenewal(threadId);
            }
        }
    }
});
进入代码 scheduleExpirationRenewal(...):
protected void scheduleExpirationRenewal(long threadId) {
    RedissonBaseLock.ExpirationEntry entry = new RedissonBaseLock.ExpirationEntry();
    RedissonBaseLock.ExpirationEntry oldEntry = (RedissonBaseLock.ExpirationEntry)EXPIRATION_RENEWAL_MAP.putIfAbsent(this.getEntryName(), entry);
    if (oldEntry != null) {
        // 表示不是第一次加锁 则加锁次数加 1 不会再开启续期锁 因为第一次加锁时调用 scheduleExpirationRenewal(long threadId) 会进入
        // else 会开启 renewExpiration()
        oldEntry.addThreadId(threadId);
    } else {
        // 在加锁时第一次调用 开启自动续期(定时重设锁的过期时间)
        entry.addThreadId(threadId);
        this.renewExpiration();
    }

}
ExpirationEntry 封装了定时任务对应的线程对象,结合注释这一段也不必展开,我们继续往下看真正开启续期的方法 renewExpiration():
private void renewExpiration() {
    RedissonBaseLock.ExpirationEntry ee = (RedissonBaseLock.ExpirationEntry)EXPIRATION_RENEWAL_MAP.get(this.getEntryName());
    if (ee != null) {
        Timeout task = this.commandExecutor.getConnectionManager().newTimeout(new TimerTask() {
            public void run(Timeout timeout) throws Exception {
                RedissonBaseLock.ExpirationEntry ent = (RedissonBaseLock.ExpirationEntry)RedissonBaseLock.EXPIRATION_RENEWAL_MAP.get(RedissonBaseLock.this.getEntryName());
                if (ent != null) {
                    Long threadId = ent.getFirstThreadId();
                    if (threadId != null) {
                        RFuture<Boolean> future = RedissonBaseLock.this.renewExpirationAsync(threadId);
                        // 这里监听续期 成功后递归调用(十秒后再次重复)
                        future.onComplete((res, e) -> {
                            if (e != null) {
                                RedissonBaseLock.log.error("Can't update lock " + RedissonBaseLock.this.getRawName() + " expiration", e);
                                RedissonBaseLock.EXPIRATION_RENEWAL_MAP.remove(RedissonBaseLock.this.getEntryName());
                            } else {
                                if (res) {
                                    RedissonBaseLock.this.renewExpiration();
                                }

                            }
                        });
                    }
                }
            }
        // 10 秒续期一次(如果还持有锁)  30000/3
        }, this.internalLockLeaseTime / 3L, TimeUnit.MILLISECONDS);
        ee.setTimeout(task);
    }
}
可以看出来锁自动续期的流程为:
- 若锁已经不存在了(比如手动释放了锁),直接返回
- 若锁仍存在,调用 Redis 异步设置锁的过期时间
renewExpirationAsync(threadId),同时监听续期结果 - 若续期成功,则递归调用 renewExpiration(),否则异常返回
- 以上过程每 10 秒重复一次 (internalLockLeaseTime / 3)
然后我们看一下调用 Redis 对锁进行续期的过程:
protected RFuture<Boolean> renewExpirationAsync(long threadId) {
    return this.evalWriteAsync(this.getRawName(), LongCodec.INSTANCE,
                RedisCommands.EVAL_BOOLEAN,
                "if (redis.call('hexists', KEYS[1], ARGV[2]) == 1) then "
                    + "redis.call('pexpire', KEYS[1], ARGV[1]); "
                    + "return 1; "
                    + "end; "
                    + "return 0;",
                Collections.singletonList(this.getRawName()),
                this.internalLockLeaseTime,
                this.getLockName(threadId));
}
这里同样使用 lua 脚本来执行了一段原子操作:
- 判断当前线程对应的锁是否存在,若存在则重新设置锁的过期时间(默认为 30 秒),返回 true
- 否则返回 false
2.5 锁的手动释放
至此,Redisson 的加锁、自动续期我们已经讨论过了,现在看一下锁的手动释放, 其入口为:
public void unlock() {
    try {
        this.get(this.unlockAsync(Thread.currentThread().getId()));
    } catch (RedisException var2) {
        if (var2.getCause() instanceof IllegalMonitorStateException) {
            throw (IllegalMonitorStateException)var2.getCause();
        } else {
            throw var2;
        }
    }
}
接着看底层实现 unlockAsync(final long threadId):
public RFuture<Void> unlockAsync(long threadId) {
    RPromise<Void> result = new RedissonPromise();
    // 释放锁
    RFuture<Boolean> future = this.unlockInnerAsync(threadId);

    // 监听释放锁结果
    future.onComplete((opStatus, e) -> {
        // 取消自动续期
        this.cancelExpirationRenewal(threadId);

        if (e != null) {
            result.tryFailure(e);
        } else if (opStatus == null) {
            IllegalMonitorStateException cause = new IllegalMonitorStateException("attempt to unlock lock, not locked by current thread by node id: " + this.id + " thread-id: " + threadId);
            result.tryFailure(cause);
        } else {
            result.trySuccess((Object)null);
        }
    });
    return result;
}
可以看出来,释放锁会执行以下操作:
- 调用 Redis 释放锁
- 监听释放锁结果,取消自动续期
然后看一下真正释放锁的操作:
protected RFuture<Boolean> unlockInnerAsync(long threadId) {
    // 若锁不存在 返回
    // 若锁存在 加锁次数 -1
    // 若加锁次数仍不等于 0 (可重入),重新设置锁的过期时间,返回
    // 若加锁次数减为 0,删除锁,同步发布释放锁事件,返回
    return this.evalWriteAsync(this.getRawName(), LongCodec.INSTANCE,
                               RedisCommands.EVAL_BOOLEAN,
                               "if (redis.call('hexists', KEYS[1], ARGV[3]) == 0) then "
                               + "return nil;"
                               + "end; "
                               + "local counter = redis.call('hincrby', KEYS[1], ARGV[3], -1); "
                               + "if (counter > 0) then "
                               + "redis.call('pexpire', KEYS[1], ARGV[2]); "
                               + "return 0; "
                               + "else redis.call('del', KEYS[1]); "
                               + "redis.call('publish', KEYS[2], ARGV[1]); "
                               + "return 1; "
                               + "end; "
                               + "return nil;",
                               Arrays.asList(this.getRawName(), this.getChannelName()),
                               new Object[]{LockPubSub.UNLOCK_MESSAGE, this.internalLockLeaseTime,
                                            this.getLockName(threadId)});
}
2.6 加锁等待
讨论了加锁成功、锁自动续期、锁释放后,我们再来看一下加锁等待。前面加锁的代码中,我们可以看到,若制定了加锁的等待时间 waitTime 时,若锁已经被占有,加锁会失败并返回锁剩余的过期时间,然后循环尝试加锁,对应以下代码:
current = System.currentTimeMillis();
RFuture<RedissonLockEntry> subscribeFuture = this.subscribe(threadId);
if (!subscribeFuture.await(time, TimeUnit.MILLISECONDS)) {
    if (!subscribeFuture.cancel(false)) {
        subscribeFuture.onComplete((res, e) -> {
            if (e == null) {
                this.unsubscribe(subscribeFuture, threadId);
            }

        });
    }

    this.acquireFailed(waitTime, unit, threadId);
    return false;
} else {
    boolean var16;
    try {
        time -= System.currentTimeMillis() - current;
        if (time <= 0L) {
            this.acquireFailed(waitTime, unit, threadId);
            boolean var20 = false;
            return var20;
        }

        // 等待锁释放 循环获取锁
        do {
            long currentTime = System.currentTimeMillis();
            ttl = this.tryAcquire(waitTime, leaseTime, unit, threadId);
            if (ttl == null) {
                var16 = true;
                return var16;
            }

            time -= System.currentTimeMillis() - currentTime;
            if (time <= 0L) {
                this.acquireFailed(waitTime, unit, threadId);
                var16 = false;
                return var16;
            }

            // waiting for message
            currentTime = System.currentTimeMillis();
            if (ttl >= 0L && ttl < time) {
                ((RedissonLockEntry)subscribeFuture.getNow()).getLatch().tryAcquire(ttl, TimeUnit.MILLISECONDS);
            } else {
                ((RedissonLockEntry)subscribeFuture.getNow()).getLatch().tryAcquire(time, TimeUnit.MILLISECONDS);
            }

            time -= System.currentTimeMillis() - currentTime;
        } while(time > 0L);

        this.acquireFailed(waitTime, unit, threadId);
        var16 = false;
    } finally {
        this.unsubscribe(subscribeFuture, threadId);
    }

    return var16;
}
在上面的 while 循环中,我们可以看出来,每次循环都会调用
ttl = this.tryAcquire(waitTime, leaseTime, unit, threadId);
这里就回到了我们之前分析的加锁流程,不再赘述。
整个加锁等待流程如下:
- 如果加锁成功,返回成功
- 加锁失败,基于发布订阅(基于 Semaphore )阻塞,收到锁释放消息后继续循环,再次尝试加锁
- 如果整个加锁尝试时间超过了 waitTime 后仍然未抢到锁,返回加锁失败
至此,Redisson 基于 Redis 实现的分布式锁的可重入锁 RedissonLock 的大致原理就分析完了。
以上 Redisson 源码分析内容来自《Redisson 分布式锁—可重入锁》。

若有收获,就点个赞吧
0 人点赞
