镜像和容器在Docker中是两个非常重要的概念,简单来讲,镜像是一些程序和文件的集合,容器是镜像的一个运行实例。Docker为了节约存储空间及共享数据,对镜像和容器进行分层。不同的镜像可以共享相同的数据。例如从同一个基础镜像中生成的子镜像可以共享基础镜像,从同一个镜像启动不同的容器也可以共享这个镜像。Docker为了加快容器的启动速度,在启动容器时,会在镜像层上为容器分配一个可写数据层,在容器运行中,新增,删除、修改的数据都会保存在容器层中
- 镜像,分层构建(节省空间)
- 容器启动,新增容器层,所有数据都写在容器层(容器删除,容器层数据丢失)
- 镜像是一些程序和文件的集合,容器是镜像的一个运行实例(一个镜像,可以启动多个容器)
1)镜像和镜像层
每个镜像都由多个镜像层组成,镜像层是只读的,从下网上,以栈的方式组合在一起,组成容器的根文件系统,如图<br />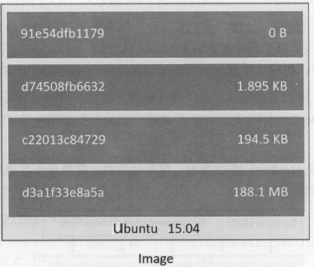<br /> Docker的存储驱动用于管理这些镜像层,对外提供单一的文件系统。镜像中的层都是只读的,当把镜像启动为容器后,Docker会创建一个可读写的容器层(采用预分配存储空间的方式),容器运行时,所有文件变化的数据都保存在容器层。<br />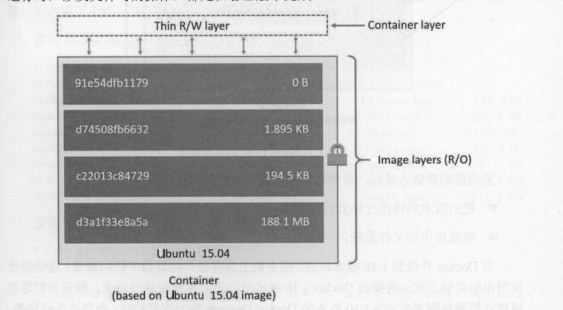
- 每个镜像层,分配一个独立的UUID
- 容器和镜像都是由多个层组成,最大的区别: 容器在最上面一层新增读写层,叫容器层(在容器中所有操作,都在读写层操作)
- 每个容器运行,都由自己的读写层(容器层之下的所有镜像层都是只读的,因此多个容器可以共享同一个镜像)
- 使用镜像共享技术,可以减小硬盘大小
2)使用复制技术加快容器启动的时间
当基于某个镜像,启动多个容器,在宿主机中,镜像层只保存一份,每个容器都由自己的读写层(容器层),如图:
当容器中修改文件时,Docker会通过存储驱动,发起一个写时复制操作。
- 在镜像层寻找需要修改的数据文件
- 把这个文件从镜像层复制到容器层中
- 在容器层修改这个文件
3)介绍overlayfs 和 overlayfs2存储驱动
[root@worker09 ~]# docker infoClient:Debug Mode: falseServer:Containers: 62Running: 56Paused: 0Stopped: 6Images: 269Server Version: 19.03.5Storage Driver: overlay2Backing Filesystem: extfsSupports d_type: trueNative Overlay Diff: trueLogging Driver: json-file
3.1)overlay存储驱动
- 两个目录:使用分层结构,一个目录在下层,保存 镜像层,另一个目录在上层,保存容器层,overlayfs把这两个目录组合在一起,对外提供一个文件系统
- overlayfs使用联合挂载技术组合这两个目录,底层目录: lowerdir ,顶层目录: upperdir,对外提供统一的文件系统叫merged
- overlay存储驱动只能使用两层,每个镜像层在/var/lib/docker/overlay都由对应的目录
- 运行容器时,存储驱动会把所有镜像层对应的目录组合起来,在上层添加一个容器层

3.2)overlay2存储驱动
overlay2支持多个lowerdir,保存多层镜像更有优势;overlay2使用更少的inode,默认在/var/lib/docker/overlay2
我更改了docker的存储位置[root@blog-xhaihua ~]# cd /data/docker/overlay2/[root@blog-xhaihua overlay2]# lltotal 4drwx------ 4 root root 72 Oct 16 14:45 006f20ff6bc78d97a269b9cd754b7ed37467dc44a98685d8e3c3e6e9be2abc24drwx------ 5 root root 69 Mar 9 08:18 00dabc3a28c2f96a7e6de0f74bf77a333540897d388ac4bb90b98d77aeecea86drwx------ 4 root root 72 Mar 5 15:04 00dabc3a28c2f96a7e6de0f74bf77a333540897d388ac4bb90b98d77aeecea86-initdrwx------ 4 root root 72 Oct 16 14:43 00de57d1613d257fcc248939b049ff1c07b8a8b4f4090b6b50a525346631d206drwx------ 4 root root 72 Oct 16 14:45 0b97366575709f23329ca395264df7b0d7e9bf4201c9fd63936b8f88a75f3a21drwx------ 4 root root 72 Oct 16 14:45 14c24de11d235fea4821b7590c10426ee61ca05af9b1c1753957eafc6cb67192
- /var/lib/docker/overlay2中的l目录保存的镜像层的短标识,每个短标识都是一个符号链接
- 最底层的镜像层包含了link文件,diff目录包含了镜像层的内容 ```python [root@blog-xhaihua overlay2]# cat 006f20ff6bc78d97a269b9cd754b7ed37467dc44a98685d8e3c3e6e9be2abc24/link RYNALN6HQ55RBPTXPLXTBZSI4R [root@blog-xhaihua overlay2]# ls 006f20ff6bc78d97a269b9cd754b7ed37467dc44a98685d8e3c3e6e9be2abc24/diff bin etc lib tmp usr var
OverLayFS结构分为三个层: LowerDir,UpperDir,MergedDir- LowerDir(只读): 只读的image layer,其实就是rootfs。在使用dockerfile构建镜像的时候,image layer可以分很多层,所以对应的lowerdir会很多(源镜像 FROM)- Upperdir(读写): upperdir则在lowerdir之上的一层,为读写层。容器在启动的时候会创建,所有容器的修改,都会在这层。- MergedDir(展示层): merged目录是容器的挂载点,在用户视角能够看见的所有文件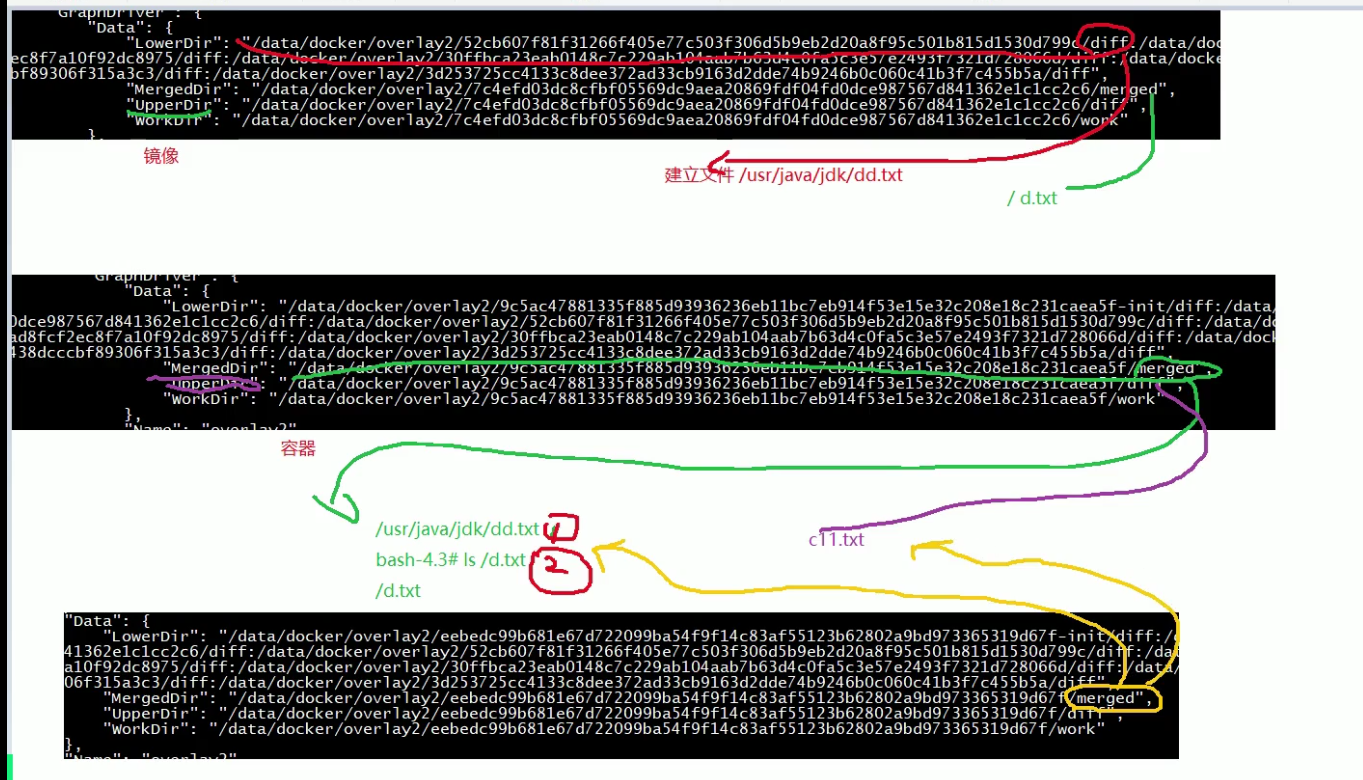<a name="NJVru"></a>### 4) 镜像操作基础命令镜像结构标识: ${register_name}/${reposttory_name}/${image_name}:${tag_name}```shell镜像的结构:${register_name}/${reposttory_name}/${image_name}:${tag_name}例如:docker.io/library/apline:3.10.1#docker.io远程仓库地址#library仓库分类的名称#apline镜像名称#3.10.1版本号 (tag)如何标识一个镜像:1)通过镜像名:tag 例如: ubuntu:16.042) 通过IMAGE ID号[root@blog-server merged]# docker image lsREPOSITORY TAG IMAGE ID CREATED SIZEubuntu 16.04 096efd74bb89 3 weeks ago 127MB
- 列出镜像 ```shell docker images
docker image ls
```shell我们可以使用 docker images 来列出本地主机上的镜像。runoob@runoob:~$ docker imagesREPOSITORY TAG IMAGE ID CREATED SIZEubuntu 14.04 90d5884b1ee0 5 days ago 188 MBphp 5.6 f40e9e0f10c8 9 days ago 444.8 MBnginx latest 6f8d099c3adc 12 days ago 182.7 MBmysql 5.6 f2e8d6c772c0 3 weeks ago 324.6 MBhttpd latest 02ef73cf1bc0 3 weeks ago 194.4 MBubuntu 15.10 4e3b13c8a266 4 weeks ago 136.3 MBhello-world latest 690ed74de00f 6 months ago 960 Btraining/webapp latest 6fae60ef3446 11 months ago 348.8 MB各个选项说明:REPOSITORY:表示镜像的仓库源TAG:镜像的标签IMAGE ID:镜像IDCREATED:镜像创建时间SIZE:镜像大小
拉取镜像
docker pull 拉取镜像 (旧命令)docker image pull 拉取镜像(新命令)
推送镜像
docker push 拉取镜像 (旧命令)docker image push 拉取镜像(新命令)
删除镜像
docker rmi 镜像ID (旧命令)docker image rmi 镜像ID(新命令)
通过修改容器来创建镜像
docker commit [OPTIONS] CONTAINER [REPOSITORY[:TAG]] (旧命令)docker image commit [OPTIONS] CONTAINER [REPOSITORY[:TAG]] (新命令)
构建镜像
docker tag 原镜像 新镜像 (镜像打标,推送到私有镜像仓库)docker build -t ${register_name}/${reposttory_name}/${image_name}:${tag_name} . 基于dockerfile构建镜像
设置镜像标签,我们可以使用 docker tag 命令,为镜像添加一个新的标签。docker tag 860c279d2fec runoob/centos:dev
5)Dockerfile(重点)
**
5.1)dockerignore (类似于gitignore)
.dockerignore 应用于 docker 镜像的构建,它存在于 docker 构建上下文的根目录,用来排除不需要上传到 docker 服务端的文件或目录
好处是:
- 构建镜像时能避免不需要的大文件上传到服务端,从而拖慢构建的速度、网络带宽的消耗;
- 可以避免构建镜像时将一些敏感文件及其他不需要的文件打包到镜像中,从而提高镜像的安全性;
.dockerignore 文件编写方法.dockerignore 文件的写法和 .gitignore 类似,支持正则和通配符,具体规则如下:
- 每行为一个条目;
- 以
#开头的行为注释; - 空行被忽略;
构建上下文路径为所有文件的根路径;
文件匹配规则具体语法如下:
5.2)为什么要使用dockerfile构建镜像
- 抑郁版本化管理,dockerfile本身是一个文本文件,文件可以放到代码仓库做版本管理
- 过程可以追溯,dockerfile的每一行指令代理一个镜像层,根据dockerfile的内容可以明确的查看镜像的完整构建过程
- 屏蔽构建环境,使用dockerfile构建镜像无需考虑构建环境,相同的dockerfile无论在哪里运行,构建结构都一样
5.3) Dockerfile 书写规则
- 单一职责,由于容器的本质就是进程,一个容器代表一个进程,因此不同功能的应用应该尽量拆分成不同容器,每个容器只负责单一业务进程
- 提供注释信息
- 保持容器最小化,避免安装无用的软件包
- 合理的选择基础镜像,容器的运行时运行业务应用,因此只要基础镜像满足应用的运行环境即可
- 尽量使用构建缓存(默认的)
- 正确设置时区 针对Centos系统(RUN ln -sf /usr/share/zoneinfo/Asia/Shanghai /etc/localtime)
- 使用国内软件源加快镜像构建速度
- 最小化镜像层,能合在一起的,就写在一起,比如RUN命令等
5.4) Dockerfile常用的指令
- FROM指令 ( 指定基础镜像,并且必须是第一条指令)
```shell
FROM
FROM
:
FROM :
说明: 其中
- LABEL指令 ( 为镜像指定标签)```shell语法: LABEL <key>=<value> <key>=<value> <key>=<value> ...LABLE maintainer="xionghaihua <xhh_198605@163.com>"LABEL version="1.0"LABEL description="centos base images"
- ENV指令 (设置镜像中的环境变量)
```shell
ENV
一次设置一个环境变量 ENV = ….. 一次可以设置多个(常用)
通过$var使用变量
${var:-word} 如果没有定义var,就使用word作为默认值
- EXPOSE (设置镜像需要暴露的端口,记录容器启动时监听在哪些端口)```shellEXPOSE <port>当容器启动时,Docker daemon会扫描镜像中的暴露端口,如果docker run 加入 -P参数,Docker Daemon会把镜像中的所有暴露端口全部导出,并为每个暴露端口分配一个随机的主机端口,暴露端口就是容器的监听端口,主机的导出端口就是外部访问容器的端口
RUN ( 在镜像里,运行指定的命令)
RUN <command> (常用)RUN ["executable", "param1", "param2"]
第一种: shell方式,使用/bin/sh -c
命令运行脚本
第二种: 通过exec方式,镜像中没有/bin/sh 如 RUN [“/bin/bash”,”-c”,”echo hello”]RUN [ "echo","$HOME"] 不会读取环境变量HOME,如果要调用shell,则必须使用 RUN ["sh","-c","echo","$HOME"]
CMD 和 ENTRYPOINT指令 (容器的启动命令)
Dockerfile中只能由一条CMD命令,如果写了多条CMD指令,那只有最后一条CMD指令生效
生产建议: 使用ENTRYPOINT指令,结合CMD指令,因为更加灵活
CMD/ENTRYPOINT ["command","param"] #exec模式CMD/ENTRYPOINT comand param #shell模式
```shell CMD 和 ENTRYPOINT区别:
如果Dockerfile中使用了ENTRYPOINT指令,启动容器时候,可以使用—entrypoint参数覆盖dockerfile中的entrypoint指令
如果Dockerfile中使用的CMD指令,可以被docker run后面的参数直接覆盖
ENTRYPOINT指令可以结合CMD指令使用,也可以单独使用,而CMD指令只能单独使用
建议: 使用ENTRYPOINT指令,结合CMD指令,因为更加灵活
```shellCMD [ "echo","$HOME"] 不会读取环境变量HOME,如果要调用shell,则必须使用 CMD ["sh","-c","echo","$HOME"]
- ADD (把文件复制到镜像中)
```shell
ADD
… ADD [“ “,… “ “]
src 本地文件、目录 《支持多个》 本地压缩包 (nginx.tar.gz),ADD到镜像里,会自动解压 ,COPY指令则不会 网上的url下载地址,不会自动解压
dest 如果src是多个文件或者目录,dest必须是目录 dest目录是容器内的绝对路径,不必要事先存在
ADD指令必须遵循以下原则:- src必须在编译目录中- src为url地址, dest结尾需要以/结尾- 如果src为目录,则复制目录内所有内容,不复制目录本身- 如果src是压缩文件,会自动解压- 如果src使用通配符,是一个文件列表,然后dest必须以/结尾- 如果dest不存在,则ADD会自动创建dest缺失的上级目录- COPY (把文件复制到镜像)```shellCOPY <src>... <dest>COPY ["<src>",... "<dest>"]当路径中间由空格,需要使用COPY ["<src>",... "<dest>"]
COPY指令必须遵循以下原则:
- src必须在编译目录中
- 如果src为目录,则复制目录内所有内容,不复制目录本身
- 如果src使用通配符,是一个文件列表,然后dest必须以/结尾
如果dest不存在,则COPY会自动创建dest缺失的上级目录
VOLUME (设置容器挂载点) ```shell volume [“/data”] volume /data1 /data2
Docker Daemon会把主机目录挂载到这些挂载点,把容器中的目录共享到宿主机上
- ARG (设置编译变量)```shellARG <name>=<value>编译镜像时,通过 docker build --build-arg <var>=<value> -t 镜像名 .
6)镜像构建案例
6.1) Centos基础镜像
[root@blog-xhaihua centos7]# cat DockerfileFROM centos:7.6.1810MAINTAINER 851628816@qq.com# 设置本地时区RUN ln -sf /usr/share/zoneinfo/Asia/Shanghai /etc/localtime \&& cp /etc/yum.repos.d/CentOS-Base.repo /etc/yum.repos.d/CentOS-Base.repo.bak \&& sed -e 's|^mirrorlist=|#mirrorlist=|g' \-e 's|^#baseurl=http://mirror.centos.org|baseurl=https://mirrors.tuna.tsinghua.edu.cn|g' \-i.bak \/etc/yum.repos.d/CentOS-*.repo \&& yum install epel-release -y \&& sed -e 's!^metalink=!#metalink=!g' \-e 's!^#baseurl=!baseurl=!g' \-e 's!//download\.fedoraproject\.org/pub!//mirrors.tuna.tsinghua.edu.cn!g' \-e 's!http://mirrors\.tuna!https://mirrors.tuna!g' \-i /etc/yum.repos.d/epel.repo /etc/yum.repos.d/epel-testing.repo \&& yum install -y vim wget tree lrzsz gcc gcc-c++ automake pcre pcre-devel zlib zlib-devel openssl openssl-devel iproute net-tools iotop
#!/bin/bashdocker build -t registry.xhaihua.cn/baseimages/centos-base:7.6.1810-v1 .
6.2) ubuntu18.04基础镜像
[root@blog-xhaihua ubuntu1804]# cat DockerfileFROM ubuntu:18.04MAINTAINER xhaihua 851628816@qq.comRUN sed -i s@/archive.ubuntu.com/@/mirrors.aliyun.com/@g /etc/apt/sources.list \&& apt-get update -y \&& apt-get -y install vim wget iproute2 tzdata net-tools iputils-ping \&& echo "Asia/Shanghai" > /etc/timezone \&& rm -f /etc/localtime
#!/bin/bashdocker build -t registry.xhaihua.cn/baseimages/ubuntu:18.04-v1 .
6.3) Java1.8基础镜像 (以centos7和ubuntu18.04)
FROM registry.xhaihua.cn/baseimages/centos-base:7.6.1810-v1MAINTAINER xhaihua 851628816@qq.comRUN cd /usr/local/src \&& wget http://download.51yuki.cn/jdk-8u211-linux-x64.tar.gz \&& tar xf jdk-8u211-linux-x64.tar.gz \&& ln -sv /usr/local/src/jdk1.8.0_211 /usr/local/jdk \&& rm -rf /usr/local/src/jdk-8u211-linux-x64.tar.gz \&& rm -rf /etc/localtime \&& ln -snf /usr/share/zoneinfo/Asia/Shanghai /etc/localtime \&& echo "Asia/Shanghai" > /etc/timezoneRUN yum install kde-l10n-Chinese glibc-common -y \&& localedef -c -f UTF-8 -i zh_CN zh_CN.utf8 \&& echo "export LANG=zh_CN.UTF-8" >> /etc/locale.confENV LC_ALL zh_CN.UTF-8ENV JAVA_HOME /usr/local/jdkENV JRE_HOME $JAVA_HOME/jreENV CLASSPATH $JAVA_HOME/lib/:$JRE_HOME/lib/ENV PATH $PATH:$JAVA_HOME/bin
FROM registry.xhaihua.cn/baseimages/ubuntu:18.04-v1MAINTAINER xhaihua 851628816@qq.comRUN cd /usr/local/src \&& wget http://download.51yuki.cn/jdk-8u211-linux-x64.tar.gz \&& tar xf jdk-8u211-linux-x64.tar.gz \&& ln -sv /usr/local/src/jdk1.8.0_211 /usr/local/jdk \&& rm -rf /usr/local/src/jdk-8u211-linux-x64.tar.gzENV JAVA_HOME /usr/local/jdkENV JRE_HOME $JAVA_HOME/jreENV CLASSPATH $JAVA_HOME/lib/dt.jar:$JAVA_HOME/lib/tools.jar:$JRE_HOME/lib:$CLASSPATHENV PATH $JAVA_HOME/bin:$PATH
#!/bin/bashdocker build -t registry.xhaihua.cn/baseimages/java:1.8.211-v1 .
6.4)python3环境 (基于ubuntu系统)
FROM registry.xhaihua.cn/baseimages/ubuntu:18.04-v1MAINTAINER xhaihua 851628816@qq.comRUN apt-get update \&& apt-get -y install python3 python3-dev python3-pip \&& pip3 install -U numpy matplotlib pandas seaborn scikit-learn \&& ln -sf /usr/share/zoneinfo/Asia/Shanghai /etc/localtime \&& echo "Asia/Shanghai" > /etc/timezone \&& apt-get clean \&& apt-get autoclean \&& rm -rf /var/lib/apt/lists/*ENV LC_ALL C.UTF-8ENV LANG en_US.UTF-8
#!/bin/bashdocker build -t registry.xhaihua.cn/baseimages/python3-v1 .
6.5) tomcat8.5基础镜像(基于Ubuntu系统)
run_tomcat.sh
#!/bin/bashecho "nameserver 114.114.114.114" > /etc/resolv.confsu - tomcat -c "/apps/tomcat/bin/catalina.sh run"
server.xml
<?xml version="1.0" encoding="UTF-8"?><!--Licensed to the Apache Software Foundation (ASF) under one or morecontributor license agreements. See the NOTICE file distributed withthis work for additional information regarding copyright ownership.The ASF licenses this file to You under the Apache License, Version 2.0(the "License"); you may not use this file except in compliance withthe License. You may obtain a copy of the License athttp://www.apache.org/licenses/LICENSE-2.0Unless required by applicable law or agreed to in writing, softwaredistributed under the License is distributed on an "AS IS" BASIS,WITHOUT WARRANTIES OR CONDITIONS OF ANY KIND, either express or implied.See the License for the specific language governing permissions andlimitations under the License.--><!-- Note: A "Server" is not itself a "Container", so you may notdefine subcomponents such as "Valves" at this level.Documentation at /docs/config/server.html--><Server port="8005" shutdown="SHUTDOWN"><Listener className="org.apache.catalina.startup.VersionLoggerListener" /><!-- Security listener. Documentation at /docs/config/listeners.html<Listener className="org.apache.catalina.security.SecurityListener" />--><!--APR library loader. Documentation at /docs/apr.html --><Listener className="org.apache.catalina.core.AprLifecycleListener" SSLEngine="on" /><!-- Prevent memory leaks due to use of particular java/javax APIs--><Listener className="org.apache.catalina.core.JreMemoryLeakPreventionListener" /><Listener className="org.apache.catalina.mbeans.GlobalResourcesLifecycleListener" /><Listener className="org.apache.catalina.core.ThreadLocalLeakPreventionListener" /><!-- Global JNDI resourcesDocumentation at /docs/jndi-resources-howto.html--><GlobalNamingResources><!-- Editable user database that can also be used byUserDatabaseRealm to authenticate users--><Resource name="UserDatabase" auth="Container"type="org.apache.catalina.UserDatabase"description="User database that can be updated and saved"factory="org.apache.catalina.users.MemoryUserDatabaseFactory"pathname="conf/tomcat-users.xml" /></GlobalNamingResources><!-- A "Service" is a collection of one or more "Connectors" that sharea single "Container" Note: A "Service" is not itself a "Container",so you may not define subcomponents such as "Valves" at this level.Documentation at /docs/config/service.html--><Service name="Catalina"><!--The connectors can use a shared executor, you can define one or more named thread pools--><!--<Executor name="tomcatThreadPool" namePrefix="catalina-exec-"maxThreads="150" minSpareThreads="4"/>--><!-- A "Connector" represents an endpoint by which requests are receivedand responses are returned. Documentation at :Java HTTP Connector: /docs/config/http.htmlJava AJP Connector: /docs/config/ajp.htmlAPR (HTTP/AJP) Connector: /docs/apr.htmlDefine a non-SSL/TLS HTTP/1.1 Connector on port 8080--><Connector port="8080" protocol="HTTP/1.1"connectionTimeout="20000"redirectPort="8443" /><!-- A "Connector" using the shared thread pool--><!--<Connector executor="tomcatThreadPool"port="8080" protocol="HTTP/1.1"connectionTimeout="20000"redirectPort="8443" />--><!-- Define a SSL/TLS HTTP/1.1 Connector on port 8443This connector uses the NIO implementation. The defaultSSLImplementation will depend on the presence of the APR/nativelibrary and the useOpenSSL attribute of theAprLifecycleListener.Either JSSE or OpenSSL style configuration may be used regardless ofthe SSLImplementation selected. JSSE style configuration is used below.--><!--<Connector port="8443" protocol="org.apache.coyote.http11.Http11NioProtocol"maxThreads="150" SSLEnabled="true"><SSLHostConfig><Certificate certificateKeystoreFile="conf/localhost-rsa.jks"type="RSA" /></SSLHostConfig></Connector>--><!-- Define a SSL/TLS HTTP/1.1 Connector on port 8443 with HTTP/2This connector uses the APR/native implementation which always usesOpenSSL for TLS.Either JSSE or OpenSSL style configuration may be used. OpenSSL styleconfiguration is used below.--><!--<Connector port="8443" protocol="org.apache.coyote.http11.Http11AprProtocol"maxThreads="150" SSLEnabled="true" ><UpgradeProtocol className="org.apache.coyote.http2.Http2Protocol" /><SSLHostConfig><Certificate certificateKeyFile="conf/localhost-rsa-key.pem"certificateFile="conf/localhost-rsa-cert.pem"certificateChainFile="conf/localhost-rsa-chain.pem"type="RSA" /></SSLHostConfig></Connector>--><!-- Define an AJP 1.3 Connector on port 8009 --><Connector port="8009" protocol="AJP/1.3" redirectPort="8443" /><!-- An Engine represents the entry point (within Catalina) that processesevery request. The Engine implementation for Tomcat stand aloneanalyzes the HTTP headers included with the request, and passes themon to the appropriate Host (virtual host).Documentation at /docs/config/engine.html --><!-- You should set jvmRoute to support load-balancing via AJP ie :<Engine name="Catalina" defaultHost="localhost" jvmRoute="jvm1">--><Engine name="Catalina" defaultHost="localhost"><!--For clustering, please take a look at documentation at:/docs/cluster-howto.html (simple how to)/docs/config/cluster.html (reference documentation) --><!--<Cluster className="org.apache.catalina.ha.tcp.SimpleTcpCluster"/>--><!-- Use the LockOutRealm to prevent attempts to guess user passwordsvia a brute-force attack --><Realm className="org.apache.catalina.realm.LockOutRealm"><!-- This Realm uses the UserDatabase configured in the global JNDIresources under the key "UserDatabase". Any editsthat are performed against this UserDatabase are immediatelyavailable for use by the Realm. --><Realm className="org.apache.catalina.realm.UserDatabaseRealm"resourceName="UserDatabase"/></Realm><Host name="localhost" appBase="/data/tomcat/webapps" unpackWARs="true" autoDeploy="true"><!-- SingleSignOn valve, share authentication between web applicationsDocumentation at: /docs/config/valve.html --><!--<Valve className="org.apache.catalina.authenticator.SingleSignOn" />--><!-- Access log processes all example.Documentation at: /docs/config/valve.htmlNote: The pattern used is equivalent to using pattern="common" --><Valve className="org.apache.catalina.valves.AccessLogValve" directory="logs"prefix="localhost_access_log" suffix=".txt"pattern="%h %l %u %t "%r" %s %b" /></Host></Engine></Service></Server>
FROM registry.xhaihua.cn/baseimages/ubuntu:18.04-v1MAINTAINER xhaihua 851628816@qq.comRUN mkdir /apps && wget https://mirrors.bfsu.edu.cn/apache/tomcat/tomcat-8/v8.5.63/bin/apache-tomcat-8.5.63.tar.gz \&& tar xf apache-tomcat-8.5.63.tar.gz -C /apps \&& rm -rf apache-tomcat-8.5.63.tar.gz \&& ln -sv /apps/apache-tomcat-8.5.33 /apps/tomcat \&& mkdir -p /data/tomcat/webapps/webroot \&& useradd tomcat -u 1001ADD run_tomcat.sh /apps/tomcat/bin/run_tomcat.shADD server.xml /apps/tomcat/conf/server.xmlRUN chown -R tomcat.tomcat /apps/tomcat /data/tomcat/webapps
#!/bin/bashdocker build -t registry.xhaihua.cn/baseimages/tomcat:8.5-v1 .
6.6) nginx基础镜像

若有收获,就点个赞吧
0 人点赞
