order: 1 title: 教程
toc: content
教程
FormRender 是一个 Schema 驱动的表单组件。只需要传入一个包含各种描述信息的 Schema,就能渲染出一个完整的表单。
我们从两个 FormRender 的必填属性:schema 和 form 开始学习 FormRender。前者用来描述表单,FormRender 根据其提供的信息渲染一个表单出来,是 FormRender 的核心。后者用来操作表单,比如提交,更改表单数据,状态等。只要熟练掌握这两个参数,就能满足大多数使用场景了。
TIP:在学习的过程中,随时进入 PlayGround,巩固练习。
Schema
通常情况下,schema 是一个 js 对象,一个简单的 schema 的结构如下。
const schema = {type: 'object', // schema 顶层的 type 总是 objectproperties: { // properties 中存放所有的表单元素address: { // address 将成为表单提交时,此项数据的 key,相当于 antd Form 中的 nametitle: '地址', // 此表单项的 labeltype: 'string', // 此表单项的数据类型是 stringplaceholder: '请输入您的地址', // 输入框的 placeholderrequired: true, // 此表单项是必填项},},};
只要将这个 schema 和另一个必传参数,表单实例,form 传入 FormRender,就能得到一个简单的表单。
/*** transform: true* defaultShowCode: true*/import React from 'react';import FormRender, { useForm } from 'form-render';const schema = {type: 'object',properties: {address: {title: '地址',type: 'string',placeholder: '请输入您的地址',required: true,},},};const Demo = () => {const form = useForm();return (<FormRender schema={schema} form={form} />);};export default Demo;
我们可以按照这个格式添加更多的表单项,比如我们添加“日期”和“地区”这两个新的表单项。
/*** transform: true* defaultShowCode: true*/import React from 'react';import FormRender, { useForm } from 'form-render';const schema = {type: 'object',properties: {address: {title: '地址',type: 'string',placeholder: '请输入您的地址',required: true,},// 添加日期选项date: {title: '日期',// range 代表当前项的数据是一个数据,且长度为2type: 'range',// format 代表当前项的格式,这里设置为 date,即日期format: 'date',placeholder: ['请选择开始日期', '请选择结束日期'],},// 添加地区选项location: {title: '地区',type: 'string',// enum 和 enumNames 代表此项有多个选项enum: ['0', '1'],enumNames: ['国内', '国外']},},};const Demo = () => {const form = useForm();return (<FormRender schema={schema} form={form} />);};export default Demo;
可以看到,schema 的结构非常简洁明了,只需要填写少量的配置信息就可以渲染出一个完整的表单。FormRender 会根据你提供的信息自动选择合适的组件去渲染。
你可以在 API 中找到所有的配置项。
除了让 FormRender 自动匹配所需的组件外,你还可以通过 widget 字段手动指定渲染使用的组件。比如我们可以添加 widget: 'select' 将之前地区的单选组件变为下拉选择。FormRender 有丰富的 内置组件 可供使用,你可以按需要选择合适的内置组件。如果内置组件不能满足需求,可以使用 自定义组件。
const schema = {// ...location: {title: '地区',type: 'string',enum: ['0', '1'],enumNames: ['国内', '国外'],// FormRender 会强制使用 select 组件去渲染这个表单项,而不是刚才的 radio 组件widget: 'select',},}
Form
FormRender 使用 useForm,管理表单状态。你必须将 useForm 返回的 form 实例传入 FormRender。
如果想提交刚才创建的表单,我们只需要在合适的位置调用 form.submit() 这个方法。FormRender 会主动校验表单,触发 onFinish 回调,并传入表单数据。
import React from 'react';import { Button } from 'antd';import FormRender, { useForm } from 'form-render';const schema = {type: 'object',properties: {address: {title: '地址',type: 'string',placeholder: '请输入您的地址',required: true,},date: {title: '日期',type: 'range',format: 'date',placeholder: ['请选择开始日期', '请选择结束日期'],},location: {title: '地区',type: 'string',enum: ['0', '1'],enumNames: ['国内', '国外'],widget: 'select',},},};const Demo = () => {const form = useForm();const onFinish = (formData) => {console.log('formData', formData);}return (<><FormRender schema={schema} form={form} onFinish={onFinish} /><Button onClick={form.submit} type="primary">提交</Button></>);};export default Demo;
除了提交外,另一个比较常见的需求是表单数据的回填,FormRender 提供的 form.setValues 可以很方便的设置表单数据。
import React from 'react';import { Button } from 'antd';import FormRender, { useForm } from 'form-render';const schema = {type: 'object',properties: {address: {title: '地址',type: 'string',placeholder: '请输入您的地址',required: true,},date: {title: '日期',type: 'range',format: 'date',placeholder: ['请选择开始日期', '请选择结束日期'],},location: {title: '地区',type: 'string',enum: ['0', '1'],enumNames: ['国内', '国外'],widget: 'select',},},};const Demo = () => {const form = useForm();React.useEffect(() => {form.setValues({address: '地址',date: ['2022-12-31', '2022-12-31'],location: '0'})}, [])const onFinish = (formData) => {console.log('formData', formData);}return (<><FormRender schema={schema} form={form} onFinish={onFinish} /><Button onClick={form.submit} type="primary">提交</Button></>);};export default Demo;
速写 Schema
对于初学者来说记住 schema 所有的字段和使用方式并非易事。为了让大家能够快速上手,建议以以下的顺序尝试。
- 去 Playground 逛逛,那里有从基础玩法、高级功能到完整样例的所有 schema 样例。
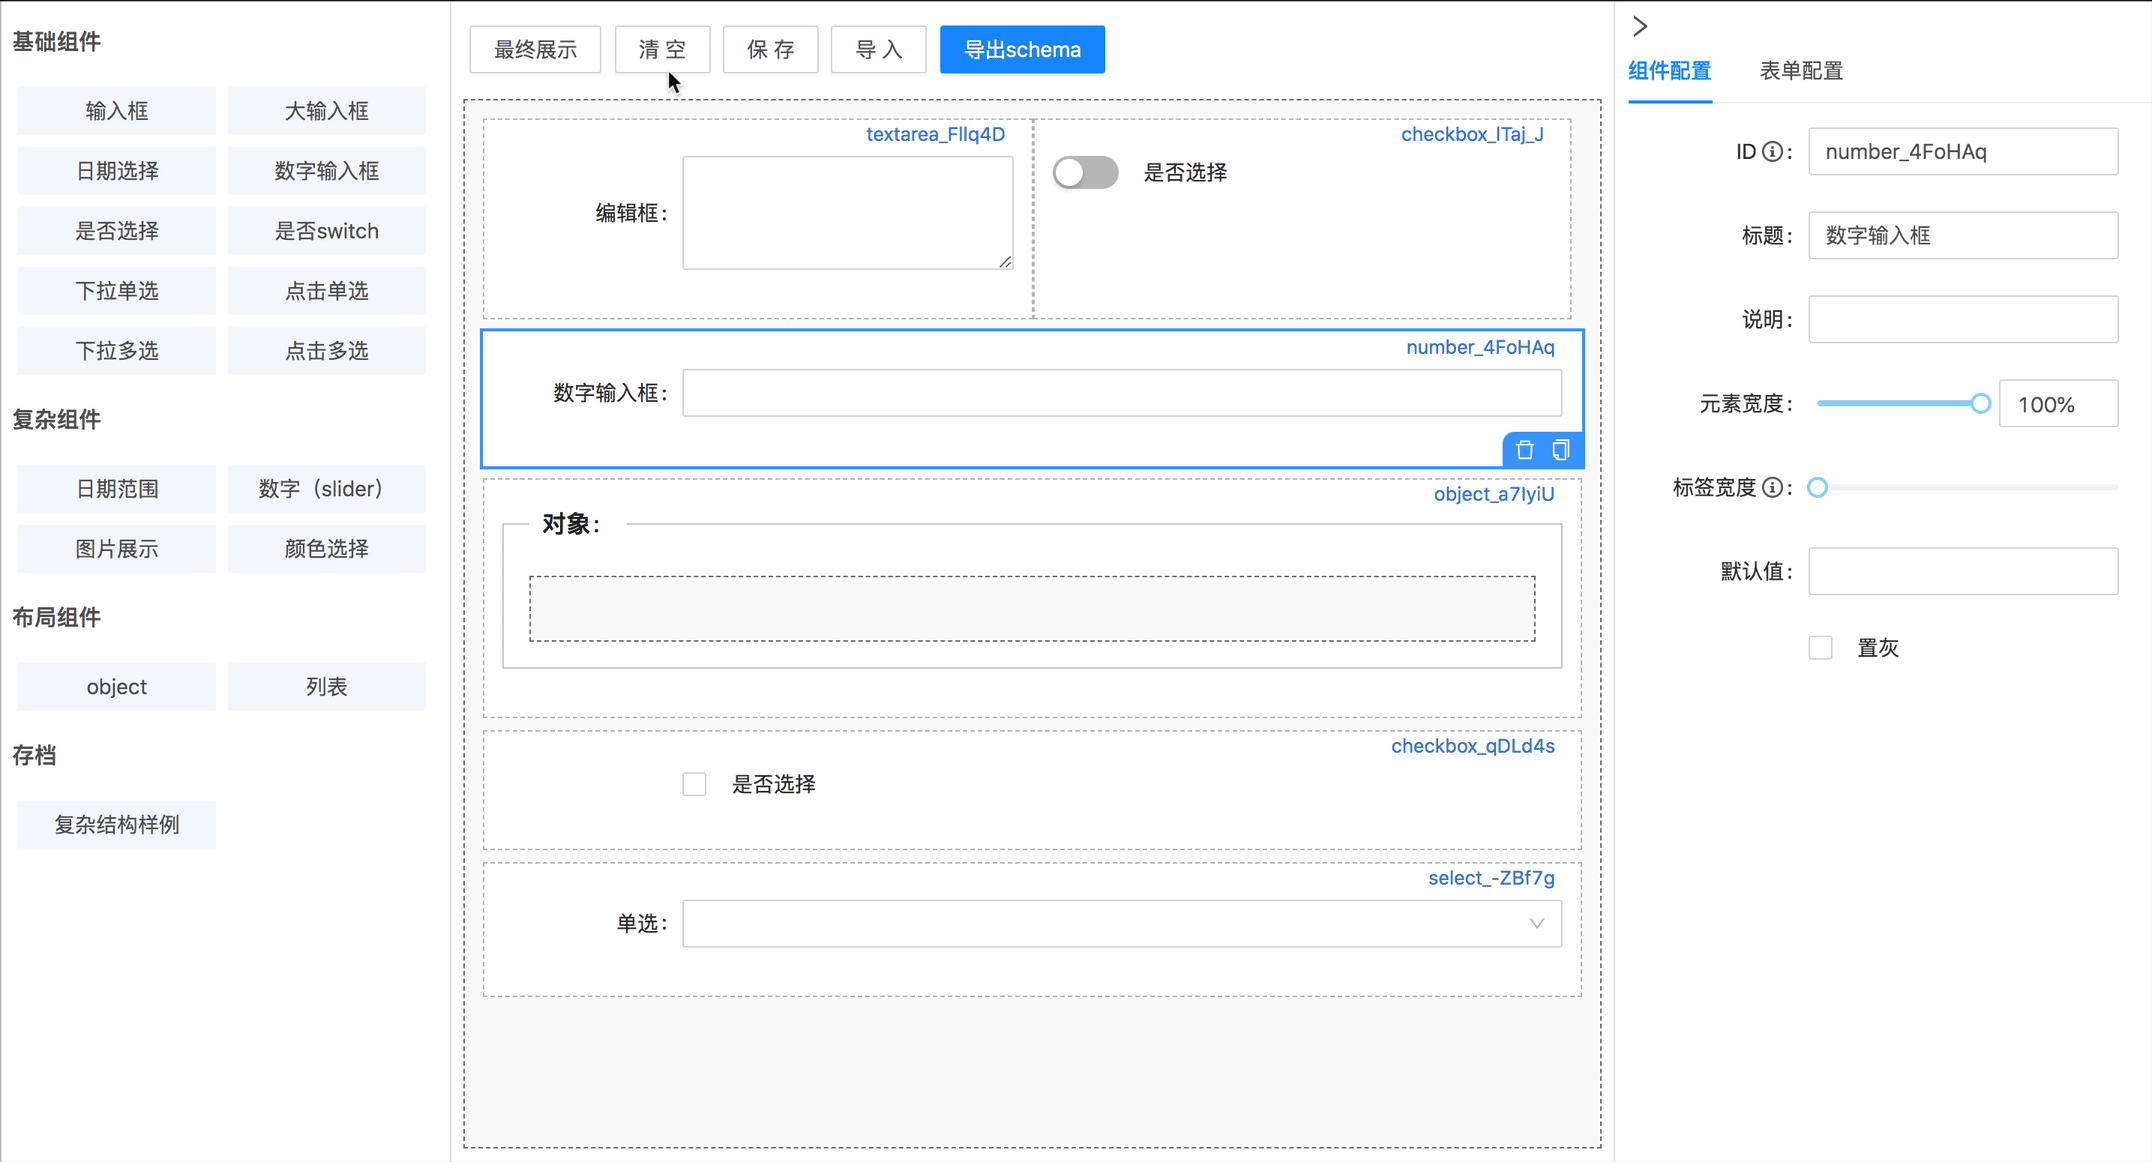
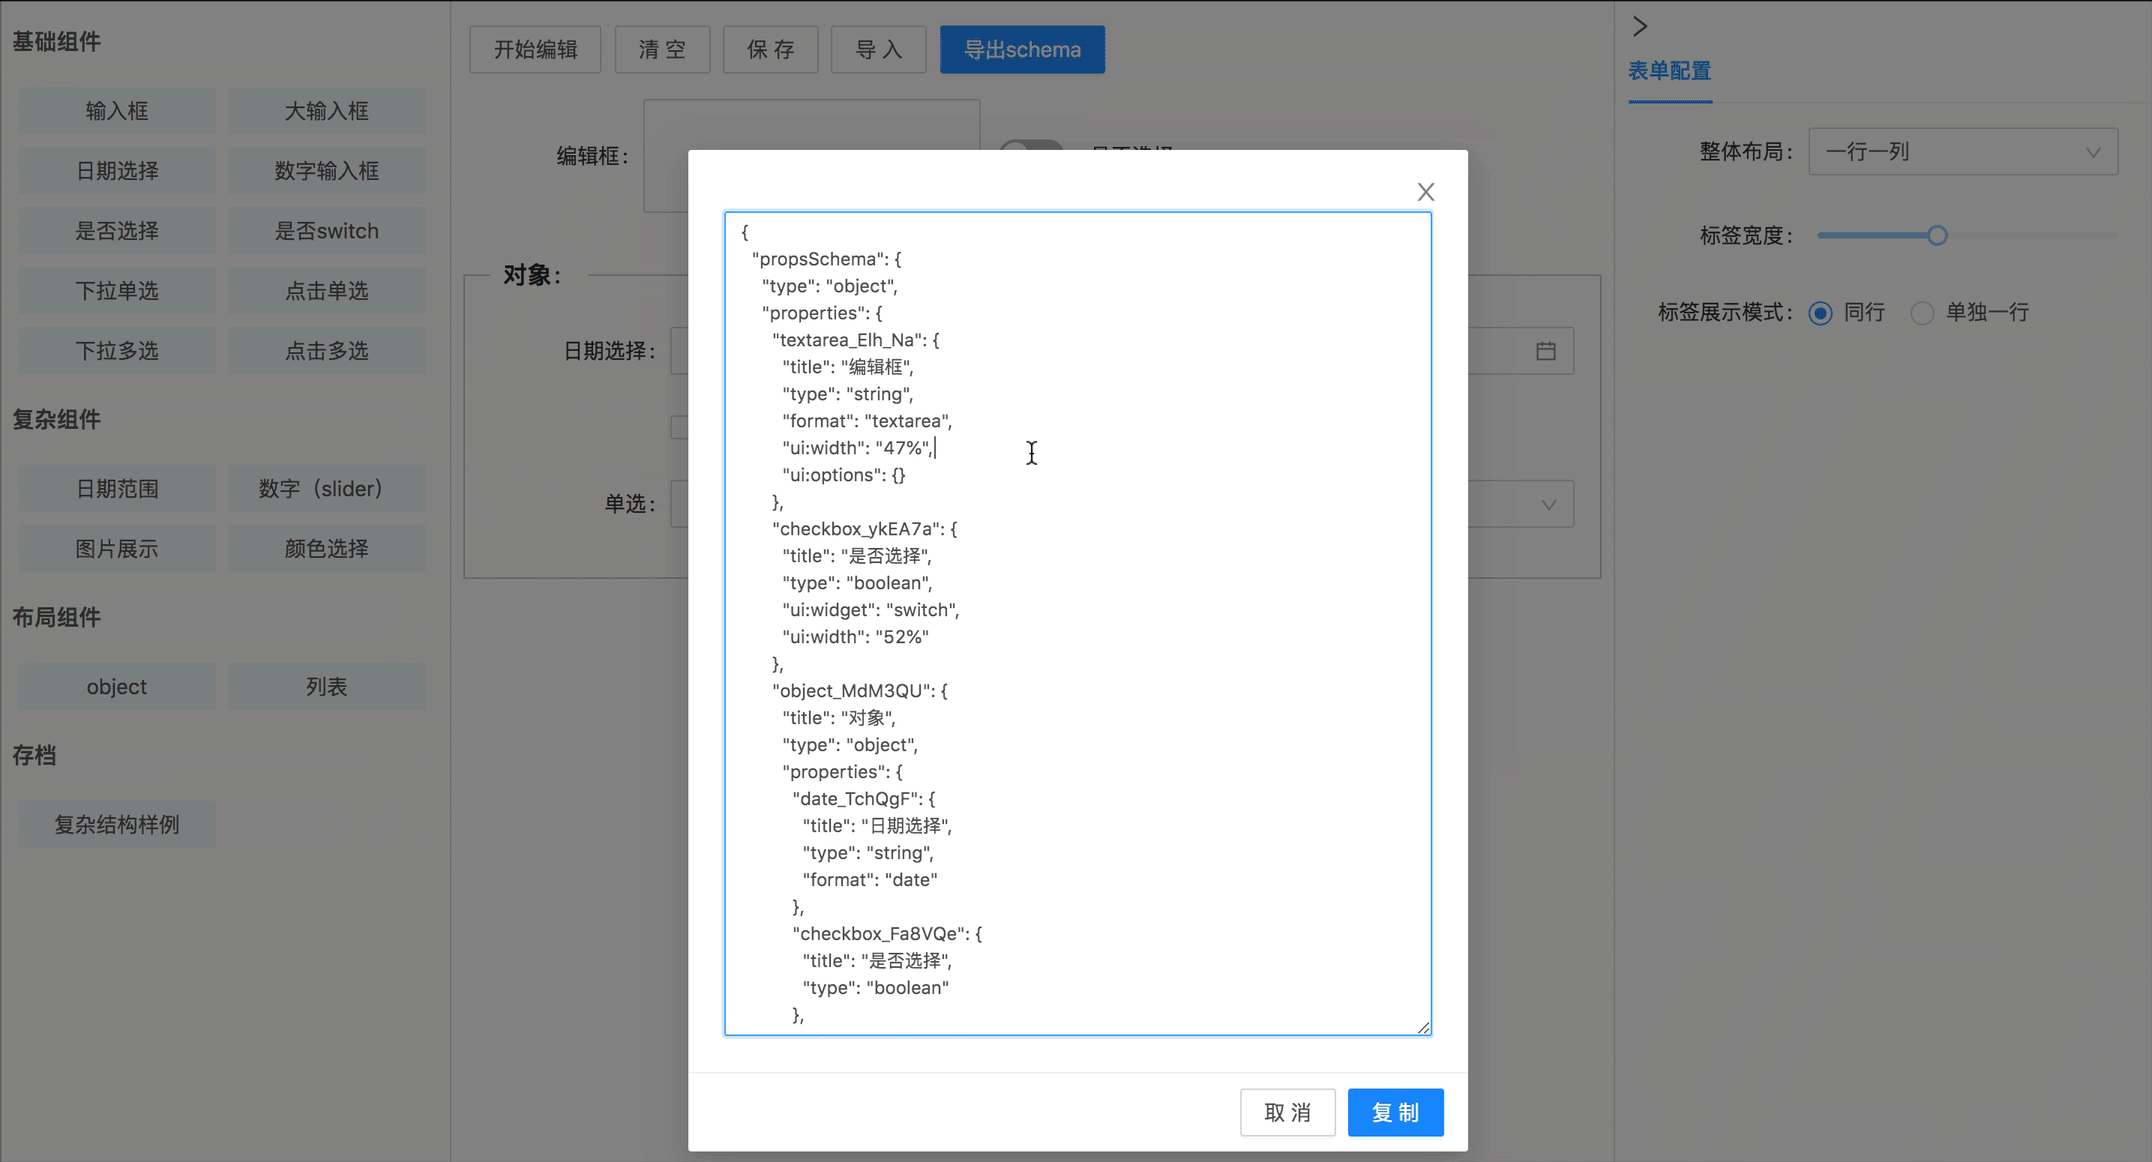
玩转一下 表单设计器,拖拖拽拽导出 schema,丢到代码里生成可用表单。本质上这是一个可视化的表单生成器,支持 schema 的导入 & 导出。
详细的 schema 规范见 schema 的 文档。同时在 vscode 上搜索
formrender可以找到 snippets 插件,手熟起来一整页表单的 schema 弹指间完成。

若有收获,就点个赞吧
0 人点赞
