项目梳理
文件目录
项目根目录结构
├── PROXY.md
├── README.md # 说明文档
├── cache.dockerfile
├── commitlint.config.js # commintlint 规范
├── docker # docker 部署配置文件
│ └── nginx.conf # 若开启 browerhistroy 可参考配置
├── docs
├── globals.d.ts
├── index.html # 主 html 文件
├── jsx.d.ts
├── mock # mock 目录
│ └── index.ts
├── node_modules # 项目依赖
├── package-lock.json
├── package.json
├── public
│ └── favicon.ico
├── shims-vue.d.ts
├── src # 页面代码
├── tsconfig.json
└── vite.config.js # vite 配置文件
src目录如下
├─assets #图片资源,svg图标等
├─components #公共组件库
├─config #全局配置文件,颜色、请求代理、样式、全局变量
├─constants #全局静态配置文件,表单
├─hooks
├─layouts #布局,头部、尾部、内容、菜单、面包屑、全局通知、搜索、设置
├─pages
├─router #路由表
│ └─modules
├─service #网络请求封装 request,原先在util中,现统一
│ └─api #所有api封装
├─store #vuex
│ └─modules
├─style #全局样式
│ └─theme #主题包
└─utils #全局工具类
菜单生成
layouts/components/MenuContent.ts的useRenderNav方法加入以下逻辑
// 对于meta中hide的路由不生成菜单if (item.meta.hide) {return undefined;}
路由配置
- meta.hide 隐藏菜单,需改写useRenderNav逻辑,如上
- meta.single 只显示一级菜单
- 动态路由目前只支持2级,所以更深的配置到同级加上冗余的路径名,配置如下:
{path: '/project',name: 'project',meta: { title: '项目', icon: 'server' },component: Layout,children: [{path: 'manage',name: 'projectManage',component: () => import('@/pages/project/manage/index.vue'),meta: { title: '项目管理' },},{path: 'add',name: 'projectAdd',component: () => import('@/pages/project/add/index.vue'),meta: { title: '新建项目', hide: true },},{path: ':projectId',name: 'projectShow',component: () => import('@/pages/project/show/index.vue'),meta: { title: '查看项目', hide: true },},{path: ':projectId/floor/:floorId',name: 'floorShow',component: () => import('@/pages/floor/show/index.vue'),meta: { title: '查看楼层', hide: true },},{path: ':projectId/floor/add',name: 'floorAdd',component: () => import('@/pages/floor/add/index.vue'),meta: { title: '增加楼层', hide: true },},],},
网络请求封装
原项目在utils目录下,现service/request.ts
提供基础的get/post/upload方法,主要看HTTP接口中的泛型使用(83行),配合api的index中方法传入该泛型(定义在types中)
import axios, { AxiosRequestConfig, AxiosResponse } from 'axios';import { MessagePlugin } from 'tdesign-vue-next';import qs from 'qs';import proxy from '../config/proxy';import { TOKEN_NAME } from '@/config/global';import { showMessage } from './status';const env = import.meta.env.MODE || 'development';const host = env === 'mock' ? '/' : proxy[env].host; // 如果是mock模式 就不配置host 会走本地Mock拦截const instance = axios.create({baseURL: host,timeout: 20000,// withCredentials: true,});const reqMethods = ['get', 'head'];instance.interceptors.request.use((config: AxiosRequestConfig) => {const token = localStorage.getItem(TOKEN_NAME);if (token) {config.headers[TOKEN_NAME] = `Bearer ${token}`;}// 数组参数序列化if (reqMethods.includes(config.method)) {// eslint-disable-next-line func-namesconfig.paramsSerializer = function (params) {return qs.stringify(params, { arrayFormat: 'repeat' });};}return config;});instance.defaults.timeout = 5000;instance.interceptors.response.use((response: AxiosResponse) => {const token = response.headers.authorization;if (token) {localStorage.setItem(TOKEN_NAME, token);}if (response.status !== 200) {showMessage(response.status);}return response;},(err) => {// 错误提示const { response } = err;if (response) {const {data: { message },} = response;if (message) {MessagePlugin.error(message);} else {showMessage(response.status);}} else {MessagePlugin.error('网络连接异常,请稍后再试');}const { config } = err;if (!config || !config.retry) return Promise.reject(err);config.retryCount = config.retryCount || 0;if (config.retryCount >= config.retry) {return Promise.reject(err);}config.retryCount += 1;const backoff = new Promise((resolve) => {setTimeout(() => {resolve(null);}, config.retryDelay || 1);});return backoff.then(() => instance(config));},);// 封装常用请求,这里是重点泛型T由封装api的方法传入interface Http {get<T>(url: string, params?: unknown): Promise<T>;post<T>(url: string, params?: unknown): Promise<T>;upload<T>(url: string, params: unknown): Promise<T>;download(url: string): void;}const http: Http = {get(url, params) {return instance({url,method: 'get',params,}).then((res) => res.data).catch((err) => err.data);},post(url, data) {return instance({url,method: 'post',data,}).then((res) => res.data).catch((err) => err.data);},upload(url, data, params = {}) {return instance({url,method: 'post',params,headers: {// 'content-type': 'text/csv''content-type': 'multipart/form-data',},data,}).then((res) => res.data).catch((err) => err.data);},download(url) {const iframe = document.createElement('iframe');iframe.style.display = 'none';iframe.src = url;// eslint-disable-next-line func-namesiframe.onload = function () {document.body.removeChild(iframe);};document.body.appendChild(iframe);},};export default instance;export { http };
api封装
index 请求方法
import { USER_ID } from '@/config/global';import { http } from '@/service/request';import { ILoginData, IUserInfo } from './types';const base = '/armory/barrack/v1';const api = {login: '/users/login',userInfo: '/users',};const baseParam = {domain: 'xxx',};// 登录export function login(params): Promise<ILoginData> {return http.post<ILoginData>(base + api.login, { ...baseParam, ...params });}// 获取用户信息export function getInfo(): Promise<IUserInfo[]> {const userId = localStorage.getItem(USER_ID);const url = `${base + api.userInfo}/${Number(userId)}`;return http.get<IUserInfo[]>(url, { ...baseParam });}
types 数据接口定义
export interface ILoginData {token: string;userId: string;userName: string;}interface Role {id: string;name: string;code: string;}export interface IUserInfo {id: number;name: string;domain: string;createTime: string;updateTime: string;loginType: string;role: Role;state: string;}
权限管理
根目录下的permission.ts配合store/modules/user.ts
主要改写user中的login、getUserInfo方法,即可实现自己的权限逻辑,配合token和roles判断
改写roles获取不同角色的路由生成菜单
大致登录过程如下: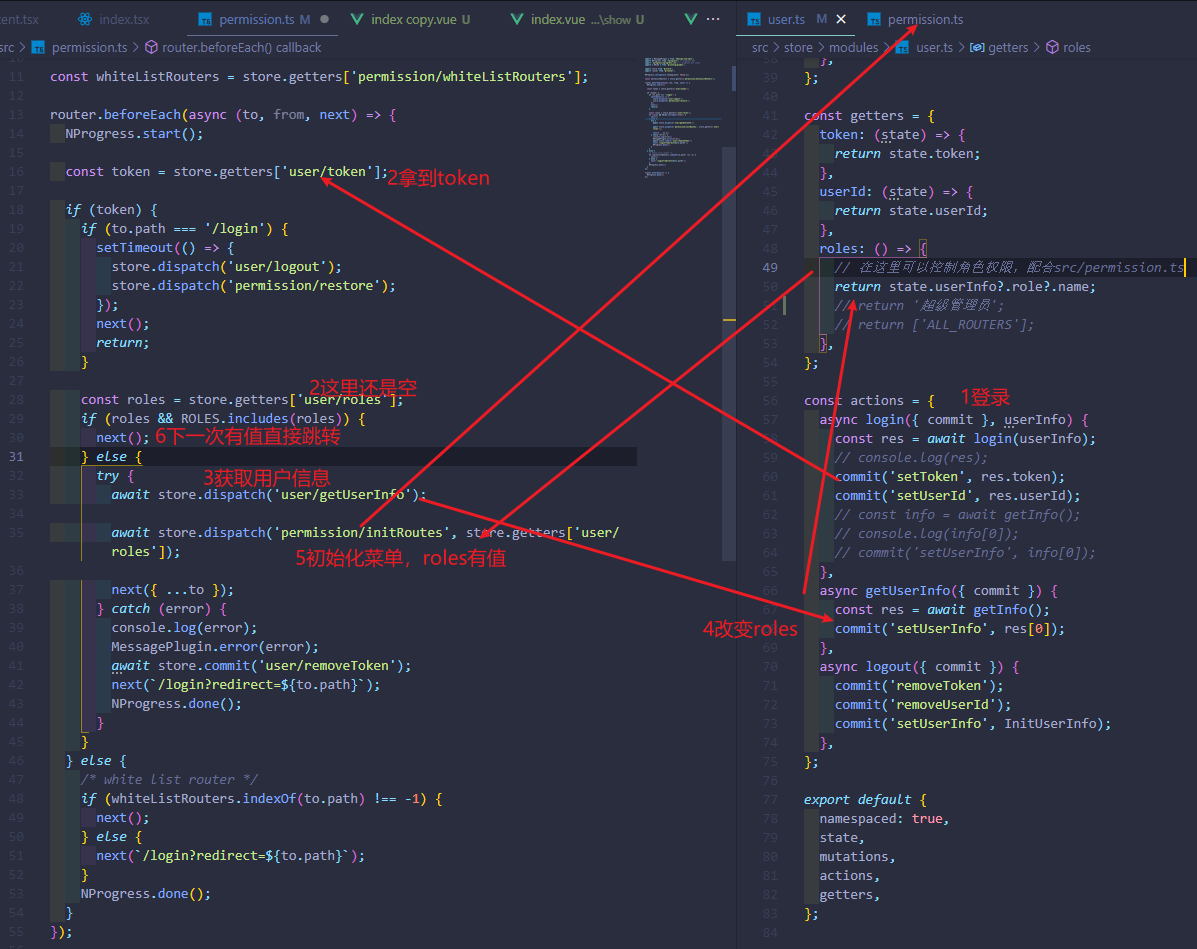
开发避坑
vue-router页面回退不显示
如果路由页面没有指定根标签,那么在路由返回时(go(-1),history.back()等),找不到可替换的标签,页面无法正常加载,vue3支持不设置根标签带来的影响
故在编写路由页面时必须指定根标签,组件页面可不受此约束

若有收获,就点个赞吧
0 人点赞
