Spring的概述
什么是Spring
Spring是分层的、JavaEE一站式(full-stack)、轻量级开源框架。
JavaEE分层
JavaEE规范的三层结构体系:
表现层(页面数据显示、页面跳转调度),例如jsp/servlet、springMVC
业务层(业务处理和功能逻辑、事务控制),例如service
持久层(数据存取和封装、和数据库打交道),例如dao
如图: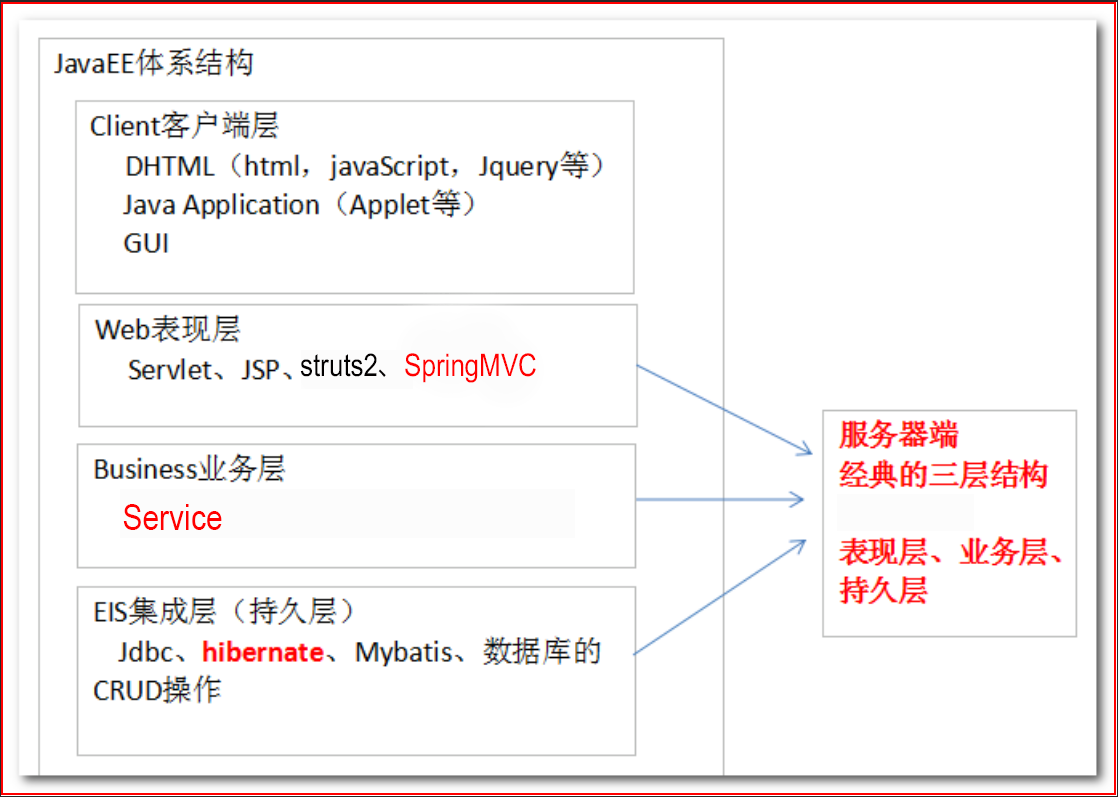
mvc设计模式如图: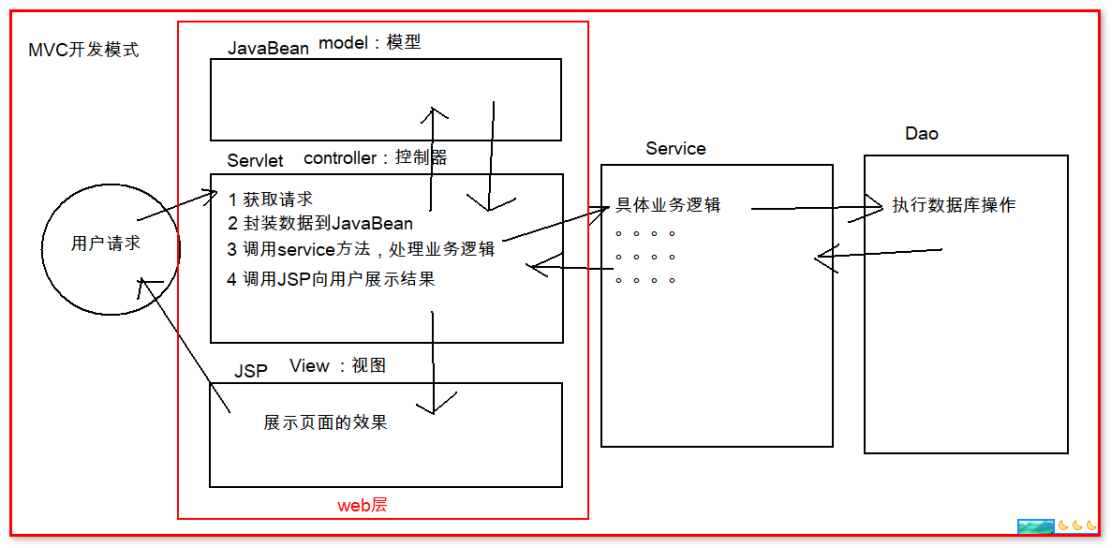
一站式
Spring提供了JavaEE各层的解决方案:
表现层:Spring MVC
业务层:Ioc、AOP、事务控制
持久层:JdbcTemplate、HibernateTemplate、Mybatis、ORM框架(对象关系映射)整合
轻量级:Spring的出现取代了EJB的臃肿、低效、繁琐复杂、脱离现实。

Spring的体系结构
Spring框架是一个分层架构,它包含一系列的功能要素并被分为大于20个模块。这些模块分为Core Container、Data Access/Integration、Web、AOP(Aspect Oriented Programming)、Instrumentation和测试部分,如图: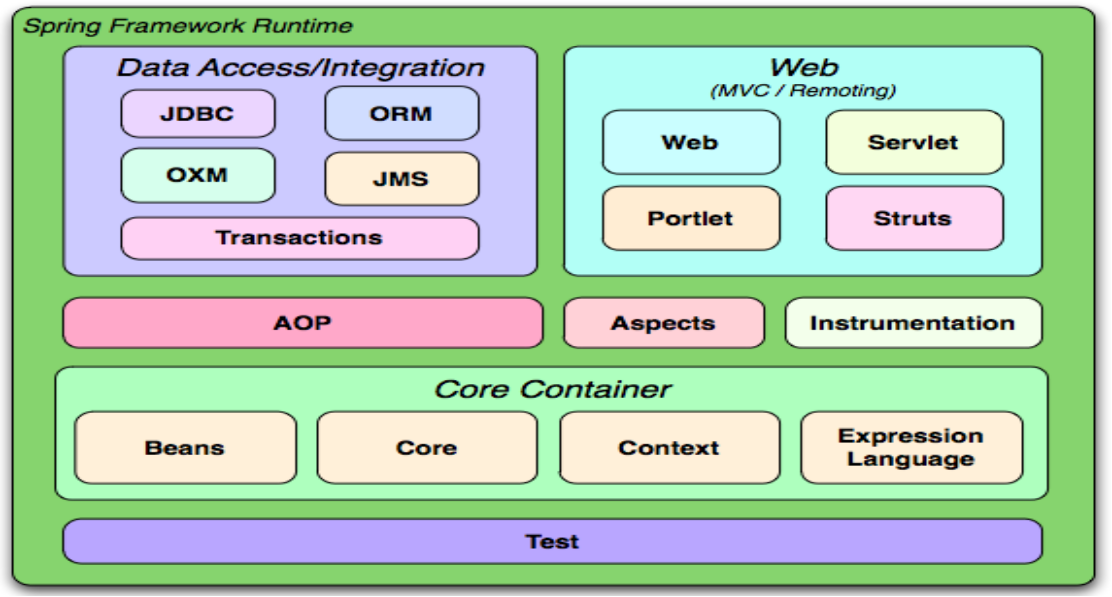
核心容器(Core Container)包括Core、Beans、Context、EL模块。
- Core和Beans模块提供了Spring最基础的功能,提供IoC和依赖注入特性。这里的基础概念是BeanFactory,它提供对Factory模式的经典实现来消除对程序性单例模式的需要,并真正地允许你从程序逻辑中分离出依赖关系和配置。
- Context模块基于Core和Beans来构建,它提供了用一种框架风格的方式来访问对象,有些像JNDI注册表。Context封装包继承了beans包的功能,还增加了国际化(I18N),事件传播,资源装载,以及透明创建上下文,例如通过servlet容器,以及对大量JavaEE特性的支持,如EJB、JMX。核心接口是ApplicationContext。
- Expression Language,表达式语言模块,提供了在运行期间查询和操作对象图的强大能力。支持访问和修改属性值,方法调用,支持访问及修改数组、容器和索引器,命名变量,支持算数和逻辑运算,支持从Spring 容器获取Bean,它也支持列表投影、选择和一般的列表聚合等。
数据访问/集成部分(Data Access/Integration)
- JDBC模块,提供对JDBC的抽象,它可消除冗长的JDBC编码和解析数据库厂商特有的错误代码。
- ORM模块,提供了常用的”对象/关系”映射APIs的集成层。 其中包括JPA、JDO、Hibernate 和 iBatis 。利用ORM封装包,可以混合使用所有Spring提供的特性进行”对象/关系”映射,如简单声明性 事务管理 。
- OXM模块,提供一个支持Object和XML进行映射的抽象层,其中包括JAXB、Castor、XMLBeans、JiBX和XStream。
- JMS模块,提供一套”消息生产者、消费者”模板用于更加简单的使用JMS,JMS用于用于在两个应用程序之间,或分布式系统中发送消息,进行异步通信。
- Transaction模块,支持程序通过简单声明性 事务管理,只要是Spring管理对象都能得到Spring管理事务的好处,即使是POJO,也可以为他们提供事务。
Web
- Web模块,提供了基础的web功能。例如多文件上传、集成IoC容器、远程过程访问、以及Web Service支持,并提供一个RestTemplate类来提供方便的Restful services访问
- Web-Servlet模块,提供了Web应用的Model-View-Controller(MVC)实现。Spring MVC框架提供了基于注解的请求资源注入、更简单的数据绑定、数据验证等及一套非常易用的JSP标签,完全无缝与Spring其他技术协作。
- Web-Struts模块, 提供了对Struts集成的支持,这个功能在Spring3.0里面已经不推荐了,建议你迁移应用到使用Struts2.0或Spring的MVC。
- Web-Portlet模块,提供了在Portlet环境下的MVC实现
AOP
- AOP模块,提供了符合AOP 联盟规范的面向方面的编程实现,让你可以定义如方法拦截器和切入点,从逻辑上讲,可以减弱代码的功能耦合,清晰的被分离开。而且,利用源码级的元数据功能,还可以将各种行为信息合并到你的代码中 。
- Aspects模块,提供了对AspectJ的集成。
- Instrumentation模块, 提供一些类级的工具支持和ClassLoader级的实现,可以在一些特定的应用服务器中使用。
Test
- Test模块,提供对使用JUnit和TestNG来测试Spring组件的支持,它提供一致的ApplicationContexts并缓存这些上下文,它还能提供一些mock对象,使得你可以独立的测试代码。
Spring的核心
IoC(Inverse of Control 控制反转): 将对象创建权利交给Spring工厂进行管理。
AOP(Aspect Oriented Programming 面向切面编程),不修改源代码进行功能增强。
百度百科:Spring 是基于IOC和AOP的一套编程框架。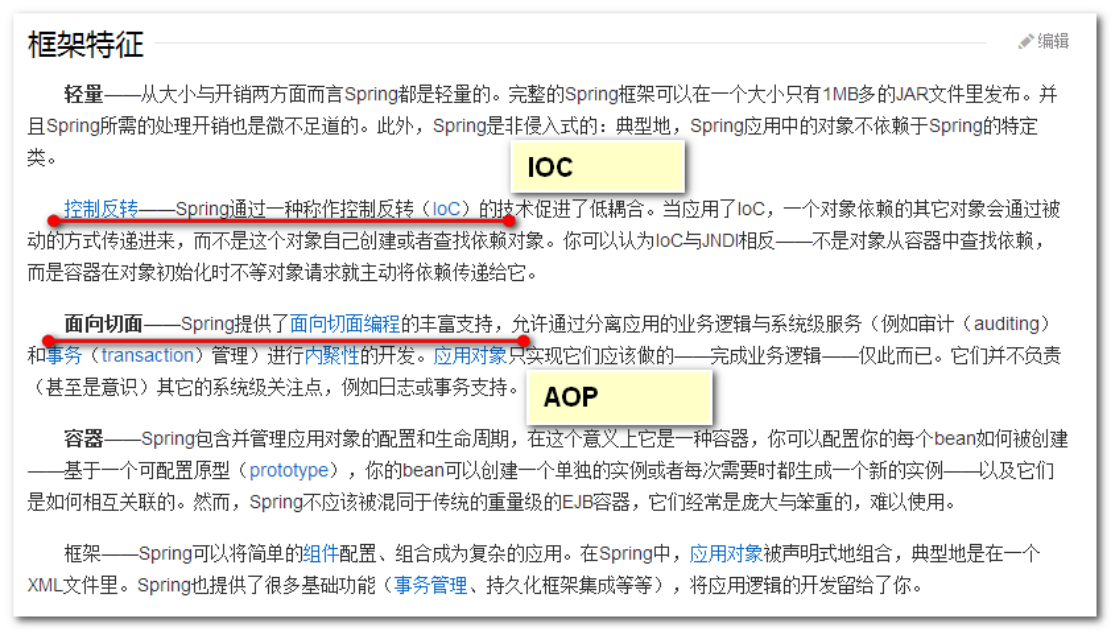
Spring的优点
Spring 出现是为了解决企业应用开发的复杂性
- 方便解耦,简化开发
Spring就是一个大工厂,可以将所有对象创建和依赖关系维护,交给Spring管理
- AOP编程的支持
Spring提供面向切面编程,可以方便的实现对程序进行权限拦截、运行监控等功能
- 声明式事务的支持
只需要通过配置就可以完成对事务的管理,而无需手动编程
- 方便程序的测试
Spring对Junit4支持,可以通过注解方便的测试Spring程序
- 方便集成各种优秀框架
Spring不排斥各种优秀的开源框架,其内部提供了对各种优秀框架(如:Struts、Hibernate、MyBatis、Quartz、 webservice、activity等)的直接支持
- 降低JavaEE API的使用难度
Spring 对JavaEE开发中非常难用的一些API(JDBC、JavaMail、远程调用等),都提供了封装,使这些API应用难度 大大降低
关于框架的特性,我们也会俗称Spring为开发架构的粘合剂。
Spring IoC快速入门
Spring核心内容的基本开发步骤:
- 下载spring jar包并导入项目,或者基于Maven新建项目(推荐)
- 编写代码(基础代码和调用代码)
- 编写配置文件(XML)
- 测试
Spring的开发包
Spring官方:http://spring.io/
下载网址:http://repo.spring.io/libs-release-local/org/springframework/spring/
官方最新版本: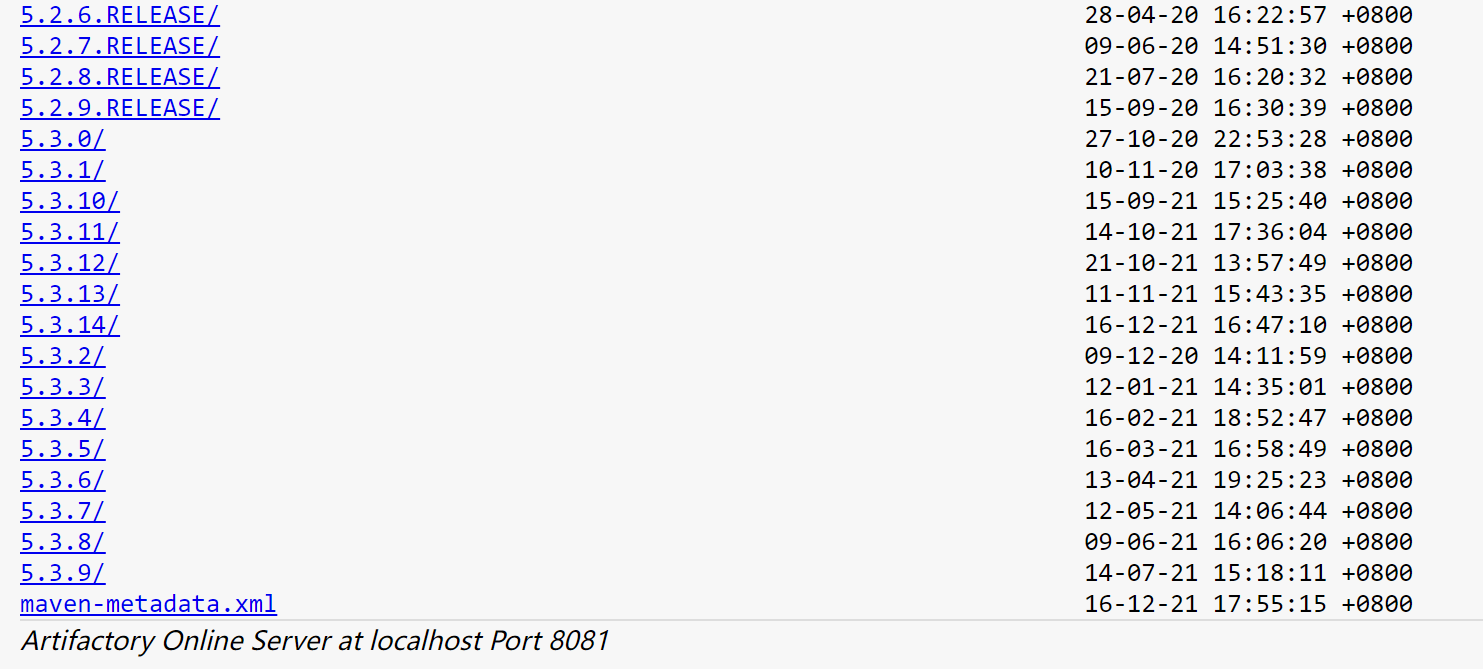
我们教程采用的版本是:5.3.6的版本(框架整合也需要对应版本jar):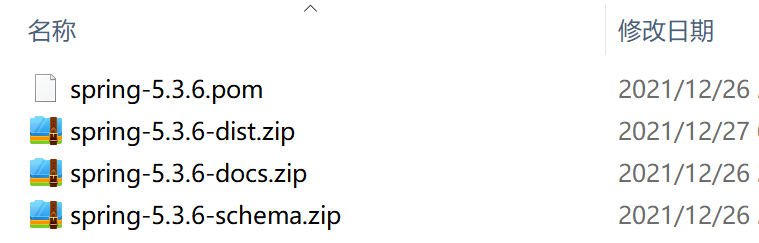
Spring5.3.6 开发包目录结构: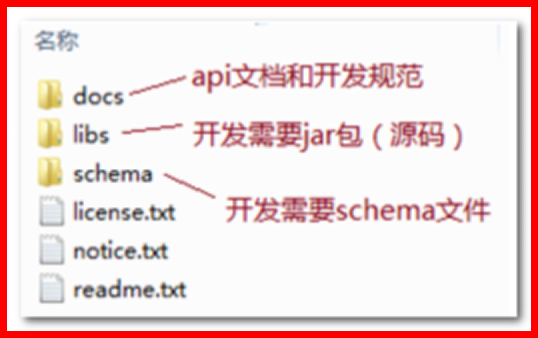
第一步:其中docs里面有api文档和开发规范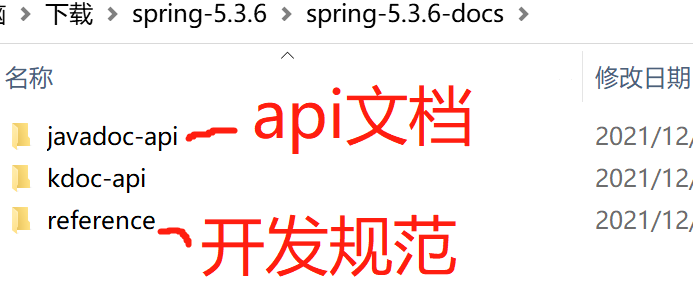
第二步:其中jar:
打开spring-5.3.6-dist\spring-framework-5.3.6\libs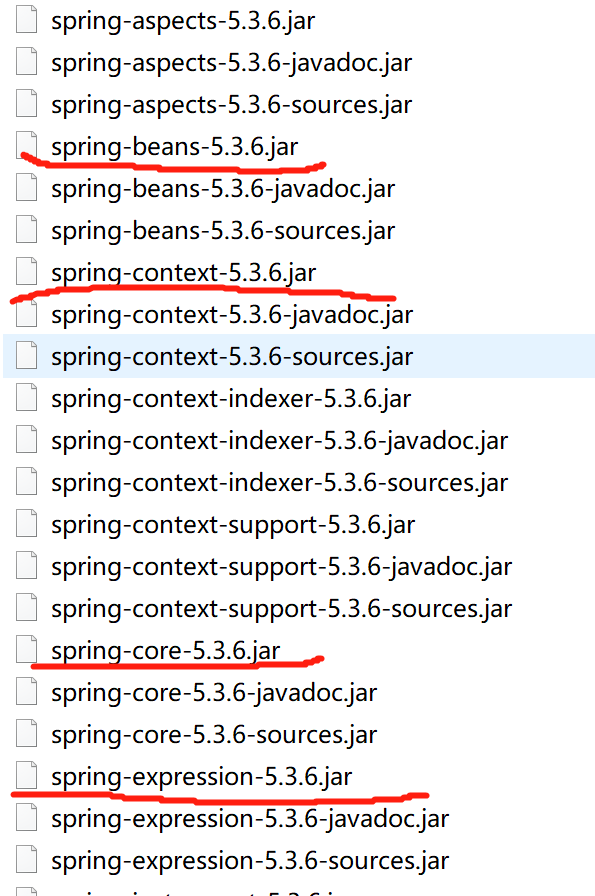
第三步:其中schema:
打开:spring-framework-5.3.6\schema\beans,查看spring配置文件的规范约束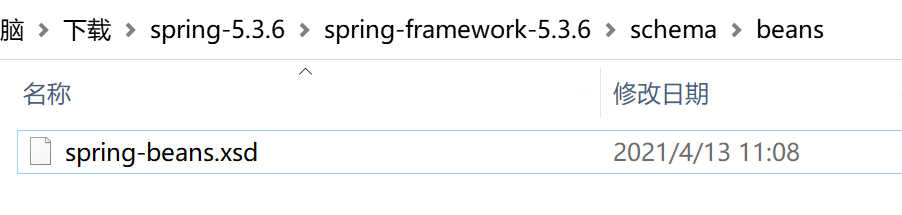
开发环境测试搭建
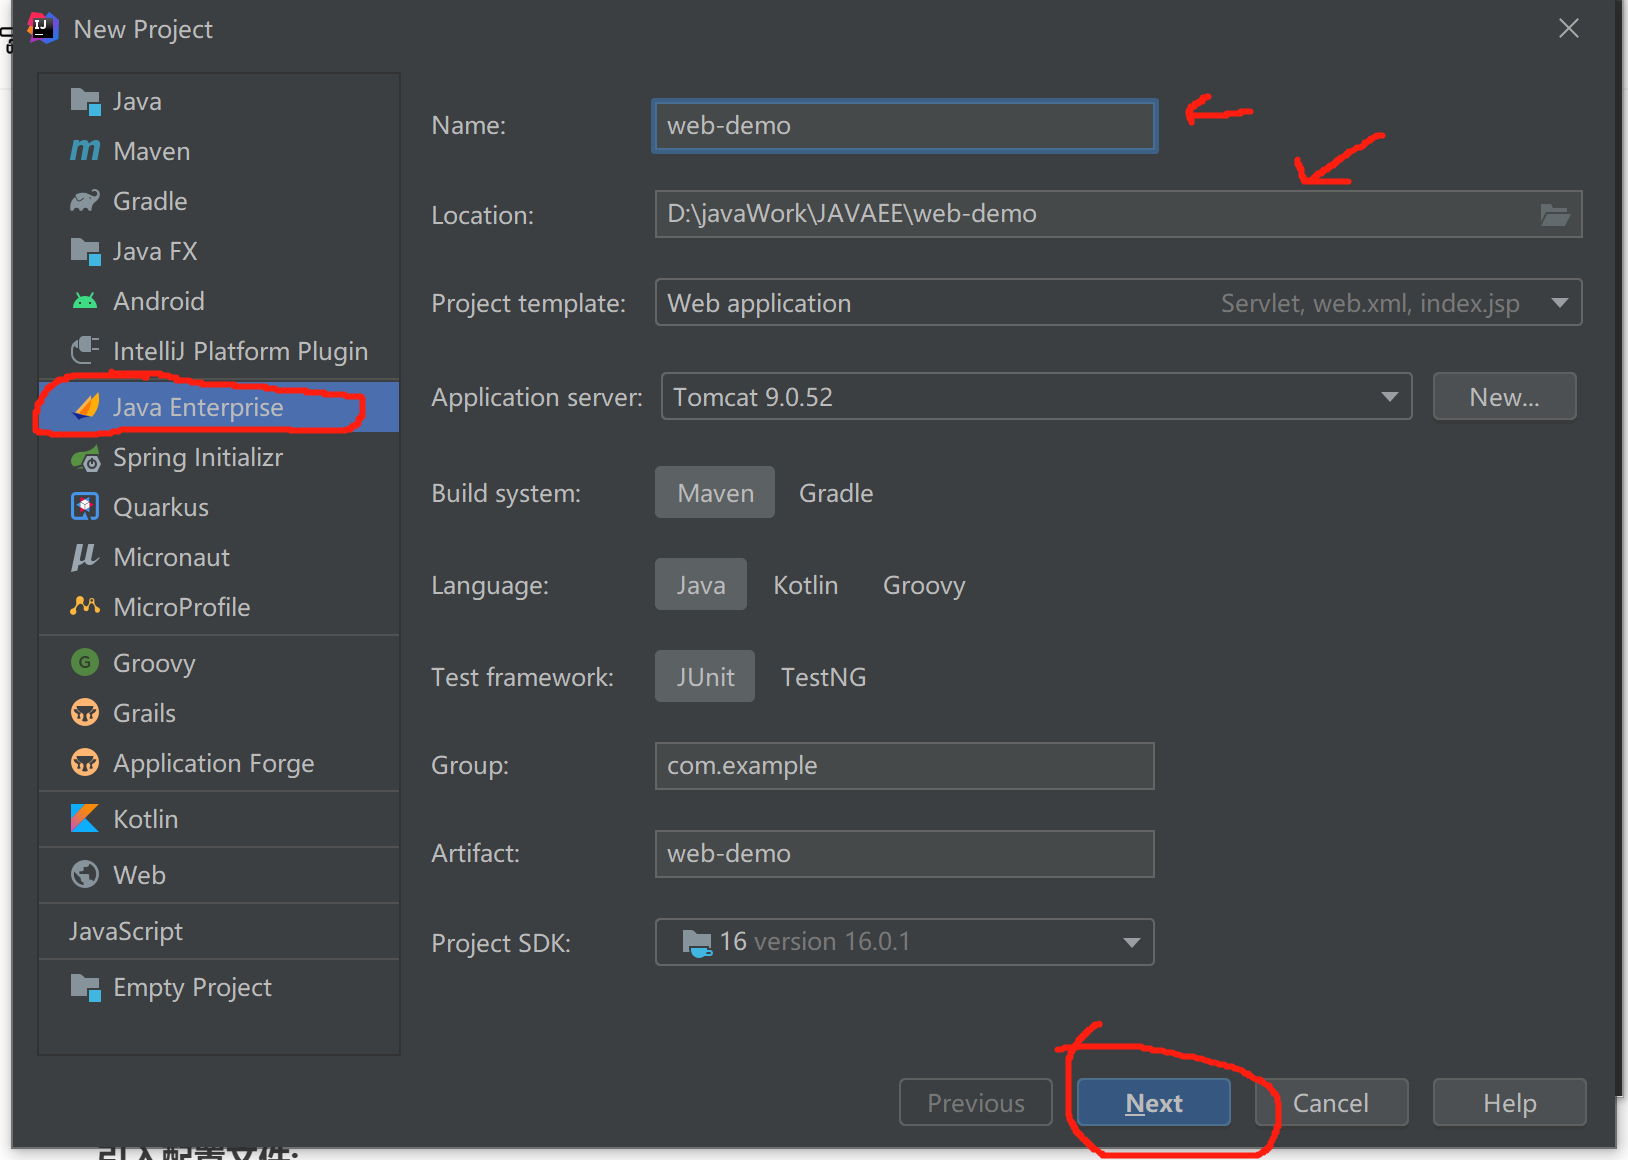
第一步:新建Maven Web工程SpringStudy,
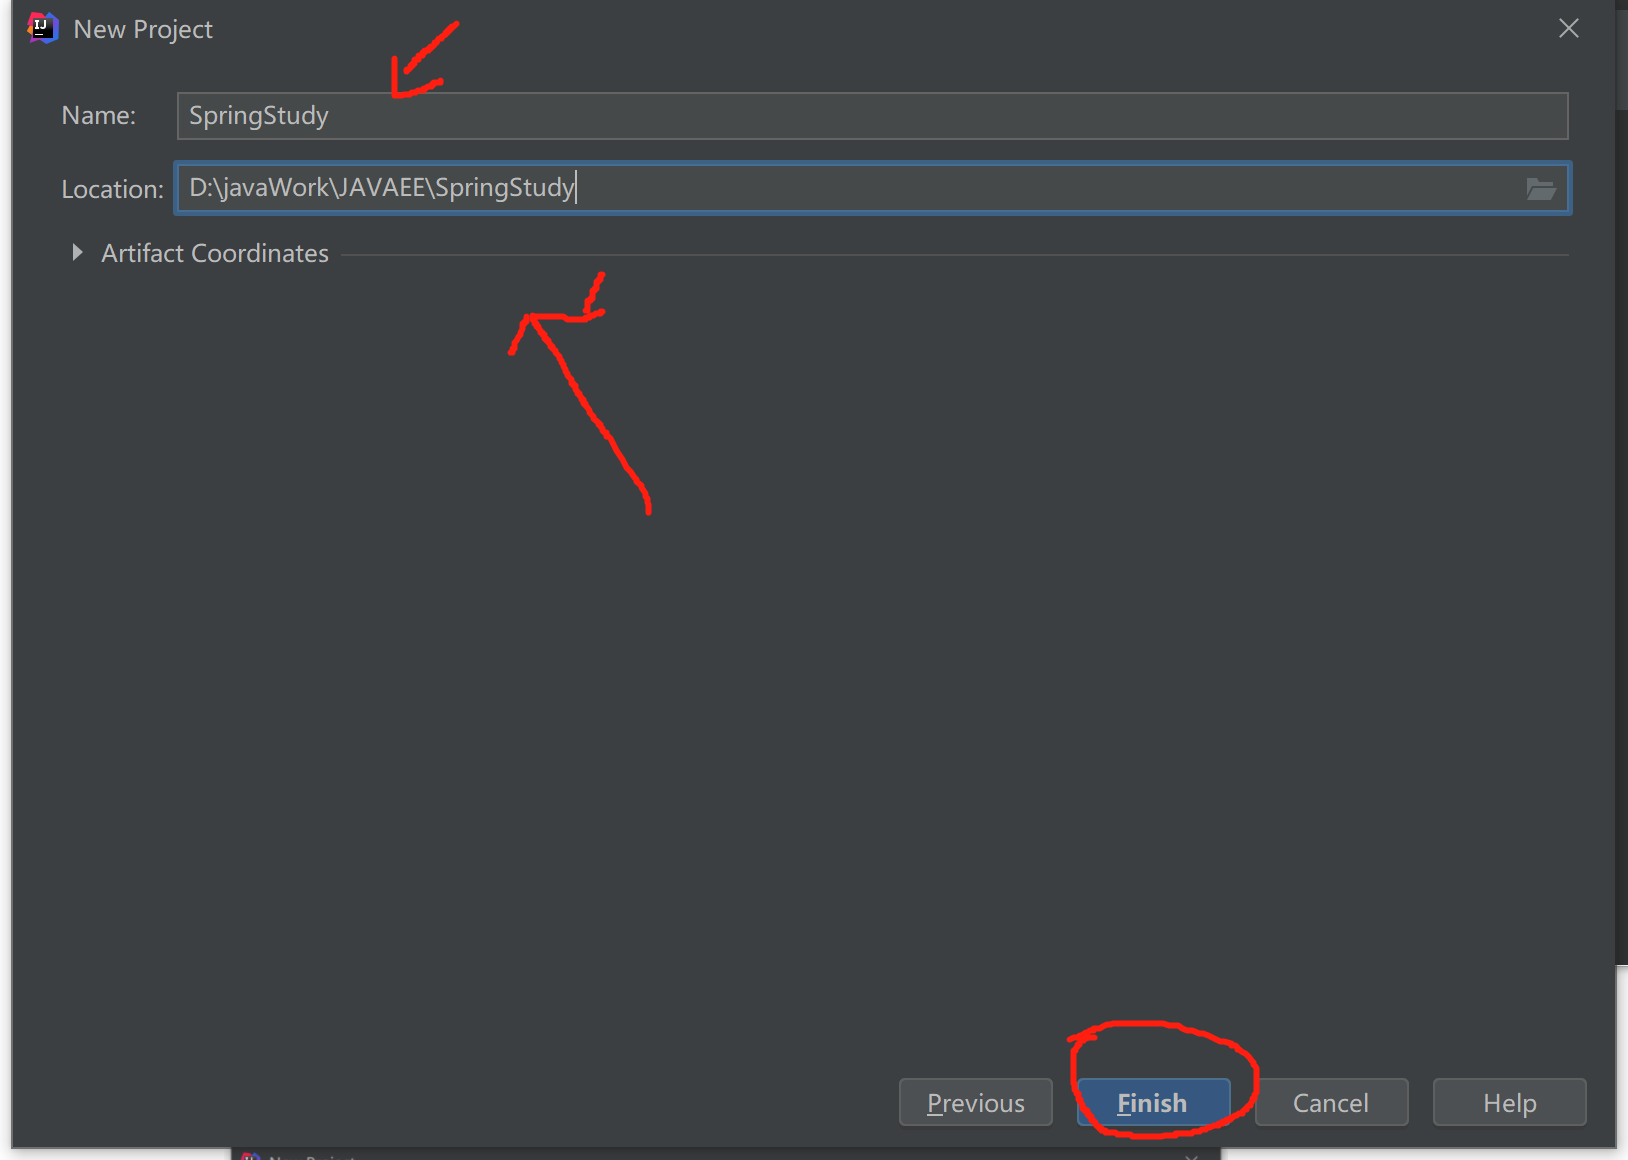
第二步:修改pom文件,添加Spring的框架依赖
1.Spring项目的核心容器包,它会将依赖的核心包都引入进去:
<dependency><groupId>org.springframework</groupId><artifactId>spring-webmvc</artifactId><version>5.3.6</version></dependency>
2.Spring框架加入log4j2依赖
<dependency>
    <groupId>org.apache.logging.log4j</groupId>
    <artifactId>log4j-core</artifactId>
    <version>2.14.0</version>
</dependency>
在resources目录下添加log4j2的配置文件:
<?xml version="1.0" encoding="UTF-8"?>
 <Configuration status="WARN">
      <Appenders>
          <Console name="Console" target="SYSTEM_OUT">
              <PatternLayout pattern="%d{HH:mm:ss.SSS} [%t] %-5level %logger{36} - %msg%n" />
          </Console>
      </Appenders>
      <Loggers>
          <Root level="error">
             <AppenderRef ref="Console" />
         </Root>
     </Loggers>
 </Configuration>
关于java日志的补充阅读:
| Java的常见的日志系统有log4J,jdk-jul,logback等,这些日志系统各自独立,编程方式也不一致。如果你一个系统要用到多个框架库,而这些框架库又可能要用不同的日志系统,那么你一个系统中就得使用多套日志系统,那多套日志系统如何融合在一起是个很大的问题。 那么如何解决呢?进行抽象,抽象出一个接口层,对每个日志实现都适配或者转接,这样这些提供给别人的库都直接使用抽象层即可,不需要关注具体的日志实现。常见的日志抽象出来的框架有Apache commons-logging和slf4j。 这里有个故事:最新是开源社区提供了commons-logging抽象,被称为JCL日志框架,出色地完成了兼容主流的日志实现(log4j、JUL、simplelog),基本一统江湖,就连顶顶大名的spring也是依赖了JCL。 看起来事物确实是美好,但是美好的日子不长,接下来另一个优秀的日志框架slf4j的加入导致了更加混乱的场面。比较巧的是slf4j的作者(Ceki Gülcü)就是log4j的作者,他觉得JCL不够优秀,所以他要自己搞一套更优雅的出来,于是slf4j日志体系诞生了,并为slf4j实现了一个亲子——logback,确实更加优雅。 但是由于之前很多代码库已经使用JCL,虽然出现slf4j和JCL之间的桥接转换,但是集成的时候问题依然多多,对很多新手来说确实会很懊恼,因为比单独的log4j时代“复杂”多了,可以关注下这个,抱怨声确实很多。到此本来应该完了,但是Ceki Gülcü觉得还是得回头拯救下自己的“大阿哥”——log4j,于是log4j2诞生了,同样log4j2也参与到了slf4j日志体系中。日志体系的江湖又将面临血雨腥风的混乱了。 |
|---|
传统方式业务代码编写(业务层、数据持久层)
采用的示例业务是模拟用户登录操作。
第一步:创建包com.igeek
第二步:创建dao
1:创建接口IUserDao
package com.igeek;
//用户的dao层
public interface IUserDao {
    //向数据查询数据,根据用户名和密码
    public void findByUsernameAndPassword();
}
2:创建IUserDao接口的实现类UserDaompl
package com.igeek;
//dao的实现类
public class UserDaoImpl implements IUserDao {
    @Override
    public void findByUsernameAndPassword() {
        System.out.println("UserDaoImpl-dao层被调用了");
    }
}
第三步:创建service
1:创建接口IUserService
package com.igeek;
//业务层
public interface IUserService {
    //登录
    public void login();
}
2:创建IUserService接口的实现类UserServiceImpl
package com.igeek;

//业务层实现
public class UserServiceImpl implements IUserService{

    public void login() {
        System.out.println("UserServiceImpl-service层被调用了。。。");
        //实例化dao层
        //传统方式
        IUserDao userDao = new UserDaoImpl();
        userDao.findByUsernameAndPassword();
    }
}
第四步:测试
创建SpringTest类进行测试:
package com.igeek;

import org.junit.Test;
//测试
public class SpringTest {
    @Test
    //模拟表现层
    public void testOld(){
        IUserService userService = new UserServiceImpl();
        userService.login();
    }
}
第五步:测试结果
控制台输出: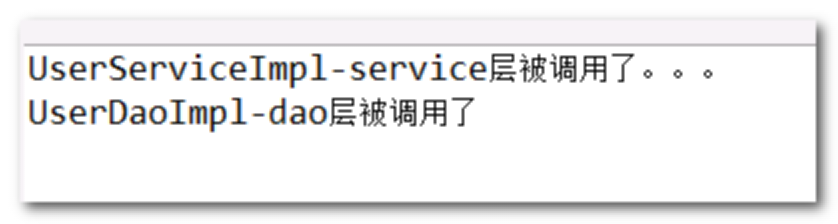
【思考分析】
存在问题:代码过于耦合,上层代码过度依赖于下一层代码的实现:
例如:UserDao userDao = new UserDaoImpl();
如果要更换实现类,或者实现类换一个名字,此时代码会报错,必须要修改原来的业务代码!
解决方案:采用IoC(Inverse of Control,控制反转)的思想。
简单的说就是引入工厂(第三者),将原来在程序中手动创建管理的依赖的UserDaoImpl对象,交给工厂来创建管理。在Spring框架中,这个工厂就是Spring中的工厂(简单的说,spring的工厂就是xml文件),因此,也可以说,将创建管理UserDaoImpl对象的控制权被反转给了Spring框架了。
例如:
传统代码
IOC方式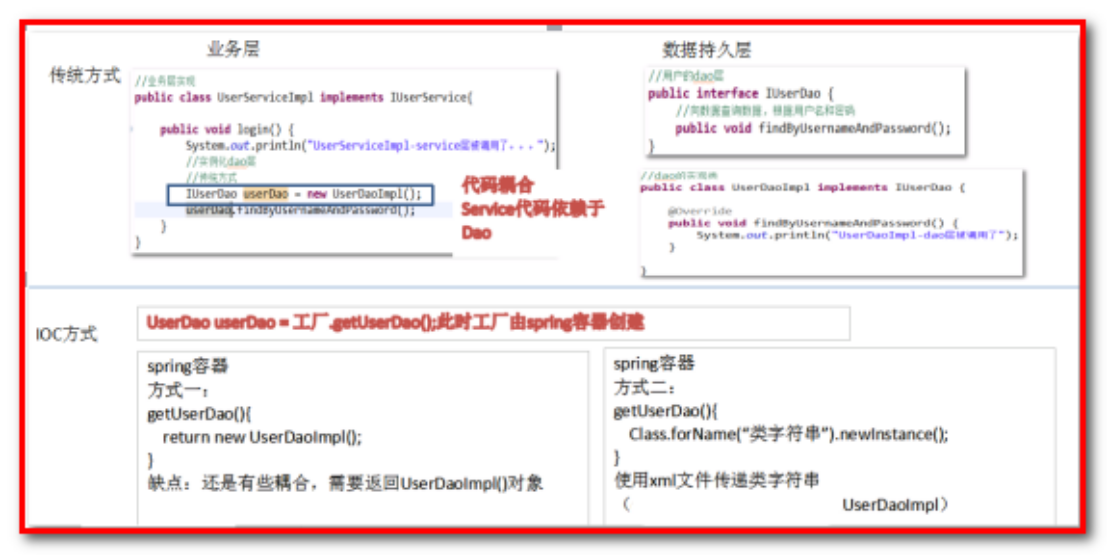
概念:IoC中文翻译为控制反转,指以前程序自己创建对象,现在将创建对象的控制权交给了第三方(Spring)了。
IoC底层实现:工厂(设计模式)+反射(机制) + 配置文件(xml)。
IoC是一种思想,是控制反转的思想、是一种解耦合的思想。
Spring是该思想的一种实现。因此Spring容器也通常称之为IoC容器。
IoC控制反转的实现
Spring核心配置文件的编写
IoC控制反转的理解和实现
第一步:在src下建立applicationContext.xml (位置:applicationContext.xml文件放置到任何目录都可以,习惯上放在resources目录)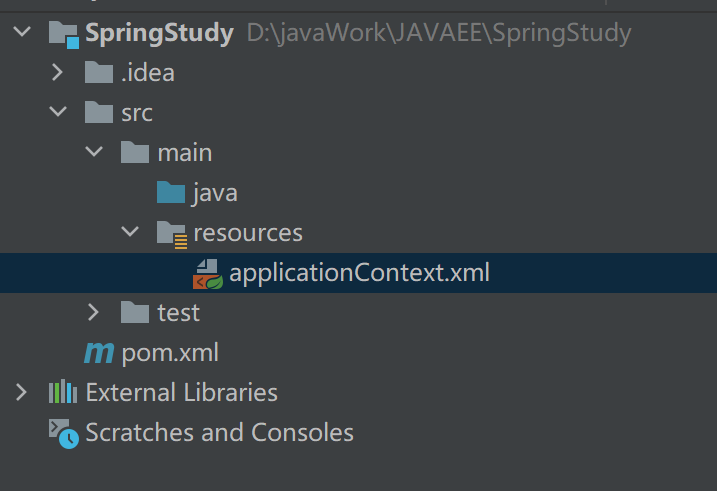
applicationContext.xml核心配置文件编写:
<?xml version="1.0" encoding="UTF-8"?>
<beans xmlns="http://www.springframework.org/schema/beans"
       xmlns:xsi="http://www.w3.org/2001/XMLSchema-instance"
       xsi:schemaLocation="http://www.springframework.org/schema/beans
                           http://www.springframework.org/schema/beans/spring-beans.xsd">

    <!--
        bean:是spring工厂帮你new的一个对象(机制:反射机制)
        class:要new的对象的类型的字符串表示形式(一定全类名)
        id/name:标识对象的名字,用来获取bean对象用的标识。习惯上,这个名字命名为接口的名字首字母小写
     -->
    <bean id="userDao"  class="com.igeek.UserDaoImpl"/>
</beans>
通过Spring的工厂获取Bean完成相关操作
基本过程是:在程序中读取Spring配置文件,得到Spring的Bean工厂,通过Spring框架获得Bean,完成相应操作
创建包:com.igeek.spring
复制代码:到com.igeek包
修改UserServiceImpl 代码,编写:
//业务层实现
public class UserServiceImpl implements IUserService{

    public void login() {
        System.out.println("UserServiceImpl-service层被调用了。。。");
        //spring的配置方式,IOC控制反转
        //构建一个spring的工厂,使用applicationContext.xml(spring的核心配置文件)获取对象
        ApplicationContext ac = new ClassPathXmlApplicationContext("applicationContext.xml");
        //从spring工厂中使用对象的标识获取对象
        IUserDao userDao = (IUserDao) ac.getBean("userDao");
        userDao.findByUsernameAndPassword();
    }
}
使用SpringTest类进行测试:
//测试
public class SpringTest {
    @Test
    //模拟表现层
    public void testOld(){
        IUserService userService = new UserServiceImpl();
        userService.login();
    }

DI依赖注入的实现
DI:Dependency Injection 依赖注入,在Spring框架负责创建Bean对象时,动态的将依赖对象注入到Bean组件(简单的说,可以将另外一个bean对象动态的注入到另外一个bean中。)
IoC:
耦合代码变成依赖注入代码的方法:
即:Spring创建了Service、Dao对象,在配置中将Dao传入Servcie,那么Service对象就包含了Dao对象的引用。
Spring的核心配置文件applicationContext.xml:
<?xml version="1.0" encoding="UTF-8"?>
<beans xmlns="http://www.springframework.org/schema/beans"
       xmlns:xsi="http://www.w3.org/2001/XMLSchema-instance"
       xsi:schemaLocation="http://www.springframework.org/schema/beans
                           http://www.springframework.org/schema/beans/spring-beans.xsd">

    <!--
    ioc
        bean:是spring工厂帮你new的一个对象(机制:反射机制)
        class:要new的对象的类型的字符串表示形式(一定全类名)
        id/name:标识对象的名字,用来获取bean对象用的标识。习惯上,这个名字命名为接口的名字首字母小写
     -->
    <bean id="userDao"  class="com.igeek.spring.UserDaoImpl"/>
    <!--
    service
    di:必须双方都是bean:在创建service的时候,主动将dao的依赖对象注入交给serivce
     -->
    <bean name="userService" class="com.igeek.spring.UserServiceImpl">
        <!-- property:
        setter属性注入
            * name:setter属性的名字,和类一致。如果setXxx,这里xxx,setUserDAO-userDAO
            * spring会自动调用setUserDao(IUserDao userDao)方法
            * ref:spring容器中定义的bean(对象)的名字
         -->
        <property name="userDao" ref="userDao"/>
    </bean>
</beans>
Service业务层代码:
//业务层实现
public class UserServiceImpl implements IUserService{

    //定义属性
    private IUserDao userDao;
    //提供set方法,使用setXxx方法完成属性的注入
    public void setUserDao(IUserDao userDao) {
        this.userDao = userDao;
    }
    //使用依赖注入的方式获取dao
    public void login() {
        System.out.println("UserServiceImpl-service层被调用了。。。");
        userDao.findByUsernameAndPassword();
    }
}
springTest.java测试代码:
//测试
public class SpringTest {
    @Test
    //模拟表现层
    public void testOld(){
        //spring的配置方式,IOC控制反转
        //构建一个spring的工厂,使用applicationContext.xml(spring的核心配置文件)获取对象
        ApplicationContext ac = new ClassPathXmlApplicationContext("applicationContext.xml");
        //从spring工厂中使用对象的标识获取对象
        IUserService userService = (IUserService) ac.getBean("userService");
        userService.login();
    }
}
分析:
【面试题】IoC和DI的区别 ?
DI和IoC是同一件事情,都是将对象控制权交给第三方(Spring)管理,只是站在不同角度而已。
Spring的工厂
ApplicationContext直译为应用上下文,是用来加载Spring框架配置文件,来构建Spring的工厂对象,它也称之为Spring容器的上下文对象,也称之为Spring的容器。
ApplicationContext 只是BeanFactory(Bean工厂,Bean就是一个java对象) 一个子接口:
为什么不直接使用顶层接口对象来操作呢?
| BeanFactory 采取延迟加载,第一次getBean时才会初始化Bean Beanfactory的用法: BeanFactory ac = new XmlBeanFactory(new ClassPathResource(“applicationContext.xml”)); BeanFactory ac = new XmlBeanFactory(new FileSystemResource(“D:\\applicationContext.xml”)); * ApplicationContext是对BeanFactory扩展,提供了更多功能 国际化处理 事件传递 Bean自动装配 各种不同应用层的Context实现 |
|---|
ApplicationContext 更加强大, 所以现在开发基本没人使用BeanFactory。
提示:后面还有个FactoryBean,注意区别。
【示例了解】
| publicvoid testSpring(){ //构建spring工厂 //ApplicationContext applicationContext = new ClassPathXmlApplicationContext(“applicationContext.xml”); //使用BeanFactory //BeanFactory applicationContext = new XmlBeanFactory(new ClassPathResource(“applicationContext.xml”)); //直接使用超级接口 BeanFactory applicationContext = new ClassPathXmlApplicationContext(“applicationContext.xml”); IUserService userService=(IUserService) applicationContext.getBean(“userService”); userService.login(); } |
|---|
Spring工厂的直接获取(两种方式)-了解
applicationContext应用上下文,加载Spring框架配置文件
| 方法一:从classpath路径加载 在类路径下寻找配置文件来实例化容器 ApplicationContext ctx = new ClassPathXmlApplicationContext(new String[]{“applicationContext.xml”}); 可以在整个类路径中寻找xml文件 通过这种方式加载。需要将spring的配置文件放到当前项目的classpath路径下 classpath路径指的是当前项目的src/main/resource目录,该目录是项目配置文件的存放位置。 方法二:从磁盘路径加载 在文件系统路径下寻找配置文件来实例化容器 ApplicationContext ctx = new FileSystemXmlApplicationContext(new String[]{“d:\\applicationContext.xml”}); (1)Spring的配置文件可以指定多个,可以通过String数组传入。 (2)通过getBean方法获得Spring容器管理Bean对象 |
|---|
如何选择:
- 如果applicationContext.xml 在src/main/resource下, ClassPathXmlApplication读取
- 如果applicationContext.xml 在WEB-INF下,FileSystemXmlApplicationContext读取
【扩展】
Bean获取的两种方式:
/**1:使用spring容器中的标识获取对象*/
ApplicationContext applicationContext = new ClassPathXmlApplicationContext("applicationContext.xml");
//IUserService userService=(IUserService) applicationContext.getBean("userService");
/**
 * 2:根据bean的类型来获取:自动到spring容器中查找哪个bean是这个类型
 * 如果  Object instanceOf(IUserService.class)或者Object instanceOf(UserServiceImpl.class)
 * 类型获取有个郁闷的情况:如果容器中有两个同样的类型,则会报错!!!!!
 */
//IUserService userService=(IUserService) applicationContext.getBean(IUserService.class);
IUserService userService=(IUserService) applicationContext.getBean(UserServiceImpl.class);//一般不会使用实现类
//业务方法
userService.login();
常用根据名称获取(id/name),即第一种方式,使用spring容器中的标识获取对象
如果根据类型获取,配置了多个类型的话,则抛出异常:
例如spring容器中配置:
 <bean name="userService" class="com.igeek.spring.UserServiceImpl">
        <property name="userDao" ref="userDao"/>
    </bean>
    <bean name="userService1" class="com.igeek.spring.UserServiceImpl">
        <property name="userDao" ref="userDao"/>
    </bean>
使用代码进行测试
IUserService userService=(IUserService) applicationContext.getBean(UserServiceImpl.class);//一般不会使用实现类

IoC容器装配Bean_基于XML配置方式
实例化Bean的四种方式 (了解)
第一种方式无参数构造器(最常用)
第一步:创建Bean1.java
//1。默认构造器(spring在创建bean的时候自动调用无参构造器来实例化,相当于new Bean1())
public class Bean1 {
}
第二步:在spring容器applicationContext.xml中配置
<!-- 实例化bean的方式 -->
    <!-- 1.:默认构造器
    在实例化的时候,自动调用默认的构造器,相当于Bean1 bean1 =new Bean1();
    -->
    <bean id="bean1" class="com.igeek.Bean1"/>
第三步:创建测试文件SpringTest.java
@Test
public void test1(){
    //先构建实例化获取spring的容器(工厂、上下文)
    ApplicationContext applicationContext = new ClassPathXmlApplicationContext("applicationContext.xml");
    //1。默认构造器获取bean的对象
    Bean1 bean1=(Bean1) applicationContext.getBean("bean1");
    System.out.println(bean1);
}
运行结果: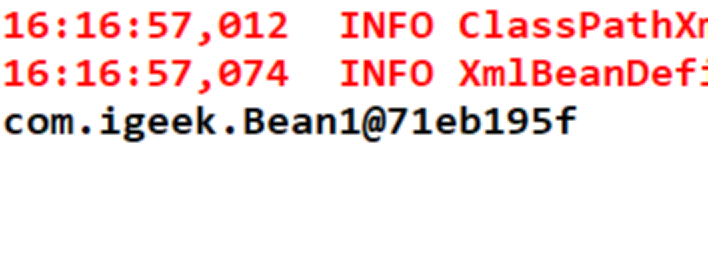
【错误演示】:
//1。默认构造器(spring在创建bean的时候自动调用无参构造器来实例化,相当于new Bean1())
public class Bean1 {
    private String name;
    //错误原因:没有无参构造器

    //如果设置一个有参数的构造器,会覆盖无参数的构造器,会报错。无法实例化Bean
    public Bean1(String name){
        this.name = name;
    }
}
【报错】:
第二种方式:静态工厂方法
第一步:创建Bean2.java
//1.静态工厂方法构造:用来在初始化bean2的时候,可以初始化其他的东西
public class Bean2 {

    //静态方法,用来返回对象的实例
    public static Bean2 getBean2(){
        //在做实例化的时候,可以做其他的事情,即可以在这里写初始化其他对象的代码
        //Connection conn....
        return new Bean2();
    }

}
第二步:Spring的容器applicationContext.xml
<!--
    2:静态工厂的方式创建bean
    用来自己定义一下工厂,让spring的大工厂来调用我们的小工厂,可以将对象的创建权限交给小工厂
    factory-method:工厂的静态方法,在bean的实例化的时候,会自动调用
    -->
    <bean id="bean2" class="com.igeek.Bean2" factory-method="getBean2"/>
第三步:测试类进行测试
@Test
public void test2(){
    //先构建实例化获取spring的容器(工厂、上下文)
    ApplicationContext applicationContext = new ClassPathXmlApplicationContext("applicationContext.xml");
    //2.静态工厂
    Bean2 bean2=(Bean2) applicationContext.getBean("bean2");
    System.out.println(bean2);
}
第三种方式:实例工厂方法
第一步:创建Bean3.java
//第三种bean,实例工厂方式创建
public class Bean3 {

}
第二步:创建实例工厂Bean3Factory类
//实例工厂:必须new工厂--》bean
public class Bean3Factory {
    //普通的方法,非静态方法
    public Bean3 getBean3(){
        //初始化实例对象返回
        return new Bean3();
    }
}
第三步:Spring容器的配置:applicationContext.xml
 <!-- 3:实例工厂的方式实例化bean -->
    <bean id="bean3Factory" class="com.igeek.Bean3Factory"/>
    <!-- factory-bean相当于ref:引用一个bean对象 -->
    <bean id="bean3" factory-bean="bean3Factory" factory-method="getBean3"/>
第四步:使用测试代码,进行测试:
@Test
public void test3(){
    //先构建实例化获取spring的容器(工厂、上下文)
    ApplicationContext applicationContext = new ClassPathXmlApplicationContext("applicationContext.xml");
    //3.实例工厂
    Bean3 bean3=(Bean3) applicationContext.getBean("bean3");
    System.out.println(bean3);
}
第四种方式:FactoryBean方式。(源码底层用的多)
第一步:创建Bean4.java
public class Bean4 {

}
第二步:创建工厂Bean,Bean4FactoryBean.java,实现FactoryBean
//4。实现FactoryBean接口的方式
//泛型:你要返回什么类型的对象,泛型就是什么
public class Bean4FactoryBean implements FactoryBean<Bean4>{
    //用来获取bean的实例,对象
    public Bean4 getObject() throws Exception {
        //写一些初始化数据库连接等等其他代码
        return new Bean4();
    }
    public Class<?> getObjectType() {
        return null;
    }
    public boolean isSingleton() {
        return false;
    }
}
FactoryBean提供getObject方法,返回目标类型对象.
第三步:spring容器中的配置
<!-- 4.实现接口FactoryBean的方法
    spring在准备实例化bean的时候,new Bean4FactoryBean,没急着返回bean对象。
    会判断,类型对象是否实现了FactoryBean接口,如果实现了,就调用接口的getObject()方法,得到bean的示例-返回。
     -->
    <bean id="bean4" class="com.igeek.Bean4FactoryBean"/>
Bean4对象是 Bean4的类型(FactoryBean的getObject返回类型 )
第四步:测试
@Test
public void test4(){
    //先构建实例化获取spring的容器(工厂、上下文)
    ApplicationContext applicationContext = new ClassPathXmlApplicationContext("applicationContext.xml");
    //3.实例工厂
    Bean4 bean4=(Bean4) applicationContext.getBean("bean4");
    System.out.println(bean4);
}
小结:
Spring容器的配置:看一下4种方式
<?xml version="1.0" encoding="UTF-8"?>
<beans xmlns="http://www.springframework.org/schema/beans"
    xmlns:xsi="http://www.w3.org/2001/XMLSchema-instance"
    xsi:schemaLocation="
        http://www.springframework.org/schema/beans http://www.springframework.org/schema/beans/spring-beans.xsd">
    <!-- 实例化bean的方式 -->
    <!-- 1.:默认构造器
    在实例化的时候,自动调用默认的构造器,相当于Bean1 bean1 =new Bean1();
    -->
    <bean id="bean1" class="com.igeek.Bean1"/>
    <!--
    2:静态工厂的方式创建bean
    用来自己定义一下工厂,让spring的大工厂来调用我们的小工厂,可以将对象的创建权限交给小工厂
    factory-method:工厂的静态方法,在bean的实例化的时候,会自动调用
    -->
    <bean id="bean2" class="com.igeek.Bean2" factory-method="getBean2"/>
    <!-- 3:实例工厂的方式实例化bean -->
    <bean id="bean3Factory" class="com.igeek.Bean3Factory"/>
    <!-- factory-bean相当于ref:引用一个bean对象 -->
    <bean id="bean3" factory-bean="bean3Factory" factory-method="getBean3"/>
    <!-- 4.实现接口FactoryBean的方法
    spring在准备实例化bean的时候,new Bean4FactoryBean,没急着返回bean对象。
    会判断,类型对象是否实现了FactoryBean接口,如果实现了,就调用接口的getObject()方法,得到bean的示例-返回。
     -->
    <bean id="bean4" class="com.igeek.Bean4FactoryBean"/>

</beans>
【四种方式】小结:
第一种:最常用
第二、第三种:一些框架初始化的时候用的多。
第四种:spring底层用的多。
【面试题】 BeanFactory和FactoryBean的区别?
BeanFactory:是一个工厂(其实是构建了一个spring上下文的环境,容器),用来管理和获取很多Bean对象,例如:加载applicationContext.xml文件。
FactoryBean:是一个Bean生成工具,是用来获取一种类型对象的Bean,它是构造Bean实例的一种方式。
Bean的作用域
由spring创建的bean对象在什么情况下有效。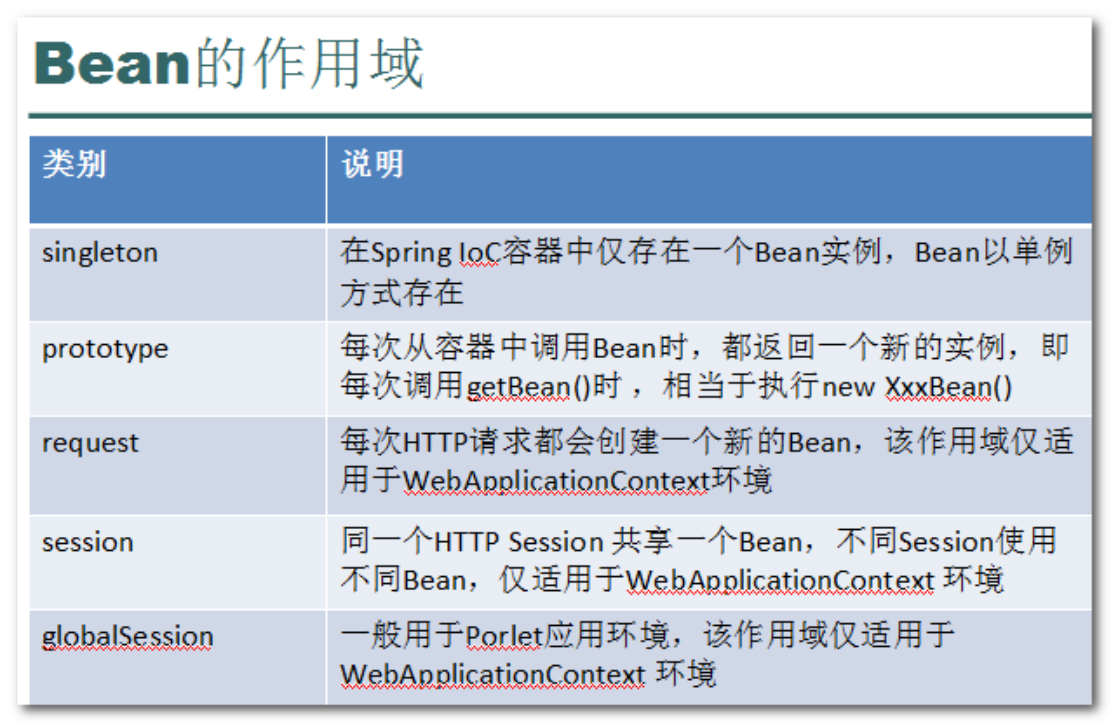
【附录】:什么是Portlet,参考百度百科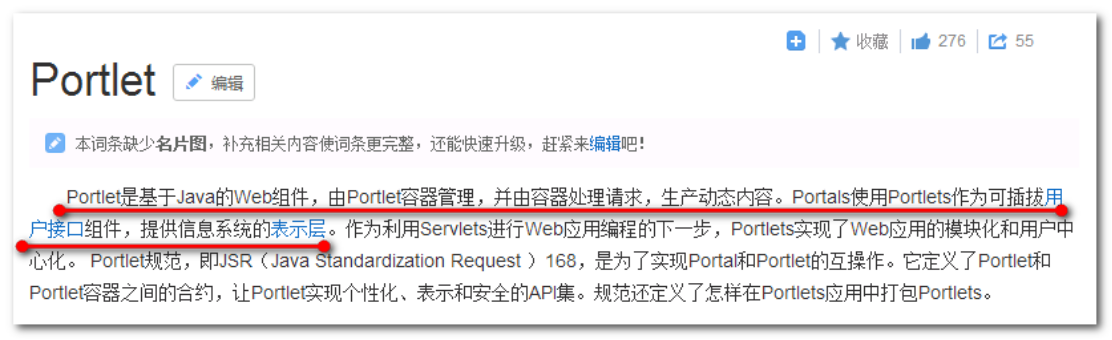
项目开发中通常会使用:singleton 单例、 prototype多例
Singleton: 在一个spring容器中,对象只有一个实例。(默认值)
Prototype: 在一个spring容器中,存在多个实例,每次getBean 返回一个新的实例。
建立包:com.igeek.scope
第一步:创建类SingletonBean.java和PrototypeBean.java
创建类SingletonBean.java类
//单例bean
public class SingletonBean {
    public SingletonBean() {
        System.out.println("SingletonBean:初始化了单例");
    }
}
创建类PrototypeBean.java类
//多例bean
public class PrototypeBean {
    public PrototypeBean() {
        System.out.println("--PrototypeBean初始化了多例的");
    }
}
第二步:定义spring容器,applicationContext.xml:
 <!--
        bean的作用范围
        scope:配置作用范围的,默认值就是singleton单例
     -->
    <!-- 单例 -->
    <!-- <bean id="singletonBean" class="com.igeek.scope.SingletonBean" scope="singleton"/> -->
    <bean id="singletonBean" class="com.igeek.scope.SingletonBean"/>
    <!-- 多例 -->
    <bean id="prototypeBean" class="com.igeek.scope.PrototypeBean" scope="prototype"/>
第三步:测试代码,创建SpringTest.java:
//newbean的方式
public class SpringTest {

    @Test
    public void testScope(){
        //先构建实例化获取spring的容器(工厂、上下文)
        ApplicationContext applicationContext = new ClassPathXmlApplicationContext("applicationContext.xml");
        //目标1:看看多次获取bean的时候,是不是同一个
        //目标2:看看bean什么时候初始化的
        //获取单例的bean:应该是同一个
        //单例:每次从spring容器中获取的对象,是同一个对象
        //单例初始化:是在spring容器初始化的时候,就初始化了
        SingletonBean singletonBean1=(SingletonBean)applicationContext.getBean("singletonBean");
        SingletonBean singletonBean2=(SingletonBean)applicationContext.getBean("singletonBean");
        System.out.println(singletonBean1);
        System.out.println(singletonBean2);
        //获取多例的bean:
        //多例:每次从spring容器中获取的对象,不是同一个对象
        //多例初始化:是在getBean的时候初始化,相当于每次getbean就是在new Bean()
        PrototypeBean prototypeBean1=(PrototypeBean)applicationContext.getBean("prototypeBean");
        PrototypeBean prototypeBean2=(PrototypeBean)applicationContext.getBean("prototypeBean");
        System.out.println(prototypeBean1);
        System.out.println(prototypeBean2);

    }

}
运行查看,测试结果: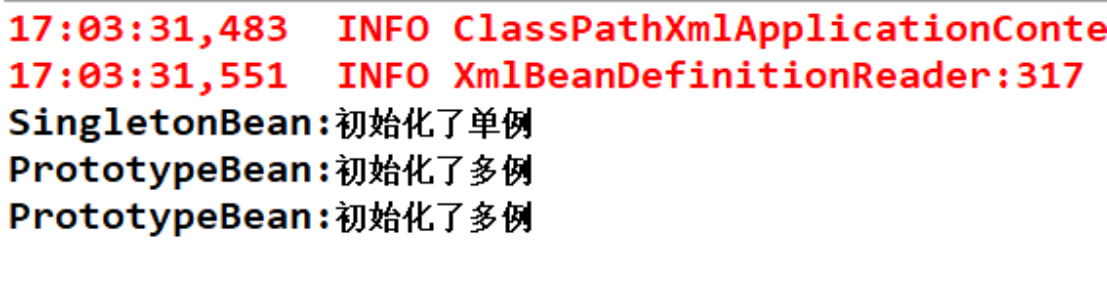
【注意】
单例是默认值,如果需要单例对象,则不需要配置scope。
Bean的生命周期
在xml配置Bean的初始化和销毁方法
通过 init-method属性指定初始化后的调用方法
通过 destroy-method属性指定销毁对象前的方法
创建包com.igeek.xmllifecycle
第一步:创建LifeCycleBean,指定一个init的方法,和一个destroy的方法。
//测试生命周期过程中的初始化和销毁bean
public class LifeCycleBean {

    //定义构造方法
    public LifeCycleBean() {
        System.out.println("LifeCycleBean构造器调用了");
    }

    //初始化后自动调用方法:方法名随意,但也不能太随便,一会要配置
    public void init(){
        System.out.println("LifeCycleBean-init初始化时调用");
    }

    // 业务方法
    public void save(){
        System.out.println("第六步:调用了LifeCycleBean类的save方法!");
    }

    //bean销毁时调用的方法
    public void destroy(){
        System.out.println("LifeCycleBean-destroy销毁时调用");
    }

}
第二步:Spring的核心容器,applicationContext.xml的配置
<!-- 生命周期调用的两个方法
    init-method:初始化时(后)调用的,bean中的共有方法即可
    destroy-method:销毁时(前)被调用的。
    -->
<bean id="lifeCycleBean" class="com.igeek.xmllifecycle.LifeCycleBean" init-method="init" destroy-method="destroy" scope="singleton"/>
第三步:SpringTest.java测试代码:
@Test
public void test(){
    //先获取spring的容器,工厂,上下文
    ApplicationContext applicationContext = new ClassPathXmlApplicationContext("applicationContext.xml");
    //对于单例此时已经被初始化
    //获取bean
    LifeCycleBean lifeCycleBean=(LifeCycleBean) applicationContext.getBean("lifeCycleBean");
    System.out.println(lifeCycleBean);

    lifeCycleBean.save();
    //为什么没有销毁方法调用。
    //原因是:使用debug模式jvm直接就关了,spring容器还没有来得及销毁对象。
    //解决:手动关闭销毁spring容器,自动销毁单例的对象
    //((ClassPathXmlApplicationContext)applicationContext).close();

}
测试查看控制台打印,发现销毁方法没有执行。
原因:销毁方法的执行必须满足两个条件:
1)单例(singleton)的bean才会可以手动销毁。
2)必须手动关闭容器(调用close的方法)时,才会执行手动销毁的方法。
换成单列模式scope=“singleton”,控制台输出结果是: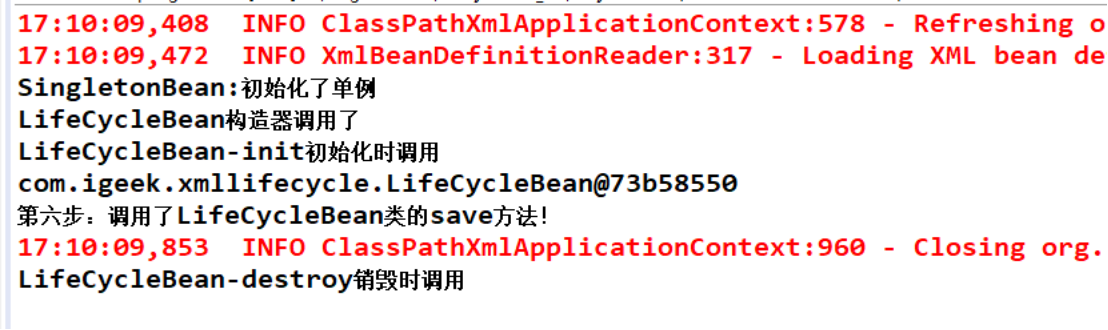
【扩展】
关于数据(一些属性等等)的初始化的。
1.直接赋值
2.在构造器中初始化
3.使用单独的初始化的方法
//测试生命周期过程中的初始化和销毁bean
public class LifeCycleBean {
    //成员变量
    private String name="Tom";//1.赋值成员变量

    //2.构造器初始化
    public LifeCycleBean(String name) {
        System.out.println("LifeCycleBean构造器调用了");
        this.name=name;
    }

    //3.set方法初始化
    private void setName(String name) {
        this.name=name;
    }

    //初始化后自动调用方法:方法名随意,但也不能太随便,一会要配置
    public void init(){
        System.out.println("LifeCycleBean-init初始化时调用");
        //3.单独的初始化方法来初始化数据
        this.name="Jack";
    }

    //bean销毁时调用的方法
    public void destroy(){
        System.out.println("LifeCycleBean-destroy销毁时调用");
        System.out.println(name);
    }
}
三种方式:根据代码情况任选。
第一种方式:直接的,但耦合性最强。一般用于给默认值的。
第二种方式:使用有参构造来初始化。代码new的时候就能直接将属性初始化,但有点耦合。
第三种方式:使用单独的set方法对属性进行赋值,完全解耦,初始化方法专门用来写初始化的一系列代码,构造器,只是用来构造class对象。
后处理Bean(BeanPostProcessor接口)了解
后处理Bean也称之为Bean的后处理器,作用是:在Bean初始化的前后,对Bean对象进行增强。它既可以增强一个指定的Bean,也可以增强所有的Bean,底层很多功能(如AOP等)的实现都是基于它的,Spring可以在容器中直接识别调用。
【示例】
要对“所有”的bean的初始化的时候进行增强(打印一句话)
第一步:创建MyBeanPostProcessor类,实现接口BeanPostProcessor
//后处理bean,:用来对bean进行功能增强,可以实现,对所有,或某个bean的初始化进行增强
public class MyBeanPostProcessor implements BeanPostProcessor{

    //初始化时(之前)调用的
    //参数1:bean对象,参数2,bean的名字,id、name
    public Object postProcessBeforeInitialization(Object bean, String beanName)
            throws BeansException {
//        System.out.println(beanName+"在初始化前开始增强了");
        //如何只增强一个bean
        if(beanName.equals("lifeCycleBean")){
            System.out.println(beanName+"在初始化前开始增强了");
        }
        return bean;//放行
    }

    //初始化时(之后)调用
    public Object postProcessAfterInitialization(Object bean, String beanName)
            throws BeansException {
//        System.out.println(beanName+"在初始化后开始增强了");
        if(beanName.equals("lifeCycleBean")){
            System.out.println(beanName+"在初始化后开始增强了");
        }
        return bean;
    }

}
第二步:定义applicationContext.xml文件
<!-- 后处理bean:spring在初始化MyBeanPostProcessor的时候,判断是否实现了BeanPostProcessor,如果实现了,就采用动态代理的方式,对所有的bean对象增强 -->
    <bean class="com.igeek.xmllifecycle.MyBeanPostProcessor"/>
执行任意bean操作的测试,控制台输出: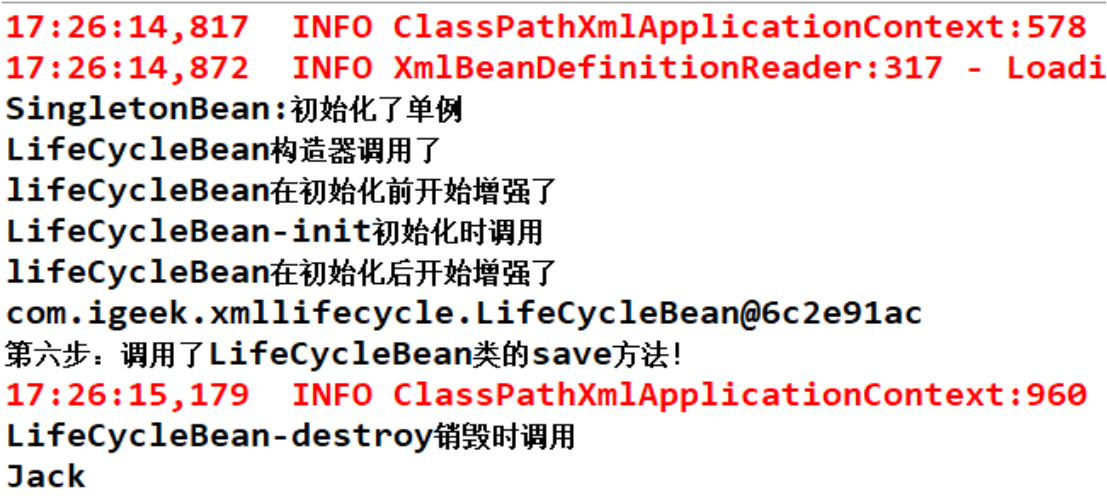
注意调用顺序。
BeanPostProcessor接口,提供增强途径,在不修改原来代码情况下,增添新的功能!
Bean属性的依赖注入
属性依赖注入的三种方式
什么是Bean属性的注入?就是对一个对象的属性赋值。有三种方式:
- 第一种:构造器参数注入
- 第二种:setter方法属性注入(setter方法的规范需要符合JavaBean规范)
- 第三种:接口注入
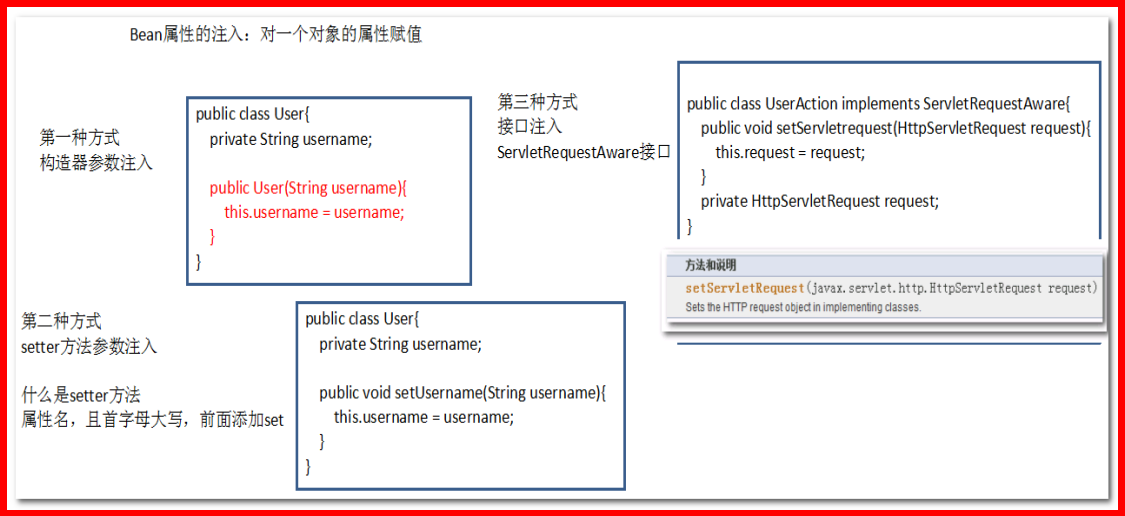
Spring 框架规范中通过配置文件配置的方式,只支持构造器参数注入和setter方法属性注入,不支持接口注入!
构造器参数注入 constructor-arg
【示例】
第一步:构造器参数注入属性值。
创建包com.igeek.xmlpropertydi,创建Car类,定义构造方法
//目标,构造器参数注入,new car直接将参数的值直接赋值
public class Car {
    private Integer id;
    private String name;
    private Double price;
    //有参构造
    public Car(Integer id, String name, Double price) {
        this.id = id;
        this.name = name;
        this.price = price;
    }

    //取值要用getter
    public Integer getId(){
        return this.id;
    }


    public String toString() {
        return "Car [id=" + id + ", name=" + name + ", price=" + price + "]";
    }

}
第二步:配置applicationContext.xml
<!-- 构造器注入属性的值 -->
    <bean id="car" class="com.igeek.xmlpropertydi.Car">
        <!--constructor-arg:告诉spring容器,要调用有参构造方法了,不再调用默认的构造方法了
        new Car(1,"宝马",99999d)
        参数第一组:定位属性
            * index:根据索引定位属性,0表示第一个位置
            * name:根据属性参数名称定位属性
            * type:根据属性数据类型定位属性
        参数第二组:值
            * value:简单的值,字符串
            * ref:复杂的(由spring容器创建的bean对象)
        -->
        <!-- <constructor-arg index="0" value="1"/> -->
        <constructor-arg index="0" name="id" value="1"/>
        <!-- <constructor-arg name="name" value="宝马1代"/> -->
        <constructor-arg name="name" >
            <value>宝马2代</value>
        </constructor-arg>
        <constructor-arg type="java.lang.Double" value="99999d"/>
    </bean>
第三步:使用SpringTest.java测试:
@Test
public void test(){
    //spring容器
    ApplicationContext applicationContext = new ClassPathXmlApplicationContext("applicationContext.xml");
    //获取car
    Car car =(Car) applicationContext.getBean("car");
    System.out.println(car);
}
【补充】
1.定位属性,可以混用
<constructor-arg index="0" name="id" value="1"/>
2.标签的属性赋值问题,可以使用子标签的value,效果和value属性一样
<constructor-arg name="name" value="宝马1代"/>
等同于
<constructor-arg name="name" >
    <value>宝马2代</value>
</constructor-arg>
setter方法属性注入 property
使用的默认的构造器(new Bean()),但必须提供属性的setter方法,使用setter方法也是企业经常使用的属性注入方式。
两步:在类中加入setter方法,在配置文件中使用
【示例】
第一步:创建Person.java,定义id、name、car属性
/**
 * 定义人类
 * setter方法属性注入
 * 相当于new Person();
 */
public class Person {
    private Integer id;
    private String name;
    private Car car;
    //必须提供setter属性方法
    public void setId(Integer id) {
        this.id = id;
    }
    public void setName(String name) {
        this.name = name;
    }
    public void setCar(Car car) {
        this.car = car;
    }

    @Override
    public String toString() {
        return "Person [id=" + id + ", name=" + name + ", car=" + car + "]";
    }

}
第二步:配置spring容器applicationContext.xml
<!-- setter方法属性注入:调用默认构造器,相当于new Person() -->
    <bean id="person" class="com.igeek.xmlpropertydi.Person">
        <!--
        property:专门进行setter属性注入用的标签 。
            * name:setter方法的属性的名字,例如SetXxx-那么name的属性值为xxx。
            * value:简单的值
            * ref:bean的名字,对象的引用
        -->
        <property name="id" value="1001"/>
        <property name="name" value="Tom"/>
        <!-- <property name="car" ref="car"/> --><!--等同于-->
        <property name="car">
            <ref bean="car"/>
        </property>
    </bean>
第三步:使用SpringTest.java测试:
@Test
public void test1(){
    //spring容器
    ApplicationContext applicationContext = new ClassPathXmlApplicationContext("applicationContext.xml");
    //获取人
    Person person=(Person)applicationContext.getBean("person");
    System.out.println(person);
}
【扩展】
-
<!-- <property name="car" ref="car"/> -->
     <!--等同于-->
     <property name="car">
         <ref bean="car"/>
     </property>
深入理解setter方法的属性注入
抛出问题:
可以的!
修改Person.java类。
public class Person {
    private Integer id;
    private String pname;//其中pname和setName方法的属性不一致,而<property name="name" value="关羽"/>其中的name属性的值指的是setName()的属性名称。
    private Car car;
    //必须提供setter属性方法
    public void setId(Integer id) {
        this.id = id;
    }
    public void setName(String name) {
        this.pname = name;
    }
    public void setCar(Car car) {
        this.car = car;
    }

    public String toString() {
        return "Person [id=" + id + ", pname=" + pname + ", car=" + car + "]";
    }

}
p名称空间的使用-了解
什么是名称空间?
作用:Schema区分同名元素。(有点类似于java的包)
回顾:Xmlns没有前缀是默认的名称空间。
为简化XML文件的配置,Spring2.5版本开始引入了一个新的p名称空间。简单的说,它的作用是为了简化setter方法属性依赖注入配置的,它不是真正的名称空间。
它的使用方法:
p:<属性名>="xxx" 引入常量值
p:<属性名>-ref="xxx" 引用其它Bean对象
操作步骤:
第一步:引入p名称空间
<beans xmlns="http://www.springframework.org/schema/beans"
       xmlns:p="http://www.springframework.org/schema/p"
       xmlns:xsi="http://www.w3.org/2001/XMLSchema-instance"
       xsi:schemaLocation="
http://www.springframework.org/schema/beans
http://www.springframework.org/schema/beans/spring-beans.xsd">
第二步:将
<!-- 使用p名称空间简化setter方法属性注入 -->
<!--
p:name:简单数据类型的属性注入
P:car-ref:复杂数据类型(bean)的属性注入
-->
<bean id="person2" class="com.igeek.xmlpropertydi.Person" p:id="1002" p:name="关羽" p:car-ref="car"/>
第三步:测试
@Test
public void test2(){
    //spring容器
    ApplicationContext applicationContext = new ClassPathXmlApplicationContext("applicationContext.xml");
    Person person2=(Person)applicationContext.getBean("person2");
    System.out.println(person2);
}
spEL表达式的使用 –会用即可
spEL(Spring Expression Language)是一种表达式语言,它是spring3.x版本的新特性。
它的作用是:支持在运行时操作和查询对象,其语法类似统一的EL语言,但是SpEL提供了额外的功能,功能更强大。
语法: #{…} , 引用另一个Bean 、属性、 方法
SpEL表达式的使用功能比较多,Bean操作相关的通常有:
案例一:配置applicationContext.xml
<!-- spEL表达式 -->
<!-- car.id相当于car.getId() -->
<!-- car.name相当于car.getName() -->
<bean id="person3" class="com.igeek.xmlpropertydi.Person" p:id="#{car.id}" p:name="#{car.name}" p:car="#{car}"/>
如果抛出异常:
需要在Car对象中调用getId和getName的方法,获取id和name的属性值,然后赋值到Person对象name的属性中。
public class Car {
    //取值要用getter
    public Integer getId(){
        return this.id;
    }

    public String getName(){
        return this.name;
    }
}
案例二:配置applicationContext.xml
<!-- spEL表达式 -->
<bean id="person4" class="com.igeek.xmlpropertydi.Person" p:id="#{1+1}" p:name="#{'Jack'.toUpperCase()}" p:car="#{car}"/>
集合类型属性注入(了解-使用时查看即可)
作用:主要用于框架整合配置。
| Java.utils包中常用集合 (1)List (2)Set (3)Map (4)Properties |
|---|
Spring为集合提供了对应的标签:
|
|---|
第一步:创建类CollectionBean.java,并提供set方法用作集合的注入
public class CollectionBean {
    private List<String> list;
    private Set<Integer> set;
    private Map<String, Object> map;
    private Properties properties;//特殊类型的map,key和value都是String

    public void setList(List<String> list) {
        this.list = list;
    }
    public void setSet(Set<Integer> set) {
        this.set = set;
    }
    public void setMap(Map<String, Object> map) {
        this.map = map;
    }
    public void setProperties(Properties properties) {
        this.properties = properties;
    }

    public String toString() {
        return "CollectionBean [list=" + list + ", set=" + set + ", map=" + map
                + ", properties=" + properties + "]";
    }

}
第二步:配置spring的核心容器applicationContext.xml
<!-- 集合的属性注入 -->
    <bean id="collectionBean" class="com.igeek.xmlpropertydi.CollectionBean">
        <!-- setter -->
        <!-- list -->
        <property name="list">
            <list>
                <value>Tom</value>
                <value>Jack</value>
            </list>
        </property>
        <!-- set -->
        <property name="set">
            <set>
                <value>12</value>
                <value>15</value>
            </set>
        </property>
        <!-- map -->
        <property name="map">
            <map>
                <entry key="name" value="张三"/>
                <entry key="age" value="22"/>
                <entry key="car" value-ref="car"></entry>
            </map>
        </property>
        <!-- properties -->
        <property name="properties">
            <props>
                <prop key="name">李四</prop>
                <prop key="age">33</prop>
            </props>
        </property>
    </bean>
第三步:使用SpringTest类进行测试
@Test
public void test5(){
    //spring容器
    ApplicationContext applicationContext = new ClassPathXmlApplicationContext("applicationContext.xml");
    CollectionBean collectionBean=(CollectionBean)applicationContext.getBean("collectionBean");
    System.out.println(collectionBean);
}

Spring的多个配置文件的开发
| 一种:创建工厂的时候加载多个配置文件: ApplicationContext applicationContext = new ClassPathXmlApplicationContext(“applicationContext.xml”,”applicationContext2.xml”); 二种:在一个配置文件中包含另一个配置文件: |
|---|
案例代码
搭建环境:
创建web项目
引入配置文件:
* applicationContext.xml
<?xml version="1.0" encoding="UTF-8"?>
<beans xmlns="http://www.springframework.org/schema/beans"
       xmlns:xsi="http://www.w3.org/2001/XMLSchema-instance"
       xsi:schemaLocation="http://www.springframework.org/schema/beans
                           http://www.springframework.org/schema/beans/spring-beans.xsd">

    <bean id="userDao"  class="com.igeek.spring.UserDaoImpl"/>

    <bean name="userService" class="com.igeek.spring.UserServiceImpl">
        <property name="userDao" ref="userDao"/>
    </bean>
</beans>
* log4j2.xml
<?xml version="1.0" encoding="UTF-8"?>
 <Configuration status="WARN">
      <Appenders>
          <Console name="Console" target="SYSTEM_OUT">
              <PatternLayout pattern="%d{HH:mm:ss.SSS} [%t] %-5level %logger{36} - %msg%n" />
          </Console>
      </Appenders>
      <Loggers>
          <Root level="error">
             <AppenderRef ref="Console" />
         </Root>
     </Loggers>
 </Configuration>
项目文件:
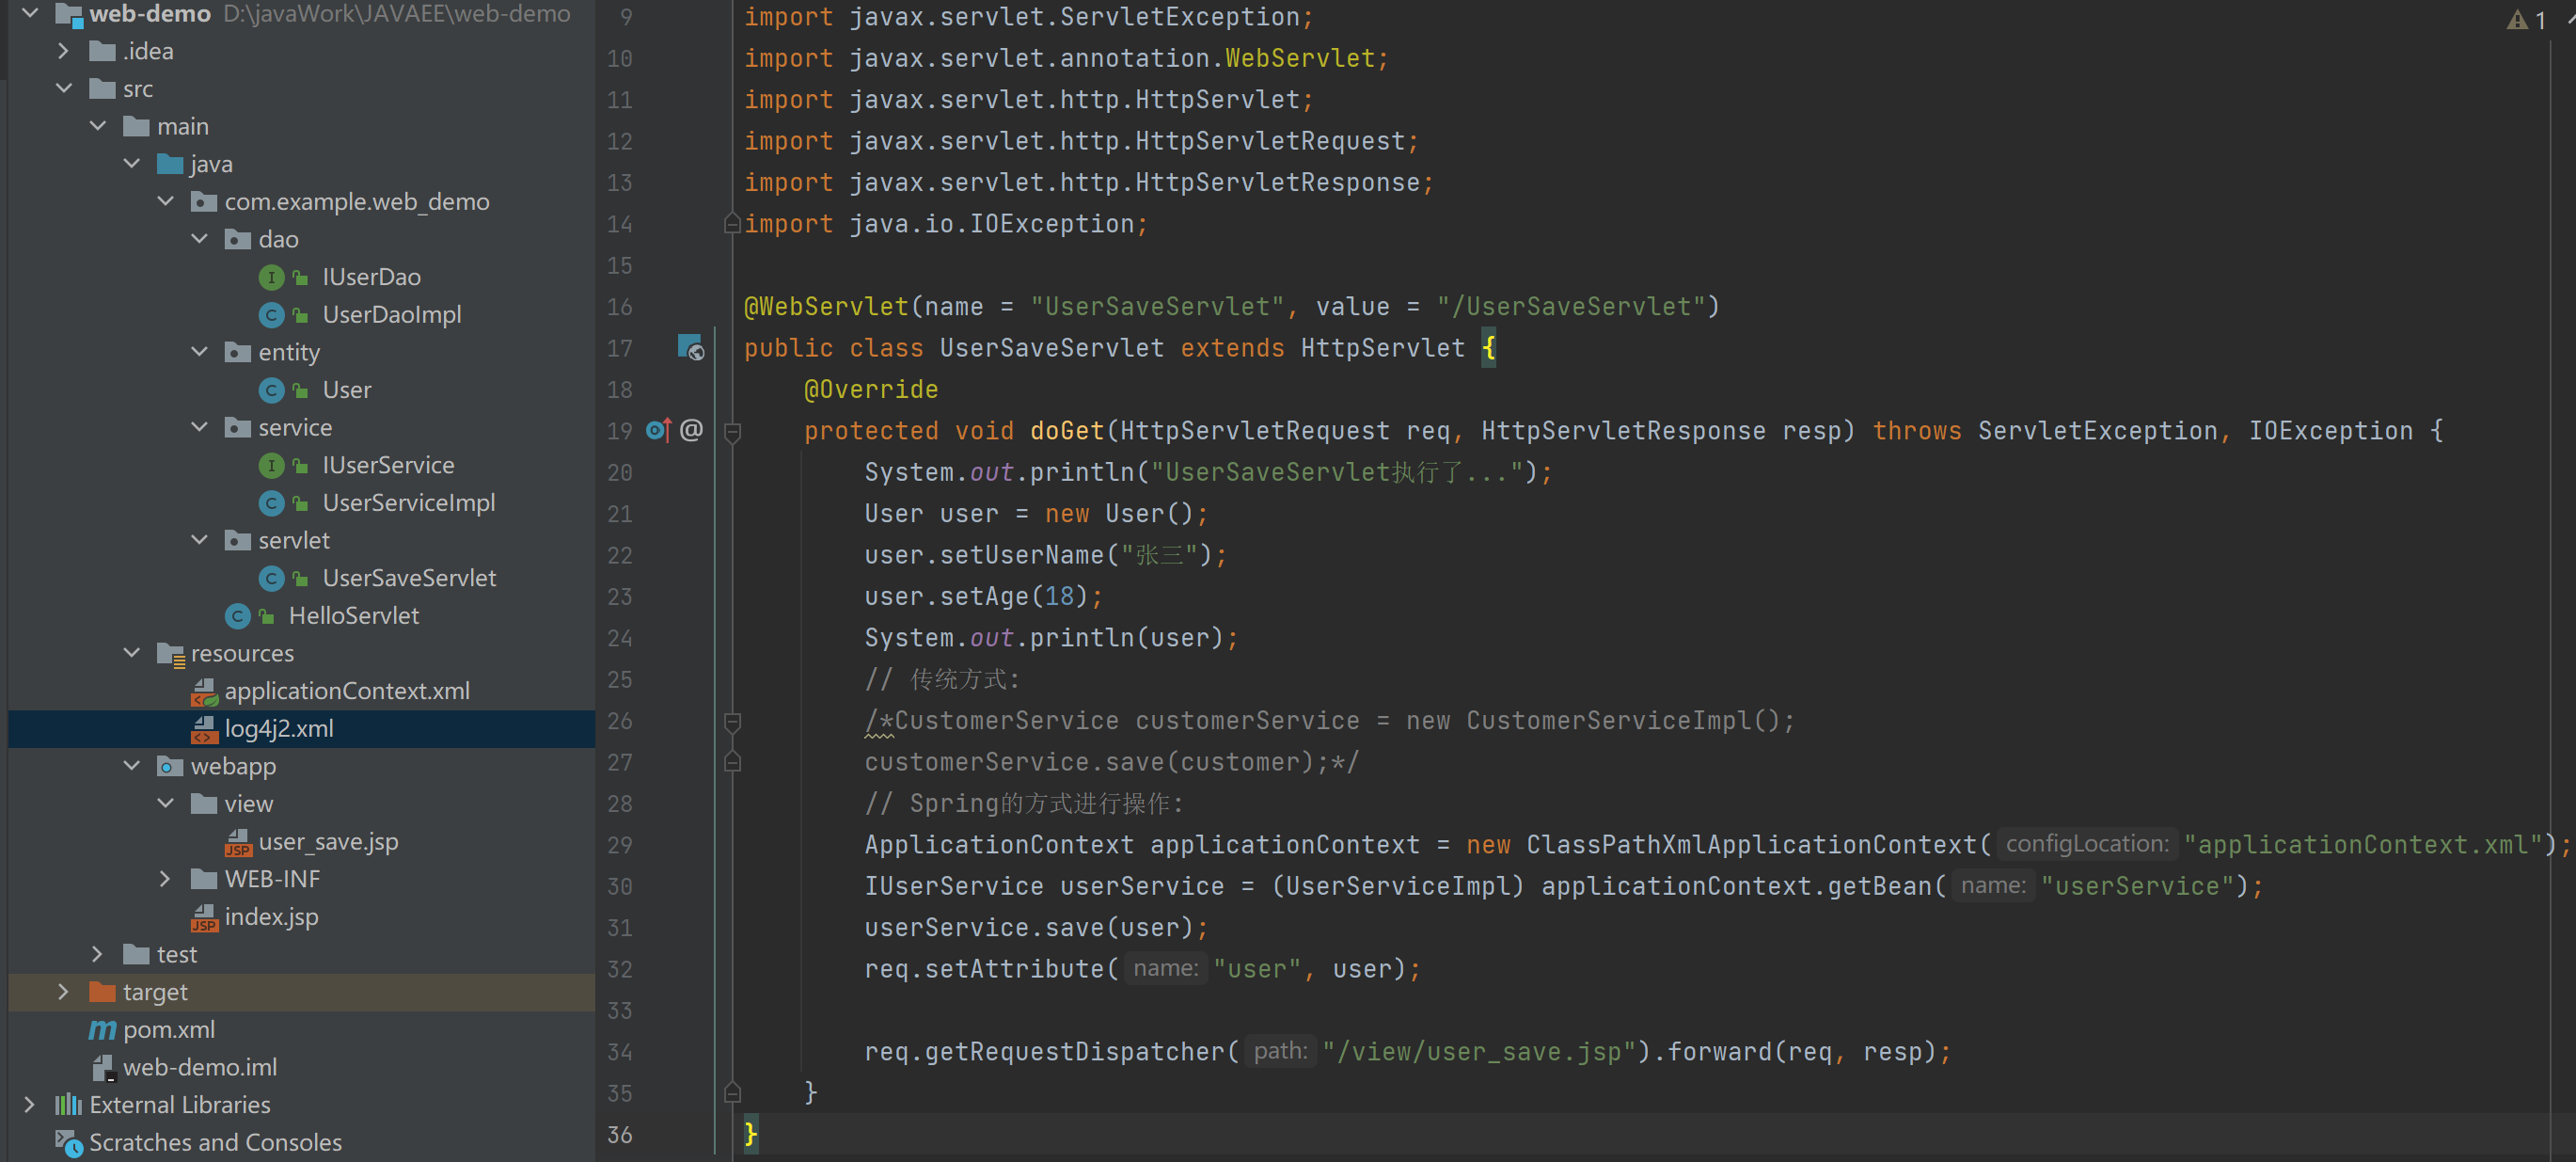
在Servlet调用业务层:
@WebServlet(name = "UserSaveServlet", value = "/UserSaveServlet")
public class UserSaveServlet extends HttpServlet {
    @Override
    protected void doGet(HttpServletRequest req, HttpServletResponse resp) throws ServletException, IOException {
        System.out.println("UserSaveServlet执行了...");
        User user = new User();
        user.setUserName("张三");
        user.setAge(18);
        System.out.println(user);
        // 传统方式:
        /*CustomerService customerService = new CustomerServiceImpl();
        customerService.save(customer);*/
        // Spring的方式进行操作:
        ApplicationContext applicationContext = new ClassPathXmlApplicationContext("applicationContext.xml");
        IUserService userService = (UserServiceImpl) applicationContext.getBean("userService");
        userService.save(user);
        req.setAttribute("user", user);

        req.getRequestDispatcher("/view/user_save.jsp").forward(req, resp);
    }
}
【思考、阅读】直接new ClassPathXmlApplicationContext()有什么缺点?
缺点:在创建Spring容器同时,需要对容器中对象初始化。而每次初始化容器的时候,都创建了新的容器对象,消耗了资源,降低了性能。
解决思路:保证容器对象只有一个。
解决方案:将Spring容器绑定到Web Servlet容器上,让Web容器来管理Spring容器的创建和销毁。
分析:ServletContext在Web服务运行过程中是唯一的, 其初始化的时候,会自动执行ServletContextListener 监听器 (用来监听上下文的创建和销毁),具体步骤为:
编写一个ServletContextListener监听器,在监听ServletContext到创建的时候,创建Spring容器,并将其放到ServletContext的属性中保存(setAttribute(Spring容器名字,Spring容器对象) )。
我们无需手动创建该监听器,因为Spring提供了一个叫ContextLoaderListener的监听器,它位于spring-web-5.3.6.jar中。
Spring整合WEB项目
开发步骤:
第一步:通过maven方式新建spring web项目
第二步:在web.xml 配置Spring的核心监听器
<!-- spring的核心监听器 -->
  <listener>
      <listener-class>org.springframework.web.context.ContextLoaderListener</listener-class>
  </listener>
第三步:启动tomcat服务器,结果发现异常,因为默认会加载
根据异常提示:发现spring的BeanFactory没有初始化,说明没有找到spring容器,即applicationContext.xml文件
第四步:在web容器中配置spring文件路径
为什么没有找到applicationContext.xml文件呢?因为此时加载的是WEB-INF/applicationContext.xml,而不是src下的applicationContext.xml文件
原因:找到ContextLoaderListener.class,再找到ContextLoader.class,发现默认加载的WEB-INF/applicationContext.xml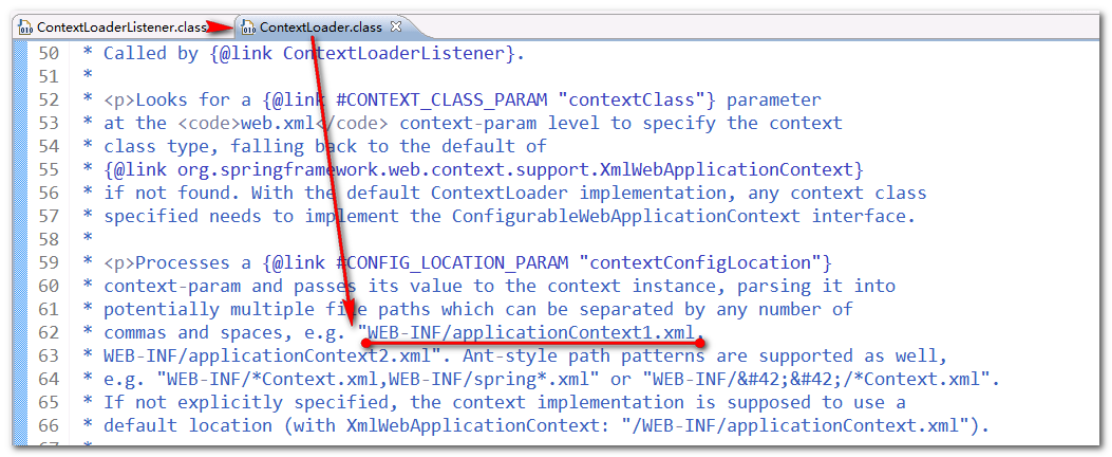
解决方案:需要在web.xml中配置,加载spring容器applicationContext.xml文件的路径
<!-- spring的核心监听器 -->
  <listener>
      <listener-class>org.springframework.web.context.ContextLoaderListener</listener-class>
  </listener>
  <!-- 全局参数变量 -->
  <context-param>
      <param-name>contextConfigLocation</param-name>
      <!-- applicationContext.xml文件的位置,使用classpath定义 -->
      <param-value>classpath:applicationContext.xml</param-value>
  </context-param>
重新启动tomcat服务器,没有异常,问题解决。
第五步:修改Servlet代码。在Servlet 中通过ServletContext 获取Spring容器对象
第一种方式:使用getAttribute
| //每次获取的都是一个spring容器 ApplicationContext applicationContext= (ApplicationContext)this.getServletContext().getAttribute(WebApplicationContext.ROOT_WEB_APPLICATION_CONTEXT_ATTRIBUTE); |
|---|
第二种方式:使用WebApplicationContextUtils (推荐)
| //工具类 WebApplicationContext applicationContext = WebApplicationContextUtils.getWebApplicationContext(this.getServletContext()); |
|---|
改写Servlet:
@WebServlet(name = "UserSaveServlet", value = "/UserSaveServlet")
public class UserSaveServlet extends HttpServlet {
    @Override
    protected void doGet(HttpServletRequest req, HttpServletResponse resp) throws ServletException, IOException {
        System.out.println("UserSaveServlet执行了...");
        User user = new User();
        user.setUserName("张三12");
        user.setAge(18);
        System.out.println(user);
        // 传统方式:
        /*CustomerService customerService = new CustomerServiceImpl();
        customerService.save(user);*/
        // Spring的方式进行操作:
        // ApplicationContext applicationContext = new ClassPathXmlApplicationContext("applicationContext.xml");

        ApplicationContext applicationContext = WebApplicationContextUtils.getWebApplicationContext(this.getServletContext());
        IUserService userService = (UserServiceImpl) applicationContext.getBean("userService");
        userService.save(user);
        req.setAttribute("user", user);

        req.getRequestDispatcher("/view/user_save.jsp").forward(req, resp);
    }
}
第一天总结:
1、复习Spring学习路线
2、IoC和DI概念区分
3、XML配置
实例化Bean方式 ,区分BeanFactory和FactoryBean
作用域 singleton和prototype
初始化和销毁 ——— 了解 BeanPostProcessor 后处理Bean
依赖注入(2种):构造器注入
了解 p名称空间 spEL 表达式
IoC容器装配Bean_基于注解配置方式
Bean的定义(注册) — 扫描机制
新建web项目:spring5_d02
第一步:
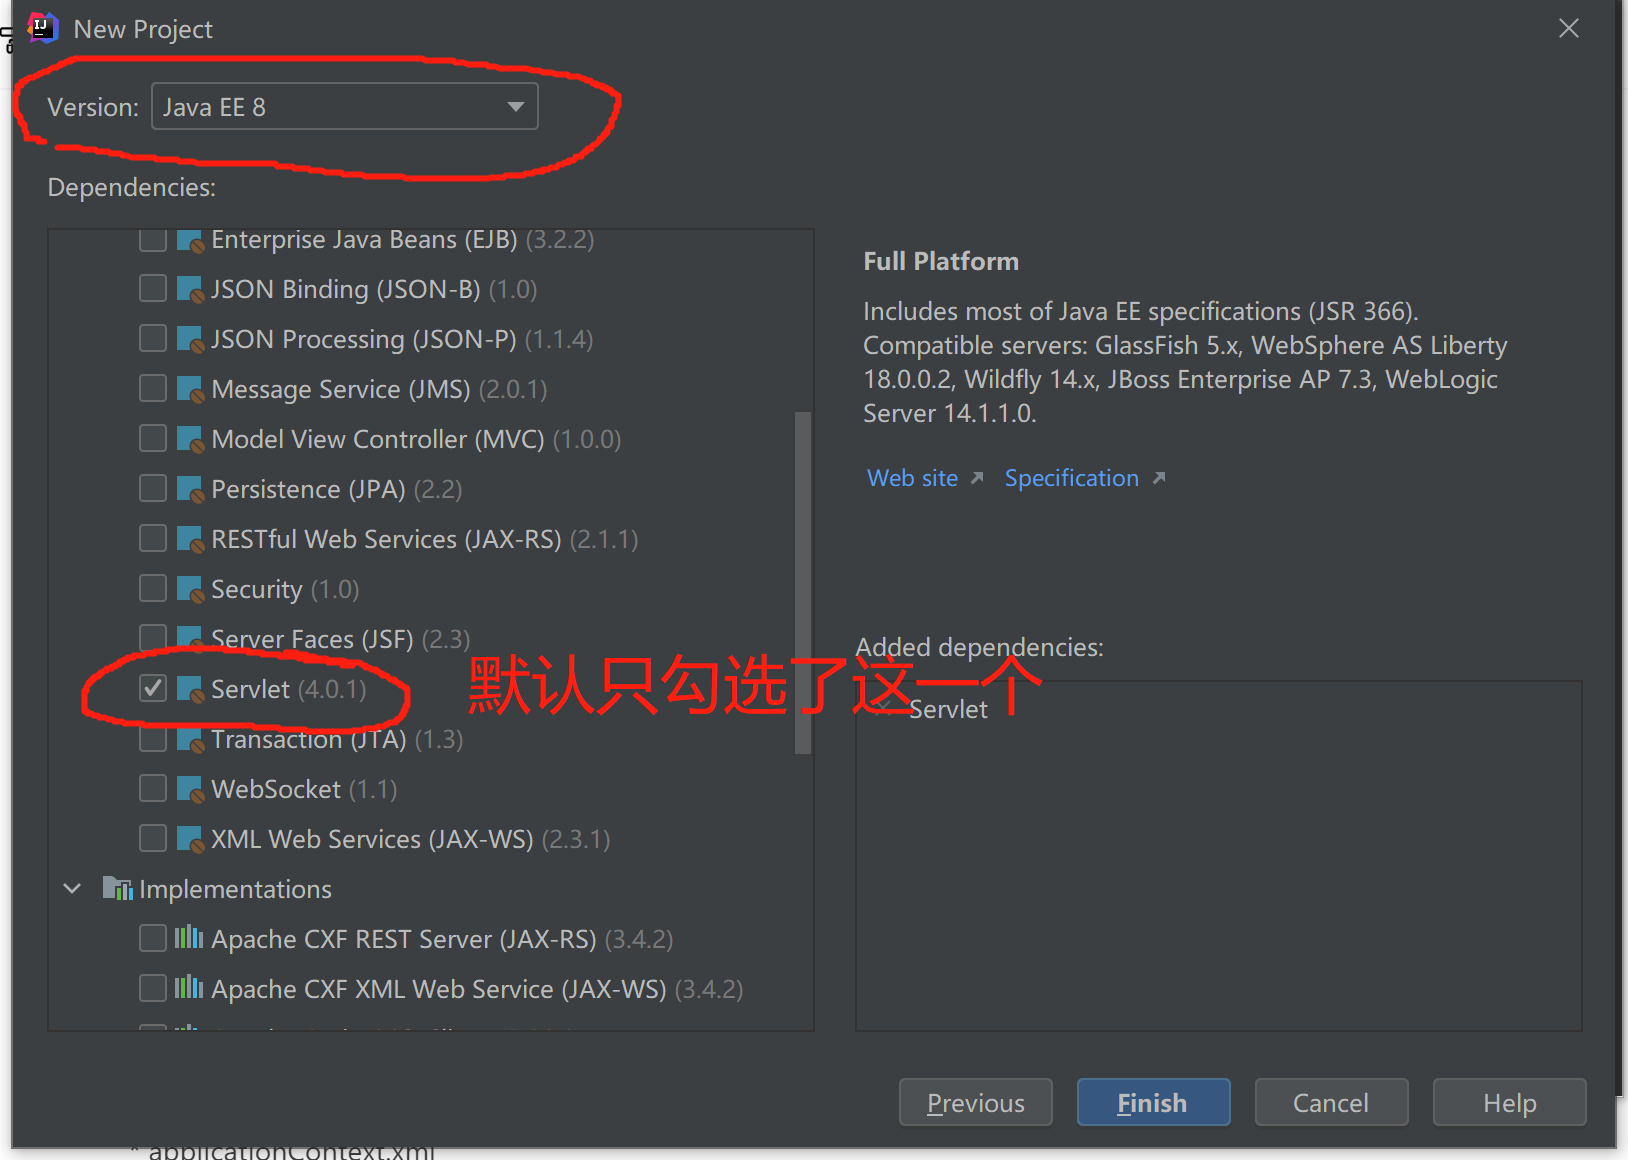
基于maven新建Java Enterprise项目,添加(spring依赖+日志依赖),pom.xml依赖如下:
<dependencies>
    <dependency>
        <groupId>org.springframework</groupId>
        <artifactId>spring-webmvc</artifactId>
        <version>5.3.6</version>
    </dependency>
    <dependency>
        <groupId>org.apache.logging.log4j</groupId>
        <artifactId>log4j-core</artifactId>
        <version>2.14.0</version>
    </dependency>
    <dependency>
        <groupId>javax.servlet</groupId>
        <artifactId>javax.servlet-api</artifactId>
        <version>4.0.1</version>
        <scope>provided</scope>
    </dependency>
    <dependency>
        <groupId>junit</groupId>
        <artifactId>junit</artifactId>
        <version>4.13.2</version>
        <scope>test</scope>
    </dependency>
</dependencies>
新建log4j2.xml
<?xml version="1.0" encoding="UTF-8"?>
<Configuration status="WARN">
    <Appenders>
        <Console name="Console" target="SYSTEM_OUT">
            <PatternLayout pattern="%d{HH:mm:ss.SSS} [%t] %-5level %logger{36} - %msg%n" />
        </Console>
    </Appenders>
    <Loggers>
        <Root level="error">
            <AppenderRef ref="Console" />
        </Root>
    </Loggers>
</Configuration>
新建applicationContext.xml
Spring XML开发和注解开发 导入jar包是相同的
第二步:编写Service和DAO 的注册
xml做法 :
注解做法: spring2.5引入 @Component 注解 如果放置到类的上面,相当于在spring容器中定义
创建包:com.igeek.ioc
创建类:CustomerService.java类
/**
 * @Component注解放置到类上
 * 相当于spring容器中定义:<bean id="customerService" class="com.igeek.ioc.CustomerService">
 * 其中id属性默认bean的名字是类名的小写
 * ——————————————————————————————————————————————————————
 * @Component(value="customer")//自定义bean的名字
 * 相当于spring容器中定义:<bean id="customer" class="com.igeek.ioc.CustomerService">
 * ——————————————————————————————————————————————————————
 */
@Component(value="customer")
public class CustomerService {

    //保存业务方法
    public void save(){
        System.out.println("CustomerService业务层被调用了。。。");
    }

}
第三步:配置注解开启和注解Bean的扫描。配置的示例如下:配置applicationContext.xml
<?xml version="1.0" encoding="UTF-8"?>
<beans xmlns="http://www.springframework.org/schema/beans"
       xmlns:context="http://www.springframework.org/schema/context"

       xmlns:xsi="http://www.w3.org/2001/XMLSchema-instance"
       xsi:schemaLocation="http://www.springframework.org/schema/beans
                        http://www.springframework.org/schema/beans/spring-beans.xsd
                           http://www.springframework.org/schema/context
                           http://www.springframework.org/schema/context/spring-context.xsd">
        <!-- 配置注解扫描
            context:component-scan:专门扫描含有@Component注解的类,自动将其作为bean
            base-package:要扫描包的路径,包含子包,com.igeek.ioc表示子包下的所有类定义注解都有效
            注解扫描配置的时候,会自动开启注解功能
    -->
    <context:component-scan base-package="com.igeek.ioc"/>

</beans>
引入context 名称空间 :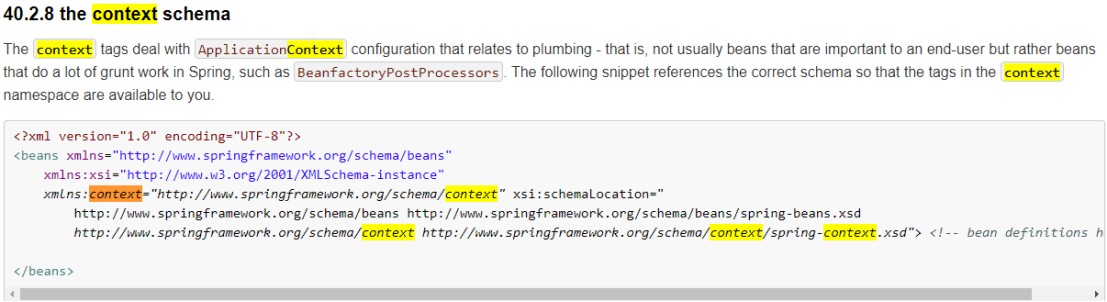
【注意】Spring的所有名称空间都需要基于Beans的名称空间。
第四步:测试:
public class SpringTest {

    @Test
    public void test(){
        //spring容器
        ApplicationContext applicationContext = new ClassPathXmlApplicationContext("applicationContext.xml");
        //获取bean
        CustomerService customerService=(CustomerService) applicationContext.getBean("customer");
        customerService.save();

    }
}
【扩展优化】:
衍生注解的问题
实际开发中,使用的是@Component三个衍生注解(“子注解”)
子注解的作用:有分层的意义(分层注解)。
| Spring3.0为我们引入了组件自动扫描机制,它可以在类路径底下寻找标注了@Component、@Service、@Controller、@Repository注解的类,并把这些类纳入进spring容器中管理。 除了@Component外,Spring提供了3个功能基本和@Component等效的注解 功能介绍 @Service用于标注业务层组件、(如Service层) @Controller用于标注控制层组件(如SpringMVC中的Controller层) @Repository用于标注数据访问组件,(如DAO层组件)。 而@Component泛指组件,当组件不好归类的时候,我们可以使用这个注解进行标注。 |
|---|
第一步:
修改CutomerService.java
//@Component(value="customer")//注释掉
@Service(value="customer")
public class CustomerService {

    //保存业务方法
    public void save(){
        System.out.println("CustomerService业务层被调用了。。。");
    }

}
创建CustomerDao.java
//持久层
@Repository("customerDao")
public class CustomerDao {

    public void save(){
        System.out.println("CustomerDao层被调用了");
    }

}
【抛出问题】:如果将Dao注入到Service呢?即使用Service类调用Dao类?
| 回顾:如果使用xml的配置,那么可以使用setter方法进行注入 |
|---|
Bean属性的依赖注入
简单数据类型依赖注入(了解)
Spring3.0后,提供 @Value注解,可以完成简单数据的注入
//@Component(value="customer")
@Service(value="customer")
public class CustomerService {
    //简单类型的成员变量
    @Value("Rose")//参数的值简单类型
    private String name="Jack";

    //保存业务方法
    public void save(){
        System.out.println("CustomerService业务层被调用了。。。");
        System.out.println("name:"+name);
    }
}
复杂类型数据依赖注入
下面完成,将Dao类的对象注入到Service类进行使用。
注解实现属性依赖注入,将注解加在setXxx方法上 或者 属性定义上 !(任选其一,省代码了)
第一种:使用@Value 结合SpEL —— spring3.0 后用
//@Component(value="customer")
@Service(value="customer")
public class CustomerService {
    //简单类型的成员变量
    @Value("Rose")//参数的值简单类型
    private String name="Jack";

    //在属性声明上面注入,底层自动还是生成setCustomerDao()
    //第一种: 使用@Value 结合SpEL  ---- spring3.0 后用
    //其中customerDao表示<bean>节点id的属性值
    //@Value(value="#{customerDao}")
    private CustomerDao customerDao;

    @Value(value="#{customerDao}")
    public void setCustomerDao(CustomerDao customerDao) {
        this.customerDao = customerDao;
    }

    //保存业务方法
    public void save(){
        System.out.println("CustomerService业务层被调用了。。。");
        System.out.println("name:"+name);
        customerDao.save();
    }

}
第二种:使用@Autowired 结合 @Qualifier
单独使用@Autowired ,表示按照类型注入,会到spring容器中查找CustomerDao的类型,对应
//第二种:使用spring的@Autowired
@Autowired//默认按照类型注入
private CustomerDao customerDao;
使用@Autowired + @ Qualifier 表示按照名称注入,会到spring容器中查找customerDao的名称,对应
//第二种:使用spring的@Autowired 结合 @Qualifier
@Autowired//默认按照类型注入的
@Qualifier("customerDao")//必须配合@Autowired注解使用,根据名字注入
private CustomerDao customerDao;
第三种: JSR-250标准(基于jdk) 提供注解@Resource
单独使用@Resource注解,表示先按照名称注入,会到spring容器中查找customerDao的名称,对应
如果没有找到,则会按照类型注入,会到spring容器中查找CustomerDao的类型,对应
//注解全名:javax.annotation.Resource,通过IDEA自动导入

//第三种: JSR-250标准(jdk) 提供@Resource
@Resource//默认先按照名称进行匹配,再按照类型进行匹配
private CustomerDao customerDao;
如果@Resource注解上添加name名称
使用@Resource注解,则按照名称注入,会到spring容器中查找customerDao的名称,对应
如果没有找到,抛出异常。
//第三种: JSR-250标准(jdk) 提供@Resource
@Resource(name="customerDao")//只能按照customerDao名称进行匹配
private CustomerDao customerDao;
第四种: JSR-330标准(jdk) 提供 @Inject
使用@Inject注解,则按照类型注入,
//注解全名:javax.inject.Inject, 通过IDEA自动导入

//第四种: JSR-330标准(jdk) 提供 @Inject ,配合@Named注解
@Inject//默认按照类型注入
private CustomerDao customerDao;
使用@inject和@Named注解,则按照名称注入
//第四种: JSR-330标准(jdk) 提供 @Inject ,配合@Named注解
@Inject//默认按照类型注入
@Named("customerDao")//按照名字注入,必须配合@Inject使用
private CustomerDao customerDao;
Bean的初始化和销毁
使用注解定义Bean的初始化和销毁
Spring初始化bean或销毁bean时,有时需要作一些处理工作,因此spring可以在创建和拆卸bean的时候调用bean的两个生命周期方法。
回顾配置文件的写法:
| 注解的写法: (1)当bean被载入到容器的时候调用setup , 注解方式如下: @PostConstruct 初始化 (2)当bean从容器中删除的时候调用teardown(scope= singleton有效) 注解方式如下: @PreDestroy 销毁 |
|---|
使用 @PostConstruct 注解, 标明初始化方法 —-相当于 init-method 指定初始化方法
使用 @PreDestroy 注解, 标明销毁方法 ——相当于 destroy-method 指定对象销毁方法
第一步:创建类:LifeCycleBean.java,定义构造方法、初始化的方法、销毁的方法。
//测试生命周期过程中的初始化和销毁bean
@Component("lifeCycleBean")
public class LifeCycleBean {

    public LifeCycleBean() {
        System.out.println("LifeCycleBean构造器调用了");
    }

    //初始化后自动调用方法:方法名随意,但也不能太随便,一会要配置
    @PostConstruct//初始化的方法
    public void init(){
        System.out.println("LifeCycleBean-init初始化时调用");
    }

    //bean销毁时调用的方法
    @PreDestroy
    public void destroy(){
        System.out.println("LifeCycleBean-destroy销毁时调用");
    }

}
第二步:配置文件,配置spring容器applicationContext.xml
<?xml version="1.0" encoding="UTF-8"?>
<beans xmlns="http://www.springframework.org/schema/beans"
       xmlns:xsi="http://www.w3.org/2001/XMLSchema-instance"
       xmlns:context="http://www.springframework.org/schema/context"
       xsi:schemaLocation="http://www.springframework.org/schema/beans
                              http://www.springframework.org/schema/beans/spring-beans.xsd
                           http://www.springframework.org/schema/context
                           http://www.springframework.org/schema/context/spring-context.xsd">
    <!-- 配置注解扫描
    context:component-scan:专门扫描含有@Component注解的类,自动将其作为bean
    base-package:要扫描包的路径,包含子包,com.igeek.ioc表示子包下的所有类定义注解都有效
    注解扫描配置的时候,会自动开启注解功能
    -->
    <context:component-scan base-package="com.igeek.ioc"/>


</beans>
第三步:使用SpringTest.java完成测试
@Test
public void testLifeCycle() throws Exception{
    //spring容器
    ApplicationContext applicationContext = new ClassPathXmlApplicationContext("applicationContext.xml");
    //单例;此时初始化的方法已经被调用
    LifeCycleBean lifeCycleBean = (LifeCycleBean)applicationContext.getBean("lifeCycleBean");
    //方案一:
    //((ClassPathXmlApplicationContext)applicationContext).close();
    //方案二:
    //反射的机制调用close方法。
    //接口只是引用了一个对象。对象本身有这个方法。
    //目标:通过接口引用,调用对象本来的拥有的方法
    //1。获取对象具体类的某个方法:参数1方法名,参数2:方法里面的参数类型
    Method method = applicationContext.getClass().getMethod("close");
    //参数1:拥有该方法的对象的名字,参数2:方法里面的参数的值
    method.invoke(applicationContext);

}
注意:如果要执行对象的销毁方法
条件一:单例Bean (在容器close时,单例Bean才会执行销毁方法)
条件二:必须调用容器 close 方法
Bean的作用域
通过@Scope注解,指定Bean的作用域(默认是 singleton 单例)
回顾:XML的方式
//测试生命周期过程中的初始化和销毁bean
@Component("lifeCycleBean")
//@Scope(value=ConfigurableBeanFactory.SCOPE_PROTOTYPE)
@Scope("prototype")//默认是单例(singleton),更改为多例(prototype)
public class LifeCycleBean {

}
测试:
@Test
public void testLifeCycleScope() throws Exception{
    //spring容器
    ApplicationContext applicationContext = new ClassPathXmlApplicationContext("applicationContext.xml");
    //单例;此时初始化的方法已经被调用
    LifeCycleBean lifeCycleBean1 = (LifeCycleBean)applicationContext.getBean("lifeCycleBean");
    LifeCycleBean lifeCycleBean2 = (LifeCycleBean)applicationContext.getBean("lifeCycleBean");
    System.out.println(lifeCycleBean1);
    System.out.println(lifeCycleBean2);
}
XML和注解混合配置
一个项目中XML和注解都有(特殊年代产物)
- Spring2.0 就有@Autowired注解
- Spring2.5 之后才有@Component注解
| 使用
XML 完成Bean定义
注解完成Bean属性注入 | | —- |
创建包:com.igeek.ioc.mixed
第一步:使用XML的方式完成Bean的定义
创建applicationContext-mixed.xml文件,定义:
<?xml version="1.0" encoding="UTF-8"?>
<beans xmlns="http://www.springframework.org/schema/beans"
       xmlns:xsi="http://www.w3.org/2001/XMLSchema-instance"
       xmlns:context="http://www.springframework.org/schema/context"
       xsi:schemaLocation="http://www.springframework.org/schema/beans
                              http://www.springframework.org/schema/beans/spring-beans.xsd
                           http://www.springframework.org/schema/context
                           http://www.springframework.org/schema/context/spring-context.xsd">

    <!-- xml方式定义bean -->
    <bean id="productDao" class="com.igeek.ioc.mixed.ProductDao"/>
    <bean id="productService" class="com.igeek.ioc.mixed.ProductService"/>

    <!-- 需要单独开启注解功能 -->
    <context:component-scan base-package="com.igeek.ioc"></context:component-scan>
</beans>
第二步:注解完成注入
(1)创建ProductDao类
//产品的数据层
public class ProductDao {

    public void save(){
        System.out.println("查询保存到数据口--数据层调用了");
    }

}
(2)创建ProductService类
//产品的业务层
public class ProductService {

    //注入dao
    //强调:注入必须是bean注入bean
    @Autowired
    private ProductDao productDao;

    //产品的保存
    public void save(){
        System.out.println("产品保存了,--业务层");
        //调用dao层
        productDao.save();
    }

}
测试类:
public class SpringTest {

    @Test
    public void test(){
        //spring容器
        ApplicationContext applicationContext = new ClassPathXmlApplicationContext("applicationContext-mixed.xml");
        //获取bean
        ProductService productService=(ProductService) applicationContext.getBean("productService");
        productService.save();

    }

}
备注:这里配置
才能使用 @PostConstruct @PreDestroy @Autowired @Resource等注解
<!-- 需要在spring容器中单独开启注解功能,扫描com.igeek.ioc包及其子包中所有类都有效,类中都可以使用注解 -->
<context:component-scan base-package="com.igeek.ioc"></context:component-scan>
Spring的junit测试集成
Spring提供spring-test-5.3.6.jar 可以整合junit。
优势:可以简化测试代码(不需要手动创建上下文,即手动创建spring容器)
使用spring和junit集成
第一步:新建项目添加junit 依赖
<dependency>
    <groupId>junit</groupId>
    <artifactId>junit</artifactId>
    <version>4.13.2</version>
    <scope>test</scope>
</dependency>
第二步:添加spring-test依赖
<dependency>
    <groupId>org.springframework</groupId>
    <artifactId>spring-test</artifactId>
    <version>5.3.6</version>
    <scope>test</scope>
</dependency>
第三步:创建包com.igeek.test,创建类SpringTest
通过@RunWith注解,使用junit整合spring
通过@ContextConfiguration注解,指定spring容器配置文件的位置
//目标:测试一下spring的bean的某些功能
@RunWith(SpringJUnit4ClassRunner.class)//junit整合spring的测试//立马开启了spring的注解
@ContextConfiguration(locations="classpath:applicationContext.xml")//加载核心配置文件,自动构建spring容器
public class SpringTest {
    //使用注解注入要测试的bean
    @Autowired
    private HelloService helloService;

    @Test
    public void testSayHello(){
        //获取spring容器
//        ApplicationContext applicationContext = new ClassPathXmlApplicationContext("applicationContext.xml");
        //从spring容器中获取bean对象
//        HelloService helloService=(HelloService)applicationContext.getBean("helloService");
        //测试业务功能
        helloService.sayHello();

    }
}
上述代码表示:在测试类运行前的初始化的时候,会自动创建ApplicationContext对象
第四步:通过@Autowired注解,注入需要测试的对象
//使用注解注入要测试的bean
@Autowired
private HelloService helloService;
第五步:调用测试方法完成测试
@Test
public void testSayHello(){
    helloService.sayHello();
}
第六步:在applicationContext.xml中添加:
<beans xmlns="http://www.springframework.org/schema/beans"
       xmlns:xsi="http://www.w3.org/2001/XMLSchema-instance"
       xmlns:p="http://www.springframework.org/schema/p"
       xmlns:context="http://www.springframework.org/schema/context"
       xsi:schemaLocation="http://www.springframework.org/schema/beans
                           http://www.springframework.org/schema/beans/spring-beans.xsd
                           http://www.springframework.org/schema/context
                           http://www.springframework.org/schema/context/spring-context.xsd">
    <!-- 开启组件扫描 -->
    <context:component-scan base-package="com.igeek.ioc"/>
    <!-- 创建Service -->
    <bean id="helloService" class="com.igeek.test.HelloService"></bean>
</beans>

若有收获,就点个赞吧
0 人点赞
