1、通过继承Thread类创建进程
//1. 创建一个继承于Thread类的子类class MyThread extends Thread {//2. 重写Thread类的run()@Overridepublic void run() {for (int i = 0; i < 100; i++) {if(i % 2 == 0){System.out.println(Thread.currentThread().getName() + ":" + i);}}}}public class ThreadTest {public static void main(String[] args) {//3. 创建Thread类的子类的对象MyThread t1 = new MyThread();//4.通过此对象调用start():①启动当前线程 ② 调用当前线程的run()t1.start();//问题一:我们不能通过直接调用run()的方式启动线程。// t1.run();/*问题二:再启动一个线程,遍历100以内的偶数。不可以还让已经start()的线程去执行。会报IllegalThreadStateException*/// t1.start();//我们需要重新创建一个线程的对象MyThread t2 = new MyThread();t2.start();//如下操作仍然是在main线程中执行的。for (int i = 0; i < 100; i++) {if(i % 2 == 0){System.out.println(Thread.currentThread().getName() + ":" + i + "***********main()************");}}}}
Thread的构造方法
创建线程对象Thread,默认有一个线程名,以Thread-开头,从0开始计数,如“Thread-0、Thread-1、Thread-2 …”
如果没有传递Runnable或者没有覆写Thread的run方法,该Thread不会调用任何方法
如果传递Runnable接口的实例或者覆写run方法,则会执行该方法的逻辑单元(逻辑代码)
如果构造线程对象时,未传入ThreadGroup,Thread会默认获取父线程的ThreadGroup作为该线程的ThreadGroup,此时子线程和父线程会在同一个ThreadGroup中
stackSize可以提高线程栈的深度,放更多栈帧,但是会减少能创建的线程数目
stackSize默认是0,如果是0,代表着被忽略,该参数会被JNI函数调用,但是注意某些平台可能会失效,可以通过“-Xss10m”设置
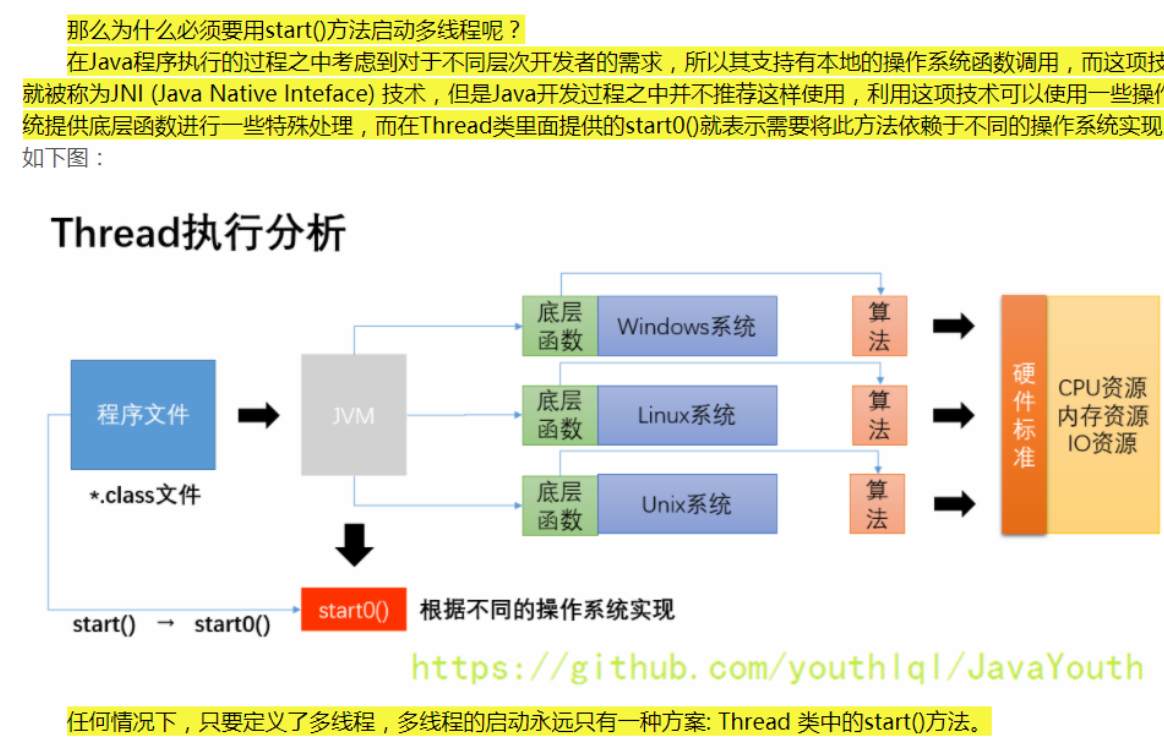
*下面是Thread 的部分源码*/public Thread(Runnable target) {init(null, target, "Thread-" + nextThreadNum(), 0);}public Thread(String name) {init(null, null, name, 0);}↓ ↓ ↓↓ ↓↓private void init(ThreadGroup g, Runnable target, String name,long stackSize) {init(g, target, name, stackSize, null, true);}↓ ↓ ↓↓ ↓↓private void init(ThreadGroup g, Runnable target, String name,long stackSize, AccessControlContext acc,boolean inheritThreadLocals) {//中间源码省略this.target = target;//①}/* What will be run. */private Runnable target; //Thread类中的target属性@Overridepublic void run() {if (target != null) { //②target.run();}}
Thread类常用API
获取当前存活的线程数:public int activeCount()
获取当前线程组的线程的集合:public int enumerate(Thread[] list)
start()源码
public synchronized void start() {if (threadStatus != 0)throw new IllegalThreadStateException();//①group.add(this);boolean started = false;try {start0();started = true;} finally {try {if (!started) {group.threadStartFailed(this);}} catch (Throwable ignore) {/* do nothing. If start0 threw a Throwable thenit will be passed up the call stack */}}}private native void start0();@Overridepublic void run() {if (target != null) {target.run();}}

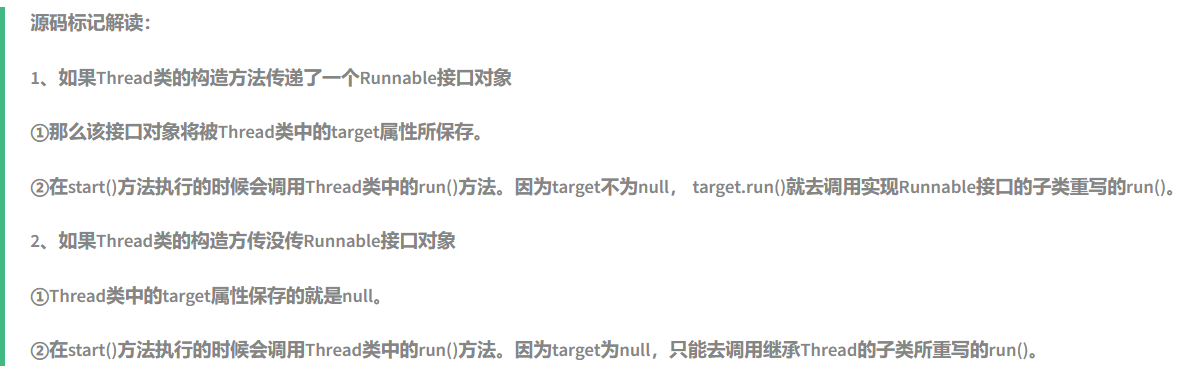
为什么线程的启动不直接使用run()而必须使用start()呢?
2、通过实现Runnable接口创建线程
//1. 创建一个实现了Runnable接口的类class MThread implements Runnable{//2. 实现类去实现Runnable中的抽象方法:run()@Overridepublic void run() {for (int i = 0; i < 100; i++) {if(i % 2 == 0){System.out.println(Thread.currentThread().getName() + ":" + i);}}}}public class ThreadTest1 {public static void main(String[] args) {//3. 创建实现类的对象MThread mThread = new MThread();//4. 将此对象作为参数传递到Thread类的构造器中,创建Thread类的对象Thread t1 = new Thread(mThread);t1.setName("线程1");/*5. 通过Thread类的对象调用start():① 启动线程 ②调用当前线程的run()-->调用了Runnable类型的target的run()*/t1.start();//再启动一个线程,遍历100以内的偶数Thread t2 = new Thread(mThread);t2.setName("线程2");t2.start();}}
Thread类和Runnable接口的关系
Runnable接口构造线程源码
/*下面是Thread类的部分源码*///1.用Runnable接口创建线程时会进入这个方法public Thread(Runnable target) {init(null, target, "Thread-" + nextThreadNum(), 0);}//2.接着调用这个方法private void init(ThreadGroup g, Runnable target, String name,long stackSize) {init(g, target, name, stackSize, null, true);}//3.再调用这个方法private void init(ThreadGroup g, Runnable target, String name,long stackSize, AccessControlContext acc,boolean inheritThreadLocals) {if (name == null) {throw new NullPointerException("name cannot be null");}this.name = name;Thread parent = currentThread();SecurityManager security = System.getSecurityManager();if (g == null) {/* Determine if it's an applet or not *//* If there is a security manager, ask the security managerwhat to do. */if (security != null) {g = security.getThreadGroup();}/* If the security doesn't have a strong opinion of the matteruse the parent thread group. */if (g == null) {g = parent.getThreadGroup();}}/* checkAccess regardless of whether or not threadgroup isexplicitly passed in. */g.checkAccess();/** Do we have the required permissions?*/if (security != null) {if (isCCLOverridden(getClass())) {security.checkPermission(SUBCLASS_IMPLEMENTATION_PERMISSION);}}g.addUnstarted();this.group = g;this.daemon = parent.isDaemon();this.priority = parent.getPriority();if (security == null || isCCLOverridden(parent.getClass()))this.contextClassLoader = parent.getContextClassLoader();elsethis.contextClassLoader = parent.contextClassLoader;this.inheritedAccessControlContext =acc != null ? acc : AccessController.getContext();//4.最后在这里将Runnable接口(target)赋值给Thread自己的target成员属性this.target = target;setPriority(priority);if (inheritThreadLocals && parent.inheritableThreadLocals != null)this.inheritableThreadLocals =ThreadLocal.createInheritedMap(parent.inheritableThreadLocals);/* Stash the specified stack size in case the VM cares */this.stackSize = stackSize;/* Set thread ID */tid = nextThreadID();}/*如果你是实现了runnable接口,那么在上面的代码中target便不会为null,那么最终就会通过重写的规则去调用真正实现了Runnable接口(你之前传进来的那个Runnable接口实现类)的类里的run方法*/@Overridepublic void run() {if (target != null) {target.run();}}
Thread类构造线程源码
//代码从上往下顺序执行public Thread() {init(null, null, "Thread-" + nextThreadNum(), 0);}private void init(ThreadGroup g, Runnable target, String name,long stackSize) {init(g, target, name, stackSize, null, true);}private void init(ThreadGroup g, Runnable target, String name,long stackSize, AccessControlContext acc,boolean inheritThreadLocals) {if (name == null) {throw new NullPointerException("name cannot be null");}this.name = name;Thread parent = currentThread();SecurityManager security = System.getSecurityManager();if (g == null) {/* Determine if it's an applet or not *//* If there is a security manager, ask the security managerwhat to do. */if (security != null) {g = security.getThreadGroup();}/* If the security doesn't have a strong opinion of the matteruse the parent thread group. */if (g == null) {g = parent.getThreadGroup();}}/* checkAccess regardless of whether or not threadgroup isexplicitly passed in. */g.checkAccess();/** Do we have the required permissions?*/if (security != null) {if (isCCLOverridden(getClass())) {security.checkPermission(SUBCLASS_IMPLEMENTATION_PERMISSION);}}g.addUnstarted();this.group = g;this.daemon = parent.isDaemon();this.priority = parent.getPriority();if (security == null || isCCLOverridden(parent.getClass()))this.contextClassLoader = parent.getContextClassLoader();elsethis.contextClassLoader = parent.contextClassLoader;this.inheritedAccessControlContext =acc != null ? acc : AccessController.getContext();this.target = target;setPriority(priority);if (inheritThreadLocals && parent.inheritableThreadLocals != null)this.inheritableThreadLocals =ThreadLocal.createInheritedMap(parent.inheritableThreadLocals);/* Stash the specified stack size in case the VM cares */this.stackSize = stackSize;/* Set thread ID */tid = nextThreadID();}/*由于这里是通过继承Thread类来实现的线程,那么target这个东西就是Null。但是因为你继承了Runnable接口并且重写了run(),所以最终还是调用子类的run()*/@Overridepublic void run() {if (target != null) {target.run();}}
直观描述
1、Thread类
class Window extends Thread{private int ticket = 100;@Overridepublic void run() {while(true){if(ticket > 0){System.out.println(getName() + ":卖票,票号为:" + ticket);ticket--;}else{break;}}}}public class WindowTest {public static void main(String[] args) {Window t1 = new Window();Window t2 = new Window();Window t3 = new Window();t1.setName("窗口1");t2.setName("窗口2");t3.setName("窗口3");t1.start();t2.start();t3.start();}}
2、Runnable接口
class Window1 implements Runnable{private int ticket = 100;@Overridepublic void run() {while(true){if(ticket > 0){System.out.println(Thread.currentThread().getName() + ":卖票,票号为:" + ticket);ticket--;}else{break;}}}}public class WindowTest1 {public static void main(String[] args) {Window1 w = new Window1();Thread t1 = new Thread(w);Thread t2 = new Thread(w);Thread t3 = new Thread(w);t1.setName("窗口1");t2.setName("窗口2");t3.setName("窗口3");t1.start();t2.start();t3.start();}}
解析:1、Threa类new了三个Thread,实际上有300张票
2、Runnable接口,new了三个Thread,实际上有100张票
3、也就是说实现Runnable接口的线程中,成员属性是所有线程共有的。但是继承Thread类的线程中,成员属性是各个线程独有的,其它线程看不到,除非采用static的方式才能使各个线程都能看到。
4、就像上面说的Runnable相当于资源,Thread才是线程。用Runnable创建线程时,new了多个Thread,但是传进去的参数都是同一个Runnable(资源)。用Thread创建线程时,就直接new了多个线程,每个线程都有自己的Runnable(资源)。在Thread源码中就是用target变量(这是一个Runnable类型的变量)来表示这个资源。
5、同时因为这两个的区别,在并发编程中,继承了Thread的子类在进行线程同步时不能将成员变量当做锁,因为多个线程拿到的不是同一把锁,不过用static变量可以解决这个问题。而实现了Runnable接口的类在进行线程同步时没有这个问题。
策略模式在Thread和Runnable中的应用
Runnable接口最重要的方法——-run方法,使用了策略者模式将执行的逻辑(run方法)和程序的执行单元(start0方法)分离出来,使用户可以定义自己的程序处理逻辑,更符合面向对象的思想。
3、通过实现Callable接口创建线程
//Callable实现多线程class MyThread implements Callable<String> {//线程的主体类@Overridepublic String call() throws Exception {for (int x = 0; x < 10; x++) {System.out.println("*******线程执行,x=" + x + "********");}return "线程执行完毕";}}public class Demo1 {public static void main(String[] args) throws Exception {FutureTask<String> task = new FutureTask<>(new MyThread());new Thread(task).start();System.out.println("线程返回数据" + task.get());}}
Callable最主要的就是提供带有返回值的call方法来创建线程。不过Callable要和Future实现类连着用,关于Future的内容在后续。
4、线程的生命周期
Java 线程在运行的生命周期中的指定时刻只可能处于下面 6 种不同状态的其中一个状态,这几个状态在Java源码中用枚举来表示。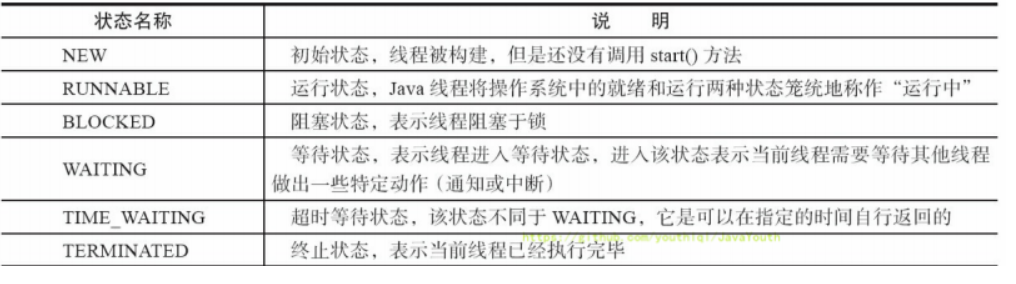
线程在生命周期中并不是固定处于某一个状态而是随着代码的执行在不同状态之间切换。Java 线程状态变迁如下图所示。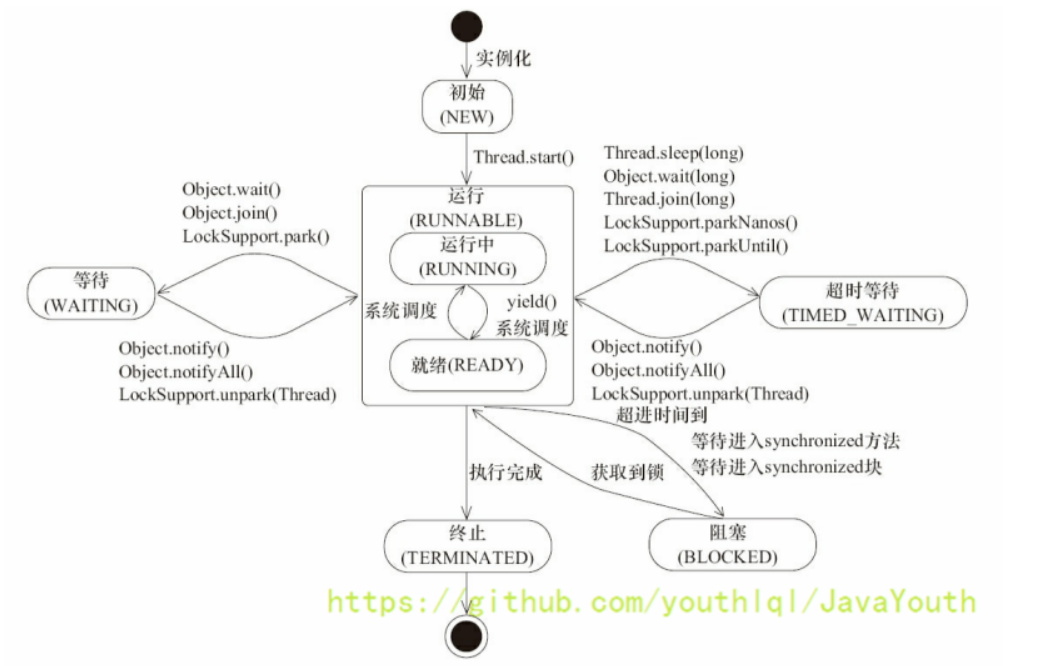
1、由上图可以看出:线程创建之后它将处于 NEW(新建) 状态,调用 start() 方法后开始运行,线程这时候处于 READY(可运行) 状态。可运行状态的线程获得了 CPU 时间片(timeslice)后就处于 RUNNING(运行) 状态。(Runable状态与Running状态统称为Runnable态)
2、操作系统隐藏 Java 虚拟机(JVM)中的 READY 和 RUNNING 状态,它只能看到 RUNNABLE 状态,所以 Java 系统一般将这两个状态统称为 RUNNABLE(运行中) 状态 。
3、调用sleep()方法,会进入Blocked状态。sleep()结束之后,Blocked状态首先回到的是Runnable状态中的Ready(也就是可运行状态,但并未运行)。只有拿到了cpu的时间片才会进入Runnable中的Running状态。
5、Java程序中的线程相关知识
一个java程序通常有几个线程
1、当你调用一个线程start()方法的时候,此时至少有两个线程,一个是调用你的线程,还有一个是被你创建出来的线程。
public static void main(String[] args) {Thread t1 = new Thread() {@Overridepublic void run() {System.out.println("==========");}};t1.start();}
这里面就是一个调用你的线程(main线程),一个被你创建出来的线程(t1,名字可能是Thread-0)
2、当JVM启动后,实际有多个线程,但是至少有一个非守护线程(比如main线程)。
Finalizer:GC守护线程
RMI:Java自带的远程方法调用(秋招面试,有个面试官问过)
Monitor :是一个守护线程,负责监听一些操作,也在main线程组中
其它
守护线程
public static void main(String[] args) throws InterruptedException {Thread t = new Thread() {@Overridepublic void run() {try {System.out.println(Thread.currentThread().getName() + " running");Thread.sleep(100000);//①System.out.println(Thread.currentThread().getName() + " done.");} catch (InterruptedException e) {e.printStackTrace();}}}; //newt.setDaemon(true);//②t.start();Thread.sleep(5_000); //JDK1.7System.out.println(Thread.currentThread().getName());}
源码标记解读:
①变量名为t的线程Thread-0,睡眠100秒。
②但是在主函数里Thread-0设置成了main线程的守护线程。所以5秒之后main线程结束了,即使在①这里守护线程还是处于睡眠100秒的状态,但由于他是守护线程,非守护线程main结束了,守护线程也必须结束。
③但是如果Thread-0线程不是守护线程,即使main线程结束了,Thread-0线程仍然会睡眠100秒再结束。
当主线程死亡后,守护线程会跟着死亡
可以帮助做一些辅助性的东西,如“心跳检测”
设置守护线程:public final void setDaemon(boolean on)
用处
A和B之间有一条网络连接,可以用守护线程来进行发送心跳,一旦A和B连接断开,非守护线程就结束了,守护线程(也就是心跳没有必要再发送了)也刚好断开。
public static void main(String[] args) {Thread t = new Thread(() -> {Thread innerThread = new Thread(() -> {try {while (true) {System.out.println("Do some thing for health check.");Thread.sleep(1_000);}} catch (InterruptedException e) {e.printStackTrace();}});// innerThread.setDaemon(true);innerThread.start();try {Thread.sleep(1_000);System.out.println("T thread finish done.");} catch (InterruptedException e) {e.printStackTrace();}});//t.setDaemon(true);t.start();}/*设置该线程为守护线程必须在启动它之前。如果t.start()之后,再t.setDaemon(true);会抛出IllegalThreadStateException*/

Join方法
例子1
public static void main(String[] args) throws InterruptedException {Thread t1 = new Thread(() -> {IntStream.range(1, 1000).forEach(i -> System.out.println(Thread.currentThread().getName() + "->" + i));});Thread t2 = new Thread(() -> {IntStream.range(1, 1000).forEach(i -> System.out.println(Thread.currentThread().getName() + "->" + i));});t1.start();t2.start();t1.join();t2.join();Optional.of("All of tasks finish done.").ifPresent(System.out::println);IntStream.range(1, 1000).forEach(i -> System.out.println(Thread.currentThread().getName() + "->" + i));}

例子2
public static void main(String[] args) throws InterruptedException {Thread t1 = new Thread(() -> {IntStream.range(1, 1000).forEach(i -> System.out.println(Thread.currentThread().getName() + "->" + i));});Thread t2 = new Thread(() -> {try {t1.join();} catch (InterruptedException e) {e.printStackTrace();}IntStream.range(1, 1000).forEach(i -> System.out.println(Thread.currentThread().getName() + "->" + i));});t1.start();t2.start();// t1.join();t2.join();Optional.of("All of tasks finish done.").ifPresent(System.out::println);IntStream.range(1, 1000).forEach(i -> System.out.println(Thread.currentThread().getName() + "->" + i));}

中断
1、Java 中的中断和操作系统的中断还不一样,这里就按照状态来理解吧,不要和操作系统的中断联系在一起
2、记住中断只是一个状态,Java的方法可以选择对这个中断进行响应,也可以选择不响应。响应的意思就是写相对应的代码执行相对应的操作,不响应的意思就是什么代码都不写。
几个方法
// Thread 类中的实例方法,持有线程实例引用即可检测线程中断状态public boolean isInterrupted() {}/*1、Thread 中的静态方法,检测调用这个方法的线程是否已经中断2、注意:这个方法返回中断状态的同时,会将此线程的中断状态重置为 false如果我们连续调用两次这个方法的话,第二次的返回值肯定就是 false 了*/public static boolean interrupted() {}// Thread 类中的实例方法,用于设置一个线程的中断状态为 truepublic void interrupt() {}
小tips
public static boolean interrupted()public boolean isInterrupted()//这个会清除中断状态
为什么要这么设置呢?原因在于:
interrupted()是一个静态方法,可以在Runnable接口实例中使用
isInterrupted()是一个Thread的实例方法,在重写Thread的run方法时使用
public class ThreadInterrupt {public static void main(String[] args) throws InterruptedException {Thread t1 = new Thread(() -> {System.out.println(Thread.interrupted());}); //这个new Thread用的是runnable接口那个构造函数Thread t2 = new Thread(){@Overridepublic void run() {System.out.println(isInterrupted());}};//这个new Thread用的就是Thread的空参构造}}
也就是说接口中不能调用Thread的实例方法,只能通过静态方法来判断是否发生中断
重难点
当然,中断除了是线程状态外,还有其他含义,否则也不需要专门搞一个这个概念出来了。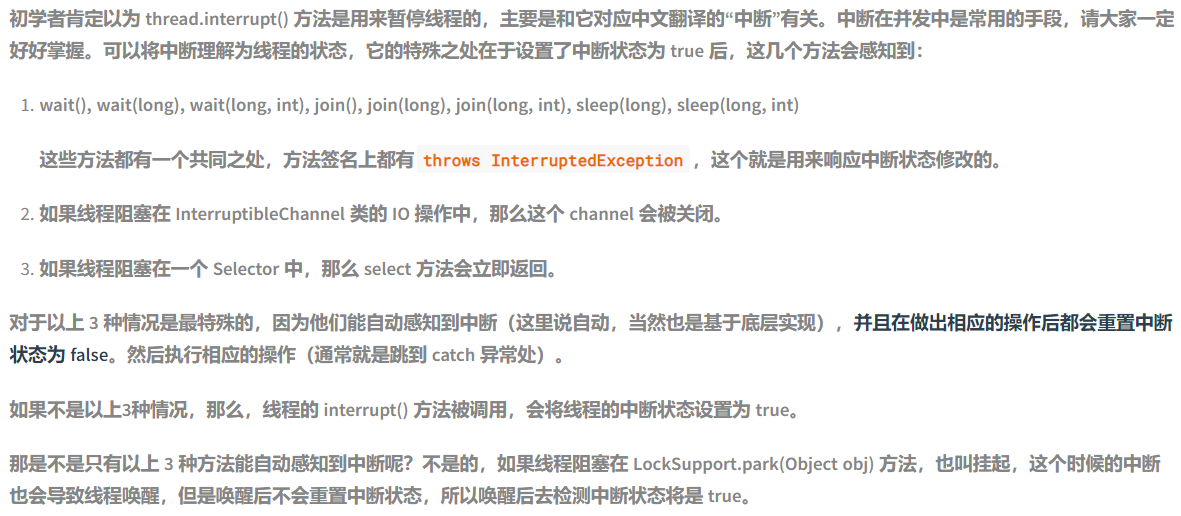
InterruptionException
它是一个特殊的异常,不是说 JVM 对其有特殊的处理,而是它的使用场景比较特殊。通常,我们可以看到,像 Object 中的 wait() 方法,ReentrantLock 中的 lockInterruptibly() 方法,Thread 中的 sleep() 方法等等,这些方法都带有 throws InterruptedException,我们通常称这些方法为阻塞方法(blocking method)。
阻塞方法一个很明显的特征是,它们需要花费比较长的时间(不是绝对的,只是说明时间不可控),还有它们的方法结束返回往往依赖于外部条件,如 wait 方法依赖于其他线程的 notify,lock 方法依赖于其他线程的 unlock等等。
当我们看到方法上带有 throws InterruptedException 时,我们就要知道,这个方法应该是阻塞方法,我们如果希望它能早点返回的话,我们往往可以通过中断来实现。
除了几个特殊类(如 Object,Thread等)外,感知中断并提前返回是通过轮询中断状态来实现的。我们自己需要写可中断的方法的时候,就是通过在合适的时机(通常在循环的开始处)去判断线程的中断状态,然后做相应的操作(通常是方法直接返回或者抛出异常)。当然,我们也要看到,如果我们一次循环花的时间比较长的话,那么就需要比较长的时间才能感知到线程中断了。
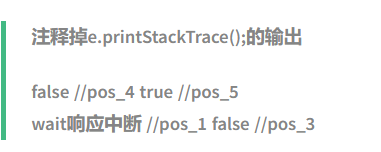
wait()中断测试
public static void main(String[] args) {Thread t = new Thread() {@Overridepublic void run() {while (true) {synchronized (MONITOR) {try {MONITOR.wait(10);} catch (InterruptedException e) {System.out.println("wait响应中断");//pos_1e.printStackTrace();//pos_2System.out.println(isInterrupted());//pos_3}}}}};t.start();try {Thread.sleep(100);} catch (InterruptedException e) {System.out.println("sleep响应中断");e.printStackTrace();}System.out.println(t.isInterrupted());//pos_4t.interrupt();System.out.println(t.isInterrupted());//pos_5}
jion()中断测试
Thread main = Thread.currentThread();Thread t2 = new Thread() {@Overridepublic void run() {try {Thread.sleep(100);} catch (InterruptedException e) {e.printStackTrace();}main.interrupt(); //pos_1System.out.println("interrupt");}};t2.start();try {t.join(); //pos_2} catch (InterruptedException e) {e.printStackTrace();}
1、pos_2这里join的是main线程,所以pos_1这里需要中断main线程,才能收到中断信息。
关闭线程
通过一个boolean优雅的关闭
private static class Worker extends Thread {private volatile boolean start = true;@Overridepublic void run() {while (start) {//执行相应的工作}}public void shutdown() {this.start = false;}}public static void main(String[] args) {Worker worker = new Worker();worker.start();try {Thread.sleep(10000);} catch (InterruptedException e) {e.printStackTrace();}worker.shutdown();}
通过判断中断状态关闭
private static class Worker extends Thread {@Overridepublic void run() {while (true) {if (Thread.interrupted()){break;}//pos_1}}}public static void main(String[] args) {Worker worker = new Worker();worker.start();try {Thread.sleep(3000);} catch (InterruptedException e) {e.printStackTrace();}worker.interrupt();}
1、但是如果pos_1位置有一个很费时的IO操作,就没有机会执行到if判断那里,也就不能关闭线程。所以就需要下面的暴力方法
暴力管理(守护进程)
public class ThreadService {//执行线程private Thread executeThread;private boolean finished = false;public void execute(Runnable task) {executeThread = new Thread() {@Overridepublic void run() {Thread runner = new Thread(task);runner.setDaemon(true);//创建一个守护线程,让守护线程来执行工作runner.start();try {/*** 1、要让executeThread等守护线程执行完,才能执行executeThread自己的逻辑。不然守护线程* 可能就来不及执行真正的工作就死了。所以这里要join* 2、runner.join(),所以实际上等待的是executeThread //pos_1*/runner.join();finished = true;} catch (InterruptedException e) {//e.printStackTrace();}}};executeThread.start();}public void shutdown(long mills) {long currentTime = System.currentTimeMillis();while (!finished) {if ((System.currentTimeMillis() - currentTime) >= mills) {System.out.println("任务超时,需要结束他!");/** pos_1那里,由于实际等待的是executeThread,所以这里中断executeThread。* pos_1就可以捕获到中断,执行线程(executeThread)就结束了,进而真正执行任务的* 守护线程runner也结束了*/executeThread.interrupt();break;}try {executeThread.sleep(1);} catch (InterruptedException e) {System.out.println("执行线程被打断!");break;}}finished = false;}}public class ThreadCloseForce {public static void main(String[] args) {ThreadService service = new ThreadService();long start = System.currentTimeMillis();service.execute(() -> {//load a very heavy resource. 模拟任务超时/*while (true) {}*/try {Thread.sleep(5000);} catch (InterruptedException e) {e.printStackTrace();}});service.shutdown(10000);long end = System.currentTimeMillis();System.out.println(end - start);}}
使用场景:分布式文件拷贝,如果拷贝的时间过长,则关闭该程序,防止程序一直阻塞。或者其他执行耗时很长的任务
守护线程的应用场景有很多
6、并发编程的三个问题
可见性
概念
可见性(Visibility):是指一个线程对共享变量进行修改,另一个先立即得到修改后的新值。
演示
/* 笔记* 1.当没有加Volatile的时候,while循环会一直在里面循环转圈* 2.当加了之后Volatile,由于可见性,一旦num改了之后,就会通知其他线程* 3.还有注意的时候不能用if,if不会重新拉回来再判断一次。(也叫做虚假唤醒)* 4.案例演示:一个线程对共享变量的修改,另一个线程不能立即得到新值* */public class Video04_01 {public static void main(String[] args) {MyData myData = new MyData();new Thread(() ->{System.out.println(Thread.currentThread().getName() + "\t come in ");try {TimeUnit.SECONDS.sleep(3);} catch (InterruptedException e) {e.printStackTrace();}//睡3秒之后再修改num,防止A线程先修改了num,那么到while循环的时候就会直接跳出去了myData.addTo60();System.out.println(Thread.currentThread().getName() + "\t come out");},"A").start();while(myData.num == 0){//只有当num不等于0的时候,才会跳出循环}}}class MyData{int num = 0;public void addTo60(){this.num = 60;}}
由上面代码可以看出,并发编程时,会出现可见性问题,当一个线程对共享变量进行了修改,另外的线程并没有立即看到修改后的最新值。
原子性
概念
原子性(Atomicity):在一次或多次操作中,要么所有的操作都成功执行并且不会受其他因素干扰而中 断,要么所有的操作都不执行或全部执行失败。不会出现中间状态
演示
案例演示:5个线程各执行1000次 i++;
/*** @Author: 吕* @Date: 2019/9/23 15:50* <p>* 功能描述: volatile不保证原子性的代码验证*/public class Video05_01 {public static void main(String[] args) {MyData03 myData03 = new MyData03();for (int i = 0; i < 20; i++) {new Thread(() ->{for (int j = 0; j < 1000; j++) {myData03.increment();}},"线程" + String.valueOf(i)).start();}//需要等待上面的20个线程计算完之后再查看计算结果while(Thread.activeCount() > 2){Thread.yield();}System.out.println("20个线程执行完之后num:\t" + myData03.num);}}class MyData03{static int num = 0;public void increment(){num++;}}
1、控制台输出:(由于并发不安全,每次执行的结果都可能不一样)
20个线程执行完之后num: 19706
1、正常来说,如果保证原子性的话,20个线程执行完,结果应该是20000。控制台输出的值却不是这个,说明出现了原子性的问题。
2、num++是由多条语句组成,以上多条指令在一个线程的情况下是不会出问题的,但是在多线程情况下就可能会出现问题。
比如num刚开始值是7。A线程在执行13: iadd时得到num值是8,B线程又执行9: getstatic得到前一个值是7。马上A线程就把8赋值给了num变量。但是B线程已经拿到了之前的值7,B线程是在A线程真正赋值前拿到的num值。即使A线程最终把值真正的赋给了num变量,但是B线程已经走过了getstaitc取值的这一步,B线程会继续在7的基础上进行++操作,最终的结果依然是8。本来两个线程对7进行分别进行++操作,得到的值应该是9,因为并发问题,导致结果是8。
3、并发编程时,会出现原子性问题,当一个线程对共享变量操作到一半时,另外的线程也有可能来操作共 享变量,干扰了前一个线程的操作。
有序性
概念
有序性(Ordering):是指程序中代码的执行顺序,Java在编译时和运行时会对代码进行优化(重排序)来加快速度,会导致程序终的执行顺序不一定就是我们编写代码时的顺序
instance = new SingletonDemo() 是被分成以下 3 步完成memory = allocate(); 分配对象内存空间instance(memory); 初始化对象instance = memory; 设置 instance 指向刚分配的内存地址,此时 instance != null
步骤2 和 步骤3 不存在数据依赖关系,重排与否的执行结果单线程中是一样的。这种指令重排是被 Java 允许的。当 3 在前时,instance 不为 null,但实际上初始化工作还没完成,会变成一个返回 null 的getInstance。这时候数据就出现了问题。
演示
添加java并发压测工具jcstress
<dependency><groupId>org.openjdk.jcstress</groupId><artifactId>jcstress-core</artifactId><version>${jcstress.version}</version></dependency>
import org.openjdk.jcstress.annotations.*;import org.openjdk.jcstress.infra.results.I_Result;@JCStressTest// @Outcome: 如果输出结果是1或4,我们是接受的(ACCEPTABLE),并打印ok@Outcome(id = {"1", "4"}, expect = Expect.ACCEPTABLE, desc = "ok")//如果输出结果是0,我们是接受的并且感兴趣的,并打印danger@Outcome(id = "0", expect = Expect.ACCEPTABLE_INTERESTING, desc = "danger")@Statepublic class Test03Ordering {int num = 0;boolean ready = false;// 线程1执行的代码@Actor //@Actor:表示会有多个线程来执行这个方法public void actor1(I_Result r) {if (ready) {r.r1 = num + num;} else {r.r1 = 1;}}// 线程2执行的代码// @Actorpublic void actor2(I_Result r) {num = 2;ready = true;}}
1、实际上上面两个方法会有很多线程来执行,为了讲解方便,我们只提出线程1和线程2来讲解。
2、I_Result 是一个保存int类型数据的对象,有一个属性 r1 用来保存结果,在多线程情况下可能出现几种结果?
情况1:线 程1先执行actor1,这时ready = false,所以进入else分支结果为1。
情况2:线程2执行到actor2,执行了num = 2;和ready = true,线程1执行,这回进入 if 分支,结果为 4。
情况3:线程2先执行actor2,只执行num = 2;但没来得及执行 ready = true,线程1执行,还是进入 else分支,结果为1。
情况4:0,发生了指令重排
// 线程2执行的代码// @Actorpublic void actor2(I_Result r) {num = 2; //pos_1ready = true;//pos_2}
pos_1处代码和pos_2处代码没有什么数据依赖关系,或者说没有因果关系。Java可能对其进行指令重排,排成下面的顺序。
// 线程2执行的代码// @Actorpublic void actor2(I_Result r) {ready = true;//pos_2num = 2; //pos_1}
此时如果线程2先执行到ready = true;还没来得及执行 num = 2; 。线程1执行,直接进入if分支,此时num默认值为0。 得到的结果也就是0。

若有收获,就点个赞吧
0 人点赞
