项目结构

SpringBoot版本2.0.2.RELEASE SpringCloud版本Finchley.SR4
<dependencies><dependency><groupId>org.apache.commons</groupId><artifactId>commons-lang3</artifactId><version>3.11</version></dependency><dependency><groupId>org.projectlombok</groupId><artifactId>lombok</artifactId><version>1.18.16</version></dependency></dependencies><build><plugins><plugin><groupId>org.springframework.boot</groupId><artifactId>spring-boot-maven-plugin</artifactId></plugin></plugins></build>
服务都需要注册到`注册中心`,请求只能通过网关进行访问(上传文件除外 太大了)<a name="ly-registry"></a>### ly-registry```java<?xml version="1.0" encoding="UTF-8"?><project xmlns="http://maven.apache.org/POM/4.0.0"xmlns:xsi="http://www.w3.org/2001/XMLSchema-instance"xsi:schemaLocation="http://maven.apache.org/POM/4.0.0 http://maven.apache.org/xsd/maven-4.0.0.xsd"><parent><artifactId>leyou</artifactId><groupId>com.leyou.parent</groupId><version>1.0.0-SNAPSHOT</version></parent><modelVersion>4.0.0</modelVersion><groupId>com.leyou.common</groupId><artifactId>ly-registry</artifactId><properties></properties><dependencies><dependency><groupId>org.springframework.cloud</groupId><artifactId>spring-cloud-starter-netflix-eureka-server</artifactId></dependency><!-- 解决JDK版本过高问题 --><!-- java.lang.TypeNotPresentException: Type javax.xml.bind.JAXBContext not present --><dependency><groupId>javax.xml.bind</groupId><artifactId>jaxb-api</artifactId></dependency><dependency><groupId>com.sun.xml.bind</groupId><artifactId>jaxb-impl</artifactId><version>2.3.0</version></dependency><dependency><groupId>org.glassfish.jaxb</groupId><artifactId>jaxb-runtime</artifactId><version>2.3.0</version></dependency><dependency><groupId>javax.activation</groupId><artifactId>activation</artifactId><version>1.1.1</version></dependency></dependencies></project>
yml配置
server:port: 10086spring:application:name: ly-registryeureka:client:service-url:defaultZone: http://127.0.0.1:10086/eureka/register-with-eureka: false # 自己不注册fetch-registry: false# server:# enable-self-preservation: false #关闭自我保护机制,开发环境使用,生成环境一定要关闭(true)
启动类EnableEurekaServer
@EnableEurekaServer@SpringBootApplicationpublic class LyRegisterApplication {public static void main(String[] args) {SpringApplication.run(LyRegisterApplication.class,args);}}
ly-common
统一异常处理,通用Mapper的BaseMapper,工具类都放在这里面,不需要注册到注册中心

ly-item
包含两个服务
ly-item-interface
不需要注册到中心,包含item服务数据库pojo类,api(暴露部分ly-item-service接口,提供给@FeignClient使用)
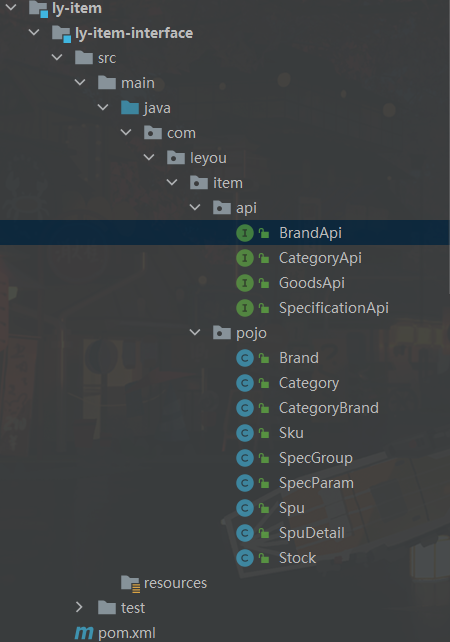
需要在pom中导入相关的包(如 springmvc包)
public interface BrandApi {@GetMapping("/brand/{id}")Brand queryBrandById(@PathVariable("id") Long id);@GetMapping("/brand/list")List<Brand> queryBrandByIdList(@RequestParam("ids") List<Long> ids);}
调用方把ly-item-interface添加到pom,使用@FeignClient注册
@FeignClient("item-service")public interface BrandClient extends BrandApi {}
ly-item-service
需要注册到注册中心,添加ly-item-interface服务,上面的api包中类之所以没有添加@FeignClient,是因为添加了就是自己服务引用自己了
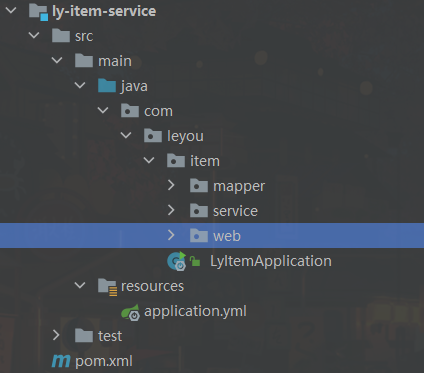
pom
<?xml version="1.0" encoding="UTF-8"?><project xmlns="http://maven.apache.org/POM/4.0.0"xmlns:xsi="http://www.w3.org/2001/XMLSchema-instance"xsi:schemaLocation="http://maven.apache.org/POM/4.0.0 http://maven.apache.org/xsd/maven-4.0.0.xsd"><parent><artifactId>ly-item</artifactId><groupId>com.leyou.service</groupId><version>1.0.0-SNAPSHOT</version></parent><modelVersion>4.0.0</modelVersion><artifactId>ly-item-service</artifactId><properties></properties><dependencies><dependency><groupId>org.springframework.boot</groupId><artifactId>spring-boot-starter-web</artifactId></dependency><dependency><groupId>org.springframework.cloud</groupId><artifactId>spring-cloud-starter-netflix-eureka-client</artifactId></dependency><dependency><groupId>com.leyou.service</groupId><artifactId>ly-item-interface</artifactId><version>1.0.0-SNAPSHOT</version></dependency><dependency><groupId>com.leyou.common</groupId><artifactId>ly-common</artifactId><version>1.0.0-SNAPSHOT</version></dependency></dependencies></project>
yml
server:port: 8081spring:application:name: item-servicedatasource:username: rootpassword: 123456url: jdbc:mysql://localhost:3306/leyou?useSSL=false&serverTimezone=GMT%2B8&allowPublicKeyRetrieval=true&useUnicode=true&characterEncoding=utf-8eureka:client:service-url:defaultZone: http://127.0.0.1:10086/eureka/instance:prefer-ip-address: true #设置eureka页面链接地址为ip地址# instance-id: ${spring.application.name} #自定义列表名称# ip-address: 127.0.0.1#logging:# level:# cn.chy.mapper: debuglogging:level:com.leyou.item.mapper: debug
ly-gataway
需要注册到注册中心,所有服务请求通过网关访问,网关再到注册中心找到对应的服务(文件上传服务需要绕过网关)
如何找到:网关配置一个api前缀 http://localhost:10010/api这就是请求网关服务,在网关服务中给其他服务添加前缀,如/item,这样就是访问item服务http://localhost:10010/api/item

pom
<?xml version="1.0" encoding="UTF-8"?><project xmlns="http://maven.apache.org/POM/4.0.0"xmlns:xsi="http://www.w3.org/2001/XMLSchema-instance"xsi:schemaLocation="http://maven.apache.org/POM/4.0.0 http://maven.apache.org/xsd/maven-4.0.0.xsd"><parent><artifactId>leyou</artifactId><groupId>com.leyou.parent</groupId><version>1.0.0-SNAPSHOT</version></parent><modelVersion>4.0.0</modelVersion><groupId>com.leyou.common</groupId><artifactId>ly-gateway</artifactId><properties></properties><dependencies><dependency><groupId>org.springframework.cloud</groupId><artifactId>spring-cloud-starter-netflix-zuul</artifactId></dependency><dependency><groupId>org.springframework.cloud</groupId><artifactId>spring-cloud-starter-netflix-eureka-client</artifactId></dependency><dependency><groupId>org.springframework.boot</groupId><artifactId>spring-boot-starter-actuator</artifactId></dependency></dependencies><build><plugins><plugin><groupId>org.springframework.boot</groupId><artifactId>spring-boot-maven-plugin</artifactId></plugin></plugins></build></project>
yml
下面的 ribbon配置是由zuul才会有
server:port: 10010spring:application:name: api-gatewayeureka:client:service-url:defaultZone: http://127.0.0.1:10086/eureka/instance:prefer-ip-address: true #设置eureka页面链接地址为ip地址# instance-id: ${spring.application.name} #自定义列表名称# ip-address: 127.0.0.1zuul:prefix: /api #添加路由前缀routes:item-service: /item/** # item模块的访问都需要添加 /itemsearch-service: /search/**upload-service:path: /upload/**serviceId: upload-service # false ,转发到 upload-service服务时候,会带上/upload前缀stripPrefix: false # 确定在转发之前是否应 删除 此路由的前缀 ,默认为truehystrix:command:default:execution:isolation:thread:timeoutInMilliseconds: 5000ribbon:ConnectionTimeout: 1000 # ribbon连接超时时长 abstractribboncommand 使用zuul才后有ReadTimeout: 3500 # ribbon的读取超时MaxAutoRetries: 0 # 当前服务的超时时间MaxAutoRetriesNextServer: 0 # 切换服务重试次数
ly-upload
一个单独的文件上传服务,上传成功后返回文件地址给前台。
需要注册
pom
<?xml version="1.0" encoding="UTF-8"?><project xmlns="http://maven.apache.org/POM/4.0.0"xmlns:xsi="http://www.w3.org/2001/XMLSchema-instance"xsi:schemaLocation="http://maven.apache.org/POM/4.0.0 http://maven.apache.org/xsd/maven-4.0.0.xsd"><parent><artifactId>leyou</artifactId><groupId>com.leyou.parent</groupId><version>1.0.0-SNAPSHOT</version></parent><modelVersion>4.0.0</modelVersion><groupId>com.leyou.service</groupId><artifactId>upload</artifactId><properties></properties><dependencies><dependency><groupId>org.springframework.cloud</groupId><artifactId>spring-cloud-starter-netflix-eureka-client</artifactId></dependency><dependency><groupId>org.springframework.boot</groupId><artifactId>spring-boot-starter-web</artifactId></dependency><dependency><groupId>com.github.tobato</groupId><artifactId>fastdfs-client</artifactId></dependency><dependency><groupId>org.springframework.boot</groupId><artifactId>spring-boot-starter-test</artifactId></dependency><!-- 读取yml到java--><dependency><groupId>org.springframework.boot</groupId><artifactId>spring-boot-configuration-processor</artifactId><optional>true</optional></dependency><dependency><groupId>com.leyou.common</groupId><artifactId>ly-common</artifactId><version>1.0.0-SNAPSHOT</version></dependency></dependencies></project>
yml
server:port: 8082spring:application:name: upload-serviceservlet:multipart:max-file-size: 5MBmax-request-size: 10MBeureka:client:service-url:defaultZone: http://127.0.0.1:10086/eureka/instance:prefer-ip-address: true #设置eureka页面链接地址为ip地址# instance-id: ${spring.application.name} #自定义列表名称# ip-address: 127.0.0.1fdfs:so-timeout: 1501connect-timeout: 601thumb-image: # 缩略图width: 60height: 60tracker-list: # tracker地址- 192.168.32.129:22122ly:upload:baseUrl: http://image.leyou.com/allowTypes:- image/png- image/jpeg- image/bmp- image/gif
ly-search
使用ElasticSearch完成搜索
pom
<?xml version="1.0" encoding="UTF-8"?><project xmlns="http://maven.apache.org/POM/4.0.0"xmlns:xsi="http://www.w3.org/2001/XMLSchema-instance"xsi:schemaLocation="http://maven.apache.org/POM/4.0.0 http://maven.apache.org/xsd/maven-4.0.0.xsd"><parent><artifactId>leyou</artifactId><groupId>com.leyou.parent</groupId><version>1.0.0-SNAPSHOT</version></parent><modelVersion>4.0.0</modelVersion><groupId>com.leyou</groupId><artifactId>ly-search</artifactId><properties><maven.compiler.source>11</maven.compiler.source><maven.compiler.target>11</maven.compiler.target></properties><dependencies><dependency><groupId>org.springframework.boot</groupId><artifactId>spring-boot-starter-web</artifactId></dependency><dependency><groupId>org.springframework.boot</groupId><artifactId>spring-boot-starter-data-elasticsearch</artifactId></dependency><dependency><groupId>org.springframework.cloud</groupId><artifactId>spring-cloud-starter-netflix-eureka-client</artifactId></dependency><dependency><groupId>org.springframework.cloud</groupId><artifactId>spring-cloud-starter-openfeign</artifactId></dependency><dependency><groupId>org.springframework.boot</groupId><artifactId>spring-boot-starter-test</artifactId></dependency><dependency><groupId>com.leyou.service</groupId><artifactId>ly-item-interface</artifactId><version>1.0.0-SNAPSHOT</version></dependency></dependencies></project>
yml
server:port: 8083spring:application:name: search-servicedata:elasticsearch:cluster-name: elasticsearchcluster-nodes: 192.168.32.129:9300jackson:default-property-inclusion: non_null # 为空的字段不返回eureka:client:service-url:defaultZone: http://127.0.0.1:10086/eureka/instance:prefer-ip-address: true #设置eureka页面链接地址为ip地址# instance-id: ${spring.application.name} #自定义列表名称ip-address: 127.0.0.1
ElasticSearch
基本概念
Elasticsearch也是基于Lucene的全文检索库,本质也是存储数据,很多概念与MySQL类似的。
Near Realtime(NRT) 近实时。数据提交索引后,立马就可以搜索到。
Cluster 集群,一个集群由一个唯一的名字标识,默认为“elasticsearch”。集群名称非常重要,具有相同集群名的节点才会组成一个集群。集群名称可以在配置文件中指定。
Node 节点:存储集群的数据,参与集群的索引和搜索功能。像集群有名字,节点也有自己的名称,默认在启动时会以一个随机的UUID的前七个字符作为节点的名字,你可以为其指定任意的名字。通过集群名在网络中发现同伴组成集群。一个节点也可是集群。
Index 索引: 一个索引是一个文档的集合(等同于solr中的集合)。每个索引有唯一的名字,通过这个名字来操作它。一个集群中可以有任意多个索引。
Type 类型:指在一个索引中,可以索引不同类型的文档,如用户数据、博客数据。从6.0.0 版本起已废弃,一个索引中只存放一类数据。
Document 文档:被索引的一条数据,索引的基本信息单元,以JSON格式来表示。
Shard 分片:在创建一个索引时可以指定分成多少个分片来存储。每个分片本身也是一个功能完善且独立的“索引”,可以被放置在集群的任意节点上。
Replication 备份: 一个分片可以有多个备份(副本)
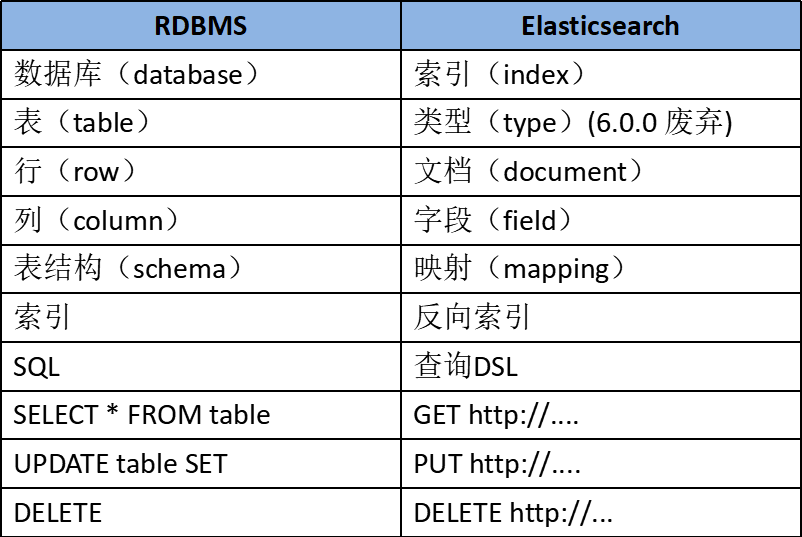
操作索引(库)
创建索引
创建索引的请求格式:
- 请求方式:PUT
- 请求路径:/索引库名
请求参数:json格式
{"settings": {"number_of_shards": 3,"number_of_replicas": 2}}
- settings:索引库的设置
- number_of_shards:分片数量
- number_of_replicas:副本数量(单机情况副本设置为0)
测试:创建一个索引为 heima
PUT http://192.168.32.129:9200/heima{"settings": {"number_of_shards": 3,"number_of_replicas": 0}}
查看索引
可以显示字段和字段类型等…
GET /索引库名GET http://192.168.32.129:9200/heima
查看所以索引库配置
GET http://192.168.32.129:9200/*
3)删除索引库
DELETE /索引库名DELETE http://192.168.32.129:9200/heima
映射配置(表)
什么是映射?
映射是定义文档的过程,文档包含哪些字段,这些字段是否保存,是否索引,是否分词等
创建映射字段
PUT /索引库名/_mapping/类型名称{"properties": {"字段名": {"type": "类型","index": true,"store": true,"analyzer": "分词器"}}}
- 类型名称:就是前面将的type的概念,类似于数据库中的不同表字段名:任意填写 ,可以指定许多属性,例如:
- type:类型,可以是text、long、short、date、integer、object等
- index:是否索引,默认为 true
- store:是否存储,默认为 false
- analyzer:分词器,这里的
ik_max_word即使用ik分词器
测试:
PUT heima/_mapping/goods{"properties": {"title": {"type": "text","analyzer": "ik_max_word"},"images": {"type": "keyword","index": "false"},"price": {"type": "float"}}}
查看映射
GET /索引库名/_mappingGET /heima/_mapping
响应: 索引(heima),映射(goods)
{"heima": {"mappings": {"goods": {"properties": {"images": {"type": "keyword","index": false},"price": {"type": "float"},"title": {"type": "text","analyzer": "ik_max_word"}}}}}}
映射字段解释
type
- String类型,又分两种:
- text:可分词,不可参与聚合
- keyword:不可分词,数据会作为完整字段进行匹配,可以参与聚合
- Numerical:数值类型,分两类
- 基本数据类型:long、interger、short、byte、double、float、half_float
- 浮点数的高精度类型:scaled_float
- 需要指定一个精度因子,比如10或100。elasticsearch会把真实值乘以这个因子后存储,取出时再还原。
- Date:日期类型
elasticsearch可以对日期格式化为字符串存储,但是建议我们存储为毫秒值,存储为long,节省空间。
index
index影响字段的索引情况。
- true:字段会被索引,则可以用来进行搜索。默认值就是true
- false:字段不会被索引,不能用来搜索
index的默认值就是true,也就是说你不进行任何配置,所有字段都会被索引。
但是有些字段是我们不希望被索引的,比如商品的图片信息,就需要手动设置index为false
store
是否将数据进行额外存储。
在学习lucene和solr时,我们知道如果一个字段的store设置为false,那么在文档列表中就不会有这个字段的值,用户的搜索结果中不会显示出来。
但是在Elasticsearch中,即便store设置为false,也可以搜索到结果。
原因是Elasticsearch在创建文档索引时,会将文档中的原始数据备份,保存到一个叫做_source的属性中。而且我们可以通过过滤_source来选择哪些要显示,哪些不显示。
而如果设置store为true,就会在_source以外额外存储一
boost
激励因子,这个与lucene中一样
其它的不再一一讲解,用的不多,大家参考官方文档:
数据
添加数据
智能判断,没有的字段也能添加数据
随机生成id
通过POST请求,可以向一个已经存在的索引库中添加数据。
语法:
POST /索引库名/类型名{"key":"value"}
示例:
POST /heima/goods/{"title":"小米手机","images":"http://image.leyou.com/12479122.jpg","price":2699.00}
响应:
{"_index": "heima","_type": "goods","_id": "r9c1KGMBIhaxtY5rlRKv","_version": 1,"result": "created","_shards": {"total": 3,"successful": 1,"failed": 0},"_seq_no": 0,"_primary_term": 2}
查看
GET http://192.168.32.129:9200/heima/_search或者GET http://192.168.32.129:9200/heima/_search{"query":{"match_all":{}}}
结果
{"_index": "heima","_type": "goods","_id": "r9c1KGMBIhaxtY5rlRKv","_version": 1,"_score": 1,"_source": {"title": "小米手机","images": "http://image.leyou.com/12479122.jpg","price": 2699}}
_source:源文档信息,所有的数据都在里面。_id:这条文档的唯一标示,与文档自己的id字段没有关联
自定义id
POST /索引库名/类型/id值{ ...}
示例:
POST http://192.168.32.129:9200/heima/goods/2{"title":"大米手机","images":"http://image.leyou.com/12479122.jpg","price":2899.00}
响应:
{"_index": "heima","_type": "goods","_id": "2","_score": 1,"_source": {"title": "大米手机","images": "http://image.leyou.com/12479122.jpg","price": 2899}}
添加数据时,有个智能判断,就是说 添加时使用没有配置映射的字段一样能够成功,它也可以根据你输入的数据来判断类型,动态添加数据映射。
只添加了 字段 title,images,price
POST http://192.168.32.129:9200/heima/goods/3{"title":"超米手机","images":"http://image.leyou.com/12479122.jpg","price":2899.00,"stock": 200,"saleable":true}
额外添加了stock库存,和saleable是否上架两个字段。
来看结果:
{"_index": "heima","_type": "goods","_id": "3","_version": 1,"_score": 1,"_source": {"title": "超米手机","images": "http://image.leyou.com/12479122.jpg","price": 2899,"stock": 200,"saleable": true}}
在看下索引库的映射关系:
{"heima": {"mappings": {"goods": {"properties": {"images": {"type": "keyword","index": false},"price": {"type": "float"},"saleable": {"type": "boolean"},"stock": {"type": "long"},"title": {"type": "text","analyzer": "ik_max_word"}}}}}}
stock和saleable都被成功映射了。
修改数据
把刚才新增的请求方式改为PUT,就是修改了。不过修改必须指定id,
- id对应文档存在,则修改
- id对应文档不存在,则新增
比如,我们把id为3的数据进行修改:
PUT http://192.168.32.129:9200/heima/goods/3{"title":"超大米手机","images":"http://image.leyou.com/12479122.jpg","price":3899.00,"stock": 100,"saleable":true}
结果:
{"took": 17,"timed_out": false,"_shards": {"total": 9,"successful": 9,"skipped": 0,"failed": 0},"hits": {"total": 1,"max_score": 1,"hits": [{"_index": "heima","_type": "goods","_id": "3","_score": 1,"_source": {"title": "超大米手机","images": "http://image.leyou.com/12479122.jpg","price": 3899,"stock": 100,"saleable": true}}]}}
删除数据
删除使用DELETE请求,同样,需要根据id进行删除:
语法
DELETE /索引库名/类型名/id值DELETE http://192.168.32.129:9200/heima/goods/3
功能
ES6
let 和 const 命令
var
之前,js定义变量只有一个关键字:varvar有一个问题,就是定义的变量有时会莫名奇妙的成为全局变量。
例如这样的一段代码:
for(var i = 0; i < 5; i++){console.log(i);}console.log("循环外:" + i)
你猜下打印的结果是什么?
let
let所声明的变量,只在let命令所在的代码块内有效。
我们把刚才的var改成let试试:
for(let i = 0; i < 5; i++){ console.log(i);}console.log("循环外:" + i)
结果:
const
const声明的变量是常量,不能被修改

字符串扩展
新的API
ES6为字符串扩展了几个新的API:
includes():返回布尔值,表示是否找到了参数字符串。startsWith():返回布尔值,表示参数字符串是否在原字符串的头部。endsWith():返回布尔值,表示参数字符串是否在原字符串的尾部。
实验一下:
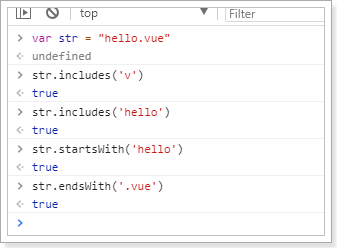
字符串模板
ES6中提供了`来作为字符串模板标记。我们可以这么玩:
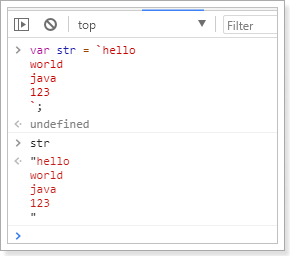
在两个`之间的部分都会被作为字符串的值,不管你任意换行,甚至加入js脚本
解构表达式
数组解构
比如有一个数组:
let arr = [1,2,3]
我想获取其中的值,只能通过角标。ES6可以这样:
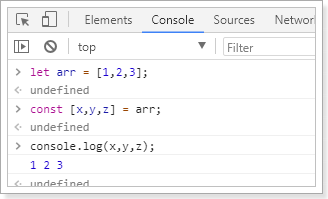
const [x,y,z] = arr;// x,y,z将与arr中的每个位置对应来取值// 然后打印console.log(x,y,z);
结果:
对象解构
例如有个person对象:
const person = {name:"jack",age:21,language: ['java','js','css']}
我们可以这么做:
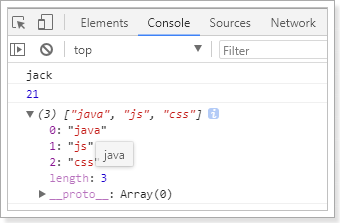
// 解构表达式获取值const {name,age,language} = person;// 打印console.log(name);console.log(age);console.log(language);
结果:
如过想要用其它变量接收,需要额外指定别名:
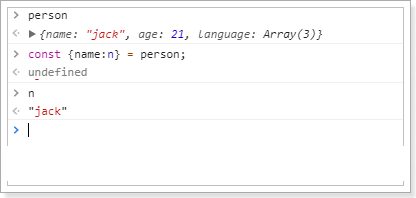
{name:n}:name是person中的属性名,冒号后面的n是解构后要赋值给的变量。
函数优化
函数参数默认值
在ES6以前,我们无法给一个函数参数设置默认值,只能采用变通写法:
function add(a , b) {// 判断b是否为空,为空就给默认值1b = b || 1;return a + b;}// 传一个参数console.log(add(10));
现在可以这么写:
function add(a , b = 1) {return a + b;}// 传一个参数console.log(add(10));
箭头函数
ES6中定义函数的简写方式:
一个参数时:
var print = function (obj) {console.log(obj);}// 简写为:var print2 = obj => console.log(obj);
多个参数:
// 两个参数的情况:var sum = function (a , b) {return a + b;}// 简写为:var sum2 = (a,b) => a+b;
代码不止一行,可以用{}括起来
var sum3 = (a,b) => {return a + b;}
对象的函数属性简写
比如一个Person对象,里面有eat方法:
let person = {name: "jack",// 以前:eat: function (food) {console.log(this.name + "在吃" + food);},// 箭头函数版:eat2: food => console.log(person.name + "在吃" + food),// 这里拿不到this// 简写版:eat3(food){console.log(this.name + "在吃" + food);}}
箭头函数结合解构表达式
比如有一个函数:
const person = {name:"jack",age:21,language: ['java','js','css']}function hello(person) {console.log("hello," + person.name)}
如果用箭头函数和解构表达式
var hi = ({name}) => console.log("hello," + name);
map和reduce
数组中新增了map和reduce方法。
map
map():接收一个函数,将原数组中的所有元素用这个函数处理后放入新数组返回。
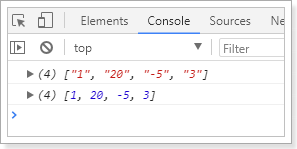
举例:有一个字符串数组,我们希望转为int数组
let arr = ['1','20','-5','3'];console.log(arr)arr = arr.map(s => parseInt(s));console.log(arr)
reduce
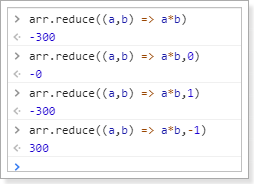
reduce():接收一个函数(必须)和一个初始值(可选)。
第一个参数(函数)接收两个参数:
- 第一个参数是上一次reduce处理的结果
- 第二个参数是数组中要处理的下一个元素
reduce()会从左到右依次把数组中的元素用reduce处理,并把处理的结果作为下次reduce的第一个参数。如果是第一次,会把前两个元素作为计算参数,或者把用户指定的初始值作为起始参数
举例:
const arr = [1,20,-5,3]
没有初始值:

指定初始值:
对象扩展
ES6给Object拓展了许多新的方法,如:
- keys(obj):获取对象的所有key形成的数组
- values(obj):获取对象的所有value形成的数组
- entries(obj):获取对象的所有key和value形成的二维数组。格式:
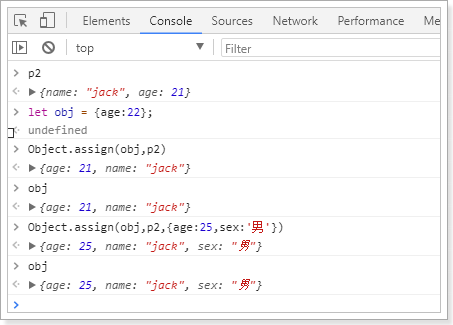
[[k1,v1],[k2,v2],...] - assign(dest, …src) :将多个src对象的值 拷贝到 dest中(浅拷贝)。
数组扩展
ES6给数组新增了许多方法:
- find(callback):数组实例的find方法,用于找出第一个符合条件的数组成员。它的参数是一个回调函数,所有数组成员依次执行该回调函数,直到找出第一个返回值为true的成员,然后返回该成员。如果没有符合条件的成员,则返回undefined。
- findIndex(callback):数组实例的findIndex方法的用法与find方法非常类似,返回第一个符合条件的数组成员的位置,如果所有成员都不符合条件,则返回-1。
- includes(数组元素):与find类似,如果匹配到元素,则返回true,代表找到了。
Vue简单分页
v-for="i in Math.min(5,totalPage)",遍历5个页码,总页数小于5就遍历总页数
index(i):计算页码
search.page = index(i):点击后把页码赋值给当前页码
<div class="fr"><div class="sui-pagination pagination-large"><ul><li :class="{prev:true,disabled:search.page===1}"><a href="#" @click.prevent.stop="prePage()">«上一页</a></li><li :class="{active:index(i)===search.page}" v-for="i in Math.min(5,totalPage)"><a href="#" @click.prevent.stop="search.page = index(i)" v-text="index(i)"></a></li><li class="dotted" v-show="totalPage-search.page>2 && totalPage> 5"><span>...</span></li><li :class="{next:true,disabled:search.page===totalPage}"><a href="#"@click.prevent.stop="nextPage()">下一页»</a></li></ul><div><span>共{{totalPage}}页 </span><span>到第<input type="text" class="page-num">页 <button class="page-confirm" onclick="alert(1)">确定</button></span></div></div></div>
vue
prePage():上一页
nextPage():下一页
index(i)():下一页
search:里面包含,当前页(search.page)和搜索关键字(search.key,是从头部传递过来的)
输入关键字一搜索,跳转到search.html(window.location = 'search.html?key=' + this.key;),search.html一来构建search对象加载
const search = ly.parse(location.search.substring(1))search.page = parseInt(search.page) || 1this.search = search
ly是封装的
var vm = new Vue({el: "#searchApp",data: {ly,search: {},total: 0,totalPage: 0,goodsList: [],filters: [],showMore: false},components: {lyTop: () => import("./js/pages/top.js")},// 这是为了刷新页面时,继续显示刷新前的页面数据watch: {search: {deep: true,handler(val, oldVal) {// 第一次加载search的时候里面是空的,就不加载 (如果search为空 或者create在初始化就返回)if (!oldVal || !oldVal.key) {return;}location.search = "?" + ly.stringify(this.search) // location.search 发生改变 页面会自动 刷新浏览器}}},created() {const search = ly.parse(location.search.substring(1))search.page = parseInt(search.page) || 1this.search = searchthis.loadDate();},methods: {loadDate() {ly.http.post("/search/page", this.search).then(resp => {this.total = resp.data.totalthis.totalPage = resp.data.totalPageresp.data.items.forEach(goods => {goods.skus = JSON.parse(goods.skus)goods.selectedSku = goods.skus[0] //提供选择});this.goodsList = resp.data.items//分类this.filters.push({key: 'cid3',options: resp.data.categories})//品牌this.filters.push({key: 'brandId',options: resp.data.brands})//规格参数resp.data.specs.forEach(spec => {this.filters.push(spec)})}).catch(error => {console.log(error)})},//-------------------------------prePage() {//当前页大于1if (this.search.page > 1) this.search.page--},nextPage() {//当前页小于总页数if (this.search.page < this.totalPage) this.search.page++},//计算页码index(i) {if (this.search.page <= 3 || this.totalPage <= 5) { // 页首 [123]45return i} else if (this.search.page >= this.totalPage - 2) { // 页尾 67 [8 9 10]return i + this.totalPage - 5} else {return i + this.search.page - 3 // 页中 23456}}},});
RabbitMQ
为什么要用它:发送消息!商品信息发生增删改通知search服务和page服务操作,还有发送短信
添加,修改商品发送通知
- 添加(添加对应的index、添加对应的网页),修改(修改对应的index、根据spuId文件后,创建新的文件)
删除商品
- 删除索引和page页面
saveGoods
发送消息
amqpTemplate.convertAndSend("item.insert",spu.getId());
page服务匹配 item.update,item.insert
@Componentpublic class PageListener {@Autowiredprivate PageService pageService;@RabbitListener(bindings = @QueueBinding(value = @Queue(value = "page.item.insert.queue", durable = "true"),exchange = @Exchange(value = "ly.item.exchange",type = ExchangeTypes.TOPIC),key = {"item.update","item.insert"}))public void insertAndUpdatePage(Long spuId){if(spuId==null){return;}pageService.createHtml(spuId);}}
Search服务 同样匹配item.update,item.insert
@Componentpublic class GoodsListener {@Autowiredprivate SearchService searchService;@Autowiredprivate GoodsRepository goodsRepository;@RabbitListener(bindings = @QueueBinding(value = @Queue(value = "index.item.insert.queue", durable = "true"),exchange = @Exchange(value = "ly.item.exchange",type = ExchangeTypes.TOPIC),key = {"item.update","item.insert"}))public void insertAndUpdateIndex(Long spuId){if(spuId==null){return;}Spu spu = searchService.querySpuById(spuId);Goods goods = searchService.buildGoods(spu);goodsRepository.save(goods);}}
Nginx
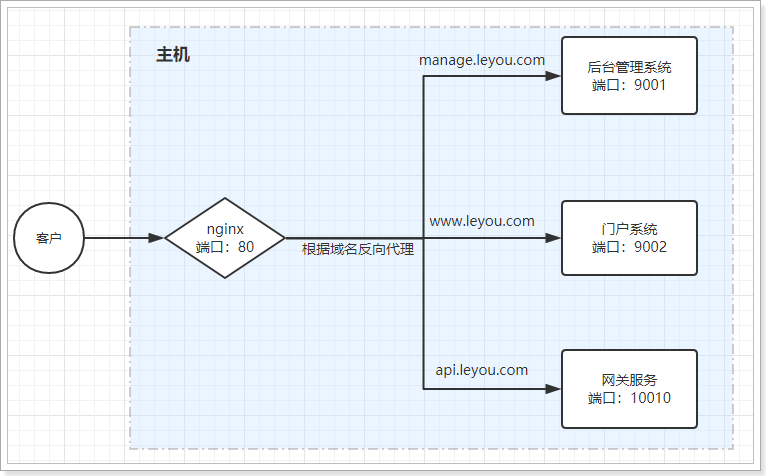
本地需要配置hosts,把域名请求转发到 本地
反向代理配置
示例:
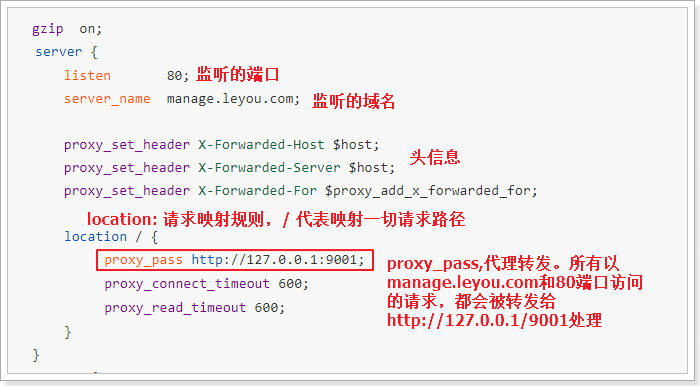
nginx 中的每个server就是一个反向代理配置,可以有多个server
server {listen 80;server_name 192.168.32.129;location / {root /leyou/static/; # 访问这个目录下的index index.html index.htm; # 默认访问页面}}
配置上传服务绕过网关
server {listen 80;server_name api.leyou.com;proxy_set_header X-Forwarded-Host $host;proxy_set_header X-Forwarded-Server $host;proxy_set_header X-Forwarded-For $proxy_add_x_forwarded_for;proxy_set_header Host $host; # 转发后还是携带自身的host(api.leyou.com),而不要用本机ip(30.40.65.40)# 上传路径的映射location /api/upload {proxy_pass http://192.168.1.103:8082;proxy_connect_timeout 600;proxy_read_timeout 600;rewrite "^/api/(.*)$" /$1 break; # $1就是匹配前面的一组(小括号)}location / {proxy_pass http://127.0.0.1:10010;proxy_connect_timeout 600;proxy_read_timeout 600;}}
- 首先,我们映射路径是/api/upload,而下面一个映射路径是 / ,根据最长路径匹配原则,/api/upload优先级更高。也就是说,凡是以/api/upload开头的路径,都会被第一个配置处理
proxy_pass:反向代理,这次我们代理到8082端口,也就是upload-service服务rewrite "^/api/(.*)$" /$1 break,路径重写:"^/api/(.*)$":匹配路径的正则表达式,用了分组语法,把/api/以后的所有部分当做1组/$1:重写的目标路径,这里用$1引用前面正则表达式匹配到的分组(组编号从1开始),即/api/后面的所有。这样新的路径就是除去/api/以外的所有,就达到了去除/api前缀的目的break:指令,常用的有2个,分别是:last、break- last:重写路径结束后,将得到的路径重新进行一次路径匹配
- break:重写路径结束后,不再重新匹配路径。
我们这里不能选择last,否则以新的路径/upload/image来匹配,就不会被正确的匹配到8082端口了
修改完成,输入nginx -s reload命令重新加载配置。
nginx代理静态页面
server {listen 80;server_name www.leyou.com;proxy_set_header X-Forwarded-Host $host;proxy_set_header X-Forwarded-Server $host;proxy_set_header X-Forwarded-For $proxy_add_x_forwarded_for;location /item {# 先找本地root html;if (!-f $request_filename) { #请求的文件不存在,就反向代理proxy_pass http://127.0.0.1:8084;break;}}location / {proxy_pass http://127.0.0.1:9002;proxy_connect_timeout 600;proxy_read_timeout 600;}}
完整配置
# user nginx;worker_processes 1;events {worker_connections 1024;}http {include mime.types;default_type application/octet-stream;client_max_body_size 100M;#log_format main '$remote_addr - $remote_user [$time_local] "$request" '# '$status $body_bytes_sent "$http_referer" '# '"$http_user_agent" "$http_x_forwarded_for"';#access_log logs/access.log main;sendfile on;#tcp_nopush on;#keepalive_timeout 0;keepalive_timeout 65;#gzip on;# 前端:管理后台server {listen 80;server_name manage.leyou.com;proxy_set_header X-Forwarded-Host $host;proxy_set_header X-Forwarded-Server $host;proxy_set_header X-Forwarded-For $proxy_add_x_forwarded_for;location / {proxy_pass http://192.168.1.103:9001;proxy_connect_timeout 600;proxy_read_timeout 600;}}# 前端:前台页面server {listen 80;server_name www.leyou.com;proxy_set_header X-Forwarded-Host $host;proxy_set_header X-Forwarded-Server $host;proxy_set_header X-Forwarded-For $proxy_add_x_forwarded_for;# location /item {# proxy_pass http://192.168.1.103:8084;# proxy_connect_timeout 600;# proxy_read_timeout 600;# }# 先找本地location /item {root html;if (!-f $request_filename) { #请求的文件不存在,就反向代理proxy_pass http://192.168.1.103:8084;break;}}location / {proxy_pass http://192.168.1.103:9002;proxy_connect_timeout 600;proxy_read_timeout 600;}}server {listen 80;server_name manage.leyou.com;location / {proxy_pass http://192.168.1.103:9001;}}# 后端接口server {listen 80;server_name api.leyou.com;proxy_set_header X-Forwarded-Host $host;proxy_set_header X-Forwarded-Server $host;proxy_set_header X-Forwarded-For $proxy_add_x_forwarded_for;proxy_set_header Host $host; # 转发后还是携带自身的host(api.leyou.com),而不要用本机ip(30.40.65.40)# 上传location /api/upload {proxy_pass http://192.168.1.103:10010;proxy_connect_timeout 600;proxy_read_timeout 600;rewrite "^/(.*)$" /zuul/$1 break;}# api入口(zuul网关)location / {proxy_pass http://192.168.1.103:10010;proxy_connect_timeout 600;proxy_read_timeout 600;}}# 图片服务器server {listen 80;server_name image.leyou.com;# 监听域名中带有group的,交给FastDFS模块处理location ~/group([0-9])/ {ngx_fastdfs_module;}# 将其它图片代理指向本地的/leyou/static目录,/leyou/static已经挂载到fastdfs内部location / {root /leyou/static/;}error_page 500 502 503 504 /50x.html;location = /50x.html {root html;}}server {listen 80;server_name 192.168.32.129;location / {root /leyou/static/;index index.html index.htm;}}}
fastDFS
<!-- fastDFS客户端--><dependency><groupId>com.github.tobato</groupId><artifactId>fastdfs-client</artifactId><version>1.26.2</version></dependency><!-- 加载yml中的配置使用--><dependency><groupId>org.springframework.boot</groupId><artifactId>spring-boot-configuration-processor</artifactId><optional>true</optional></dependency
添加一个配置文件,解决jmx重复注册bean的问题
@Configuration@Import(FdfsClientConfig.class)// 解决jmx重复注册bean的问题@EnableMBeanExport(registration = RegistrationPolicy.IGNORE_EXISTING)public class FastClientImporter {}
测试类
@RunWith(SpringRunner.class)@SpringBootTestpublic class FdfsTest {@Autowiredprivate FastFileStorageClient storageClient;@Autowiredprivate ThumbImageConfig thumbImageConfig;// 上传文件@Testpublic void testUpload() throws FileNotFoundException {File file = new File("G:\\image\\simpledesktops.png");// 上传并且生成缩略图StorePath storePath = this.storageClient.uploadFile(new FileInputStream(file), file.length(), "jpg", null);// 带分组的路径System.out.println(storePath.getFullPath());// 不带分组的路径System.out.println(storePath.getPath());System.out.println("========================");System.out.println("========================");}// 上传文件并获取缩略图@Testpublic void testUploadAndCreateThumb() throws FileNotFoundException {File file = new File("G:\\image\\simpledesktops.png");// 上传并且生成缩略图StorePath storePath = this.storageClient.uploadImageAndCrtThumbImage(new FileInputStream(file), file.length(), "png", null);// 带分组的路径System.out.println(storePath.getFullPath());// 不带分组的路径System.out.println(storePath.getPath());// 获取缩略图路径String path = thumbImageConfig.getThumbImagePath(storePath.getPath());System.out.println(path);}}
application.yml 添加
fdfs:so-timeout: 1501connect-timeout: 601thumb-image: # 缩略图width: 60height: 60tracker-list: # tracker地址- 192.168.32.129:22122ly:upload:baseUrl: http://image.leyou.com/allowTypes:- image/png- image/jpeg- image/bmp- image/gif
读取配置
@Component@ConfigurationProperties(prefix = "ly.upload")@Datapublic class UploadProperties {private String baseUrl;private List<String> allowTypes;}
上传服务
package com.leyou.upload.service;import com.github.tobato.fastdfs.domain.StorePath;import com.github.tobato.fastdfs.service.FastFileStorageClient;import com.leyou.enums.ExceptionEnum;import com.leyou.exception.LyException;import com.leyou.upload.config.UploadProperties;import lombok.extern.slf4j.Slf4j;import org.apache.commons.lang3.StringUtils;import org.springframework.beans.factory.annotation.Autowired;import org.springframework.boot.context.properties.EnableConfigurationProperties;import org.springframework.stereotype.Service;import org.springframework.web.multipart.MultipartFile;import javax.imageio.ImageIO;import java.awt.image.BufferedImage;import java.io.File;import java.io.IOException;import java.util.Arrays;import java.util.List;/*** @author chy* @since 2021-05-12 17:48*/@Slf4j@Service//@EnableConfigurationProperties(UploadService.class)public class UploadService {@Autowiredprivate FastFileStorageClient storageClient;// 自己编写的上传文件配置 包含上传地址 和 允许类型@Autowiredprivate UploadProperties uploadProperties;public String uploadImage(MultipartFile file) {try {//校验是否包含文件类型if (!uploadProperties.getAllowTypes().contains(file.getContentType())) {throw new LyException(ExceptionEnum.INVALID_FILE_TYPE);}//校验文件内容BufferedImage read = ImageIO.read(file.getInputStream());if (read == null) {throw new LyException(ExceptionEnum.INVALID_FILE_TYPE);}//校验通过 上传到 fastDFS//文件后缀String suffix = StringUtils.substringAfterLast(file.getOriginalFilename(), ".");StorePath storePath = storageClient.uploadFile(file.getInputStream(), file.getSize(), suffix, null);log.info("上传到的地址:{}", uploadProperties.getBaseUrl() + storePath.getFullPath());return uploadProperties.getBaseUrl() + storePath.getFullPath();} catch (Exception e) {log.error("【文件上传】文件上传失败:{}", e);throw new LyException(ExceptionEnum.INVALID_FILE_TYPE);}}}
通用Mapper使用PageHelper
通用Mapper和PageHelper pom
<dependency><groupId>tk.mybatis</groupId><artifactId>mapper-spring-boot-starter</artifactId></dependency><dependency><groupId>com.github.pagehelper</groupId><artifactId>pagehelper-spring-boot-starter</artifactId></dependency>
启动类添加
//import tk.mybatis.spring.annotation.MapperScan@MapperScan("com.leyou.item.mapper") ;
查询代码
@Autowiredprivate BrandMapper brandMapper;// page: 当前页码// rows: 显示大小// sortBy: 排序字段// desc: 是否倒序// key: 搜索关键字public PageResult<Brand> queryBrandByPage(Integer page, Integer rows, String sortBy , Boolean desc, String key) {//分页PageHelper.startPage(page, rows);/*** 过滤* where `name` like '%x%' or letter =='x'* order by id desc*/Example example = new Example(Brand.class);if(StringUtils.isNoneBlank(key)){example.createCriteria().andLike("name", "%" + key + "%").orEqualTo("letter",key.toUpperCase());}//排序if(StringUtils.isNoneBlank(sortBy)){example.setOrderByClause(sortBy + (desc ? " DESC":" ASC"));}List<Brand> brands = brandMapper.selectByExample(example);if(CollectionUtils.isEmpty(brands)){throw new LyException(ExceptionEnum.BRAND_NO_FOUND);}PageInfo<Brand> pageInfo = new PageInfo<>(brands);return new PageResult<Brand>(pageInfo.getTotal(),pageInfo.getList());}
解决跨域
@Configurationpublic class GateWayCorsConfig {@Beanpublic CorsFilter corsFilter() {//1.添加CORS配置信息CorsConfiguration config = new CorsConfiguration();//1) 允许的域,不要写*,否则cookie就无法使用了config.addAllowedOrigin("http://www.leyou.com");//2) 是否发送Cookie信息config.setAllowCredentials(true);//3) 允许的请求方式config.addAllowedMethod("OPTIONS");config.addAllowedMethod("HEAD");config.addAllowedMethod("GET");config.addAllowedMethod("PUT");config.addAllowedMethod("POST");config.addAllowedMethod("DELETE");config.addAllowedMethod("PATCH");// 4)允许的头信息config.addAllowedHeader("*");// 5)有效时长config.setMaxAge(3600L);//2.添加映射路径,我们拦截一切请求UrlBasedCorsConfigurationSource configSource = new UrlBasedCorsConfigurationSource();configSource.registerCorsConfiguration("/**", config);//3.返回新的CorsFilter.return new CorsFilter(configSource);}}
页面静态化
就是直接产生html页面,然后把页面放在nginx下面
@Autowiredprivate TemplateEngine templateEngine;public void createHtml(Long spuId){//上下文Context context = new Context();//数据context.setVariables(loadModel(spuId));//输出流File dest = new File("G:\\java\\SpringCloud\\html",spuId+ ".html");if(dest.exists()){dest.delete();}try( PrintWriter writer = new PrintWriter(dest,"UTF-8")) {templateEngine.process("item",context,writer);} catch (Exception e) {log.info("【静态页服务】文生成静态页异常!{}",e);e.printStackTrace();}}public void deleteHtml(Long spuId){File dest = new File("G:\\java\\SpringCloud\\html",spuId+ ".html");if(dest.exists()){dest.delete();}}
Cookie相关
前台界面,访问需要用户信息的服务时(如购物车),每次请求之前都需要先发送一次校验请求,目的是刷新token
解决host地址的变化
那么问题来了:为什么我们这里的请求serverName变成了:127.0.0.1:8087呢?
这里的server name其实就是请求时的主机名:Host,之所以改变,有两个原因:
- 我们使用了nginx反向代理,当监听到api.leyou.com的时候,会自动将请求转发至127.0.0.1:10010,即Zuul。
- 而后请求到达我们的网关Zuul,Zuul就会根据路径匹配,我们的请求是/api/auth,根据规则被转发到了 127.0.0.1:8087 ,即我们的授权中心。
我们首先去更改nginx配置,让它不要修改我们的host:proxy_set_header Host $host;
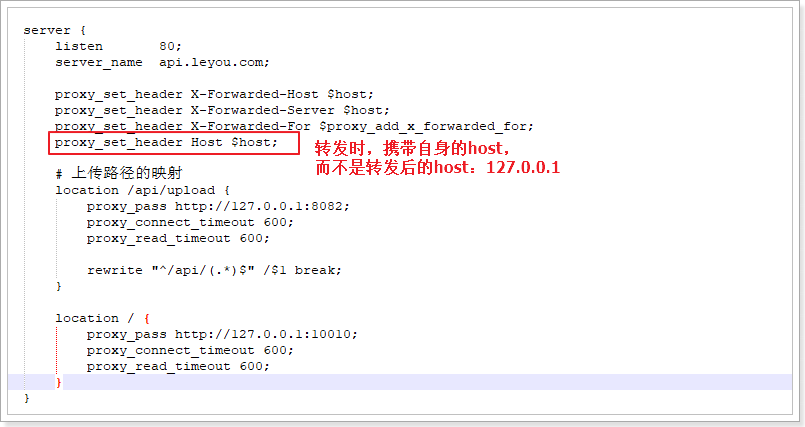
zuul配置add-host-header: true sensitive-headers:无内容
zuul:prefix: /api #添加路由前缀routes:item-service: /item/** # item模块的访问都需要添加 /itemsearch-service: /search/** # 搜索微服务user-service: /user/**auth-service: /auth/**add-host-header: true #添加host头信息sensitive-headers: #配置禁止使用的头信息,这里设置为null,否则set-cookie无效
登录成功返回token,写入到cookie,设置cookie有效期cookie.setMaxAge();
主要是这个两个
cookie.setDomain("leyou.com");cookie.setPath("/");
以后每次访问前,都需要发送一个请求来刷新token
品牌分类
商城的核心自然是商品,而商品多了以后,肯定要进行分类,并且不同的商品会有不同的品牌信息,其关系如图所示:
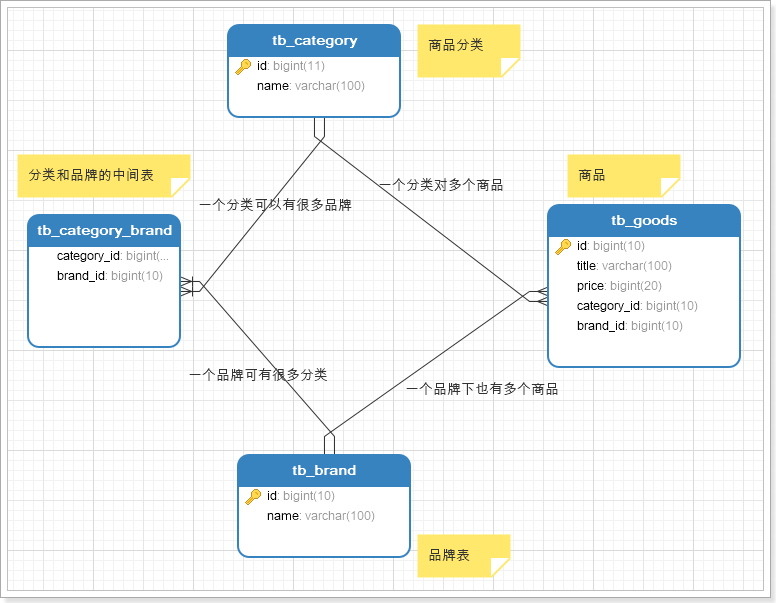
- 一个商分类下有很多商品
- 一个商品分类下有很多品牌
- 而一个品牌,可能属于不同的分类
- 一个品牌下也会有很多商品
因此,我们需要依次去完成:商品分类、品牌、商品的开发。
商品规格参数
表结构
我们看下规格参数的格式:
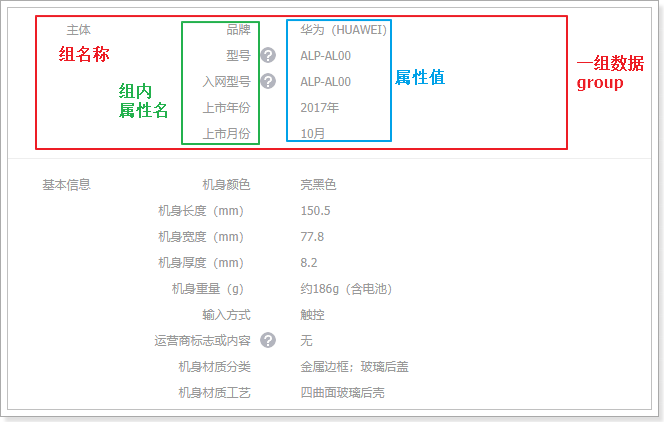
可以看到规格参数是分组的,每一组都有多个参数键值对。不过对于规格参数的模板而言,其值现在是不确定的,不同的商品值肯定不同,模板中只要保存组信息、组内参数信息即可。
因此我们设计了两张表:
- tb_spec_group:组,与商品分类关联
- tb_spec_param:参数名,与组关联,一对多
规格组
规格参数分组表:tb_spec_group
CREATE TABLE `tb_spec_group` (`id` bigint(20) NOT NULL AUTO_INCREMENT COMMENT '主键',`cid` bigint(20) NOT NULL COMMENT '商品分类id,一个分类下有多个规格组',`name` varchar(50) NOT NULL COMMENT '规格组的名称',PRIMARY KEY (`id`),KEY `key_category` (`cid`)) ENGINE=InnoDB AUTO_INCREMENT=14 DEFAULT CHARSET=utf8 COMMENT='规格参数的分组表,每个商品分类下有多个规格参数组';
规格组有3个字段:
- id:主键
- cid:商品分类id,一个分类下有多个模板
- name:该规格组的名称。
规格参数
规格参数表:tb_spec_param
CREATE TABLE `tb_spec_param` (`id` bigint(20) NOT NULL AUTO_INCREMENT COMMENT '主键',`cid` bigint(20) NOT NULL COMMENT '商品分类id',`group_id` bigint(20) NOT NULL,`name` varchar(255) NOT NULL COMMENT '参数名',`numeric` tinyint(1) NOT NULL COMMENT '是否是数字类型参数,true或false',`unit` varchar(255) DEFAULT '' COMMENT '数字类型参数的单位,非数字类型可以为空',`generic` tinyint(1) NOT NULL COMMENT '是否是sku通用属性,true或false',`searching` tinyint(1) NOT NULL COMMENT '是否用于搜索过滤,true或false',`segments` varchar(1000) DEFAULT '' COMMENT '数值类型参数,如果需要搜索,则添加分段间隔值,如CPU频率间隔:0.5-1.0',PRIMARY KEY (`id`),KEY `key_group` (`group_id`),KEY `key_category` (`cid`)) ENGINE=InnoDB AUTO_INCREMENT=24 DEFAULT CHARSET=utf8 COMMENT='规格参数组下的参数名';
按道理来说,我们的规格参数就只需要记录参数名、组id、商品分类id即可。但是这里却多出了很多字段,为什么?
还记得我们之前的分析吧,规格参数中有一部分是 SKU的通用属性,一部分是SKU的特有属性,而且其中会有一些将来用作搜索过滤,这些信息都需要标记出来。
通用属性
用一个布尔类型字段来标记是否为通用:
- generic来标记是否为通用属性:
- true:代表通用属性
- false:代表sku特有属性
搜索过滤
与搜索相关的有两个字段:
- searching:标记是否用作过滤
- true:用于过滤搜索
- false:不用于过滤
- segments:某些数值类型的参数,在搜索时需要按区间划分,这里提前确定好划分区间
- 比如电池容量,0~2000mAh,2000mAh 3000mAh,3000mAh~4000mAh
数值类型
某些规格参数可能为数值类型,这样的数据才需要划分区间,我们有两个字段来描述:
- numberic:是否为数值类型
- true:数值类型
- false:不是数值类型
- unit:参数的单位
SPU和SKU数据结构(重点)
规格确定以后,就可以添加商品了,先看下数据库表
SPU表
SPU表:
CREATE TABLE `tb_spu` (`id` bigint(20) NOT NULL AUTO_INCREMENT COMMENT 'spu id',`title` varchar(255) NOT NULL DEFAULT '' COMMENT '标题',`sub_title` varchar(255) DEFAULT '' COMMENT '子标题',`cid1` bigint(20) NOT NULL COMMENT '1级类目id',`cid2` bigint(20) NOT NULL COMMENT '2级类目id',`cid3` bigint(20) NOT NULL COMMENT '3级类目id',`brand_id` bigint(20) NOT NULL COMMENT '商品所属品牌id',`saleable` tinyint(1) NOT NULL DEFAULT '1' COMMENT '是否上架,0下架,1上架',`valid` tinyint(1) NOT NULL DEFAULT '1' COMMENT '是否有效,0已删除,1有效',`create_time` datetime DEFAULT NULL COMMENT '添加时间',`last_update_time` datetime DEFAULT NULL COMMENT '最后修改时间',PRIMARY KEY (`id`)) ENGINE=InnoDB AUTO_INCREMENT=208 DEFAULT CHARSET=utf8 COMMENT='spu表,该表描述的是一个抽象的商品,比如 iphone8';
与我们前面分析的基本类似,但是似乎少了一些字段,比如商品描述。
我们做了表的垂直拆分,将SPU的详情放到了另一张表:tb_spu_detail
CREATE TABLE `tb_spu_detail` (`spu_id` bigint(20) NOT NULL,`description` text COMMENT '商品描述信息',`generic_spec` varchar(10000) NOT NULL DEFAULT '' COMMENT '通用规格参数数据',`special_spec` varchar(1000) NOT NULL COMMENT '特有规格参数及可选值信息,json格式',`packing_list` varchar(3000) DEFAULT '' COMMENT '包装清单',`after_service` varchar(3000) DEFAULT '' COMMENT '售后服务',PRIMARY KEY (`spu_id`)) ENGINE=InnoDB DEFAULT CHARSET=utf8;
这张表中的数据都比较大,为了不影响主表的查询效率我们拆分出这张表。
需要注意的是这两个字段:generic_spec和special_spec。
前面讲过规格参数与商品分类绑定,一个分类下的所有SPU具有类似的规格参数。SPU下的SKU可能会有不同的规格参数信息,因此我们计划是这样:
- SPUDetail中保存通用的规格参数信息。
- SKU中保存特有规格参数。
来看下我们的表如何存储这些信息。
generic_spec字段
首先是generic_spec,其中保存通用规格参数信息的值,这里为了方便查询,使用了json格式:
整体来看:
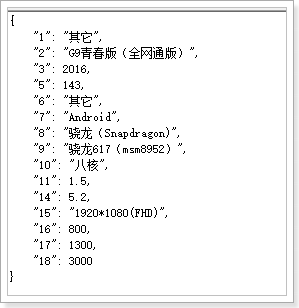
json结构,其中都是键值对:
- key:对应的规格参数的
spec_param的id - value:对应规格参数的值
special_spec字段
注:为了搜索完成后显示
我们说spu中只保存通用规格参数,那么为什么有多出了一个special_spec字段呢?
以手机为例,品牌、操作系统等肯定是全局通用属性,内存、颜色等肯定是特有属性。
当你确定了一个SPU,比如小米的:红米4X
全局属性值都是固定的了:
品牌:小米型号:红米4X
特有属性举例:
颜色:[香槟金, 樱花粉, 磨砂黑]内存:[2G, 3G]机身存储:[16GB, 32GB]
颜色、内存、机身存储,作为SKU特有属性,key虽然一样,但是SPU下的每一个SKU,其值都不一样,所以值会有很多,形成数组。
我们在SPU中,会把特有属性的所有值都记录下来,形成一个数组:
里面又有哪些内容呢?
来看数据格式:
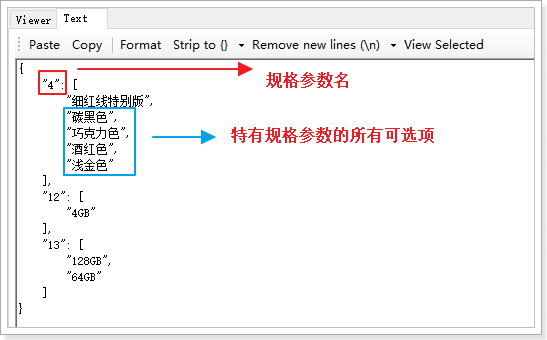
也是json结构:
- key:规格参数id
- value:spu属性的数组
那么问题来:特有规格参数应该在sku中记录才对,为什么在spu中也要记录一份?
因为我们有时候需要把所有规格参数都查询出来,而不是只查询1个sku的属性。比如,商品详情页展示可选的规格参数时:
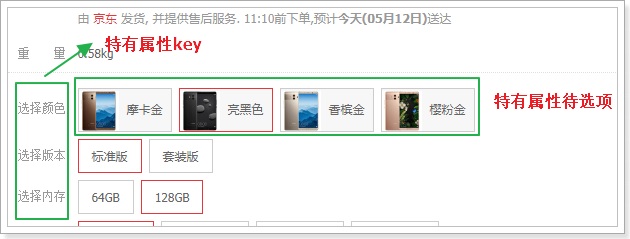
刚好符合我们的结构,这样页面渲染就非常方便了。
SKU表
CREATE TABLE `tb_sku` (`id` bigint(20) NOT NULL AUTO_INCREMENT COMMENT 'sku id',`spu_id` bigint(20) NOT NULL COMMENT 'spu id',`title` varchar(255) NOT NULL COMMENT '商品标题',`images` varchar(1000) DEFAULT '' COMMENT '商品的图片,多个图片以‘,’分割',`price` bigint(15) NOT NULL DEFAULT '0' COMMENT '销售价格,单位为分',`indexes` varchar(100) COMMENT '特有规格属性在spu属性模板中的对应下标组合',`own_spec` varchar(1000) COMMENT 'sku的特有规格参数,json格式',`enable` tinyint(1) NOT NULL DEFAULT '1' COMMENT '是否有效,0无效,1有效',`create_time` datetime NOT NULL COMMENT '添加时间',`last_update_time` datetime NOT NULL COMMENT '最后修改时间',PRIMARY KEY (`id`),KEY `key_spu_id` (`spu_id`) USING BTREE) ENGINE=InnoDB DEFAULT CHARSET=utf8 COMMENT='sku表,该表表示具体的商品实体,如黑色的64GB的iphone 8';
还有一张表,代表库存:
CREATE TABLE `tb_stock` (`sku_id` bigint(20) NOT NULL COMMENT '库存对应的商品sku id',`seckill_stock` int(9) DEFAULT '0' COMMENT '可秒杀库存',`seckill_total` int(9) DEFAULT '0' COMMENT '秒杀总数量',`stock` int(9) NOT NULL COMMENT '库存数量',PRIMARY KEY (`sku_id`)) ENGINE=InnoDB DEFAULT CHARSET=utf8 COMMENT='库存表,代表库存,秒杀库存等信息';
问题:为什么要将库存独立一张表?
因为库存字段写频率较高,而SKU的其它字段以读为主,因此我们将两张表分离,读写不会干扰。
特别需要注意的是sku表中的indexes字段和own_spec字段。sku中应该保存特有规格参数的值,就在这两个字段中。
indexes字段
注:就只是为了选择时候定位
在SPU表中,已经对特有规格参数及可选项进行了保存,结构如下:
{"4": ["香槟金","樱花粉","磨砂黑"],"12": ["2GB","3GB"],"13": ["16GB","32GB"]}
这些特有属性如果排列组合,会产生12个不同的SKU,而不同的SKU,其属性就是上面备选项中的一个。
比如:
- 红米4X,香槟金,2GB内存,16GB存储
- 红米4X,磨砂黑,2GB内存,32GB存储
你会发现,每一个属性值,对应于SPUoptions数组的一个选项,如果我们记录下角标,就是这样:
- 红米4X,0,0,0
- 红米4X,2,0,1
既然如此,我们是不是可以将不同角标串联起来,作为SPU下不同SKU的标示。这就是我们的indexes字段。
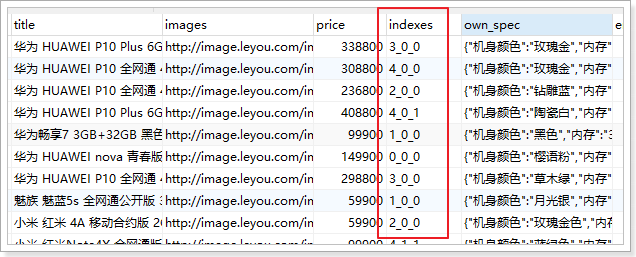
这个设计在商品详情页会特别有用:
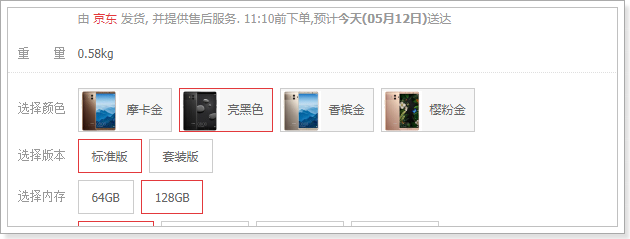
当用户点击选中一个特有属性,你就能根据 角标快速定位到sku。
own_spec字段
看结构:
{ "4":"香槟金","12":"2GB","13":"16GB"}
保存的是特有属性的键值对。
SPU中保存的是可选项,但不确定具体的值,而SKU中的保存的就是具体的值。
购物车
1.实现未登录状态的购物车
2.实现登陆状态下的购物车
流程图
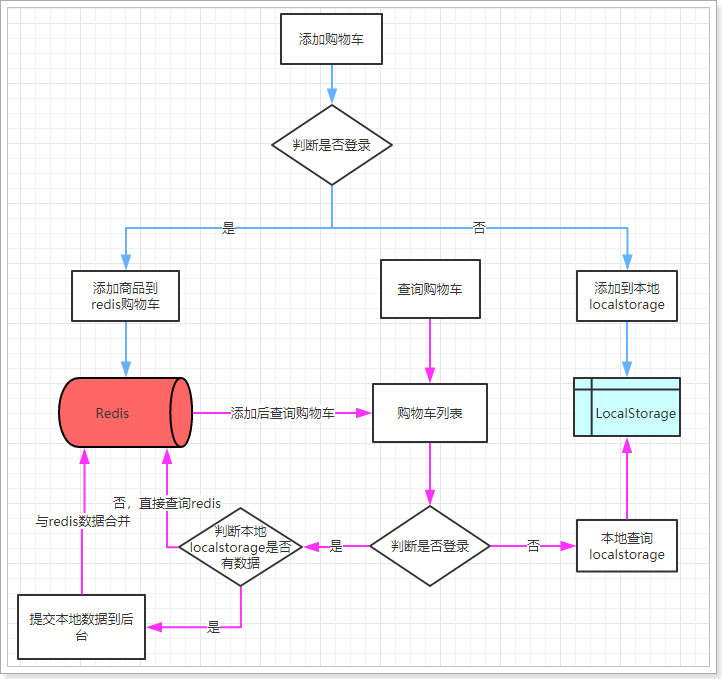
这幅图主要描述了两个功能:新增商品到购物车、查询购物车。
新增商品:
- 判断是否登录
- 是:则添加商品到后台Redis中
- 否:则添加商品到本地的Localstorage
无论哪种新增,完成后都需要查询购物车列表:
- 判断是否登录
- 否:直接查询localstorage中数据并展示
- 是:已登录,则需要先看本地是否有数据,
- 有:需要提交到后台添加到redis,合并数据,而后查询
- 否:直接去后台查询redis,而后返回
添加购物车:
先发送一个axios请求去获取用户信息(判断是否登录)
已登陆
添加商品到后台Redis中
我们要知道是谁发送的请求,才能在Redis中获取数据,编写一个拦截器拦截所有请求,从中获取cookie中token内的用户信息,存入threadLocal(每次请求完成一定要释放threadLocal)
@Autowiredprivate StringRedisTemplate redisTemplate;public static final String prefix = "cart:user:id:";public void addCart(Cart cart) {UserInfo userInfo = ThreadUtils.get();String key = prefix + userInfo.getId();String skuIdKey = cart.getSkuId().toString();//获取加入的数量int num = cart.getNum();//另一种操作hashkey的apiBoundHashOperations<String, Object, Object> operations = redisTemplate.boundHashOps(key);//如果存在这个商品 就在原来的基础上加数量if (operations.hasKey(skuIdKey)) {String jsonCart = Objects.requireNonNull(operations.get(skuIdKey)).toString();cart = JsonUtils.parse(jsonCart, Cart.class);cart.setNum(cart.getNum() + num);}operations.put(skuIdKey, JsonUtils.serialize(cart));}
未登录
添加商品到本地的Localstorage
获取localStorage中的购物车(可能为空,空就设置为[]),判断是否有新添加的商品,有就添加数量,没有就添加商品
// 获取以前的购物车const carts = ly.store.get("LY_CART") || [];// 获取与当前商品id一致的购物车数据const cart = carts.find(c => c.skuId === this.sku.id);if (cart) {// 存在,修改数量cart.num += this.num;} else {// 不存在,新增carts.push({skuId: this.sku.id,title: this.sku.title,image: this.images[0],price: this.sku.price,num: this.num,ownSpec: JSON.stringify(this.ownSpec)})}// 未登录ly.store.set("LY_CART", carts);// 跳转到购物车列表页window.location.href = "http://www.leyou.com/cart.html";
查询购物车
同样发送一个axios请求去获取用户信息(判断是否登录)
已登录
获取用户信息,然后在redis中进行查询
public List<Cart> list() {UserInfo userInfo = ThreadUtils.get();String key = prefix + userInfo.getId();//如果没有这个keyif (!redisTemplate.hasKey(key)) {throw new LyException(ExceptionEnum.CART_NOT_FOUND);}BoundHashOperations<String, Object, Object> operations = redisTemplate.boundHashOps(key);return operations.values().stream().map(o -> JsonUtils.parse(o.toString(), Cart.class)).collect(Collectors.toList());}
未登录
从localStorage取出商品信息进行显示
登录后购物车合并(包括了查询)
当跳转到购物车页面,查询购物车列表前,需要判断用户登录状态,
- 如果登录:
- 首先检查用户的LocalStorage中是否有购物车信息,
- 如果有,则提交到后台保存,
- 清空LocalStorage
- 查询购物车
- 查询商品列表(主要是提示价格变化)
- 如果未登录,直接查询即可
工具
雪花算法
public class IdWorker {// 时间起始标记点,作为基准,一般取系统的最近时间(一旦确定不能变动)private final static long twepoch = 1288834974657L;// 机器标识位数private final static long workerIdBits = 5L;// 数据中心标识位数private final static long datacenterIdBits = 5L;// 机器ID最大值private final static long maxWorkerId = -1L ^ (-1L << workerIdBits);// 数据中心ID最大值private final static long maxDatacenterId = -1L ^ (-1L << datacenterIdBits);// 毫秒内自增位private final static long sequenceBits = 12L;// 机器ID偏左移12位private final static long workerIdShift = sequenceBits;// 数据中心ID左移17位private final static long datacenterIdShift = sequenceBits + workerIdBits;// 时间毫秒左移22位private final static long timestampLeftShift = sequenceBits + workerIdBits + datacenterIdBits;private final static long sequenceMask = -1L ^ (-1L << sequenceBits);/* 上次生产id时间戳 */private static long lastTimestamp = -1L;// 0,并发控制private long sequence = 0L;private final long workerId;// 数据标识id部分private final long datacenterId;public IdWorker(){this.datacenterId = getDatacenterId(maxDatacenterId);this.workerId = getMaxWorkerId(datacenterId, maxWorkerId);}/*** @param workerId* 工作机器ID* @param datacenterId* 序列号*/public IdWorker(long workerId, long datacenterId) {if (workerId > maxWorkerId || workerId < 0) {throw new IllegalArgumentException(String.format("worker Id can't be greater than %d or less than 0", maxWorkerId));}if (datacenterId > maxDatacenterId || datacenterId < 0) {throw new IllegalArgumentException(String.format("datacenter Id can't be greater than %d or less than 0", maxDatacenterId));}this.workerId = workerId;this.datacenterId = datacenterId;}/*** 获取下一个ID** @return*/public synchronized long nextId() {long timestamp = timeGen();if (timestamp < lastTimestamp) {throw new RuntimeException(String.format("Clock moved backwards. Refusing to generate id for %d milliseconds", lastTimestamp - timestamp));}if (lastTimestamp == timestamp) {// 当前毫秒内,则+1sequence = (sequence + 1) & sequenceMask;if (sequence == 0) {// 当前毫秒内计数满了,则等待下一秒timestamp = tilNextMillis(lastTimestamp);}} else {sequence = 0L;}lastTimestamp = timestamp;// ID偏移组合生成最终的ID,并返回IDlong nextId = ((timestamp - twepoch) << timestampLeftShift)| (datacenterId << datacenterIdShift)| (workerId << workerIdShift) | sequence;return nextId;}private long tilNextMillis(final long lastTimestamp) {long timestamp = this.timeGen();while (timestamp <= lastTimestamp) {timestamp = this.timeGen();}return timestamp;}private long timeGen() {return System.currentTimeMillis();}/*** <p>* 获取 maxWorkerId* </p>*/protected static long getMaxWorkerId(long datacenterId, long maxWorkerId) {StringBuffer mpid = new StringBuffer();mpid.append(datacenterId);String name = ManagementFactory.getRuntimeMXBean().getName();if (!name.isEmpty()) {/** GET jvmPid*/mpid.append(name.split("@")[0]);}/** MAC + PID 的 hashcode 获取16个低位*/return (mpid.toString().hashCode() & 0xffff) % (maxWorkerId + 1);}/*** <p>* 数据标识id部分* </p>*/protected static long getDatacenterId(long maxDatacenterId) {long id = 0L;try {InetAddress ip = InetAddress.getLocalHost();NetworkInterface network = NetworkInterface.getByInetAddress(ip);if (network == null) {id = 1L;} else {byte[] mac = network.getHardwareAddress();id = ((0x000000FF & (long) mac[mac.length - 1])| (0x0000FF00 & (((long) mac[mac.length - 2]) << 8))) >> 6;id = id % (maxDatacenterId + 1);}} catch (Exception e) {System.out.println(" getDatacenterId: " + e.getMessage());}return id;}}
yml
ly:worker:workerId: 1datacenterId: 1
IdWorkerProperties
@Component@Data@ConfigurationProperties(prefix = "ly.worker")public class IdWorkerProperties {private long workerId;// 当前机器idprivate long datacenterId;// 序列号}
IdWorkerConfig
@Configurationpublic class IdWorkerConfig {@Beanpublic IdWorker idWorker(IdWorkerProperties prop) {return new IdWorker(prop.getWorkerId(), prop.getDatacenterId());}}
使用
@Autowiredprivate IdWorker idWorker;Long orderId = idWorker.nextId();
JsonUtil
public class JsonUtils {public static final ObjectMapper mapper = new ObjectMapper();private static final Logger logger = LoggerFactory.getLogger(JsonUtils.class);public static String serialize(Object obj) {if (obj == null) {return null;}if (obj.getClass() == String.class) {return (String) obj;}try {return mapper.writeValueAsString(obj);} catch (JsonProcessingException e) {logger.error("json序列化出错:" + obj, e);return null;}}public static <T> T parse(String json, Class<T> tClass) {try {return mapper.readValue(json, tClass);} catch (IOException e) {logger.error("json解析出错:" + json, e);return null;}}public static <E> List<E> parseList(String json, Class<E> eClass) {try {return mapper.readValue(json, mapper.getTypeFactory().constructCollectionType(List.class, eClass));} catch (IOException e) {logger.error("json解析出错:" + json, e);return null;}}public static <K, V> Map<K, V> parseMap(String json, Class<K> kClass, Class<V> vClass) {try {return mapper.readValue(json, mapper.getTypeFactory().constructMapType(Map.class, kClass, vClass));} catch (IOException e) {logger.error("json解析出错:" + json, e);return null;}}public static <T> T nativeRead(String json, TypeReference<T> type) {try {return mapper.readValue(json, type);} catch (IOException e) {logger.error("json解析出错:" + json, e);return null;}}}
使用
// 获取通用规格参数Map<Long, String> genericMap = JsonUtils.parseMap(spuDetail.getGenericSpec(), Long.class, String.class);// 获取特有规格参数Map<Long, List<String>> specialMap = JsonUtils.nativeRead(spuDetail.getSpecialSpec(), new TypeReference<Map<Long, List<String>>>() {});

