这篇文章,是建立在大家对binder已经有了一定认识的基数上,因此对于一些具体概念不再衍述!
对于binder,主要可以分为实名binder和匿名binder,那么何为实名,何为匿名?
1.实名binder
其实实名binder大家应该都很熟悉,每当我们需要和一个系统服务交互的时候其实就会利用实名binder和系统服务建立IPC通信。
比如我们需要获取windowmanager的服务,我们可以直接通过下面代码获取:
WindowManager wm = context.getSystemService(WINDOW_SERVICE);
其实这里我们通过代码获取的就是WMS的实名binder的proxy代理,那么这个代理又是如何返回给我们的?

我们先抛开这个不谈,我们先来整理下关于Binder使用到的元素:
IBinder
Binder implements IBinder
Stub extends android.os.Binder
Proxy implements SelfInterface
IInterface
SelfInterface extends android.os.IInterface
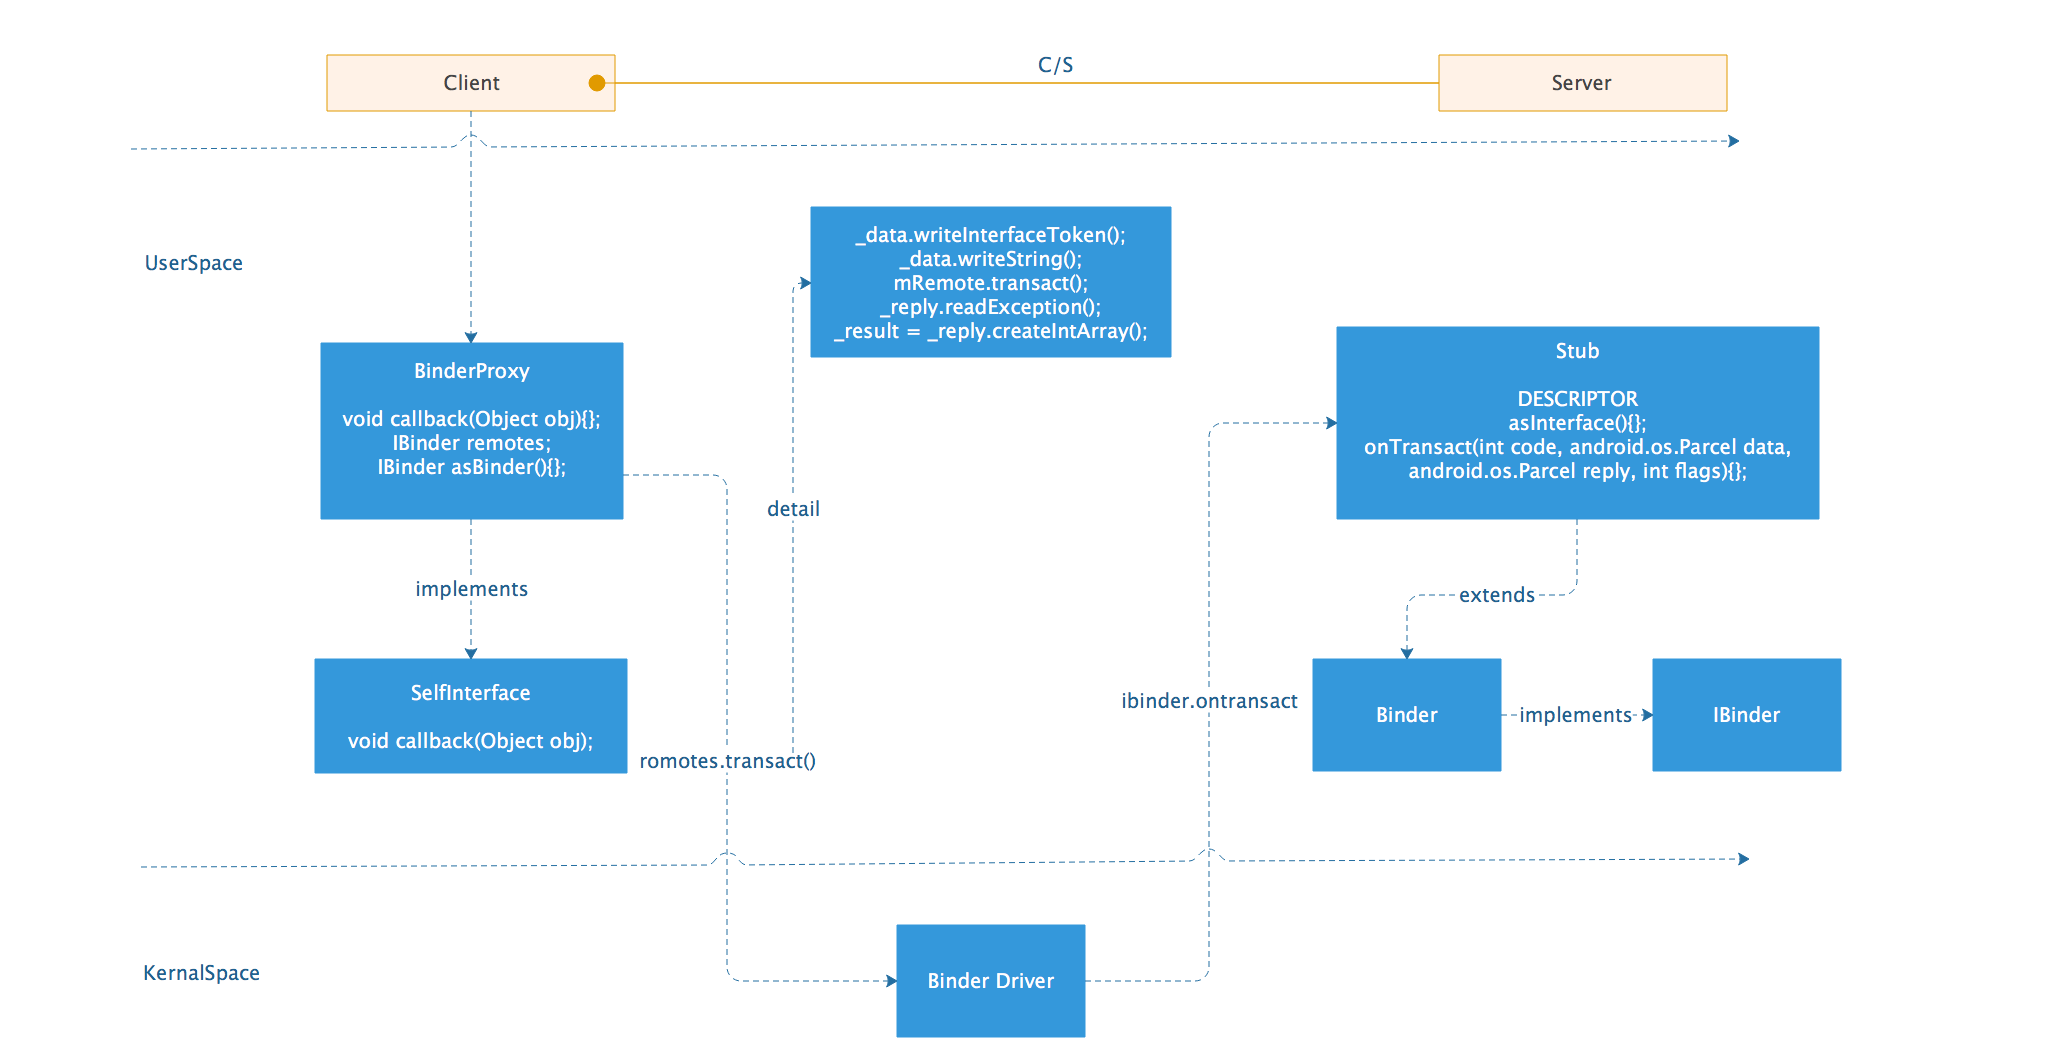
现在,我们先不考虑Binder驱动中的工作和Binder的注册,单从上面的元素调用来分析C/S的IPC通信:
Client端
无论是何种通信,首先都要约定通信的内容,因此我们先定义一个接口来约定通信内容:
public interface SelfInterface{void callback(Object obj);}
这里我们约定了一个带参数的回调方法callback(Object obj)来和Server端进行通信。
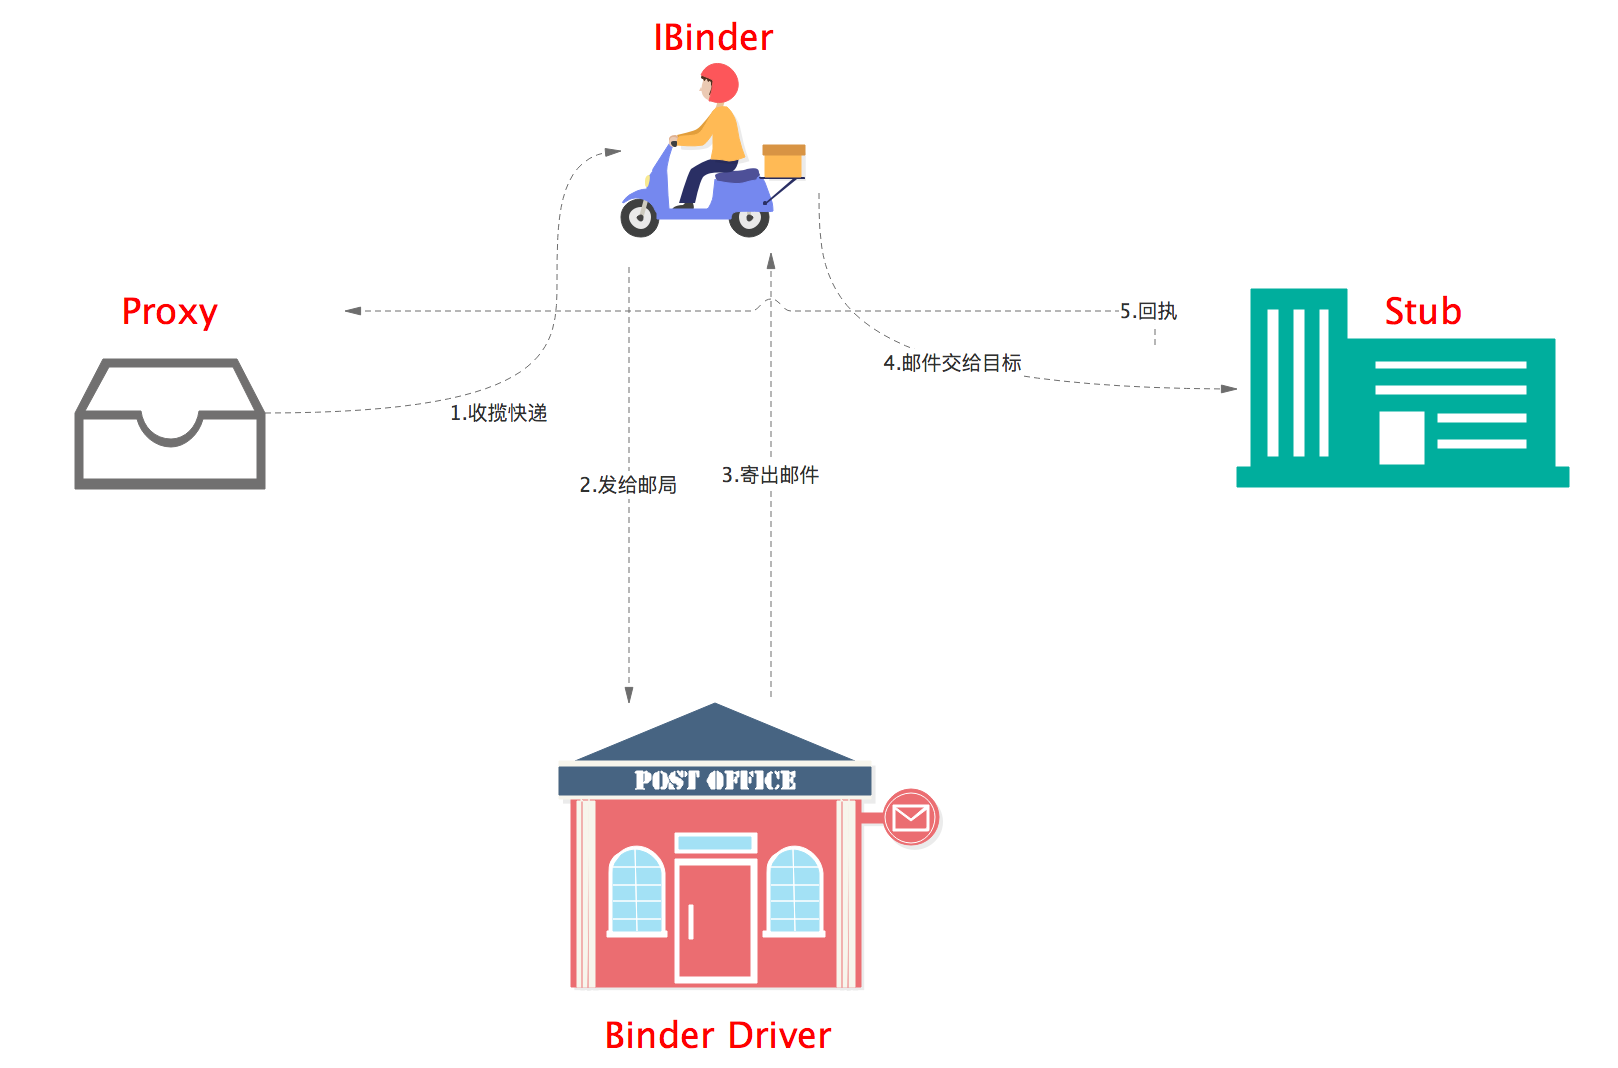
约定了通信内容之后,我们需要一个载体来进行通信操作,就好比你寄快递,把要寄的东西打包好之后,需要填写一个快递单,并先把包裹存放在快递的寄件代理处,等快递小哥来接收,在这里,大家可以把BinderProxy看作是寄件代理处,而把IBinder看作是快递小哥:


1.收揽快递(Proxy -> IBinder):
我们进行进程间通信之前,首先需要一个IBinder的代理,它可以告诉Binder驱动把邮件寄给哪个Server端,并告诉Server端需要做些什么,Proxy就好比是存放在代理寄件处的包裹,上面标注了需要取件的快递小哥(mRemotes), 以及里面装载了邮寄的物件(实现的SelfInterface接口),当我们调用了Proxy的复写的SelfInterface中的方法后,就会通知快递小哥把包裹送往邮局(Binder Driver)。
private static class Proxy implements SelfInterface {private android.os.IBinder mRemote;Proxy(android.os.IBinder remote) {mRemote = remote;}@Overridepublic android.os.IBinder asBinder() {return mRemote;}public java.lang.String getInterfaceDescriptor() {return DESCRIPTOR;}@Overridepublic void callback(Object obj) throws android.os.RemoteException {android.os.Parcel _data = android.os.Parcel.obtain();android.os.Parcel _reply = android.os.Parcel.obtain();int[] _result;try {_data.writeInterfaceToken(DESCRIPTOR);mRemote.transact(Stub.TRANSACTION_loginTFCard, _data, _reply, 0);_reply.readException();_result = _reply.createIntArray();} finally {_reply.recycle();_data.recycle();}return _result;}}
在Proxy中,我们通过构造函数会传入远端注册的IBinder mRemotes,我们可以通过Stub.asInterface()去获取对应IBinder的代理,我们当然也可以在代理中通过asBinder()来获取这个IBinder。
我们重点来分析以下在Proxy中复写的来自于SelfInterface接口定义的方法。
@Overridepublic void callback(Object obj) throws android.os.RemoteException {android.os.Parcel _data = android.os.Parcel.obtain();android.os.Parcel _reply = android.os.Parcel.obtain();int[] _result;try {_data.writeInterfaceToken(DESCRIPTOR);mRemote.transact(Stub.TRANSACTION_loginTFCard, _data, _reply, 0);_reply.readException();_result = _reply.createIntArray();} finally {_reply.recycle();_data.recycle();}return _result;}
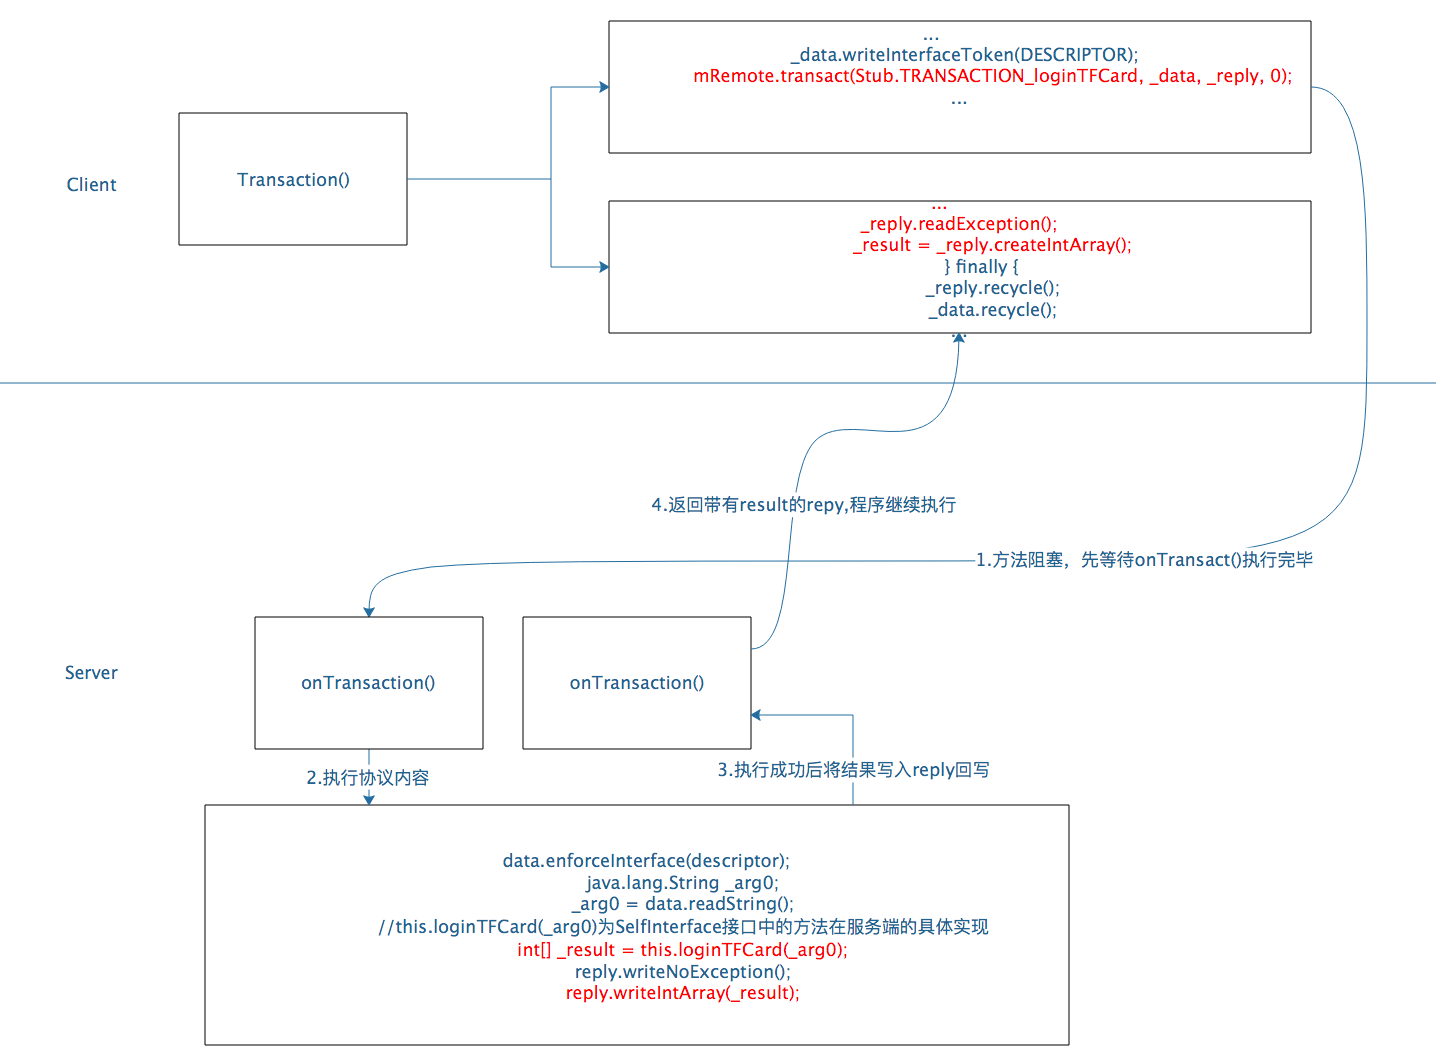
这里首先会对我们的数据进行序列化,这一块涉及到数据的传输,我们不过多叙述,主要关注mRemote.transact(Stub.TRANSACTION_loginTFCard, _data, _reply, 0),在这里调用了IBinder中的transact(args..)方法来把通信内容交由Binder驱动处理,在这个过程中会阻塞下一步的执行,只有等Binder.onTransact(int code, @NonNull Parcel data, @Nullable Parcel reply, int flags)方法相应并且处理了客户端传来的通信内容并成功写入到reply后,才会继续执行下面的代码来获取服务端处理的结果:
_reply.readException();_result = _reply.createIntArray();
由此可见,Proxy在整个Binder IPC通信过程中相当于客户端寄存中心(代理中心),它会负责实现客户端想要实现的方法,并且利用通过Stub.asInterface(android.os.IBinder obj)中缓存的IBinder来和服务端进行Binder通信,代码中注释描述了asInterface的功能:
public static jifuliya.lyl.retrofitproxy.IEcmServiceBinder asInterface(android.os.IBinder obj) {if ((obj == null)) {return null;}//查询IBinder是否是本地进程所注册,即IBinder是否属于自己android.os.IInterface iin = obj.queryLocalInterface(DESCRIPTOR);if (((iin != null) && (iin instanceof jifuliya.lyl.retrofitproxy.IEcmServiceBinder))) {//如果属于自己则直接返回,属于进程内部通信return ((jifuliya.lyl.retrofitproxy.IEcmServiceBinder) iin);}//如果不属于自己则生成对应的代理,将远程IBinder缓存到Proxy代理中return new jifuliya.lyl.retrofitproxy.IEcmServiceBinder.Stub.Proxy(obj);}
2&3:在邮局中的那些事
通过底层BpBinder和BbBinder的通信来完成底层的数据传递,这个后面我们单独提取出来细细道来。

4:把包裹送到目的地
远端Server会持有一个Stub,它继承了Binder,我们可以通过复写onTransact()来和Binder驱动定义响应协议,Binder驱动将协议通知给BbBinder,在响应客户端的过程中按照定义的协议进行响应。这就好比我们在接收快递的时候可以选择代收或者亲自接收等,当完成了接收之后,我们会向邮局返回一个已经签收成功的订单回执,来告诉邮局我已经成功接受了包裹,并且可以附带一些信息给寄送快递的人,这个回执就是_reply,相当于Server端对处理结果的反馈。
我们来看看这个Stub到底长什么样子?
public static abstract class Stub extends android.os.Binder implements jifuliya.lyl.retrofitproxy.IEcmServiceBinder {private static final java.lang.String DESCRIPTOR = "jifuliya.lyl.retrofitproxy.IEcmServiceBinder";/*** Construct the stub at attach it to the interface.*/public Stub() {this.attachInterface(this, DESCRIPTOR);}/*** Cast an IBinder object into an jifuliya.lyl.retrofitproxy.IEcmServiceBinder interface,* generating a proxy if needed.*/public static jifuliya.lyl.retrofitproxy.IEcmServiceBinder asInterface(android.os.IBinder obj) {if ((obj == null)) {return null;}android.os.IInterface iin = obj.queryLocalInterface(DESCRIPTOR);if (((iin != null) && (iin instanceof jifuliya.lyl.retrofitproxy.IEcmServiceBinder))) {return ((jifuliya.lyl.retrofitproxy.IEcmServiceBinder) iin);}return new jifuliya.lyl.retrofitproxy.IEcmServiceBinder.Stub.Proxy(obj);}@Overridepublic boolean onTransact(int code, android.os.Parcel data, android.os.Parcel reply, int flags) throws android.os.RemoteException {java.lang.String descriptor = DESCRIPTOR;switch (code) {case INTERFACE_TRANSACTION: {reply.writeString(descriptor);return true;}case TRANSACTION_callback: {data.enforceInterface(descriptor);java.lang.String _arg0;_arg0 = data.readString();int[] _result = this.loginTFCard(_arg0);reply.writeNoException();reply.writeIntArray(_result);return true;}default: {return super.onTransact(code, data, reply, flags);}}}}
这里面的DESCRIPTOR相当于一个身份name,作为身份凭证,asInterface()在#1中我们已经分析过了,主要是为了生成改Binder的一个代理,作为客户端的通信入口,现在我们把重点放在onTransact()上:
@Overridepublic boolean onTransact(int code, android.os.Parcel data, android.os.Parcel reply, int flags) throws android.os.RemoteException {java.lang.String descriptor = DESCRIPTOR;switch (code) {case INTERFACE_TRANSACTION: {reply.writeString(descriptor);return true;}case TRANSACTION_callback: {data.enforceInterface(descriptor);java.lang.String _arg0;_arg0 = data.readString();//this.loginTFCard(_arg0)为SelfInterface接口中的方法在服务端的具体实现int[] _result = this.loginTFCard(_arg0);reply.writeNoException();reply.writeIntArray(_result);return true;}default: {return super.onTransact(code, data, reply, flags);}}}
我们所有在客户端中定义的每一个通信内容,都会生成一个类似于TRANSACTION_callback的code,彼此之间不会重复,当我们通过Binder驱动在onTransact()拿到data后,会将data中的参数通过data.readString()读取出来,并将参数传入到自己对应的callback(param)中按照自己约定的逻辑协议处理数据,最后将结果通过reply.writeIntArray(_result)写到序列化的reply中。
5.收件回执reply
我们通过一张图来表述reply在整个Binder通信中的生命周期:

这里注意一点,transact()中执行到mRemote.transact()后会等待onTransact()成功把result写入reply并回传后才会继续下面的代码指令执行。
当1-5执行完毕后,一次进程间的Binder IPC通信就算完成了,是不是很简单?

下一章我将带大家在此基础上详细分析实名Binder的注册和通信。

