Mybatis的初次使用
1.数据库搭建

2.实体类实现
在java中创建与数据表字段相对应的对象
public class Customer {private Integer id;private String name;private String jobs;private String phone;public Integer getId() {return id;}public void setId(Integer id) {this.id = id;}public String getName() {return name;}public void setName(String name) {this.name = name;}public String getJobs() {return jobs;}public void setJobs(String jobs) {this.jobs = jobs;}public String getPhone() {return phone;}public void setPhone(String phone) {this.phone = phone;}@Overridepublic String toString() {return "Customer{" +"id=" + id +", name='" + name + '\'' +", jobs='" + jobs + '\'' +", phone='" + phone + '\'' +'}';}}
接口类的创建
public interface CustomerDao {public Customer getCustomerById(int id);}
3.mybatis的全局配置文件
<?xml version="1.0" encoding="UTF-8" ?><!DOCTYPE configurationPUBLIC "-//mybatis.org//DTD Config 3.0//EN""http://mybatis.org/dtd/mybatis-3-config.dtd"><!--配置--><configuration><!--配置环境--><environments default="mysql"><!--环境变量--><environment id="mysql"><!--事务管理器--><transactionManager type="JDBC"/><!--数据源 配置链接池--><dataSource type="pooled"><property name="driver" value="com.mysql.jdbc.Driver"/><property name="url" value="jdbc:mysql://localhost:3306/mybatis"/><property name="username" value="root"/><property name="password" value="123456"/></dataSource></environment></environments><!--引入每个接口的实现器--><mappers><!--resource:从类路径寻找--><mapper resource="test/CustomerMapper.xml"></mapper></mappers></configuration>
4.实现操作数据库语句的Sql映射文件
<?xml version="1.0" encoding="UTF-8" ?><!DOCTYPE mapperPUBLIC "-//mybatis.org//DTD Mapper 3.0//EN""http://mybatis.org/dtd/mybatis-3-mapper.dtd"><!--命名空间 :写接口的全类名,告诉mybatis这个文件实现哪个接口的--><mapper namespace="com.mybatis.test.dao.CustomerDao"><!--select:数据库相关操作id:操作数据库的方法的名字resultType:指定方法操作后的返回值类型--><select id="getCustomerById" resultType="com.mybatis.test.bean.Customer">select * from Customer where id = #{id}</select></mapper>
5.log4j的配置
log4j的配置文件,能够在控制台出看到相关的数据库操作信息(可写可不写)
log4j.rootLogger=DEBUG,Consolelog4j.appender.Console=org.apache.log4j.ConsoleAppenderlog4j.appender.Console.layout=org.apache.log4j.PatternLayoutlog4j.appender.Console.layout.ConversionPattern=%d [%t] %-5p [%c] - %m%nlog4j.logger.org.apache=INFO
6.代码测试
单元测试类
@Testpublic void test01() throws IOException {String source="mybatis-config.xml";InputStream inputStream = Resources.getResourceAsStream(source);//SqlSessionFactory:是工厂,负责创建sqlSession对象//SqlSession sql会话(代表和数据库的一次会话)SqlSessionFactory sqlSessionFactory = new SqlSessionFactoryBuilder().build(inputStream);//获得和数据库的一次会话,getConnection()SqlSession sqlSession = sqlSessionFactory.openSession();CustomerDao mapper = sqlSession.getMapper(CustomerDao.class);Customer customerById = mapper.getCustomerById(1);System.out.println(customerById);}

执行过程
1.获取mybatis的全局配置文件
String source="mybatis-config.xml";
2.将配置资源文件转化为流
InputStream inputStream = Resources.getResourceAsStream(source);
3.通过SqlSessionFactoryBuilder的类中的build方法来创建SqlSession工厂
SqlSessionFactory sqlSessionFactory = new SqlSessionFactoryBuilder().build(inputStream);
4.sqlsession工厂通过openSession获得和数据库的一次会话
SqlSession sqlSession = sqlSessionFactory.openSession();
5.通过接口获得mapper,它是customer对象
CustomerDao mapper = sqlSession.getMapper(CustomerDao.class);
6.调用接口的数据库操作函数,获得数据库中的记录
Customer customerById = mapper.getCustomerById(1);
实现方法二
相比较上一个,实现实体类的接口,通过映射器接口调用,获得相应的数据库操作方法还获取数据库中的字段转化为一个对象。
CustomerDao mapper = sqlSession.getMapper(CustomerDao.class);Customer customerById = mapper.getCustomerById(1);
该命名就可以直接映射到在命名空间中同名的映射器类,并将已映射的 select 语句匹配到对应名称、参数和返回类型的方法。第一种方法有很多优势,首先它不依赖于字符串字面值,会更安全一点。
第二种实现方法
实现映射配置文件
?xml version="1.0" encoding="UTF-8" ?><!DOCTYPE mapperPUBLIC "-//mybatis.org//DTD Mapper 3.0//EN""http://mybatis.org/dtd/mybatis-3-mapper.dtd"><mapper namespace="com.mybatis.test.mapper.CustomerMapper"><select id="getCustomerById" parameterType="Integer" resultType="com.mybatis.test.bean.Customer">select * from Customer where id = #{id}</select></mapper>
命名空间设置为包名加映射文件名,此配置方法在src/java中不会自动的装配到.class文件中,所以配置之后如果不做声明,这无法运行。
在Maven中说明,要编码的配置文件
<build><resources><resource><directory>src/main/java</directory><includes><include>**/*.xml</include></includes></resource></resources></build>
只有添加了这样的信息,才能编码进字节码文件中。
在全局配置中的mappers加入此语句,来获得映射文件
<mapper resource="com/mybatis/test/mapper/CustomerMapper.xml"></mapper>
因此我们只需要在单元测试中调用这样的函数就行。
Customer customer = sqlSession.selectOne("com.mybatis.test.mapper.CustomerMapper.getCustomerById", 2);
通过这样,也可以实现sql语句的查询。
MyBatis实现增删查改
<!--增删改不用放回类型--><update id="updateCustomer">update Customer set username=#{username},jobs=#{jobs},phone=#{phone} where id=#{id}</update><delete id="deleteCustomer">delete from Customer where id=#{id}</delete><insert id="insertCustomer">insert into Customer(username,jobs,phone)values(#{username},#{jobs},#{phone})</insert><select id="selectCustomer" resultType="com.mybatis.test.bean.Customer">select * from Customer</select>
在资源文件夹下的映射文件中进行改动。
将sqlsession工厂写在工具类中
public class MybatisUtils {private static SqlSessionFactory sqlSessionFactory;static{String source="mybatis-config.xml";InputStream inputStream = null;try {inputStream = Resources.getResourceAsStream(source);} catch (IOException e) {e.printStackTrace();}sqlSessionFactory = new SqlSessionFactoryBuilder().build(inputStream);}public static SqlSession getSqlSession(){return sqlSessionFactory.openSession();}}
进行单元测试
@Testpublic void test02(){SqlSession sqlSession = MybatisUtils.getSqlSession();CustomerDao customerDao = sqlSession.getMapper(CustomerDao.class);//修改Customer customer = new Customer(1,"jack","teacher","88888888");Customer customer1 = new Customer("tomcat","server","12345678911");customerDao.updateCustomer(customer);customerDao.insertCustomer(customer1);customerDao.deleteCustomer(4);//查询所有的记录List<Customer> customers = customerDao.selectCustomer();for (Customer customer2 : customers) {System.out.println(customer2);}sqlSession.commit();sqlSession.close();}


MyBatis全局配置文件
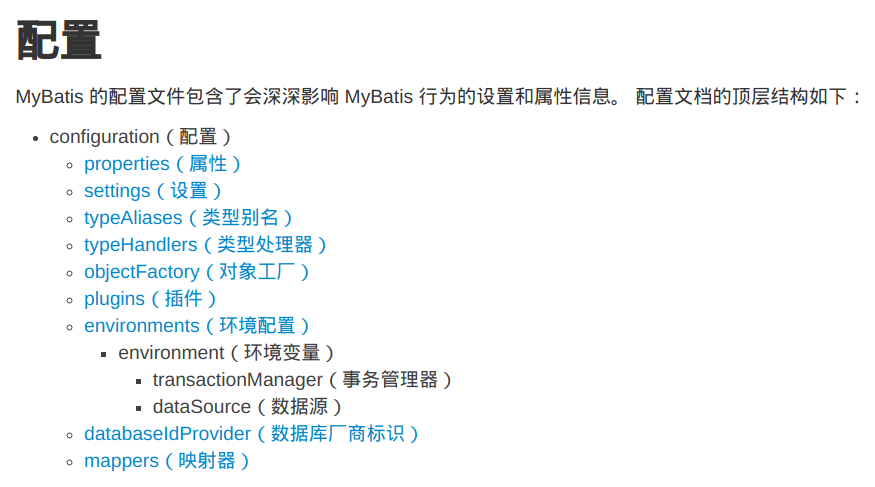
注:mybatis标签的书写顺序要严格按照以上要求进行书写,不然会报错
全局文件:指导mybatis正确运行的一些设置
映射文件:是对Mapper接口的实现的描述
sqlSession.getMapper(Custome.class).getClass();
properties标签
主要用来引入外部配置文件信息,和spring相同,可以用于数据源信息的配置
外部配置文件
username=rootpassword=348102jdbc.url=jdbc:mysql://localhost:3306/mybatisdriverclass=com.mysql.jdbc.Driver
全局配置文件
<!--和spring的context:property-placeholder一样,用于引入外部配置文件标签属性:resource:从类路径中选择url:引用磁盘路径或者网络路径的资源--><properties resource="dbconfig.properties"></properties><!--配置环境--><environments default="mysql"><!--环境变量--><environment id="mysql"><!--事务管理器--><transactionManager type="JDBC"/><!--数据源 配置链接池--><dataSource type="pooled"><!--${}取出外部配置文件中的值--><property name="driver" value="${driverclass}"/><property name="url" value="${jdbcurl}"/><property name="username" value="${username}"/><property name="password" value="${password}"/></dataSource></environment></environments>
settings标签
可以设置mybatis中开启相应的功能,比如二级缓冲,和驼峰命名等相关设置
<settings><!--开启驼峰命名规则 假设实体类中userName可以对应数据库user_name这样的字段--><setting name="mapUnderscoreToCamelCase" value="true"/></settings>
当相应带有_符号的字段取不到值时,可以开启驼峰命名规则进行获取。
typeAliases标签
对相应的bean对象起别名,减去全类名书写时繁琐
xml配置
<!--起别名--><typeAliases><!--不指定alias名字默认类名作为别名,不区分大小写--><typeAlias type="com.mybatis.test.bean.Customer" alias="customer"></typeAlias><!--对包下的使用bean起别名--><package name="com.mybatis.test.bean"/></typeAliases>
注解配置
@Alias("custom")
映射文件
<select id="getCustomerById" resultType="Custom">select * from Customer where id = #{id}</select>
typeHandlers标签
MyBatis 在设置预处理语句(PreparedStatement)中的参数或从结果集中取出一个值时, 都会用类型处理器将获取到的值以合适的方式转换成 Java 类型。
类型处理器底层还是调用jdbc的setXX类型方法进行赋值的。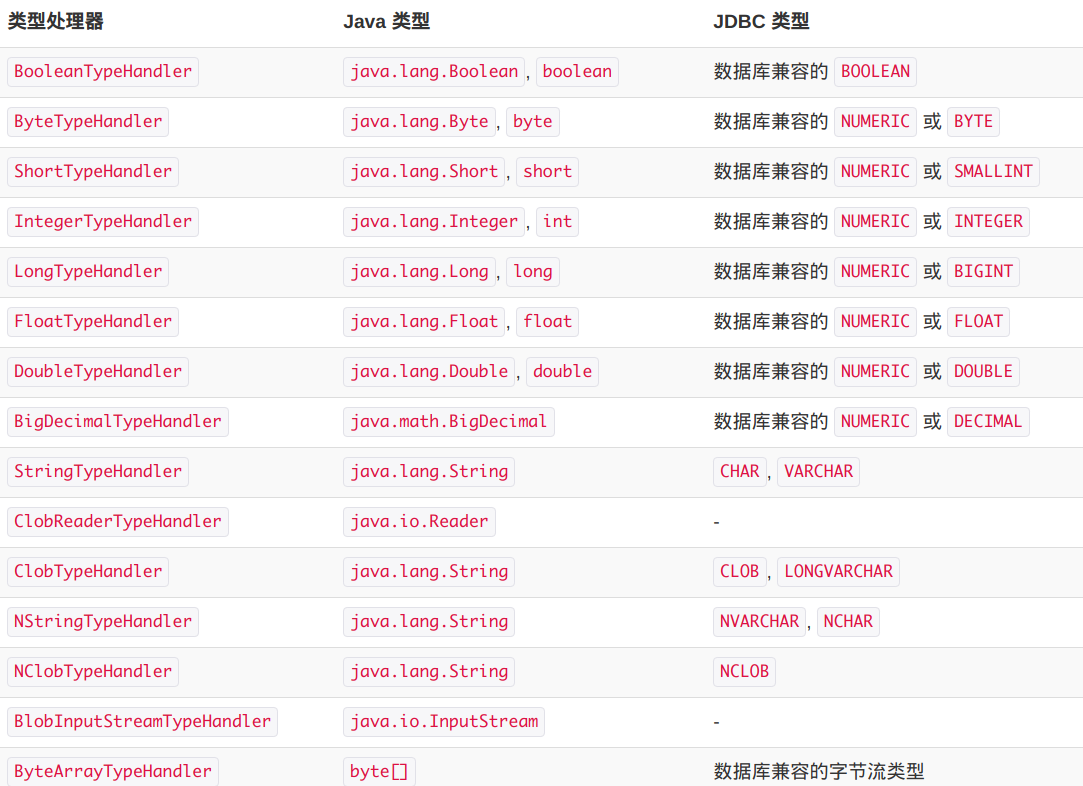
可自定义类型处理器
plugins标签
MyBatis 允许你在映射语句执行过程中的某一点进行拦截调用。MyBatis 允许使用插件来拦截的方法调用包括:
- Executor (update, query, flushStatements, commit, rollback, getTransaction, close, isClosed):执行器
- ParameterHandler (getParameterObject, setParameters):参数处理器
- ResultSetHandler (handleResultSets, handleOutputParameters):结果集处理器
- StatementHandler (prepare, parameterize, batch, update, query):预处理器
environments标签
<!--default:默认是使用哪个环境,使用id为mysql的环境--><environments default="mysql"><!--环境变量--><environment id="mysql"><!--事务管理器--><transactionManager type="JDBC"/><!--数据源 配置链接池--><dataSource type="pooled"><!--${}取出外部配置文件中的值--><property name="driver" value="${driverclass}"/><property name="url" value="${jdbcurl}"/><property name="username" value="${username}"/><property name="password" value="${password}"/></dataSource></environment><environment id="oracle"><!--事务管理器--><transactionManager type="JDBC"/><!--数据源 配置链接池--><dataSource type="pooled"><!--${}取出外部配置文件中的值--><property name="driver" value="${driverclass}"/><property name="url" value="${jdbcurl}"/><property name="username" value="${username}"/><property name="password" value="${password}"/></dataSource></environment></environments>
注:虽然mybatis中有数据源和事务管理的功能,但是在和spring整合之后,就交给spring进行控制了。
databaseIdProvider标签
做数据库移植使用,实际开发中基本不会使用,数据库一般都是决定好的。
<!--配置数据库产商信息--><databaseIdProvider type="DB_VENDOR"><!--在映射文件中的sql语句添加上databaseId的值,指定他在那种数据库中运行--><property name="SQL Server" value="sqlserver"/><property name="MySQL" value="mysql"/><property name="Oracle" value="oracle" /></databaseIdProvider>
mappers标签
<!--引入每个接口的实现器--><mappers><!--class:从接口中寻找,注意,相应的映射文件得和接口在同一包下url:从磁盘或者网络路径中寻找resource:从类路径寻找--><mapper resource="test/CustomerMapper.xml"></mapper><mapper resource="com/mybatis/test/mapper/CustomerMapper.xml"></mapper></mappers>
批量注入
<mappers><package name="com.mybatis.test.dao"/></mappers>
可以配合逆向工程生成的接口和映射文件相匹配,注意两者要在同一个包下。
SQL映射文件
MyBatis中对于数据库的操作相较jdbc简单了许多,下面是xml映射文件中所用的标签。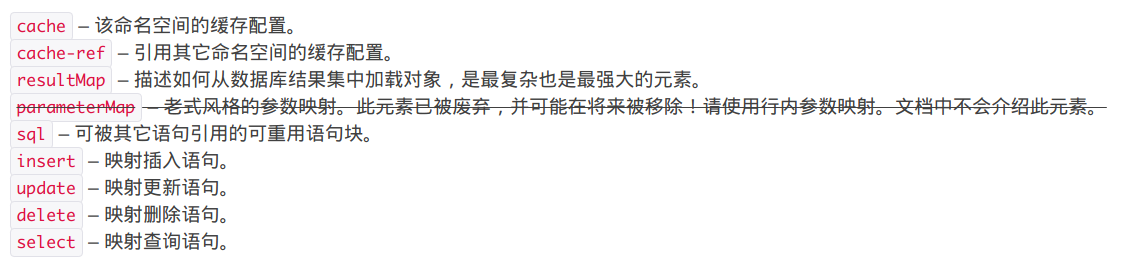
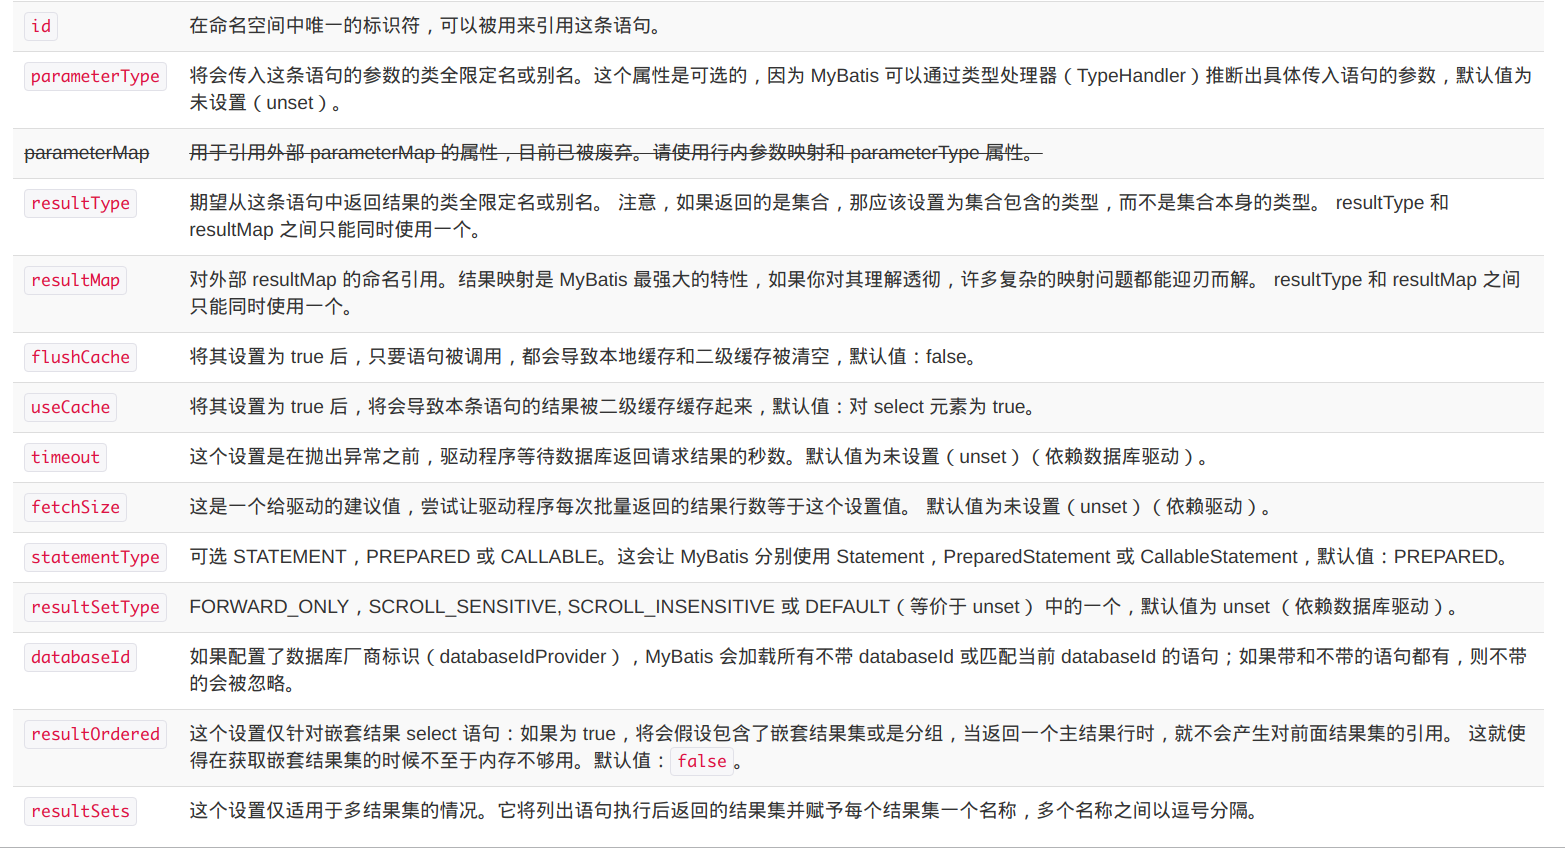
select标签
insert, update 和 delete标签
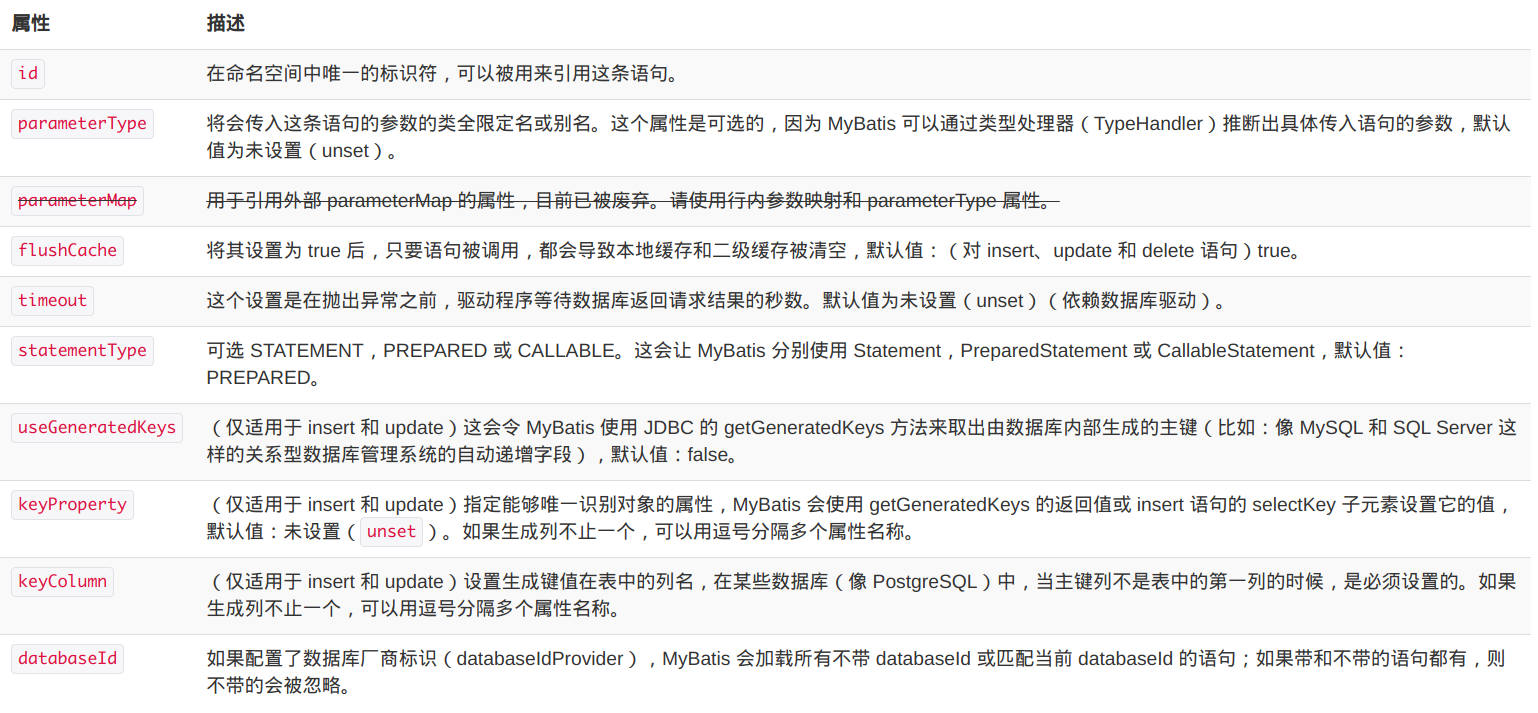
获取自增主键的值
有些数据库的主键是可以自增的,比如mysql和Sql Server,因此当我们为数据添加值时,并不一定需要设置自增主键的值。
<!--在插入是获取自增主键的值useGeneratedKeys:会调用jdbc中的方法,自动获取自增主键的值keyProperty:将自增主键赋值给对象中的那个属性--><insert id="insertCustomer" useGeneratedKeys="true" keyProperty="id">insert into Customer(username,jobs,phone)values(#{username},#{jobs},#{phone})</insert>
单元测试
Customer customer = new Customer("java","teacher","88888888");mapper.insertCustomer(customer);System.out.println(customer.getId());

获取非自增主键的值
oracle的主键是不自增的
<!--查找非自增主键的值--><insert id="insertCustomer2"><!--在插入语句运行前,从数据库中找到最大的主键值+1,赋值给对象的id,和select标签相似,需设定返回类型--><selectKey order="BEFORE" keyProperty="id" resultType="Integer">select max(id)+1 from Customer;</selectKey>insert into Customer(id,username,jobs,phone)values(#{id},#{username},#{jobs},#{phone})</insert>
单元测试
//非自增Customer customer1 = new Customer(null,"java","teacher","88888888");mapper.insertCustomer(customer1);System.out.println(customer1.getId());

传入参数的取值
以select为例
- 传入一个参数,${参数名}中参数名可以随便写
- 传入多个参数时,${参数名}得使用0,1…n或者param1,param2…paramN
在CustomeDao类中添加这样的查找方法
Customer getCustomerByIdAndName(int id,String username);
映射文件配置如下
<select id="getCustomerByIdAndName" resultType="com.mybatis.test.bean.Customer">select * from Customer where id = #{param1} and username = #{param2};</select>
才可以获取到相应的Custome记录。
如果想指定使用参数名,则必须告诉mybatis,接口对象方法参数中声明。
Customer getCustomerByIdAndName(@Param("id") int id, @Param("username") String username);
用Param注解去声明我们使用的参数名。
原因:
- 在mybatis中,多个参数传入时,会自动将参数封装为一个map,map中使用的key一般是0~n或者param1~n,去匹配我们传入的值。
传入pojo
- 取值#{pojo.属性}
传入map
-
${}和#{}的区别
<select id="getCustomerByIdAndName" resultType="com.mybatis.test.bean.Customer">select * from Customer where id = ${id} and username = #{username};</select>
结果:

#{}:参数预编译的方式,参数位置用?代替,参数是后来预编译进去的,不会有sql注入问题
${}:没有进行预编译,直接和sql进行拼串,不安全返回list
Mapper接口
List<Customer> selectCustomer();
映射文件
<select id="selectCustomer" resultType="com.mybatis.test.bean.Customer">select * from Customer</select>
mybatis会将查找出来的字段,根据类的变量名赋值,之后自动封装成一个list。
返回map
Map<Object,Object> getCustomerByIdReturnMap(int id);
<select id="getCustomerByIdReturnMap" resultType="java.util.Map">select * from Customer where id = #{id}</select>

MyBatis会自动将数据库中的字段分装为key和value。返回多个Map
在映射类中指定相应的MapKey的值,将指定数据库中的那个字段作为key
@MapKey("id")Map<Integer,Customer> getCutomerRetrunMap();
<select id="getCutomerRetrunMap" resultType="java.util.Map">select * from Customer</select>
获得结果

获得的结果是一个HashMap,不是一个Customer对象。
需要在映射文件中指定。<select id="getCutomerRetrunMap" resultType="com.mybatis.test.bean.Customer">select * from Customer</select>
resultMap自定义封装字段名
当数据库中的字段是不满足驼峰命名规则时,需要手动的自定数据库中字段对应bean中的属性,数据才能自动被封装到字段的类中。
数据库中存在这样的一张表
定义的bean是这样的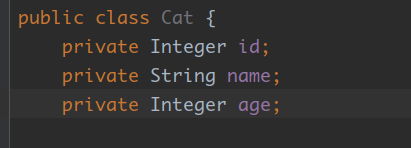
可以看到,属性名和字段中的列名不相同,这样是无法将字段中的数据封装。
可以看到name和age得不到值。
映射文件<select id="findCatById" resultType="com.mybatis.test.bean.Cat">select id id,cName name,cAge age from cat where id=#{id}</select>
也可以通过为字段起别名来封装
还有另一种方式,使用ResultMap来自定义封装<select id="findCatById" resultType="com.mybatis.test.bean.Cat" resultMap="myCat">select * from cat where id=#{id}</select><!--id:指定唯一标识type:为哪个javabean自定义--><resultMap id="myCat" type="com.mybatis.test.bean.Cat"><!--id标签,主键设置column:哪个主键列property:设置和主键列对应的bean中属性--><id column="id" property="id"></id><!--普通列的设置--><result column="cName" property="name"></result><result column="cAge" property="age"></result></resultMap>
级联查询
一对一关系
创建一个锁表
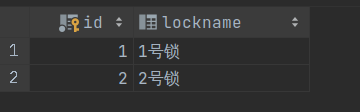
创建一个key表,并且用外键lockid将他们关联起来
实体类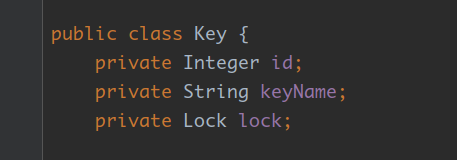
查出key的同时将锁的信息查出
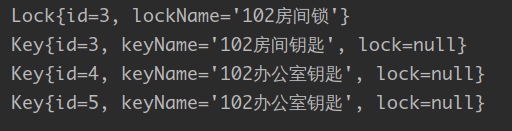
映射文件配置<select id="findKeyById" resultMap="myKey">select k.id keyid,k.keyname keyname,l.id lockid,l.lockname lockname from `key` k, `lock` l where k.lockid=l.id and k.id=#{id}</select><resultMap id="myKey" type="com.mybatis.test.bean.Key"><id column="keyid" property="id" ></id><result column="keyname" property="keyName"></result><result column="lockid" property="lock.id"></result><result column="lockname" property="lock.lockName"></result></resultMap>
可以获得结果

使用association自定义封装级联对象<select id="findKeyById" resultMap="myKey">select k.id keyid,k.keyname keyname,l.id lockid,l.lockname lockname from `key` k, `lock` l where k.lockid=l.id and k.id=#{id}</select><resultMap id="myKey" type="com.mybatis.test.bean.Key"><id column="keyid" property="id" ></id><result column="keyname" property="keyName"></result><!--<result column="lockid" property="lock.id"></result>--><!--<result column="lockname" property="lock.lockName"></result>--><!--javaType:自定分装对象的类型--><association property="lock" javaType="com.mybatis.test.bean.Lock" ><id property="id" column="lockid"></id><result column="lockname" property="lockName"></result></association></resultMap>
多对一关系
多对一关系,外键要放在多的一方,放在一的一方会导致列的不确定性。
多个钥匙
一个房间锁
多对一个关系
注:从多的一方看,每个记录都有对应一个记录匹配,是一对一关系;
从一的一方看,每个记录有多个记录匹配,是多对一关系。
因此,我们需要在锁实体类中创建一个集合,接受钥匙的信息。
映射文件配置<select id="findLockById" resultMap="myLock">select l.id lockid,l.lockname lockname, k.*from `key` k, `lock` lwhere k.lockid=l.id and l.id =#{id}</select><resultMap id="myLock" type="com.mybatis.test.bean.Lock"><id property="id" column="lockid"></id><result column="lockname" property="lockName"></result><!--property:指定对象中的哪个集合ofType:指定集合中封装的类型--><collection property="keys" ofType="com.mybatis.test.bean.Key"><id column="id" property="id"></id><result column="keyname" property="keyName"></result></collection></resultMap>
多对多关系
无论是从哪一方看,都是多对一的关系,则在哪一方的表中增加外键都会导致表中列的不确定性,使用单独增加一个表,把两者的关系在表中存储。
如果是多个学生和多个老师进行关联,则采用中间表进行查询,需要在这两个实体类中分别加入两者的集合,三表进行链接查询即可,并赋值。select分步查询
不采用链接查询的方式,查出key的同时,并且查出lock的值。
在lock映射文件中配置<select id="findSimpleLockById" resultType="com.mybatis.test.bean.Lock">select * from `lock` where id=#{id}</select>
在key映射文件中配置
<!--分布查询--><select id="findSimpleKeyById" resultMap="myKey02">select * from `key` where id=#{id}</select><resultMap id="myKey02" type="com.mybatis.test.bean.Key"><id column="id" property="id"></id><result column="keyname" property="keyName"></result><!--column:指定查出的哪一列出入select中作为查询值--><association property="lock" select="com.mybatis.test.dao.LockMapper.findSimpleLockById" column="lockid" /></resultMap>
select指定命名空间中的查询语句id,传入参数进行查询

可以看得到,sql语句有两条,分别查询了不同的表。按需加载
分布查询会将所有的记录都查询出来,当我们不需要时,它会严重的影响性能,因此需要对查询时间进行设置,当我们需要时,才从数据库中查询出来。

在全局配置文件中设置<settings><!--延迟加载--><setting name="lazyLoadingEnabled" value="true"/><!--属性按需加载--><setting name="aggressiveLazyLoading" value="flase"/></settings>
则当我们去获得key中非lock对象的属性时,不会加载lock对象,就不会有sql语句出现。

可以看到,我们获取key中的钥匙名称时,并没有查找lock的sql语句出现。
如果想取消全局配置文件中的lazy加载,则在映射文件中相应语句中设置<association property="lock" select="com.mybatis.test.dao.LockMapper.findSimpleLockById"column="lockid" fetchType="eager"/>
由于是两次查询,所有实际上在工作中,为了减少数据库的访问次数,因此不怎么采用分布查询。
动态SQL
if标签
使用if标签,但标签可以添加满足条件的查询条件
在Mapper接口中添加这样的查询条件List<Customer> findCutomer(Customer customer);
mybatis会自动将对象中的属性和值封装成一个map。
在映射文件中配置<!-- 动态sql --><select id="findCutomer" resultType="com.mybatis.test.bean.Customer">select * from Customer where<if test="id!=null and id>0">id > #{id} and</if><if test="username!=null and username!=""">username like #{username}</if></select>
单元测试
//动态sql@Testpublic void test09(){SqlSession sqlSession = MybatisUtils.getSqlSession();CustomerDao mapper = sqlSession.getMapper(CustomerDao.class);Customer customer = new Customer();customer.setId(2);customer.setUsername("%t%");List<Customer> customer1 = mapper.findCutomer(customer);for (Customer customer2 : customer1) {System.out.println(customer2);}}
where标签
where标签能自动去除前缀and,但是无法去除后缀的and
配置文件<select id="findCutomer" resultType="com.mybatis.test.bean.Customer">select * from Customer<where><if test="id!=null and id>0">id > #{id}</if><if test="username!=null and username!=""">and username like #{username}</if></where></select>
上述配置,当第一条件不满足,第二条件满足时,where会紧跟这and,但是where标签会去除这个and
单元测试//动态sql@Testpublic void test09(){SqlSession sqlSession = MybatisUtils.getSqlSession();CustomerDao mapper = sqlSession.getMapper(CustomerDao.class);Customer customer = new Customer();//customer.setId(2);customer.setUsername("%t%");List<Customer> customer1 = mapper.findCutomer(customer);for (Customer customer2 : customer1) {System.out.println(customer2);}}
trim标签
截取字符串,和sql语句配合使用。可以去除/添加前缀字符串或者后缀字符串
<select id="findCutomer" resultType="com.mybatis.test.bean.Customer">select * from Customer<trim prefix="where" suffixOverrides="and"><if test="id!=null and id>0">id > #{id} and</if><if test="username!=null and username!=""">username like #{username}</if></trim></select>

当满足第一个条件时,trim自动去除后缀and,可以看到查出所有满足条件的记录foreach标签
遍历元素,假设传入参数是一个集合或者map
List<Customer> findCutomerIn(@Param("idx") List<Integer> idx);
映射文件配置
<!--collection:指定集合类,默认是list的separator:添加的操作,两次遍历的集合open:以什么开始close:以什么结束item:集合中元素的值。map则对应是valueindex:集合的下标,如果是map,就是key--><select id="findCutomerIn" resultType="com.mybatis.test.bean.Customer">select * from Customer where id in<foreach collection="idx" separator="," open="(" close=")" item="id">#{id}</foreach></select>
choose标签
选择分支标签,满足条件则随机选择一个
<!--choose选择 --><select id="findCutomerByChoose" resultType="com.mybatis.test.bean.Customer">select * from Customer<where><choose><when test="id!=null and id!=""">id=#{id}</when><when test="username!=null and username!=""">username=#{username}</when><otherwise>1=1</otherwise></choose></where></select>
单元测试
//choose分支结构@Testpublic void test11(){SqlSession sqlSession = MybatisUtils.getSqlSession();CustomerDao mapper = sqlSession.getMapper(CustomerDao.class);Customer customer = new Customer();customer.setId(2);customer.setUsername("Tom");List<Customer> cutomerByChoose = mapper.findCutomerByChoose(customer);System.out.println(cutomerByChoose);}
set标签
自动的删除后缀逗号(,)
<update id="updateCustomerBySet" >update Customer<set><if test="username!=null and username!=""">username=#{username},</if><if test="jobs!=null and jobs!=""">jobs=#{jobs},</if><if test="phone!=null and phone!=""">phone=#{phone}</if></set><where>id=#{id}</where></update>
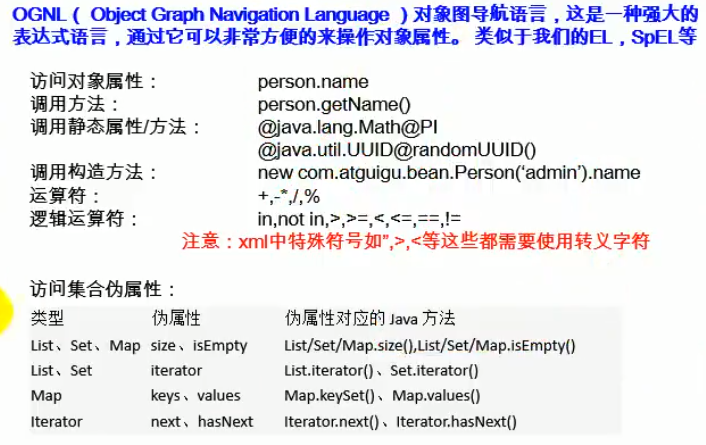
OGNL表达式
bind标签
绑定字符串等,在模糊查询中使用
<!-- 动态sql --><select id="findCutomer" resultType="com.mybatis.test.bean.Customer">select * from Customer<bind name="username2" value="'%'+username+'%'"/><trim prefix="where" suffixOverrides="and"><if test="id!=null and id>0">id > #{id} and</if><if test="username!=null and username!=""">username like #{username2}</if></trim></select>
bind标签将传入的username前后绑定了%,形成了一个新的值,适用多种数据库。
sql标签
可重用sql
<sql id="mySql">select * from Customer</sql><select id="getCustomerById" resultType="Custom"><include refid="mySql"></include> where id = #{id}</select>
缓存
缓存机制,为了加快数据库中的查询效率,缓存本身就是一个map
一级缓存
本地缓存,线程级别的缓存,sqlSession级别的缓存,只有在同一个sqlsession下才可以使用
单元测试//一级缓存@Testpublic void test13(){SqlSession sqlSession = MybatisUtils.getSqlSession();CustomerDao mapper = sqlSession.getMapper(CustomerDao.class);Customer customerById = mapper.getCustomerById(1);System.out.println(customerById);Customer customerById1 = mapper.getCustomerById(1);System.out.println(customerById1);System.out.println(customerById==customerById1);}
查询同一条记录,可以发现sql语句只发送一次,获得的两个对象都是同一个对象。

一级缓存失效
失效情况
sqlsession关闭
- 查询参数不同
- 增删改操作后,mysql中记录被刷新也会再次寻找缓存
- 缓存被清空


mybatis查询记录会先从一级缓存中查询,如果没有再去mysql中查询。
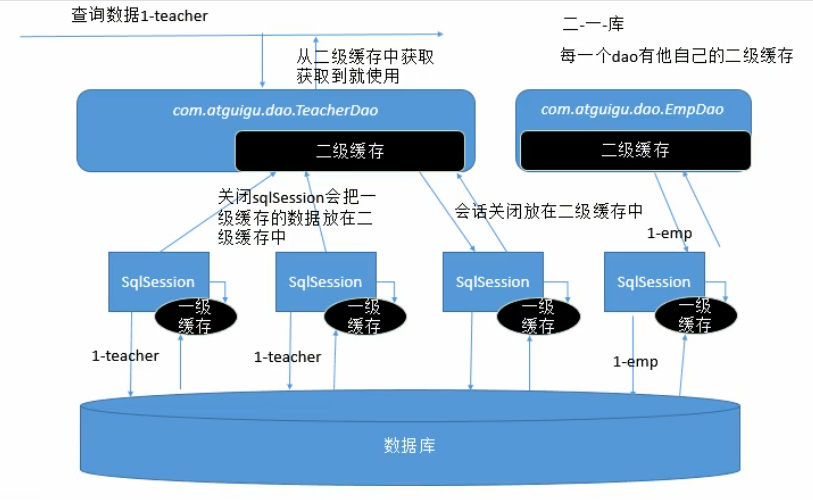
二级缓存
namespace级别的缓存,只对同一个映射文件有效,不同映射文件,有不同的二级缓存。
只有当sqlsession提交或者关闭时,记录才会被添加到二级缓存中。
mybatis默认不使用,需要配置。
使用步骤
1、全局配置文件中打开缓存
<setting name="cacheEnabled" value="true"/>
2、映射文件开启缓存
<cache></cache>
3、bean类实现序列化接口
public class Customer implements Serializable
单元测试
//二级级缓存@Testpublic void test14(){SqlSession sqlSession = MybatisUtils.getSqlSession();CustomerDao mapper = sqlSession.getMapper(CustomerDao.class);Customer customerById = mapper.getCustomerById(1);System.out.println(customerById);sqlSession.close();SqlSession sqlSession1 = MybatisUtils.getSqlSession();CustomerDao mapper1 = sqlSession1.getMapper(CustomerDao.class);Customer customerById1 = mapper1.getCustomerById(1);System.out.println(customerById1);}
结果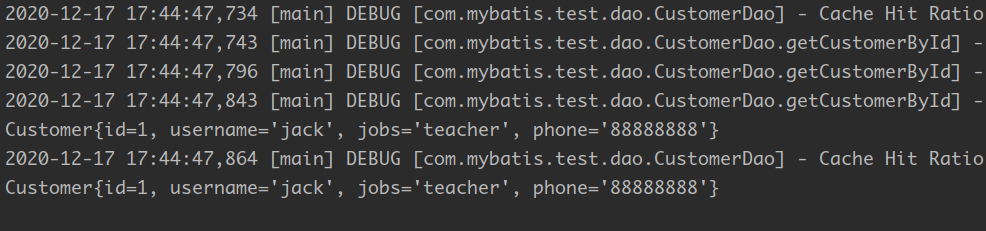
可以看到第一个sqlsession关闭后,第二个sqlsession能从二级缓存中获得以前查询的记录
缓存的访问顺序
优先从二级缓存中寻找,如果没找到,再去一级缓存中拿,再没有,则从数据库中重新查找,放到一级缓存中,sqlsession关闭之后,纪录被保存到二级缓存。
因此,一二级缓存中不存在相同的纪录。
缓存原理
缓存标签
指定标签是否使用二级缓存
useCache="true"
是否刷新一二级缓存
flushCache="false"
增删改默认刷新缓存,查找默认不刷新缓存
执行器
simple执行器:
- 每次执行都会sql语句的结果,但结果不会缓存
reuse执行器
- 当执行一条sql语句会缓存,再次查询相同sql,则会在缓存中返回
batch执行器

若有收获,就点个赞吧
0 人点赞
