前言
前面几章学习了一些零零散散的CSS神操作骚技巧,每个单独的技巧都很强大,若组合起来岂不是更强大?本章以及后两章都是对这些学习过的CSS神操作骚技巧做一个总结和应用。学到的东西必须学以致用才行,不然就白学了。
以下准备3个jQuery时代的Web组件,当然它们不是基于jQuery开发,而是基于纯CSS开发。合理将CSS神操作骚技巧结合,也许能制作出一些出乎意料的效果。
本章的主题是切换控件,主要是用于鼠标悬浮或点击时选中组件中的单个部分。常见控件有手风琴和折叠面板。
手风琴
手风琴在jQuery时代很常见,主要用于电商网站的商品栏目展示。笔者清楚记得10年前的淘宝首页就有这个手风琴效果,不过那时CSS3作为一个新生代的Web技术,由于兼容问题也很难应用到网页中。
其特点是鼠标悬浮到组件的某个部分,该部分就会扩张开来并挤压旁边的部分,当鼠标离开时就恢复原状。若鼠标快速在其上面略过,就会产生手风琴弹琴的效果。
使用JS实现手风琴效果,必须监听mouseenter和mouseleave两个鼠标事件,而:hover可代替两者的效果。所以纯CSS实现手风琴效果的关键就是:hover,核心代码如下。
li {// 鼠标未悬浮状态&:hover {// 鼠标悬浮状态}}
手风琴的静态效果是一个内部横向排列着等宽子容器的大容器。换成CSS术语就是子节点水平排列且高度一致,在不触发悬浮效果时各个子节点的宽度都一致。依据其特征可用Flex布局完成这个排版。
<ul class="accordion">
    <li></li>
    <li></li>
    <li></li>
    <li></li>
    <li></li>
    <li></li>
</ul>
当鼠标悬浮任意子节点时会触发:hover,此时让li:hover声明一些相关状态即可,为了让<li>在悬浮前和悬浮后的外观过渡不那么生硬,声明transition:all 300ms会更好。
.accordion {
    display: flex;
    width: 600px;
    height: 200px;
    li {
        flex: 1;
        cursor: pointer;
        transition: all 300ms;
        &:nth-child(1) {
            background-color: #f66;
        }
        &:nth-child(2) {
            background-color: #66f;
        }
        &:nth-child(3) {
            background-color: #f90;
        }
        &:nth-child(4) {
            background-color: #09f;
        }
        &:nth-child(5) {
            background-color: #9c3;
        }
        &:nth-child(6) {
            background-color: #3c9;
        }
        &:hover {
            flex: 2;
            background-color: #ccc;
        }
    }
}
后续出现相关状态切换的节点,最好都声明transition,这样能让整个动画过渡变得更自然,除了某些情况,可回看第12章变换与动画。
- 在线演示:Here
- 在线源码:Here
折叠面板
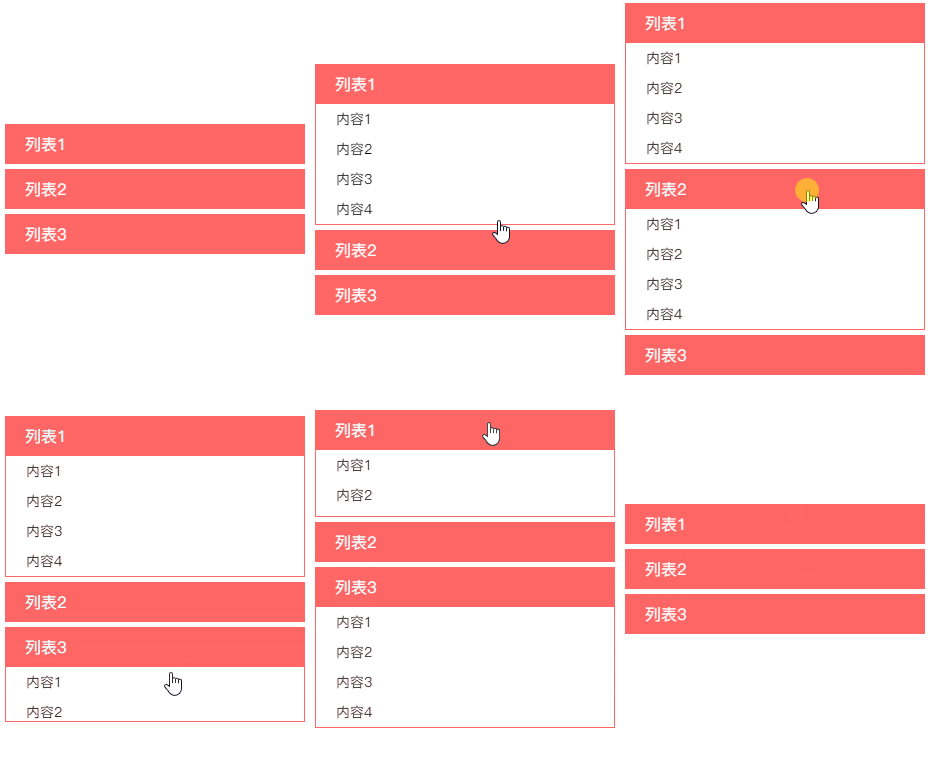
折叠面板其实是手风琴的一个垂直版本,手风琴的子节点是水平排版的,而折叠面板的子节点是垂直排版的。折叠面板通常都是点击子菜单,显示更多的子菜单,可同时打开也可单独打开。本次通过纯CSS完成一个多选的折叠面板。
还记得在第9章选择器里<input>和<label>的巧妙搭配吗?在此通过<input>和<label>模拟按钮的点击事件,为何这样处理可回看第9章选择器。<input>和<article>成为同胞元素且让<input>放置在最前面,是为了方便使用+/~在<input>触发:checked时带动<article>也进入选中状态。
此时就可通过上述CSS代码就能让input:checked + article {} input:checked ~ article {}<article>动起来了。由于将<input>的鼠标选择事件转移到<label>上,由<label>控制选中状态,所以需对<input>设置隐藏。
上述结构未为<div class="accordion"> <input id="collapse1" type="checkbox" hidden> <input id="collapse2" type="checkbox" hidden> <input id="collapse3" type="checkbox" hidden> <article> <label for="collapse1">列表1</label> <p>内容1<br>内容2<br>内容3<br>内容4</p> </article> <article> <label for="collapse2">列表2</label> <p>内容1<br>内容2<br>内容3<br>内容4</p> </article> <article> <label for="collapse3">列表3</label> <p>内容1<br>内容2<br>内容3<br>内容4</p> </article> </div><article>设置单独类,由于同级结构中存在<input>和<article>,所以不能使用:nth-child(n),而是使用:nth-of-type(n)选择指定的<article>。
折叠内容在实际使用场景的高度是不固定或很难预测的,有些同学会声明height:auto。若声明了transtion,height从0变更到auto是无任何过渡效果的,与不声明transtion一样显得很生硬。但是max-height可借助transtion过渡,在隐藏折叠内容时声明max-height:0,在展开折叠内容时声明max-height:1000px,这个1000px只是一个示例,反正比预计的高度大即可,声明2000px也无所谓。当然还必须声明overflow:hidden隐藏超出内容区域的内容。.accordion { width: 300px; article { cursor: pointer; & + article { margin-top: 5px; } } input { &:nth-child(1):checked ~ article:nth-of-type(1) p, &:nth-child(2):checked ~ article:nth-of-type(2) p, &:nth-child(3):checked ~ article:nth-of-type(3) p { border-bottom-width: 1px; max-height: 600px; } } label { display: block; padding: 0 20px; height: 40px; background-color: #f66; cursor: pointer; line-height: 40px; font-size: 16px; color: #fff; } p { overflow: hidden; padding: 0 20px; border: 1px solid #f66; border-top: none; border-bottom-width: 0; max-height: 0; line-height: 30px; transition: all 500ms; } }
- 在线演示:Here
- 在线源码:Here
暗黑模式
笔者曾经发表过一篇《纯CSS免费让掘金社区拥有暗黑模式切换功能》,详情请查看原文,在此就不啰嗦了。
<div class="dark-theme">
 <input class="ios-switch" type="checkbox">
 <iframe class="main" src="https://juejin.im"></iframe>
</div>
.btn { border-radius: 31px; width: 102px; height: 62px; background-color: #e9e9eb; } .dark-theme { display: flex; .ios-switch { position: relative; appearance: none; cursor: pointer; transition: all 100ms; @extend .btn; &::before { position: absolute; content: ""; transition: all 300ms cubic-bezier(.45, 1, .4, 1); @extend .btn; } &::after { position: absolute; left: 4px; top: 4px; border-radius: 27px; width: 54px; height: 54px; background-color: #fff; box-shadow: 1px 1px 5px rgba(#000, .3); content: ""; transition: all 300ms cubic-bezier(.4, .4, .25, 1.35); } &:checked { background-color: #5eb662; &::before { transform: scale(0); } &::after { transform: translateX(40px); } & + .main { filter: invert(1) hue-rotate(180deg); img, video, .avatar, .image, .thumb { filter: invert(1) hue-rotate(180deg); } } } } .main { margin-left: 20px; border: 1px solid #3c9; width: 1000px; height: 400px; background-color: #fff; transition: all 300ms; } }

