工作合约
工作合约 恭喜贵公司获选为蔽公司建立下一代 Internet 气象观测站!该气象观测站必须建立在我们专利申请中的 WeatherData 对象上,由 WeatherData 对象负责追踪目前的天气状况(温度,适度,气压)。我们希望贵公司建立一个应用,有三种布告板,分别显示目前的状况,气象统计以及简单的预报。当 WeatherObject 对象获得最新的测量数据时,三种布告板必须时时更新。 而且,这是一个可以扩展的气象站,Weather-O-Rama 气象站希望公布一组 API,好让其他开发人员可以写出自己的气象布告板,并插入此应用中。我们希望贵公司能够提供这样的 API。 Weather-O-Rama 气象站有很好的商业运营模式:一旦客户上钩,他们使用每个布告板都要付钱。最好的部分就是,为了感觉贵公司建立此系统,我们将以公司的认股权支付你。 我们期待看到你的设计和应用的 alpha 版本。 真挚的 Johnny Hurricane —- Weather-O-Rama气象站执行长 附注:我们正在通宵整理 WeatherData 源文件给你们
气象监测应用的概况
此系统中的三个部分是气象站(获取实际气象数据的物理装置),WeatherData 对象(追踪来自气象站的数据,并更新布告板)和布告板(显示目前天气状况给用户看)。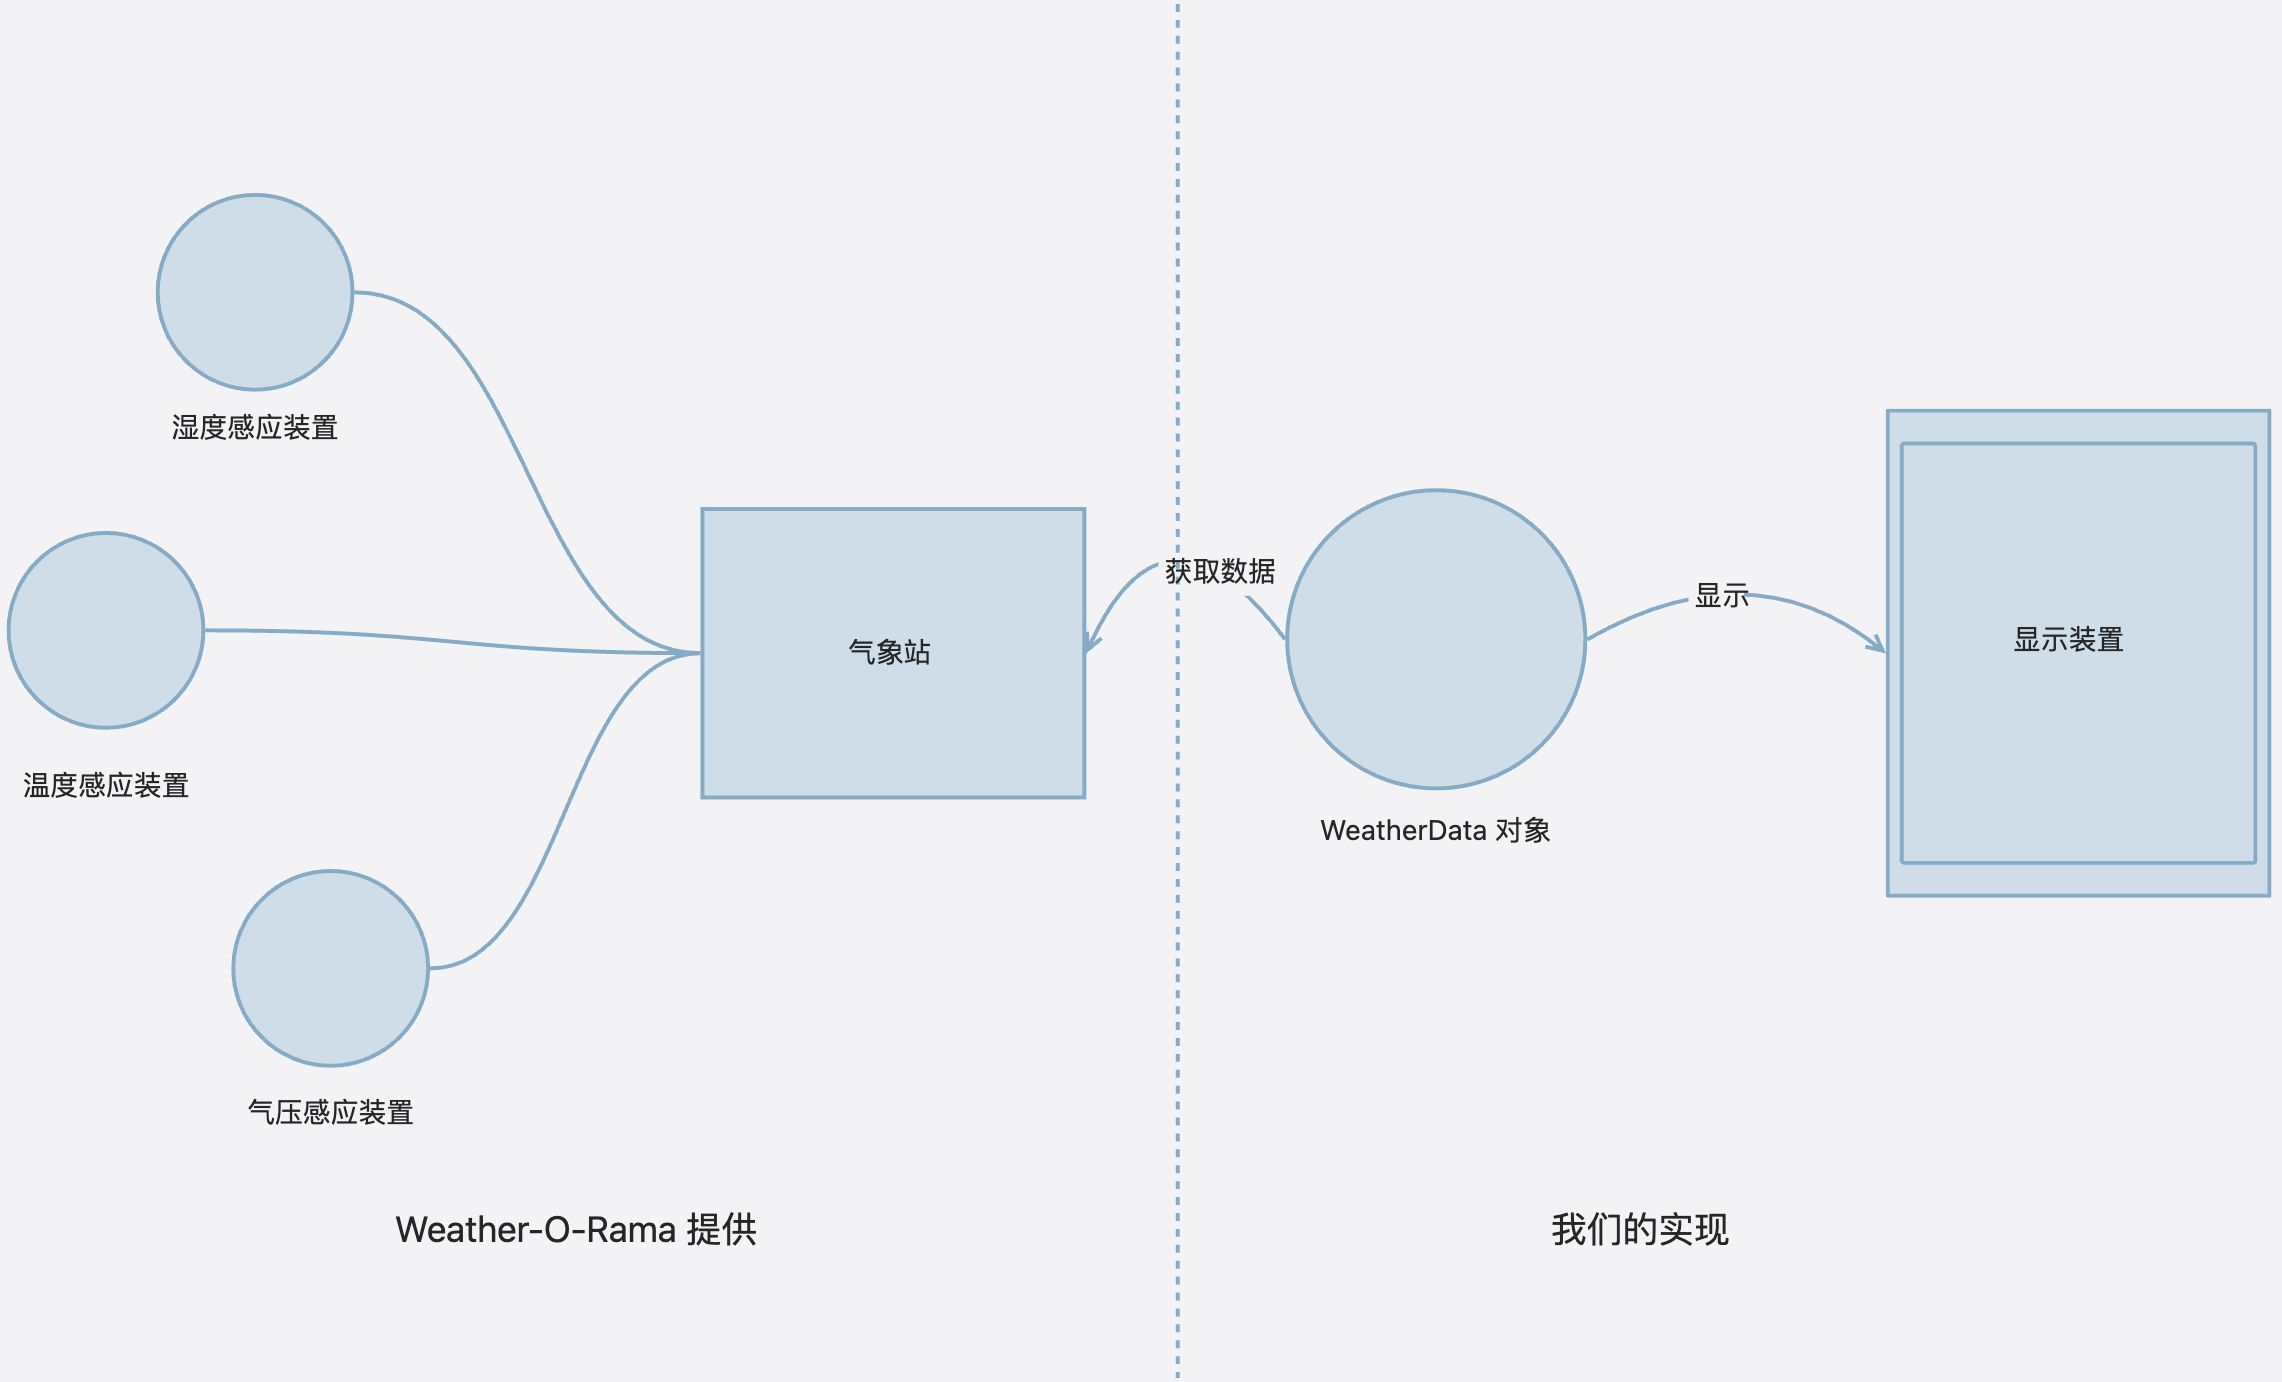
瞧一瞧刚送到的 WeatherData 类
如同他们所承诺的,隔天早上收到了 WeatherData 源文件,看了一下代码,一切都很直接: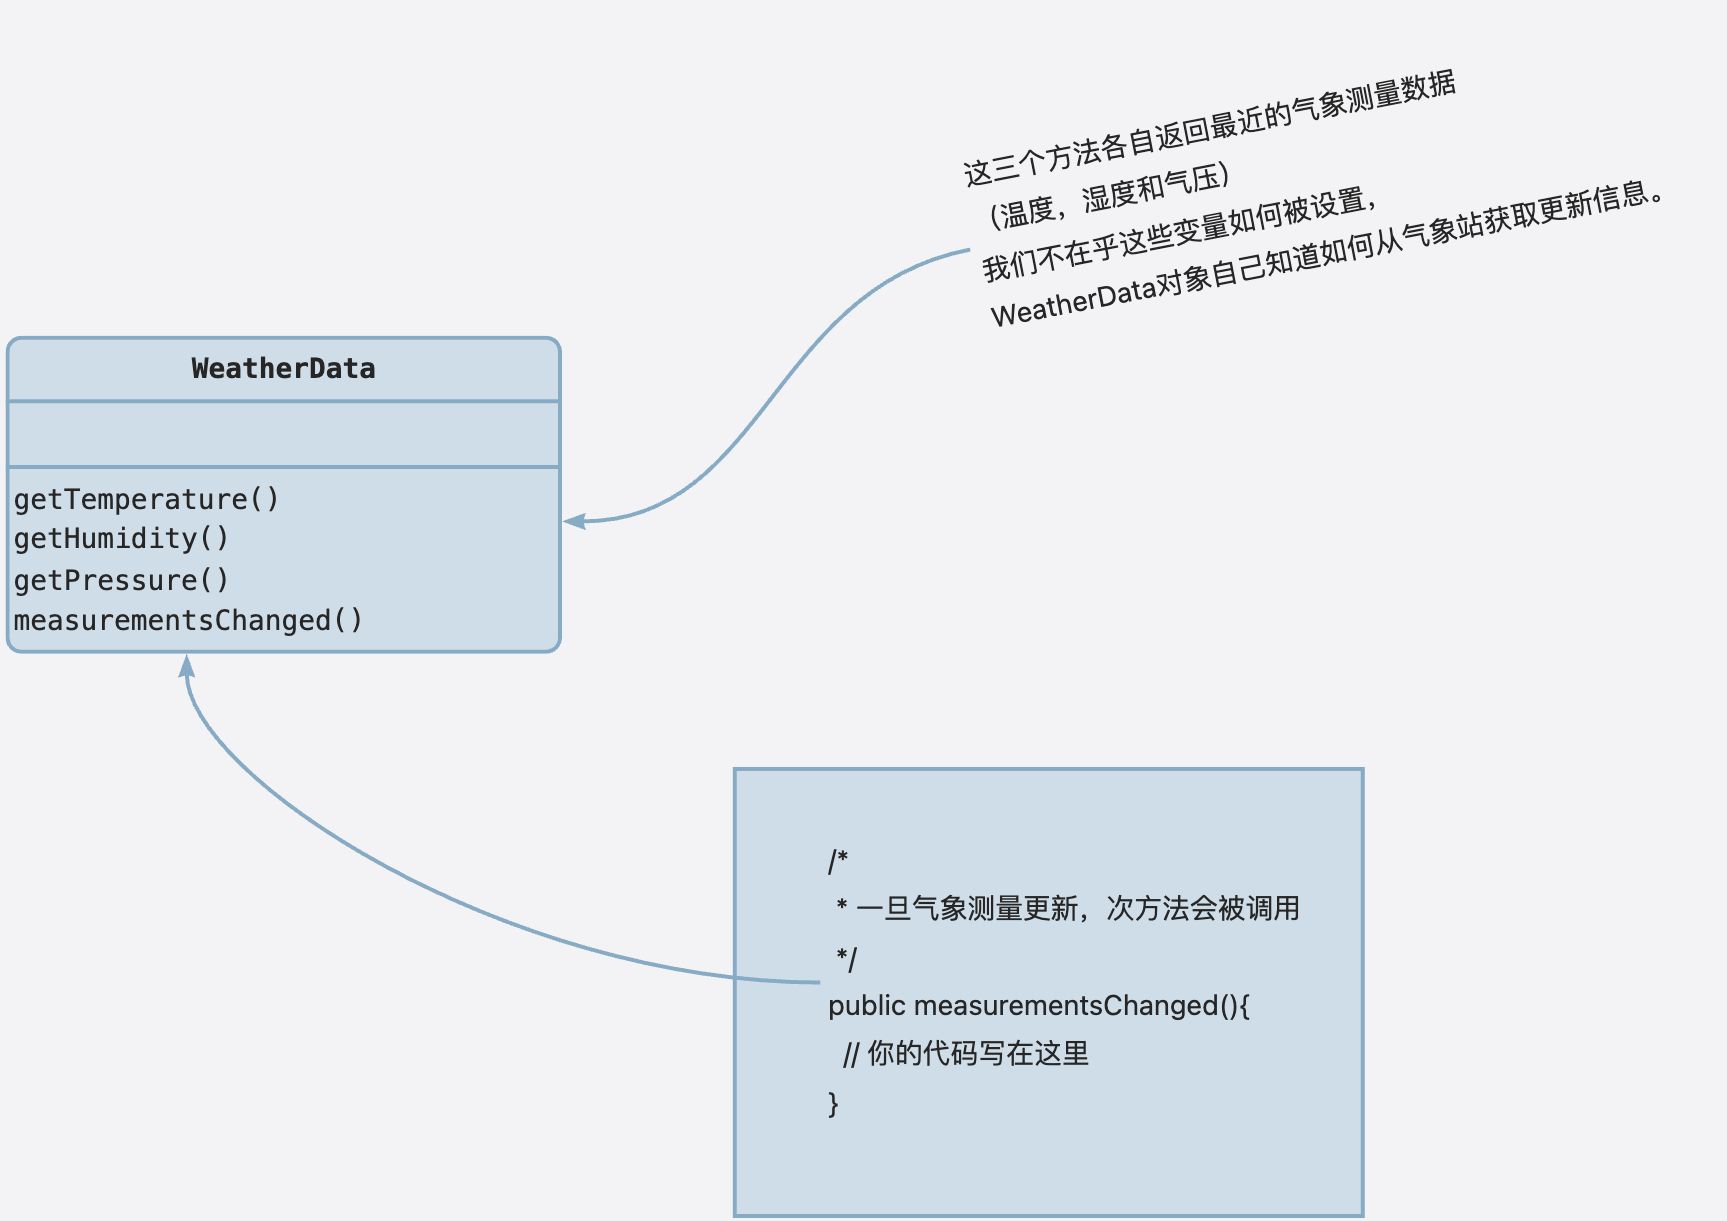
我们目前知道些什么
- WeatherData 类提供了三个 getter 方法,可以取得三个测量值:温度,湿度和气压。
- 当新的测量数据备妥时,measurementsChanged() 方法就会被调用(我们不在乎这个方法是怎么被调用的,我们只在乎它被调用了)。
- 我们需要实现三个使用天气数据的布告板:“目前状态”布告,“气象统计”布告,“天气预报”布告。一旦有新的测量,这个布告需要马上更新。
此系统必须可扩展,让其他开发人员建立定制的布告板,用户可以随心所欲地添加或删除任何布告板。目前初始的布告板有三类:“目前状况”布告,“气象统计”布告,“天气预报”布告。
先看一个错误示范
这是第一个可能的实现,我们依照 Weather-O- Rama 气象站开发人员的暗示,在measurementsChanged() 方法中添加我们的代码:
export class WeatherData {public measurementsChanged() {// 调用三个 get 方法,以取得最近的测量值。const temp = this.getTemperature();const humidity = this.getHumidity();const pressure = this.getPressure();// 现在,更新三个布告栏。currentConditionsDisplay.update(temp, humidity, pressure);statisticsDisplay.update(temp, humidity, pressure);forecastDisplay.update(temp, humidity, pressure);}// 这里是其他 WeatherData 的方法}
这样实现有什么问题:
我们这是在针对实现编程,而非针对接口。
- 对于每个新的布告板,我们都要修改代码。
- 我们没有封装改变的部分。
- 我们无法在运行时动态增加或删除布告栏。
认识观察者模式
我们看看报纸和杂志的订阅是怎么回事
- 报社的业务就是出版报纸
- 向某家报社订阅报纸,只要他们有新报纸出版,就会给你送来。只要你是他们的客户,你就会一直收到新报纸
- 当你不想再看报纸时,取消订阅,他们就不会再送新报纸来
- 只要报社还在运营,就会一直有人(或单位)向他们订阅报纸或取消订阅报纸
出版者+订阅着=观察者模式
如果你了解报纸订阅是怎么回事,其实就知道观察者模式是怎么回事,只是名称不太一样:出版者改称为“主题”(Subject),订阅者改称为“观察者”(Observer)。
让我们来看得更仔细一点:
定义观察者模式
当你试图勾勒观察者模式时,可以利用报纸订阅服务,以你出版社和订阅者来比拟这一切。
在真实世界中,你通常会看到观察者模式被定义成: :::info 观察者模式
定义了对象之间一对多依赖,这样一来,当一个对象改变时,
它的所有依赖者都会收到通知并自动更新。 :::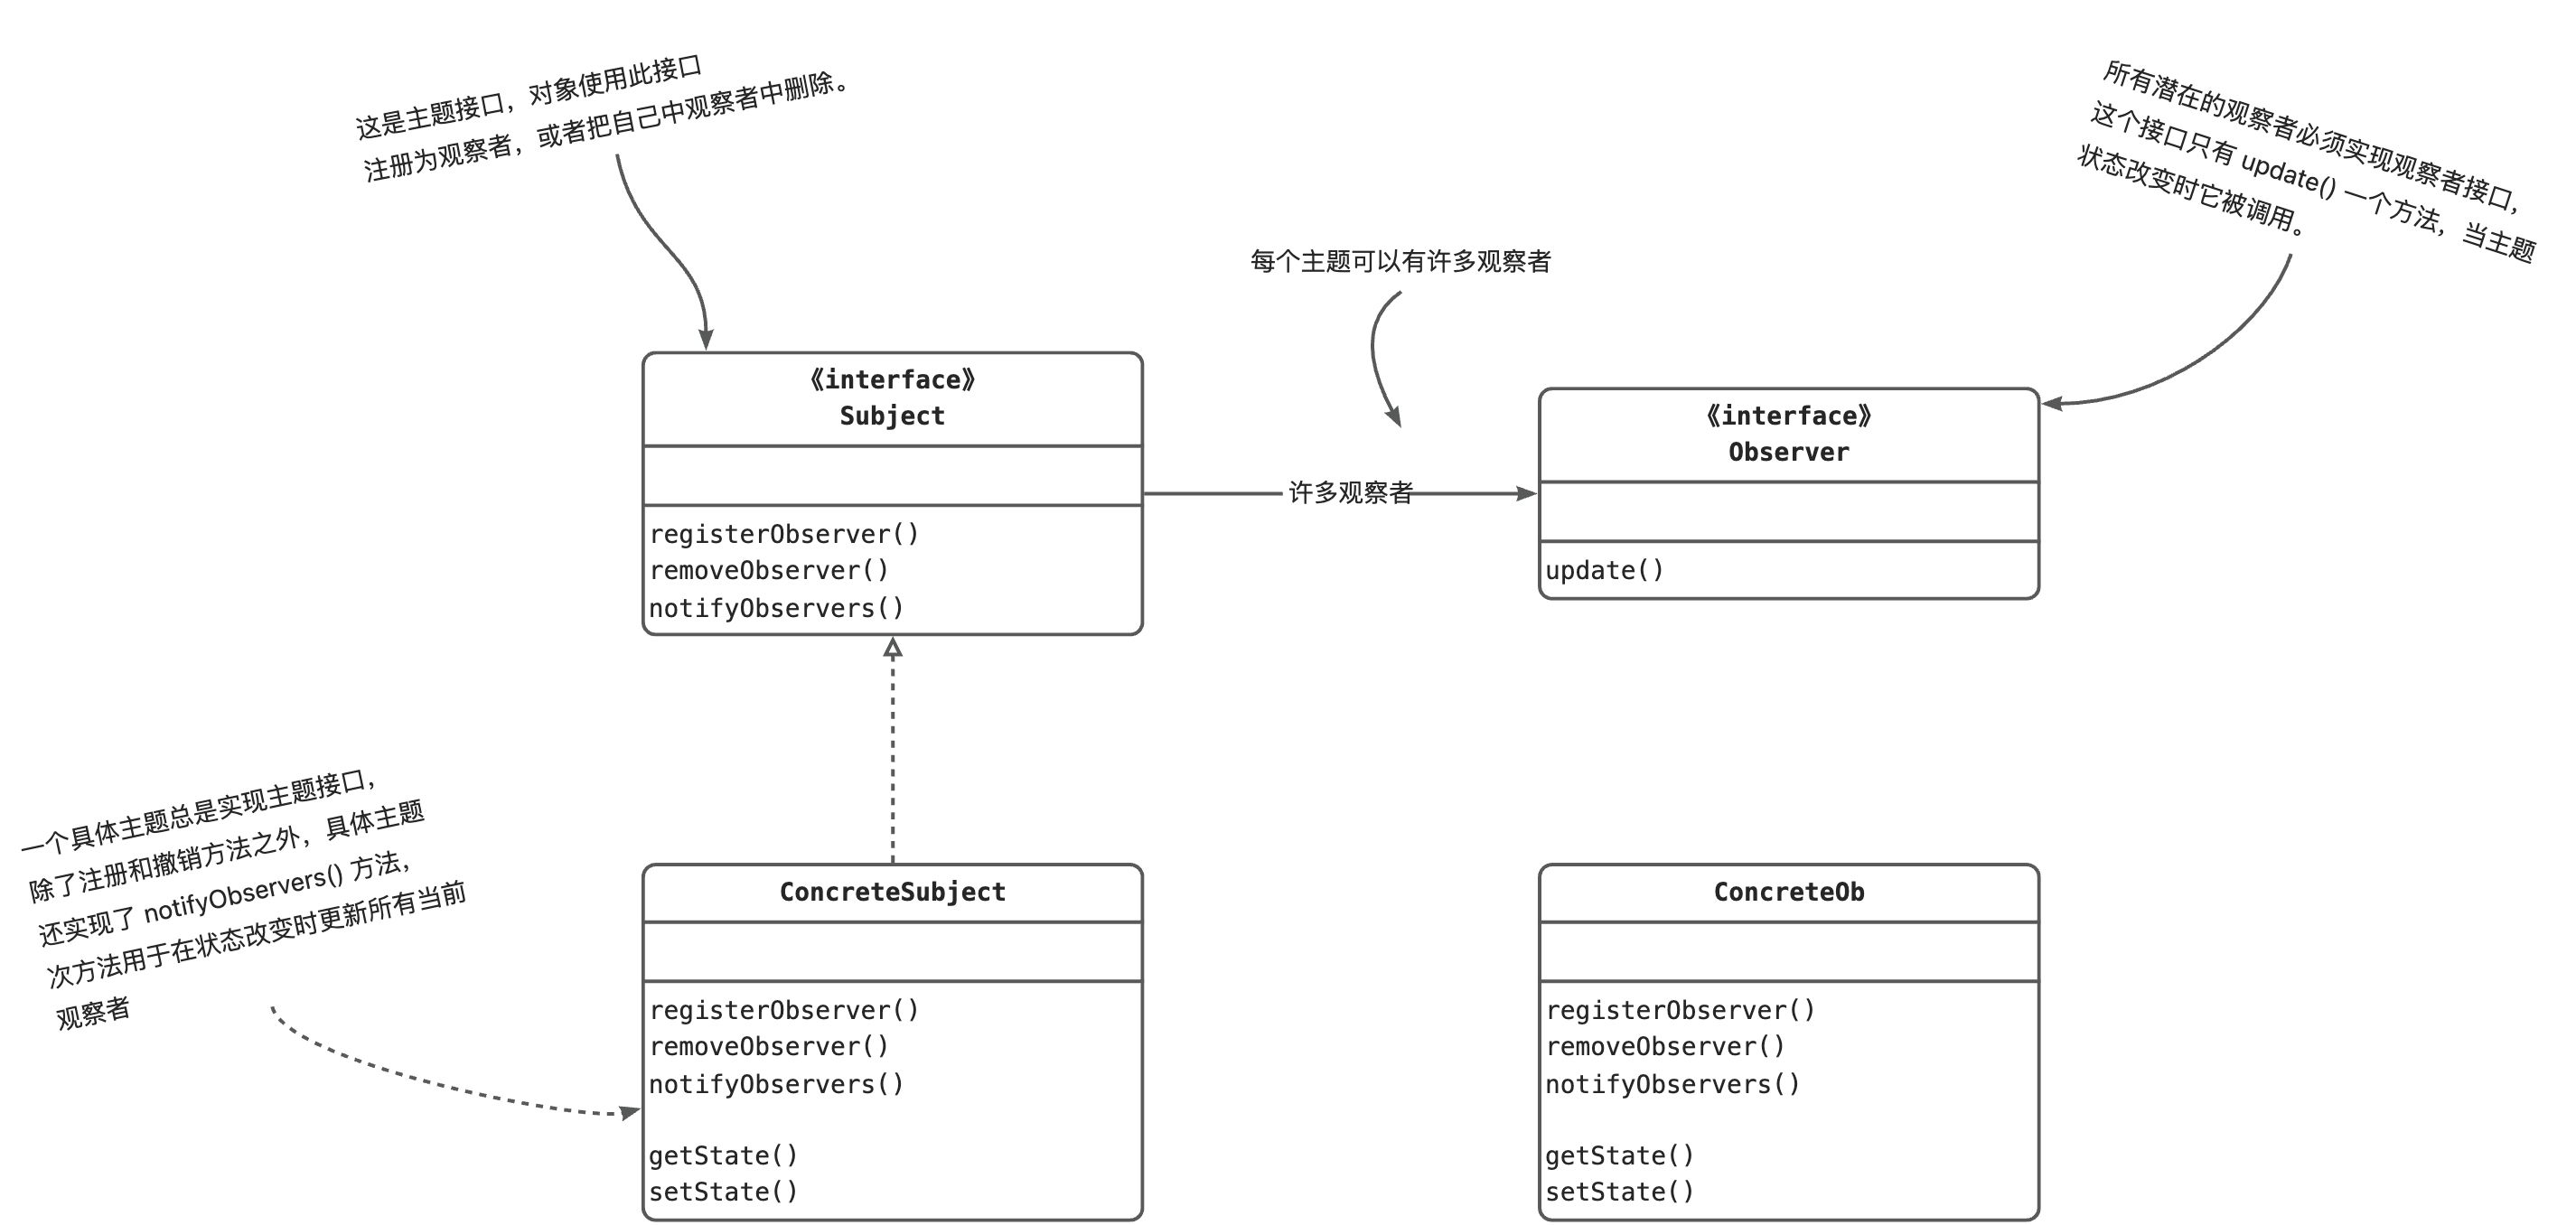
松耦合的威力
当两个对象之间松耦合,它们依然可以交互,但是不太清楚彼此的细节。
观察者模式提供了一种对象设计,让主题和观察者之间松耦合。
为什么呢?
关于观察者的一切,主题只知道观察者实现了某个接口(Observer接口)。主题不需要知道观察者的具体类是谁,做了什么或其他细节。
任何时候我们都可以增加新的观察者。因为主题唯一依赖的东西是一个实现 Observer 接口的对象列表,所以我们可以随时增加观察者。事实上,在运行时我们可以用新的观察者取代现有观察者,主题不受任何影响。同样的,也可以在任何时候删除某个观察者。
有新类型的观察者出现时,主题的代码不需要修改。假如我们有个新的具体类需要当观察者,我们不需要为了兼容新类型而修改主题的代码,所有要做的就是在新的类里实现此观察者接口,然后注册为观察者即可。主题不在乎别的,它只会发送通知给所有实现了观察者接口的对象。
我们可以独立的复用主题或观察者。如果我们在其他地方需要使用主题和观察者,可以轻易的复用,因为二者并非紧耦合。
改变主题或观察者其中一方,并不会影响另一方。因为两者是松耦合的,所以只要他们之间接口仍被遵守,我们就可以自由得改变他们而不会有任何问题。 :::info 设计原则
为了交互对象之间的松耦合设计而努力 ::: 松耦合的设计之所以能让我们建立有弹性的OO系统,能够应对变化,是因为对象之间的互相依赖降到了最低。完成气象站
设计气象站
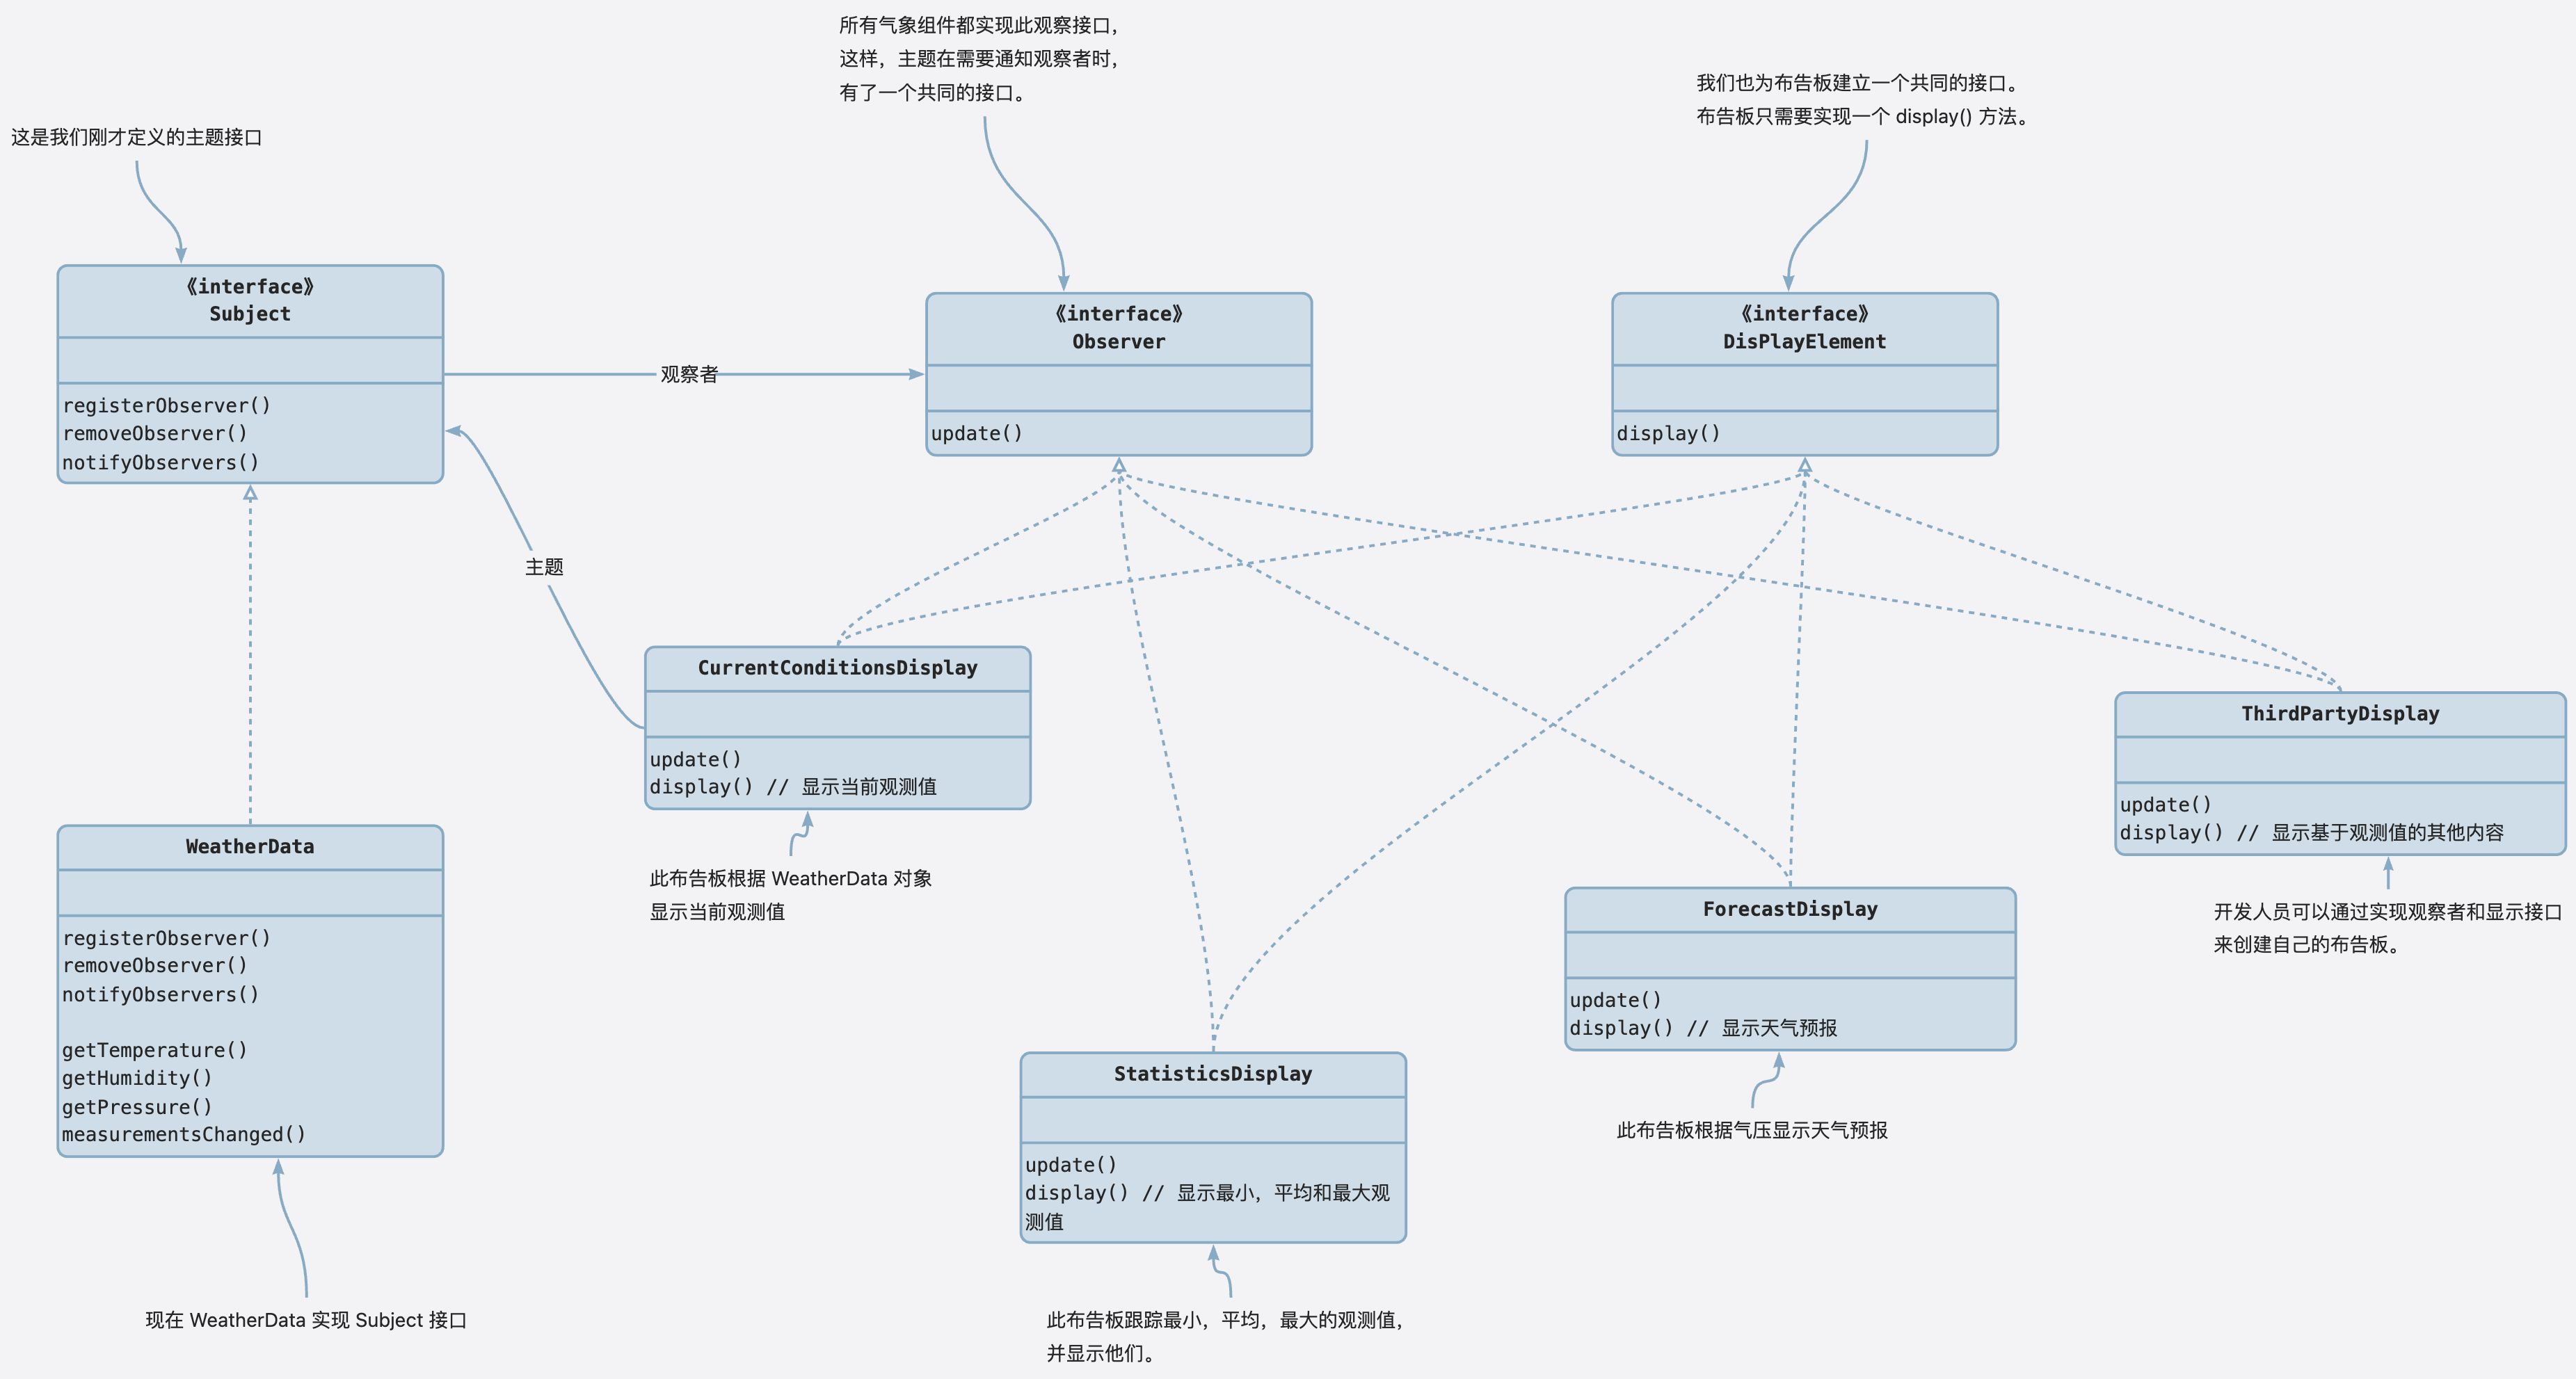
实现气象站
根据上面的 UML 图,我们要开始实现这个系统了。如果我们使用 Java 去实现,实际上在 java.util 包中已经内置了最基本的 Observer 接口与Observable 类,这和我们的 Subject 接口 与 Observer 接口很相似。既然我们时前端开发那么我们就用 TS 去实现。
所以,让我们从建立接口开始: ```typescript export interface Subject { registerObserver(o: Observer); removeObserver(o: Observer); notifyObservers(); }
export interface Observer { update(temp: number, humidity: number, pressure: number); }
export interface DisplayElement { display(); }
> 把观测值直接传入观察者中是更新状态最直接的方法。你认为这样做法明智吗?> 暗示:这些观测值的种类和个数在未来有可能改变吗?如果以后会改变,这些变化是否被很好得封装?别担心,在我们完成第一次实现后,我们会再回来探讨这个设计决策。<a name="s7B35"></a>### 在 WeatherData 中实现主题接口还记得我们在一开始试图实现的 WeatherData 类吗?我们现在要用观察者模式实现。```typescriptexport class WeatherData implements Subject {private observers: Set<Observer> = new Set();private temperature: number;private humidity: number;private pressure: number;public registerObserver(o: Observer) {this.observers.add(o);}public removeObserver(o: Observer) {if (this.observers.has(o)) {this.observers.delete(o);}}public notifyObservers() {this.observers.forEach((observer) => {observer.update(this.temperature, this.humidity, this.pressure);});}public measurementsChanged() {this.notifyObservers();}/*** 为了测试,模拟读取气象数据*/public setMeasurements(temp: number, humidity: number, pressure: number) {this.temperature = temp;this.humidity = humidity;this.pressure = pressure;this.measurementsChanged();}}
现在我们来建立布告板吧
我们已经把 WeatherData 类写出来了,现在轮到布告板了。Weather-O-Rama 气象站订购了三个布告板:目前状况布告板,统计布告板和预测布告板。我们先看看目前布告板。
/*** 目前状况布告板*/export class CurrentConditionsDiaplay implements Observer, DisplayElement {private temperature: number;private humidity: number;public constructor(private weatherData: Subject) {weatherData.registerObserver(this);}public update(temp: number, humidity: number) {this.temperature = temp;this.humidity = humidity;this.display();}public display() {console.log(`Current conditions: ${this.temperature}F degress and ${this.humidity}%humidity`);}}
很方便得,我们实现了另外两块布告板
/*** 统计布告板*/export class StatisticsDisplay implements Observer, DisplayElement {private tempSum = 0;private maxTemp = 0;private minTemp = 200;private numReadings = 0;public constructor(private weatherData: Subject) {weatherData.registerObserver(this);}public update(temp: number, humidity: number, pressure: number) {this.tempSum += temp;this.numReadings++;if (temp > this.maxTemp) {this.maxTemp = temp;}if (temp < this.minTemp) {this.minTemp = temp;}this.display();}public display() {console.log('Avg/Max/Min temperature = ' +this.tempSum / this.numReadings +'/' +this.maxTemp +'/' +this.minTemp);}}
/*** 预测布告板*/export class ForecastDisplay implements Observer, DisplayElement {private currentPressure = 29.92;private lastPressure = 0;public constructor(private weatherData: Subject) {weatherData.registerObserver(this);}public update(temp: number, humidity: number, pressure: number) {this.lastPressure = this.currentPressure;this.currentPressure = pressure;this.display();}public display() {console.log('Forecast: ');if (this.currentPressure > this.lastPressure) {console.log('Improving weather on the way!');} else if (this.currentPressure == this.lastPressure) {console.log('More of the same');} else if (this.currentPressure < this.lastPressure) {console.log('Watch out for cooler, rainy weather');}}}
启动气象站
先建立一个测试程序
气象站已经完成得差不多了,我们还需要一些代码将一切连接在一起:
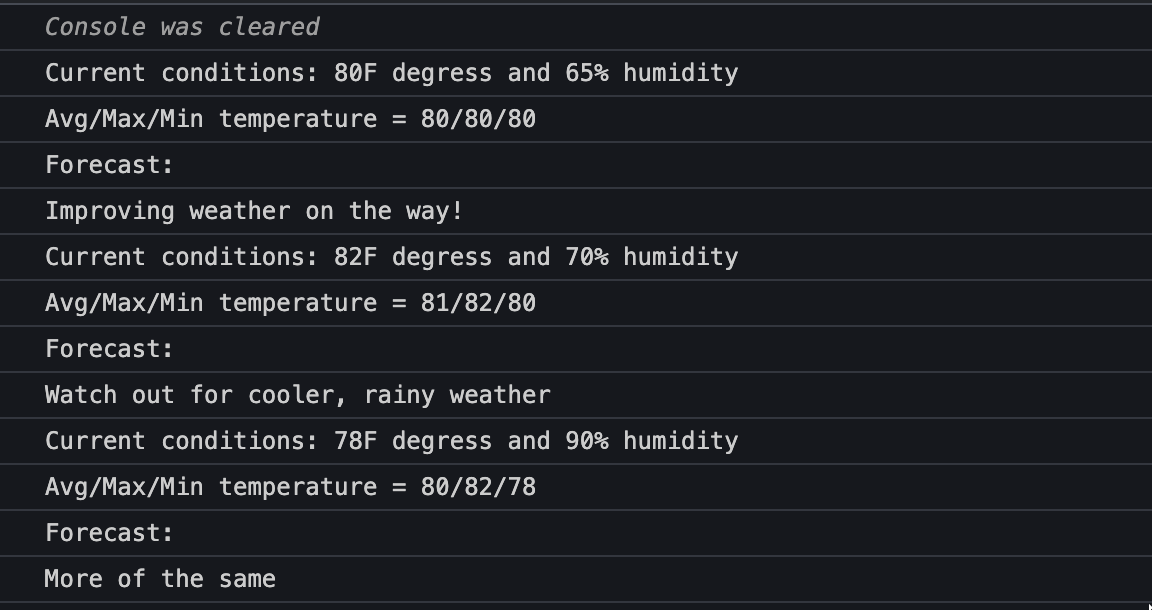
export class WeatherStation {public main() {const weatherData = new WeatherData();new CurrentConditionsDiaplay(weatherData);new StatisticsDisplay(weatherData);new ForecastDisplay(weatherData);weatherData.setMeasurements(80, 65, 30.4);weatherData.setMeasurements(82, 70, 29.2);weatherData.setMeasurements(78, 90, 29.2);}}
运行程序
新需求:加入酷热指数布告板
刚刚接到气象站来电通知,他们还需要酷热指数布告板,而我们实现起来也很容易,之前涉及的代码完全不需要改动什么,只需要新建一个类就可以了:
/*** 酷热指数布告板*/export class HeatIndexDisplay implements Observer, DisplayElement {private heatIndex = 0;public constructor(private weatherData: Subject) {weatherData.registerObserver(this);}public update(temp: number, humidity: number, pressure: number) {this.heatIndex = this.computeHeatIndex(temp, humidity);this.display();}public display() {console.log('Heat index is ' + this.heatIndex);}private computeHeatIndex(t: number, rh: number) {return (16.923 +0.185212 * t +5.37941 * rh -0.100254 * t * rh +0.00941695 * (t * t) +0.00728898 * (rh * rh) +0.000345372 * (t * t * rh) -0.000814971 * (t * rh * rh) +0.0000102102 * (t * t * rh * rh) -0.000038646 * (t * t * t) +0.0000291583 * (rh * rh * rh) +0.00000142721 * (t * t * t * rh) +0.000000197483 * (t * rh * rh * rh) -0.0000000218429 * (t * t * t * rh * rh) +0.000000000843296 * (t * t * rh * rh * rh) -0.0000000000481975 * (t * t * t * rh * rh * rh));}}
再看刚才的那个设计决策
我们可以看一下 java.uitl.Observer 是怎么做的:
它也有一个 update 方法,但是方法签名不太一样
update(Observable o, Object arg)
这样做就比较灵活了,
主题本身当作第一个个变量,好让观察者知道是哪个主题通知它的。
第二个参数是具体的数据对象,这样就能做到通用。
感兴趣的同学可以用最新的设计方式重构上面的实现。
本章要点

若有收获,就点个赞吧
0 人点赞
